Snowflake Crochet Coin Purse Pattern
Sometimes smaller is better. This snowflake crochet coin purse is just the right size for a few essentials. White embroidery adds a festive, finishing touch on the solid red background.

This content is protected by copyright. See this Terms of Use / Copyright page for more information.
This post contains sponsored content and/or affiliate links. If you click an affiliate link and make a purchase, I may get a commission.
2022 Bag Along CAL
This snowflake crochet coin purse is the final pattern in the 2022 Bag Along CAL. With this bag, we will have crocheted along through 6 different patterns, with multiple technique tutorials for each. See the main CAL post for the full schedule and links to previous patterns.

Enter the Giveaway
There was a giveaway to go along with each new bag pattern, which means this will be our final giveaway as well. All the giveaway details and entry forms are in the first post for the bag, which also lists all the materials needed

The giveaway prizes for the CAL are all sponsored by WeCrochet. This final giveaway ends on December 26th, 2022 at 11:59pm, central time, so be sure to get your entries in!
Knit Picks Shine Sport
WeCrochet also provided all of the Knit Picks yarns for the bag designs. For this cabled crochet tote bag pattern, I chose Shine Sport. This cotton/modal blend is not only shiny, it’s also super soft and strong!

In comes in rich, saturated tones, as well as a few pastel colors and neutrals. I chose #24488 serrano for my bag, with #24486 white for the embroidery. Other wintery or festive combinations that would work well are white embroidery on #25336 Sailor, #25345 Currant, #24487 Serenade, or #24485 Black.
Bag Along CAL Tutorials
For each bag in the crochet along, there are 2 or more associated technique tutorials. For this snowflake crochet coin purse, there will be three. As they are posted, I will update the links here.
- Split Single Crochet Stitch in Rounds and Rows
- Embroidered Snowflakes and Surface Crochet
- Attaching the purse frame (coming soon)
See the main CAL post for the full schedule of patterns and tutorials.


Materials
- Yarn: Knit Picks Shine Sport – 60% Pima Cotton / 40% Modal natural beech wood fiber, sport weight yarn (110 yds / 50g per skein)
- 90 yds #24488 Serrano
- 5 yds #24486 White
- Hook: US size F (3.75 mm) hook or size needed to match gauge
- Notions:
- Scissors
- Yarn needle
- Stitch marker
- 3 – 3.5″ Metal purse frame (see note)
- Sewing needle
- Sewing thread to match the Serrano yarn (or clear nylon thread)
Note: The frame I used is nearly square and measures about 3.25″ on each side, for a total perimeter of 13″. The width of the frame is less important than the total perimeter when open. If your frame is not quite square, it may be slightly wider or narrower but have the same total perimeter. The total perimeter of your purse frame should be 12.5-13.5″ when open.

Project Level
Intermediate: Split stitches in the round, embroidery and sewing to metal frame.
Size
Bottom: 3.25″ x 3.25″
Height: 4″
Gauge
16 ssc x 22 rnds = 4 inches.
Use pattern as gauge swatch – Bottom should measure approximately 3.25″ square.
Abbreviations used
(Pattern is written in US terms)
blo = back loop only
ch = chain
rnd = round
RS = right side(s)
sc = single crochet
sk = skip
sl st = slip stitch
sp = space
ssc = split single crochet
st(s) = stitch(es)
Recommended Resources
- Split / Center Stitches in the Round
- Split Single Crochet Tutorial (coming soon)
- Embroidery for Snowflake Coin Purse (coming soon)
- Attaching a Metal Purse Frame (coming soon)
Special Stitch
Split single crochet (ssc): Insert hook between the legs of indicated st, draw up a loop, yarn over and draw through both loops on hook.

This stitch is also known as waistcoat stitch or centered single crochet.
Instructions
Join rnds where indicated with a sl st in the first st of the rnd.
Bottom
With serrano, ch 2.
Rnd 1 (RS): [Sc, ch 1] 4 times in 2nd ch from hook, join, sl st in first ch-1 sp. (4 sc, 4 ch-1 sps)
Rnd 2: Ch 1, (sc, ch 1, sc) in first ch-1 sp, ssc in next st, [(sc, ch 1, sc) in next ch-1 sp, ssc in next st] around, join. (8 sc, 4 ssc, 4 ch-1 sps).
Rnd 3: Ch 1, ssc in first st, ch 1, sk next ch-1 sp, [ssc in each st across to next ch-1 sp, ch 1, sk next ch-1 sp] three times, ssc in each remaining st across, join, sl st in first ch-1 sp. (12 ssc, 4 ch-1 sps)
Rnd 4: Ch 1, (sc, ch 1, sc) in first ch-1 sp, ssc in each st across to next ch-1 sp, [(sc, ch 1, sc) in next ch-1 sp, ssc in each st across to next ch-1 sp] around, join, sl st in first ch-1 sp. (8 sc, 12 ssc, 4 ch-1 sps)
Rnd 5: Ch 1, (sc, ch 1, sc) in first ch-1 sp, ssc in each st across to next ch-1 sp, [(sc, ch 1, sc) in next ch-1 sp, ssc in each st across to next ch-1 sp] around, join. (8 sc, 20 ssc, 4 ch-1 sps)
Rnd 6-7: Repeat rnds 3-4. (8 sc, 28 ssc, 4 ch-1 sps)
Rnd 8: Repeat rnd 4. (8 sc, 36 ssc, 4 ch-1 sps)
Bottom should measure approximately 3.25 inches square. The perimeter (13 inches) should be approximately the same as the perimeter of your frame.

Body
Rnd 9: Ch 1, sc in first ch-1 sp, ssc in each of next 11 sts, [sc in next ch-1 sp, ssc in each of next 11 sts,] around, join with sl st in blo of first sc. (4 sc, 44 ssc)
Rnds 10-34: Ch 1, sc in blo of first st, ssc in each of next 11 sts, [sc in blo of next st, ssc in each of next 11 sts] around, join with sl st in blo of first sc.
Fasten off. Weave in all ends.

Surface Crochet
Video tutorial for this section coming soon!
Working in back loop only has left a “ladder” of unused front loops in each corner.
Starting in any corner, insert hook into bag just underneath the bottom-most front loop (closest to the base).

Holding white yarn inside bag, draw up a loop of white.
Working towards the top of the bag, insert hook into bag just underneath next unworked front loop, draw up a loop, draw this loop through loop on hook (surface sl st made).

Surface sl st in this manner under each front loop to top of bag.

Fasten off.
Repeat for each of the other 3 corners.
Embroidered Snowflake
Video tutorial for this section coming soon!
With white yarn and yarn needle, embroider snowflakes as desired on 2 sides (front and back) of bag. Use the ssc sts as a grid to make 3 lines that cross each other in the middle. These are the spokes of the snowflake.
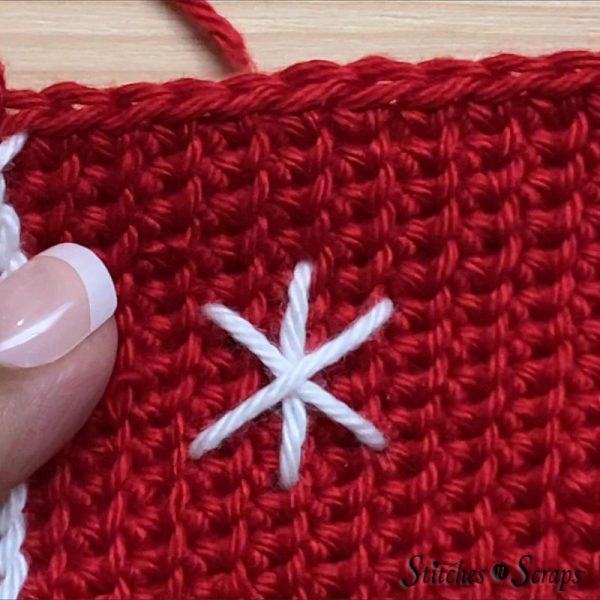
For larger snowflakes, embroider a small V shape near the tip of each spoke.

Use the tails to tack down any long “floats” on the inside of the bag. Weave in all ends.
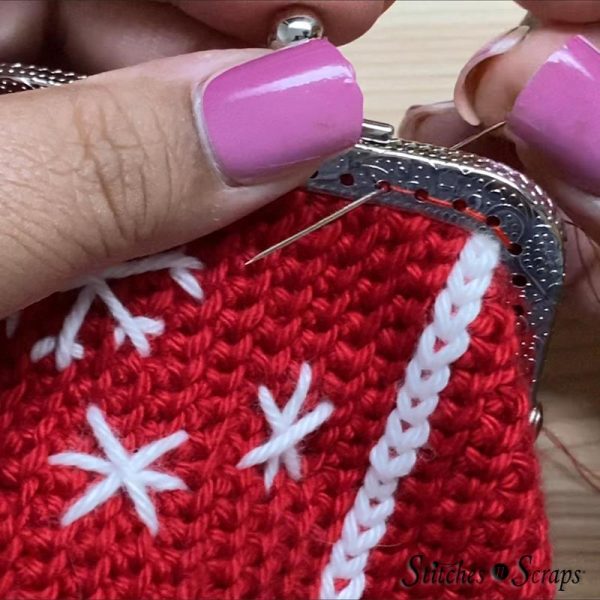
Attach Purse Frame
Video tutorial for this section coming soon!
Stand bag up so base is flat and top opening forms a square.
Open purse frame flat. Match up the corners of the frame with the corners (surface crochet columns) of the bag.

If your purse frame is not perfectly square, you may need to adjust the top opening of the bag to fit the frame shape. In this case, your surface crochet columns may not be precisely in the corner. Just make sure that the front and back of the frame are centered. Mark the sts that will be the corners.
Using sewing thread and starting in right-front corner, sew frame to bag securely across front. I used a back stitch and went over each stitch twice. Make sure the next bag corner lines up with the next corner of the frame.
On the side edge, mark the center st. Sew frame to bag along the side edge so that the marked st is centered under the hinge. When you get to the hinge, where there are no holes to work into, skip 3 sts (or an odd number of sts that fits your frame), centered on the marked center st. Carry your thread through the skipped sts and continue sewing on the other side of the hinge.

Continue sewing bag to frame in the same manner for the other two sides of the bag.
Weave in the ends of your sewing thread and any other remaining ends.
From the inside of the bag, use yarn needle to push the top edge of the sts under the lip of the frame so that no sts are sticking out.

Share this crochet coin purse pattern on Pinterest! Here’s an image perfect for pinning.

Rate this Snowflake Crochet Coin Purse Pattern!
I hope you enjoyed this cabled crochet tote bag pattern.
A downloadable pdf of this pattern is available on Ravelry for a small fee. The fee for the pdf format is to offset the advertising revenue lost when you print or download the pattern rather than viewing it online.
Do you want the best of Stitches n Scraps delivered right to your inbox? Don’t miss a stitch – Subscribe now!


You May Also Like

Bag #6 – Materials & Giveaway – BagAlongCAL

Bag #3 – Materials & Giveaway – BagAlongCAL
