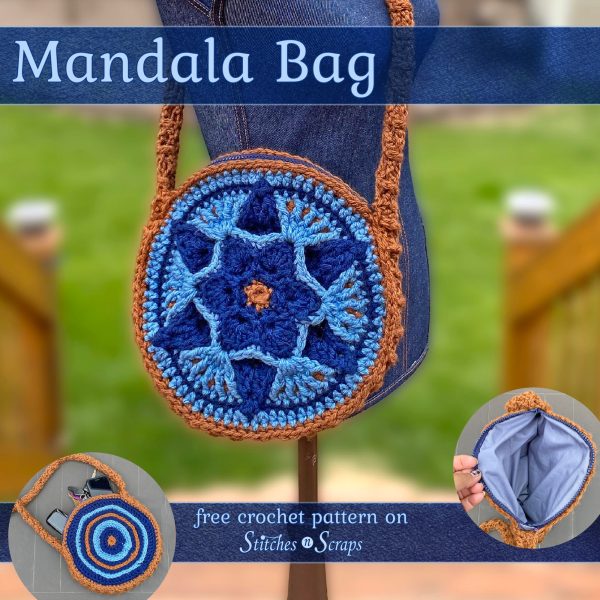
Crochet Mandala Bag Pattern
This crochet mandala bag pattern includes two options for the front and back panels: a layered flower, or circular stripes. Mix them or match them for a bag that’s uniquely yours! Then finish it off with a zipper and optional fabric lining.
This content is protected by copyright. See this Terms of Use / Copyright page for more information.
This post contains sponsored content and/or affiliate links. If you click an affiliate link and make a purchase, I may get a commission.
2022 Bag Along CAL
This crochet mandala bag is the third pattern in the 2022 Bag Along CAL. Crochet along through 6 different bag patterns, with multiple technique tutorials for each. See the main CAL post for the full schedule.

Enter the Giveaway
With each new bag pattern, there will be a new giveaway as well! All the giveaway details and entry forms will be in the first post for each bag, which will also list all the materials needed for that bag. Here is the materials list and giveaway info for bag number 3.

The giveaway prizes for the CAL are all sponsored by WeCrochet. This third giveaway ends on June 24th, 2022 at 11:59pm, central time, so be sure to get your entries in!
Knit Picks Brava Bulky
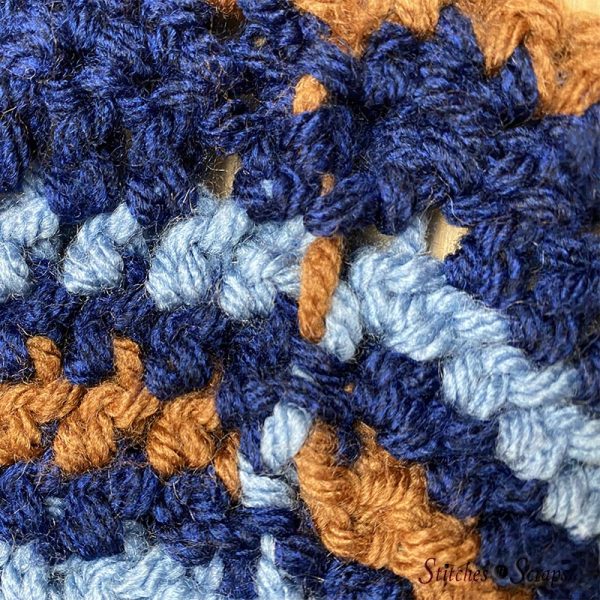
WeCrochet also provided all of the Knit Picks yarns for the bag designs. For this pattern, I chose Brava Bulky. This is the same Brava yarn we’ve worked with before, but this time in a thick and squishy, bulky weight! In these blue and brown shades, the bag pairs wonderfully with jeans for a casual summer look.

Bag Along CAL Tutorials
For each bag in the crochet along, I will be posting several technique tutorials. Here are the two tutorials for this bag:
See the main CAL post for the full schedule of patterns and tutorials.
Sewing the Lining
You CAN make this bag without the sewn lining, but it will be much stronger and hold its shape better with the lining. I’ve kept the lining simple because my sewing skills are mediocre at best. I promise, if I can do it, you can too!
Feel free to sew by hand or use a machine, whichever is most comfortable for you. Also, if your seams get a bit messed up, remember no one will see them anyway because they will be inside the bag!


Materials
- Yarn: Knit Picks Brava Bulky 100% acrylic, bulky weight yarn (136 yds / 100 g per skein), 1 skein each of:
- #28336 Brindle (A)
- #28358 Solstice Heather (B)
- #28342 Denim (C)
- Hook: US size K / 6.5mm hook or size needed to match gauge
- Notions:
- Scissors
- Yarn needle
- 12 stitch markers or scraps of yarn to use as stitch markers
- 12-inch zipper (see note below)
- 1/2 yard fabric for lining (optional)
- Sewing thread, needle, and pins or clips for lining (optional)
Any zipper length between 9 & 12 inches will be ok, but 12 is recommended. The width of the zipper (including the zipper tape on the sides) should be about 1.25 to 1.5 inches.
Project Level
Intermediate – Complex: Project level depends on which options you choose.
The layered flower mandala is complex – multiple layers, working into rounds below, post stitches, and working into back loops and third loops.
The rest of the pattern is intermediate – working in the round, working in third loops, and attaching a zipper.
The sewn lining is fairly easy sewing and is optional.
Size
Circle is 11 inches in diameter. Bag is 1.5 inches deep.
Gauge
11 hdc x 8 rnds = 4 inches.
Use the pattern as a gauge swatch:
- Rnds 1-5 of layered flower mandala should measure approximately 4 inches in diameter at widest point.
- Rnds 1-7 of striped mandala should measure approximately 6 inches in diameter.
Abbreviations used
(Pattern is written in US terms)
blo = back loop only
ch = chain
dc = double crochet
hdc = half double crochet
fptr = front post treble crochet
rnd = round
sc = single crochet
sk = skip
sl st = slip stitch
st(s) = stitch(es)
tr = treble crochet
tlo = third loop only
Instructions
Entire bag is worked on the right side, do not turn. Join rounds as indicated with a sl st into the first st of the rnd.
For clean color changes, always change colors in the last step of the previous stitch – use the new color to finish the last stitch of the old color. See this Changing Colors tutorial for a closer look.
Choose Mandala Options:
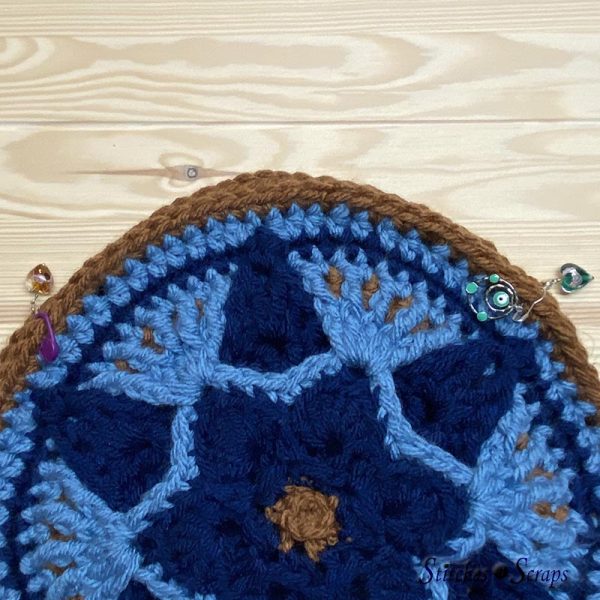
There are 2 options for the front and back of the bag: The layered flower mandala and the striped mandala.

You need two mandalas to make your bag. Both can be the same, or you can use one of each.
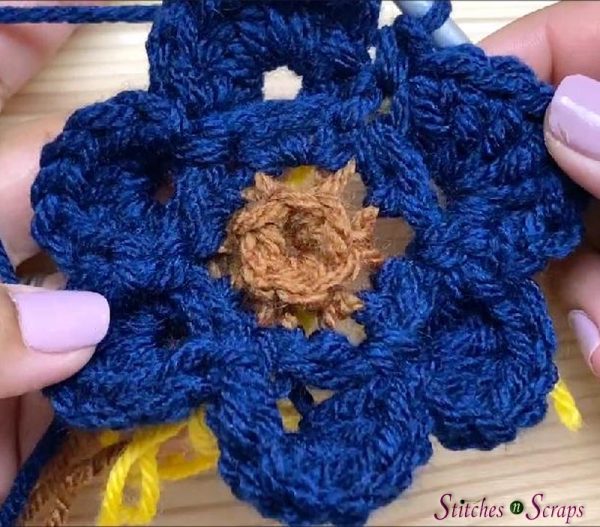
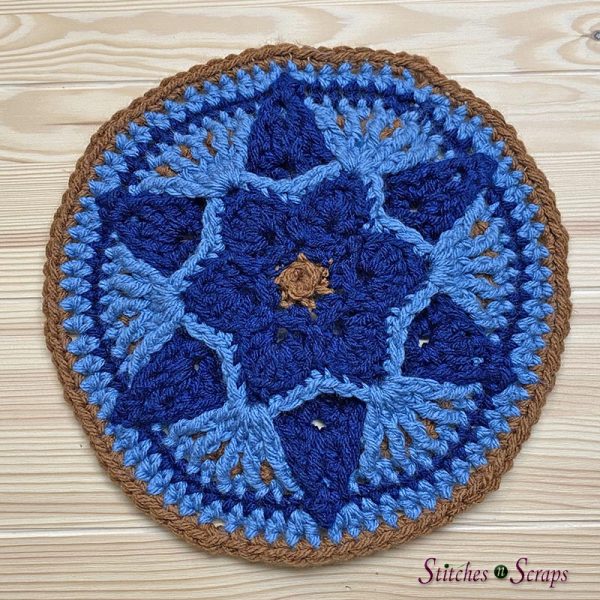
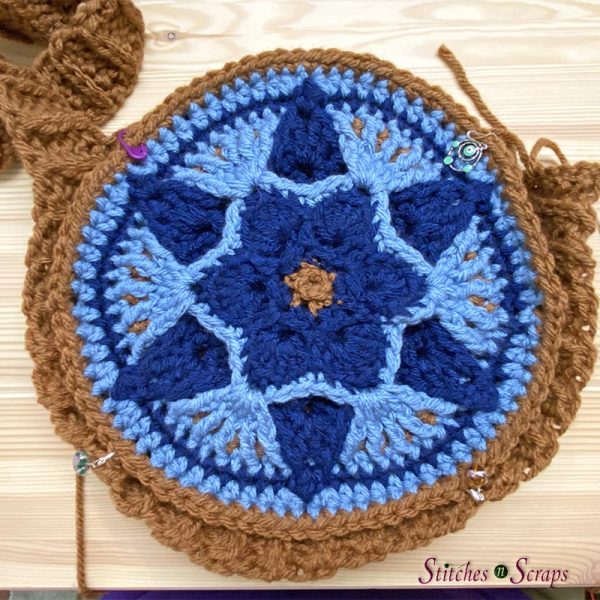
Layered Flower Mandala
Video Tutorial coming soon!
Center
Rnd 1: With A, ch 2, 6 hdc in 2nd ch from hook, join, fasten off A. (6 hdc)
Rnd 2: Join B with sl st in tlo of any st, 2 hdc in tlo of same st, 2 hdc in tlo of each st around, join. (12 hdc)
In rnd 3 you will be placing a marker in each chain space. You can do this as you make each chain space, or you can mark them all once you are done with the round.
Rnd 3: Ch 1, sc in tlo of first st, ch 1, (sc, ch 1) in tlo of each remaining st around, join, place marker in each ch-1 sp. (12 sc, 12 marked ch-1 sps)

Top Layer Petals
Since rnd 3 was worked into the tlo, the front and back loops of the sts on rnd 2 are still unworked. For rnd 4, when working into “the st below”, work into these remaining front and back loops.
Rnd 4: Sl st in first ch-1 sp, ch 3 (counts as dc throughout), 6 dc in same sp, sc in the st below the next ch-1 sp, [sk the ch-1 sp behind the sc just made, 7 dc in next ch-1 sp and remove marker from that sp, sk next st on the rnd below, sc in the next st on the rnd below] around, sk last ch-1 sp, join, fasten off B. (6 petals with 7 dc each, 6 sc).
There should be 6 ch-1 sps from rnd 2 that are still unworked and still have stitch markers in them.
Join C with sl st in blo of 4th (center) dc of any 7-dc petal.
Rnd 5: Ch 1 (counts as ch-1 sp), sk first dc, sc in blo of each of next 3 dc, sk next sc, sc in blo of each of next 3 dc, [ch 1, sk next dc, sc in blo of each of next 3 dc, sk next sc, sc in blo of each of next 3 dc] around, join with sl st to starting ch-1 sp. (36 sc, 6 ch-1 sps)
Remove hook from working loop of C and secure the loop with a stitch marker. Let loop and working yarn hang at the front of the work while you make the next section.
Bottom Layer Petals
Working behind the top layer of petals, join B with sl st in any unused (marked) ch-1 sp from rnd 2.

Rnd 6: Ch 3, 3 dc in same sp, ch 1, [7 dc in next unused (marked) ch-1 sp from rnd 2, ch 1] around, 3 dc in same sp as beginning of rnd, join. (6 petals with 7 dc each, 6 ch-1 sps)

Rnd 7: Ch 5 (counts as tr and ch-1 throughout), tr in same st, dc in each of next 2 sts, sk next st, sc in next ch-1 sp, sk next st, dc in each of next 2 sts, [(tr, ch 1, tr) in next st, dc in each of next 2 sts, sk next st, sc in next ch-1 sp, sk next st, dc in each of next 2 sts] around, join. (12 tr, 24 dc, 6 sc, 6 ch-1 sps)

Rnd 8: Sl st in first ch-1 sp, ch 5, (tr, dc) in same sp, dc in next tr, dc in next dc, sk next dc, sl st in next sc, sk next dc, dc in next dc, dc in next tr, [(dc, tr, ch 1, tr, dc) in next ch-1 sp, dc in next tr, dc in next dc, sk next dc, sl st in next sc, sk next dc, dc in next dc, dc in next tr] around, dc in same sp as beginning of rnd, join with sl st. (12 tr, 36 dc, 6 ch-1 sps)

Remove hook from working loop of B and secure working loop with a stitch marker. Let the loop and yarn hang at the front of the work.
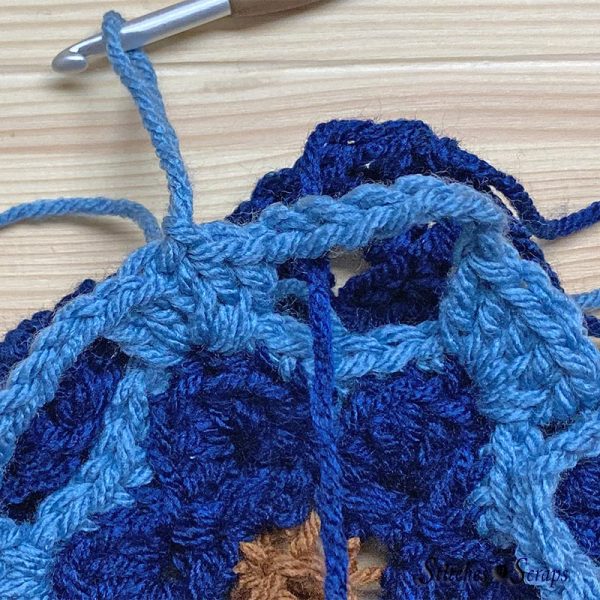
Top layer Fans
The ch-7 loops in rnd 9 will eventually end up behind the back layer petals. For now it’s easier to work in front of them, and pull the petals through later.
But when you get to the petal with the working yarn of B still attached, be sure to move that working yarn to the front of your work so that it comes up underneath the ch-7 loop. Because it’s attached to the ball, we can’t pull that through as easily later.
Remove marker from working loop of C and place the loop back on the hook.
Rnd 9: Ch 3, 2 dc in same sp, ch 7, [5 dc in next ch-1 sp of rnd 5, ch 7] around, 2 dc in same sp as beginning of rnd, join with A, drop C. (6 fans with 5 dc each, 6 ch-7 sps).
Rnd 10: With A, ch 1, 2 hdc in first st, hdc in each of the next 2 sts, 3 hdc in next ch-7 sp, hdc in each of the next 2 sts, [3 hdc in next st, hdc in each of the next 2 sts, 3 hdc in next ch-7 sp, hdc in each of the next 2 sts] around, hdc in same st as beginning of rnd, join with C, fasten off A. (60 hdc)
When working an fpdc into rnd 9, sk the st on the current row behind that fpdc.
Rnd 11: With C, ch 1, sc in first st (middle st of 3-hdc group), fptr around third (center) dc of 5-dc group of rnd 9, [sc in next st, fptr around next dc on rnd 9] twice, *(sc, ch 1, sc) in next st, fptr around next dc on rnd 9, [sc in next st, fptr around next dc on rnd 9] 4 times, repeat from * around, join. (30 fptr, 36 sc, 6 ch-1 sps)

Remove hook from working loop of C and secure the loop with a stitch marker. Let loop and working yarn hang at the front of the work while you make the next section.
Border
Pull all of the bottom layer petals up through the ch-7 loops of the top layer so that they rest on top of the work, between the fans.

Remove marker from working loop of B and place the loop back on the hook.
If your working yarn of B is on the back side of the work, fasten off B and re-attach it in the same place with the working yarn in front.
Rnd 12: With B, (sl st, ch 3, sl st) in first ch-1 sp on rnd 8 (back layer petal), sk the ch-1 sp on rnd 11 behind the petal, sc in each st on rnd 11 across to next ch-1 sp, [(sl st, ch 3, sl st) in next ch-1 sp on rnd 8, sk the next ch-1 sp on rnd 11, sc in each st on rnd 11 across to next ch-1 sp] around, join, fasten off B. (66 sc, 6 ch-3 picots)

Remove marker from working loop of C and place the loop back on the hook.
Rnd 13: Ch 2 (does not count as a st), hdc in the sc from rnd 12 that’s directly in front of the working loop of C, [hdc in each sc across to 1 sc before next ch-3 picot, 2 hdc in next sc, sk next ch-3 picot, 2 hdc in next sc] around, hdc in each remaining sc around to first st, fasten off B. (78 hdc)
Join A with sl st in any st.
Rnd 14: 2 sc in first st, sc in each of next 12 sts, [2 sc in next st, sc in each of next 12 sts] around, join, fasten off. (84 sc)
Simple Striped Mandala
When changing colors, drop unused colors at the back of the work and pick them up again as needed. If you’re using a lining, the loose “floats” at the back will be hidden inside the lining.
If you are not using a lining, leave longer tails and use them to tack down any loose strands as you weave them in. That way nothing can snag on them inside the bag.
Rnd 1: With A, ch 2, 8 hdc in 2nd ch from hook, join, change to B. (8 hdc)
Rnd 2: With B, ch 1, 2 hdc in tlo of each st around, join. (16 hdc)
Rnd 3: Ch 1, 2 hdc in first st, hdc in next st, [2 hdc in next st, hdc in next st] around, join, change to C. (24 hdc)
Rnd 4: With C, ch 1, 2 sc in tlo of first st, sc in tlo of each of next 3 sts, [2 sc in tlo of next st, sc in tlo of each of next 3 sts] around, join. (30 sc)
Rnd 5: Ch 1, 2 hdc in first st, hdc in each of next 4 sts, [2 hdc in next st, hdc in each of next 4 sts] around, join, change to B. (36 hdc)
Rnd 6: With B, ch 1, 2 hdc in tlo of first st, hdc in tlo of each of next 5 sts, [2 hdc in tlo of next st, hdc in tlo of each of next 5 sts] around, join, change to A. (42 hdc)
Rnd 7: With A, ch 1, 2 hdc in tlo of first st, hdc in tlo of each of next 6 sts, [2 hdc in tlo of next st, hdc in tlo of each of next 6 sts] around, join, change to B. (48 hdc)
Rnd 8: With B, ch 1, 2 hdc in tlo of first st, hdc in tlo of each of next 7 sts, [2 hdc in tlo of next st, hdc in tlo of each of next 7 sts] around, join, change to C. (54 hdc)
Rnd 9: With C, ch 1, 2 hdc in tlo of first st, hdc in tlo of each of next 8 sts, [2 hdc in tlo of next st, hdc in tlo of each of next 8 sts] around, join, change to B. (60 hdc)
Rnd 10: With B, ch 3 (counts as dc), dc in tlo of same (first) st, dc in tlo of each of next 3 sts, [2 dc in tlo of next st, dc in tlo of each of next 3 sts] around, join. (72 dc)
Rnd 11: Ch 1, 2 sc in first st, sc in each of next 12 sts, [2 sc in next st, sc in each of next 12 sts] around, join, change to A. (78 sc)
Rnd 12: With A, 2 sc in first st, sc in each of next 13 sts, [2 sc in next st, sc in each of next 13 sts] around, join, fasten off. (84 sc)

Weave in ends. Wash and block.
Strap
You can leave very long (36-inch) starting and ending tails for sewing later, or you can use separate pieces of yarn for sewing, whichever is easier for you.
With A, ch 6.
Row 1: Hdc in 2nd ch from hook and each ch across. (5 hdc)
Row 2: Ch 1, hdc in tlo of each st across.
Repeat row 2 until strap measures about 60 inches or desired length (about 141 rows total). End after an odd number of rows.
This piece wraps around the sides and bottom of the bag, with the extra length as the shoulder strap.
Secure working loop with a stitch marker and remove hook.

Wash and block strap.
Lining (optional but recommended)
Video tutorial coming soon!
Cut fabric pieces
Fold fabric in half with right sides together. Place one crochet mandala on top of fabric. Use a pencil or fabric marking chalk to trace around mandala, leaving about a 1/4 inch seam allowance all the way around. Cut out the marked circle, cutting through both layers. You should now have 2 circles of fabric.

Cut a strip of fabric 1 1/2 x 34 inches long. If needed, you can sew 2 strips of fabric together to get the appropriate length. I did not cut mine long enough, and ended up having to add additional length later.

Sew zipper to side strip
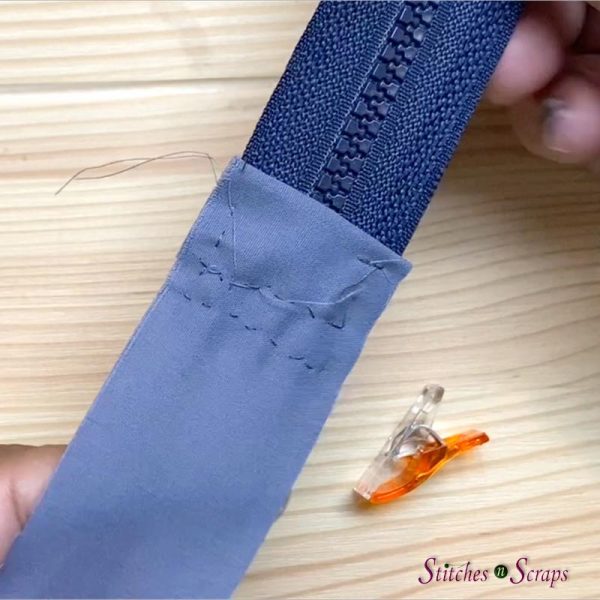
Fold over one inch on one end of the fabric strip (it doesn’t really matter which way you fold it). Pin or clip in place.
Place this folded end on top of the back end of the zipper so that it overlaps the zipper end by about 1/2 inch. This creates a small flap. The zipper should be right side up and the fabric should be wrong side up.

Sew the zipper and flap together along the side and bottom edges only. Do not sew across the teeth of the zipper, as the zipper still needs to be able to open under the flap.
Sew zipper to first circle
Line up the zipper and side strip along the edge of one of the fabric circles. The wrong side of the zipper should be touching the right side of the circle.
You can clip or pin this seam in place first if you find it helpful, but you may find it easier to sew it without pinning. I clipped it at first, but ended up removing the clips because I had stretched the fabric a bit too tightly.

Starting at the front end of the zipper, sew around the edge of the circle and side strip with a 1/4 inch seam allowance. Sew slowly and keep adjusting your positioning so that the edge of the zipper or side strip lines up with the edge of your fabric circle without any pleats or gathering. Stop about 1 inch from the end of the circle.

When you come almost all the way back around, stop and remove your work from the machine. Fold the free end of the side strip over so that it creates another tab, covering most of the zipper pull. Clip in place and trim any extra fabric, leaving about 1 inch folded over for the tab. Finish sewing around the circle so that the end tab rests on top of the zipper.

Sew Zipper to 2nd Circle
Pin or clip the 2nd circle in place along the other side of the side strip. Once again, the right side of the zipper should be touching the wrong side of the fabric circle. This time pins or clips are important to keep the spacing even.

Sew side strip to 2nd circle all the way around.

Assembly
Mark opening
Center zipper across where you would like the top opening of the bag to be. Mark the edges of the top opening on the mandala with stitch markers. Place the markers just inside the edge of the zipper (or fabric tabs if you made the lining), so that the tabs and zipper ends will be hidden when the bag is completed.
Place matching markers on the 2nd mandala, making sure you have the same number of stitches between the markers on both pieces.
Attach strap to first mandala
Line up starting end of strap with one marker on one of the mandalas, so that right sides are together. Sew strap and mandala edges together around the bottom of the mandala, to the opposite marker.
You can use any seam you prefer. I sewed from the right side and used a combination of a mattress stitch and whipstitch seam – I went from top to bottom through the edge of the side strip and around the posts of the edge stitches on the circle.
Pin or clip the other end of the strap to the beginning of this seam and check the length. You can add or remove rows to the strap in sets of two rows as desired. Fasten off. Sew the strap ends together.
Attach strap to 2nd mandala
Pin or clip the opposite edge of the strap to the edge of the other mandala, with right sides together.
Turn bag right side out. If you made a lining, insert it now and check for fit. Adjust strap seams if needed, then remove lining.
Sew remaining strap into a tube
Fold the remaining strap lengthwise. Starting about 1 inch from the edge of the bag, sew the sides of the strap together. This forms a tubular handle.

Weave in all ends. Insert lining again if you made one.
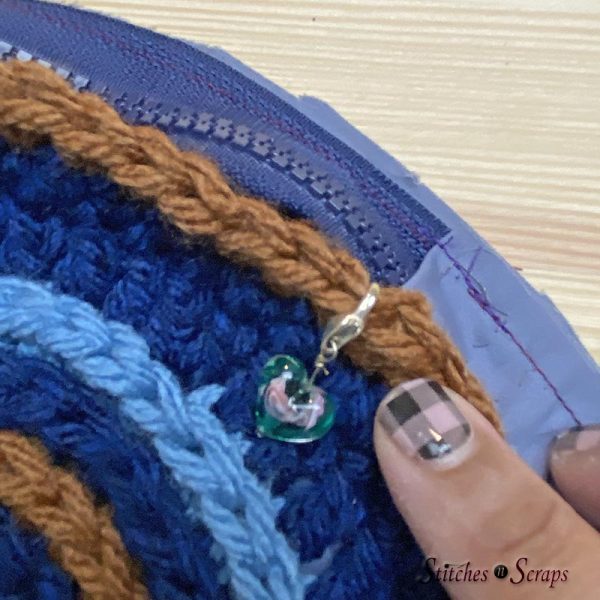
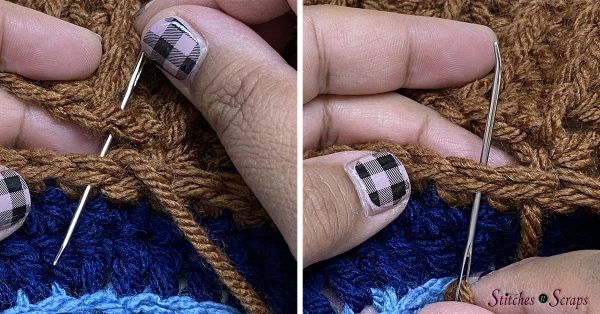
Attach Zipper
Pin zipper in place along top opening.
To get the alignment even, I first pinned through all layers with the zipper closed, then slowly opened the zipper, removing the pins one by one, and clipping each side separately.
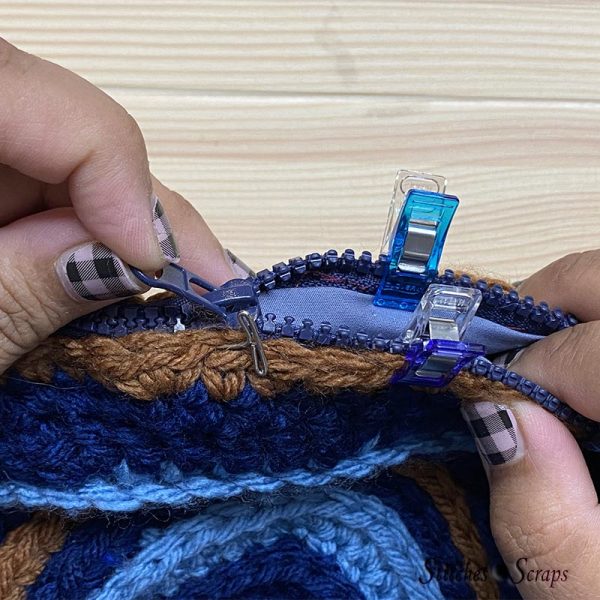
Sew the zipper to the open edge of each mandala. Go a bit past the opening on each side, and sew across the strap below the ends of the zipper.

This way the zipper can open and close fully, and the pull will be hidden under the strap.

Rate this Crochet Mandala Bag!
I hope you enjoyed this crochet mandala bag pattern.
A downloadable pdf of this pattern is available on Ravelry for a small fee. The fee for the pdf format is to offset the advertising revenue lost when you print or download the pattern rather than viewing it online.
Do you want the best of Stitches n Scraps delivered right to your inbox? Don’t miss a stitch – Subscribe now!


7 Comments
Dorna
when will you post a video tutorial for this bag?
Pia Thadani
First one on May 24th. There are 2 videos for each bag in the CAL. The full schedule is here 🙂 https://stitchesnscraps.com/2022-bag-along-cal/
Dorna
Is there a video that walks through the whole thing? I’m struggling with following the pattern 🙂
Pia Thadani
There is a video tutorial for the flower mandala, and one for the zippered lining. What part of the pattern are you stuck on? Maybe I can help?
Dorna
is there a video tutorial for the straps? i’ll let you know if I’ve questions. thanks for your help!
Pia Thadani
No, there isn’t one for the strap, but i think you’ll find the pattern pretty self explanatory there. It’s just back and forth in rows, then sewn around the circles, and then the handle part is sewn into a tube.
Is there a specific part of the strap instructions that you’re stuck on?
Alexandra
Very pretty! I really like the way the light blue pops on top of the dark blue.