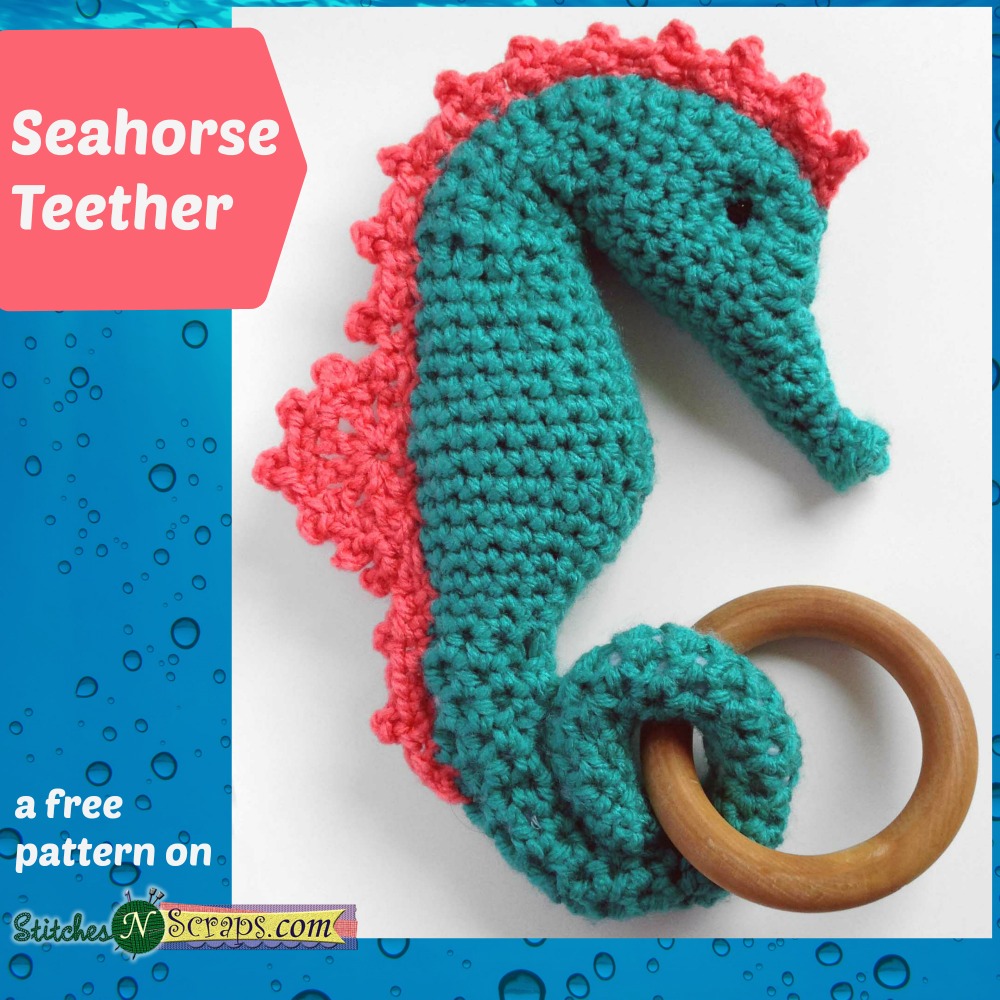
Seahorse Crochet Teether
This sweet seahorse crochet teether is a cuddly new friend for your baby, with a teething ring wrapped up in its tail.
This content is protected by copyright. See this Terms of Use / Copyright page for more information.
This post contains sponsored content and/or affiliate links. If you click an affiliate link and make a purchase, I may get a commission.
Red Heart Baby Hugs Yarn
This adorable seahorse teether is made in Red Heart Baby Hugs yarn, which I received free from Red Heart for this design. The pattern uses both worsted weight (medium) and dk weight (light) versions of Baby Hugs Yarn.

Just like the name suggests, this yarn has the soft texture and bright colors that babies love. Moms love that Baby Hugs is OEKO-TEX® Standard 100 Class I certified, which means it has been tested to be free from harmful levels of over 300 substances!
Make the matching blanket
If you like this pattern, be sure to check out the matching Anemone security blanket – you can make both patterns with just one skein of medium and one skein of light!

Continuous Rounds and Running Stitch Markers
Use a stitch marker to keep track of the beginning of the round. You can use a regular stitch marker, but my favorite technique is to use a piece of scrap yarn as a running stitch marker instead. Learn how in this Running Stitch Markers tutorial.

The marker spirals around the work because of the way continuous rounds gradually shift by one stitch every 2 rounds. In the instructions, the shaping also shifts to account for this. Read more about how this works in this post about Why Continuous Rounds Shift.


Materials
- Yarn:
- 55-60 yds Red Heart Baby Hugs Medium – Aloe
- 10-15 yds Red Heart Baby Hugs Light – Peachy
- Small amount of black thread or yarn for eyes.
- 55-60 yds Red Heart Baby Hugs Medium – Aloe
- 10-15 yds Red Heart Baby Hugs Light – Peachy
- Small amount of black thread or yarn for eyes.
- Hook: Size H / 8 (5 mm) hook or size needed to obtain gauge
- Notions:
- Maple teething ring
- Fiberfill / stuffing material
- Yarn or Tapestry needle
- Stitch marker or scrap yarn
Project Level
Intermediate: The stitches are easy but the shaping is more complicated. Most important thing is to keep track of the first stitch of each round.
Size
About 8 inches long when complete, not counting teething ring. Size will vary depending on your gauge and finishing (how tightly you curl the tail, etc).
Gauge
16 sc x 18 rows = 4 inches. Exact gauge is not critical. It’s best to use the smallest hook you are comfortable with for the medium yarn. Your stitches should be a bit tight, so the stuffing doesn’t come out.
Abbreviations used
This pattern uses US terms.
- ch = chain
- sc = single crochet
- hdc = half double crochet
- sc2tog = single crochet next 2 stitches together
- hdc-dec = half double crochet decrease (see special stitches)
- dc = double crochet
- sl st = slip stitch
- st(s) = stitch(es)
- sp(s) = space(s)
- rnd = round
- yo = yarn over
- WS = wrong side
- RS = right side
Special Stitches:
Half Double Crochet Decrease (hdc-dec): Yo, insert hook into next st, yo and draw up a loop (3 loops on hook). Insert hook into next st, yo and draw up a loop (4 loops on hook). Yo and pull through all 4 loops.
Picot: Ch 3, sl st in 3rd ch from hook.
Instructions
The entire body of the seahorse is worked in continuous rounds. Do NOT turn or join rounds unless specifically indicated.
Tail
Rnd 1 (RS): With Aloe, make a magic circle leaving an 8-inch tail for sewing. Ch 1, 4 sc in circle (4 sts)
OR Alternate Rnd 1: With Aloe, ch 2, 4 sc in 2nd ch from hook. (4 sts)
Rnd 2: (2 sc in next st, sc in next st) twice. (6 sts)
Rnds 3-4: Sc in next 3 sts, hdc in next 3 sts.
Rnd 5-6: Hdc in next st, sc in next 3 sts, hdc in next 2 sts.
Rnds 7-8: Hdc in next 2 sts, sc in next 3 sts, hdc in next st.
Rnds 9-10: Hdc in next 3 sts, sc in next 3 sts.
Rnds 11-12: Sc in next st, hdc in next 3 sts, sc in next 2 sts.
Rnds 13-14: Sc in next 2 sts, hdc in next 3 sts, sc in next st.
Rnd 15: Sc in next 2 sts, 2 sc in next st, hdc in next 3 sts. (7 sts)
Rnd 16: Sc in next 4 sts, hdc in next 2 sts, 2 hdc in next st. (8 sts)
Begin stuffing your seahorse and continue stuffing as you go. It should be plump, but not so stuffed that you can see the stuffing through the stitches.
Rnds 17-18: Hdc in next st, sc in next 4 sts, hdc in next 3 sts.
Rnds 19-20: Hdc in next 2 sts, sc in next 4 sts, hdc in next 2 sts.
Rnds 21-22: Hdc in next 3 sts, sc in next 4 sts, hdc in next st.
Rnds 23-24: Hdc in next 4 sts, sc in next 4 sts.
Rnds 25-26: Sc in next st, hdc in next 4 sts, sc in next 3 sts
Rnds 27-28: Sc in next 2 sts, hdc in next 4 sts, sc in next 2 sts
Rnds 29-30: Sc in next 3 sts, hdc in next 4 sts, sc in next st.
Body
Rnd 31: [2 sc in next st, sc in next st] twice, sc in next 4 sts. (10 sts)
Rnd 32: [Sc in next st, 2 sc in next st] twice, sc in next 6 sts. (12 sts)
Rnd 33: Sc in next 2 sts, 2 sc in next st, sc in next 3 sts, 2 sc in next st, sc in next 5 sts. (14 sc)
Rnd 34: [Sc in next 3 sts, 2 sc in next st] twice, sc in next 6 sts. (16 sts)
Rnd 35: Sc in next 4 sts, [2 sc in next st, sc in next 5 sts] twice. (18 sts)
Rnd 36: [Sc in next 5 sts, 2 sc in next st] twice, sc in next 6 sts. (20 sts)
Rnds 37-38: Sc in next 6 sts, hdc in next 9 sts, sc in next 5 sts.
Rnds 39-40: Sc in each st around
Rnd 41: sc in next 8 sts, sc2tog, sc in next 5 sts, sc2tog, sc in next 3 sts. (18 sts)
Rnd 42: Sc in each st around
Rnd 43: Sc in next 8 sts, sc2tog, sc in next 5 sts, sc2tog, sc in next st. (16 sts)
Rnd 44: Sc in each st around
Rnd 45: Sc in next 9 sts, sc2tog, sc in next 3 sts, sc2tog. (14 sts)
Rnd 46: Sc in each st around
Neck
Rnd 47: Sc2tog, hdc in next 9 sts, sc2tog, sc in next st. (12 sts)
Rnd 48: Sc in next st, hdc in next 9 sts, sc in next 2 sts.
Rnd 49: Sc in next st, sc2tog, hdc in next 7 sts, sc2tog. (10 sts)
Rnd 50: Sc in next 2 sts, hdc in next 7 sts, sc in next st.
Rnds 51-52: Sc in next 4 sts, hdc in next 5 sts, sc in next st.
Rnds 53-54: Sc in next 5 sts, hdc in next 5 sts.
Head
Rnd 55: Hdc in next st, [sc in next st, 2 sc in next st] twice, sc in next st, hdc in next 4 sts. (12 sts).
Rnd 56: Hdc in next st, sc in next 2 sts, 2 sc in next st, sc in next st, 2 sc in next st, sc in next 2 sts, hdc in next 4 sts. (14 sts)
Rnd 57: Hdc in next 2 sts, sc in next 2 sts, 2sc in next st, sc in next 3 sts, 2 sc in next st, sc in next 2 sts, hdc in next 3 sts. (16 sts)
Rnd 58: Hdc in next 3 sts, sc in next 9 sts, hdc in next 4 sts.
Rnds 59-60: Hdc in next 5 sts, sc in next 7 sts, hdc in next 4 sts.
Rnd 61: Hdc in next st, hdc-dec, hdc in next 2 sts, sc in next 7 sts, hdc in next 2 sts, hdc-dec (14 sts).
Rnd 62: Hdc in next st, hdc-dec, hdc in next st, sc in next 7 sts, hdc in next st, hdc-dec. (12 sts).
Remember to continue stuffing as you go – head gets very small at the end and will be harder to stuff.
Rnd 63: Hdc in next st, hdc-dec, sc in next 7 sts, hdc-dec. (10 sts)
Rnd 64: Hdc in next st, hdc-dec, sc in next 5 sts, hdc-dec. (8 sts)
Rnd 65: Hdc in next 3 sts, sc in next 5 sts.
Rnd 66: Sc in each st around.
Rnd 67: Sc2tog, sc in next 4 sts, sc2tog. (6 sts)
Rnd 68: Sc in each st around.
Rnd 69: [Sc in next st, sc2tog] twice. (4 sts)
Rnd 70: Sc in each st around.
Rnd 71: [2 sc in next st, sc in next st] twice. (6 sts)
Rnd 72: Sc in each st around.
Rnd 73: Sc2tog 3 times, fasten off.
Finish stuffing and weave in any ends except for the long starting tail.
Eye and neck pictures show fin already attached – please ignore that, it will be done later.
Make eye: With black yarn or thread, sew through both sides of head at the same time where you want the eye to be. Pull snuggly so the eye sinks in a little. When you’re happy with it, sew in the ends.
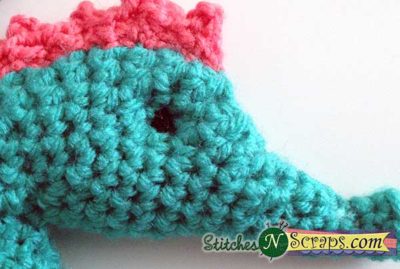
Secure neck: If you leave the neck as-is, the head will be able to move up and down a bit more. If you prefer a more secure / sharper crease in the neck as shown, use a scrap of Aloe to sew it in place. Fold the head down against the neck, and sew them together at the crease.

Fin
Foundation chain: With Peachy, ch 46
Row 1: Turn, sl st in 2nd ch from hook, sc in next ch, (picot, sc in next 3 chs) 10 times, sc in next 4 chs, leaving remaining chains unworked.
Row 2: Turn, sk first 2 sc, [ch 1, dc] 5 times in next sc, ch 1, sk next 2 sc, sl st in next sc.
Row 3: Turn, sk sl st, sc in first ch-1 sp, [picot, sc in next dc, sc in next ch-1 sp] 5 times; continuing in unworked chs from foundation chain, sc in next ch, picot, [sc in next 3 chs, picot] twice, sc in next ch, sl st in last ch.
Fasten off, leaving an 18-inch tail for sewing.
Attach Fin
You may find it helpful to pin or baste fin in place before sewing. Using long tail, Sew through the base of the fin from front to back, then through the seahorse underneath, from back to front. Continued in this manner to attach entire length of the fin. If desired, repeat seam in opposite direction to make it extra secure. Weave in fin ends.

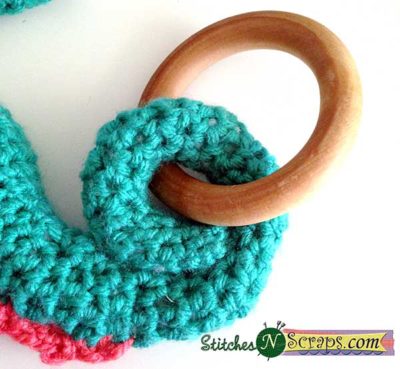
Attach Teething Ring
Slide the teething ring onto the tail, curl the tail up, and sew it securely in place using the end.
Weave in any remaining ends.
I hope you enjoy this Seahorse Crochet Teether pattern. Special thanks to Red Heart for providing the beautiful yarn, and to MixedKreations, dollyBambas, DalColloLungo, wilmaelee, and asdlane for testing the pattern!
A downloadable pdf of this pattern is available on Ravelry for a small fee. The fee for the pdf format offsets the advertising revenue lost when you print or download the pattern rather than viewing it online.
Do you want the best of Stitches n Scraps delivered right to your inbox? Don’t miss a stitch – Subscribe now!


16 Comments
Darlene P.
Thank you so much for this pattern!! Such a delightful idea for a teether!!!
Pia Thadani
You’re welcome! 🙂
Kathryn Pless
How cute! Thanks for the step by step tutorial and sharing the pattern.
stitches'n'scraps
Thanks Kathryn! Glad you liked it 🙂
Susan Hall-Amado
Do you know of another place other than Amazon that carries baby teething rings? Amazon is out of stock and they are not anticipating having them restocked.
Pia Thadani
Try this one 🙂 https://amzn.to/29ybMiP otherwise I will check when I come back from the show
Laura
Anyway to get this on video? I’d love to make this but get so lost reading detections 🙁
Pia Thadani
sorry, I don’t really do videos yet (mostly because I’m VERY camera shy). I’m happy to help you through the directions though, if you get stuck!
Rocio Garcia
It’s a very lovely pattern. Easy to follow with a wonderful result. Thank you a lot
Pia Thadani
You’re welcome! I’m glad you liked it 🙂
Ruth
Great pattern and I thank you for sharing it with us. I’m not going to use it as a teether but just as a stuffed toy for my 4 year old grandson but it’s such a great pattern I have to use this one. And actually if I had the rings I might make it as a teether for his 7 month old brother.Thanks again
Pia Thadani
Awesome! So glad you like it!
Gerdy
Fantastisch dank u voor het patroon!
Pia Thadani
Bitte! 🙂
Dee
When (what rows and what stitch) do you recommend I use the “continuous round shift” technique? Thank you.
Pia Thadani
It’s not something you have to do. The pattern already takes the shifting into account. That post just explains what’s happening behind the scenes so to speak 🙂