Alternative Half Double Crochet Decrease
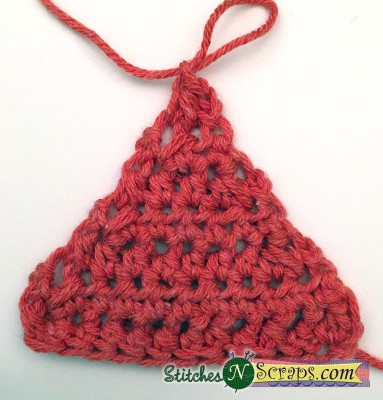
The traditional half double crochet 2 together (hdc2tog) decrease can be bulky, particularly at the edges of the fabric. This cleaner, sleeker, alternative half double crochet decrease reduces the bulk with just a slight modification.
This content is protected by copyright. See this Terms of Use / Copyright page for more information.
This post contains sponsored content and/or affiliate links. If you click an affiliate link and make a purchase, I may get a commission.
Turning Chain
I usually start my half double crochet (hdc) rows with one slightly taller than normal chain, instead of the more common 2 chains. This reduces the bulk and keeps the edges nice and straight.
When decreasing at the starting edge though, an extra chain helps the stitch to “lean in”, creating a smoother line. So I do use 2 chains when starting an hdc row with a decrease.
Traditional Half Double Crochet Decrease
The traditional half double crochet 2 together (hdc2tog) is essentially a small hdc cluster: [Yarn over, insert hook into next st, pull up a loop] twice, yarn over and pull through all 5 loops on hook.
Jessie at Home has a great traditional hdc2tog tutorial for your reference.
This swatch shows traditional, hdc2tog decreases along the right edge. The decreases look a little bulky and uneven, and do not form a smooth line.
Alternative Half Double Crochet Decrease
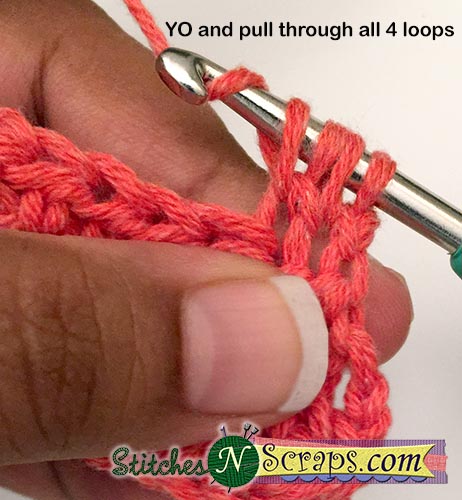
For a smoother line, simply eliminate one of the yarn overs! I prefer to remove the 2nd yarn over, but you can actually remove either. It does create a slightly different look, but the difference is hardly noticeable. Try it both ways and see what you like better.
Removing the first yarn over
Do NOT yarn over, insert hook into next st, pull up a loop, yarn over, insert hook into next st, pull up a loop, yarn over and pull through all 4 loops on hook.



Smoother Edges
The orange swatch shows alternative half double crochet decreases on both sides. At the start of each row, I skipped the first yarn over, and at the end of each row I skipped the second yarn over.

Compare this to the blue swatch, which shows traditional half double crochet decreases (hdc2tog), and you can see how much smoother the edges are.
When to Use this Alternative Half Double Crochet Decrease
With some yarns, and for some applications, the traditional hdc2tog might work better. For example, in the middle of a row you may want the extra bulk to fill in the space better.
In other situations, the alternative hdc decrease is a better choice. For example, in lacy patterns where you don’t want a lot of bulk, or on edges as shown in this tutorial.
A gauge swatch is a great opportunity to try both ways and see what fits your particular pattern better. Maybe you’ll even find a different way entirely! With crochet, it’s always ok to play with stitches and make them your own. In fact, that’s usually how new stitches are invented!
Rate this alternative half double crochet decrease tutorial!
Do you want the best of Stitches n Scraps delivered right to your inbox? Don’t miss a stitch – Subscribe now!




4 Comments
Mary Hutto
Thanks for this tutorial! I love the way you so clearly explain each step.
Pia Thadani
You’re welcome!
Tina Allred
Have you done a tutorial on how to eliminate the gap after first dc stitch on each row? I love your wonderful tutorials and your creative nail varnish. Lol
Pia Thadani
Thanks! I have an awful time keeping my nails neat, so the nail wraps are quite the lifesaver for me…plus they’re fun 🙂
One way to close that gap is by doing the 2nd stitch (the first actual dc) as a linked dc – I do have a tutorial for that: https://stitchesnscraps.com/tutorial-linked-double-crochet-ldc/
My favorite way though is with a chainless starting double crochet. I have not done a tutorial for that one, but it’s on my list for “someday”. There’s a great tutorial on Moogly (https://www.mooglyblog.com/improved-csdc/) which is where I originally learned it.