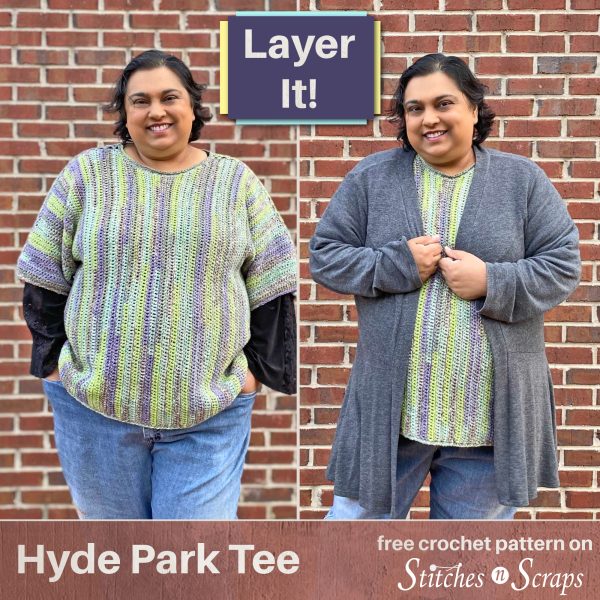
Sideways Crochet Top – Hyde Park Tee
Whether you’re hitting the books, or hitting the beach, the Hyde Park Tee has you covered! Wear it on its own, or layer it with a jacket for chillier weather. This sideways crochet top is worked from sleeve to sleeve, with lacy shoulder seams for a flattering fit.

This content is protected by copyright. See this Terms of Use / Copyright page for more information.
This post contains sponsored content and/or affiliate links. If you click an affiliate link and make a purchase, I may get a commission.
Laid Back Layers
The only thing predictable about Chicago weather is that it’s unpredictable, particularly in the fall! A frosty morning can quickly turn into a sunny, summerlike afternoon. With the ever-changing temperatures, indoor areas often end up feeling overheated. This time of year, versatile layering pieces like this top are a must-have.
Wear it all by itself to stay comfortably cool indoors, and then toss on a jacket when the temperature drops. It also looks nice layered on top of a long sleeve shirt for extra warmth.
King Cole Drifter Dk Yarn
The folks at King Cole generously provided me with the Drifter DK yarn for this design. It’s a unique blend of cotton, acrylic, and wool. It has the warmth of wool, the breathability of cotton, and the softness of acrylic.

Each self-striping colorway is inspired by and named for a different state in the US. Of course I chose Illinois for this top! The shifting colors, paired with the sideways crochet construction, create a waterfall of vertical stripes.
I loved this yarn so much, I decided to sell it in my shop. When you purchase this yarn from the Stitches n Scraps Shop, you’ll get the printable, pdf version of this pattern for free!


Materials
- Yarn: 1050 [1150, 1300, 1450, 1550, 1675, 1775, 1900, 2025] yds King Cole Drifter DK yarn (69% acrylic, 25% cotton, 6% wool, 328 yd / 100 g per skein). Sample shown in color 3259 – Illinois
- Hook: Size 7 / 4.5 mm hook or size needed to match gauge
- Notions:
- Tapestry Needle
- 6 locking stitch markers
Project Level
Easy: Single and double crochet in rows with minimal shaping and some seaming. Join-as-you-go style shoulder seam.
Sizes
XS [S, M, L, 1X, 2X, 3X, 4X, 5X]
| Size | To fit bust (inches) | Yardage needed |
|---|---|---|
| XS | 30 | 1050 |
| S | 34 | 1150 |
| M | 38 | 1300 |
| L | 42 | 1450 |
| 1X | 46 | 1550 |
| 2X | 50 | 1675 |
| 3X | 54 | 1775 |
| 4X | 58 | 1900 |
| 5X | 62 | 2025 |

Gauge
14 dc x 8 rows = 4 inches after blocking.
Gauge is important for a good fit. Measure gauge after blocking. Preferably, hang your swatch to dry, with a light weight (like a binder clip) on the bottom of it, to simulate the weight of the sweater pulling on itself.
Abbreviations used
ch = chain
dc = double crochet
rnd = round
RS = right side
sc = single crochet
sl st = slip stitch
st(s) = stich(es)
WS = wrong side
Recommended Resources
Instructions
Back
Back Right Sleeve
Ch 24 [25, 26, 27, 29, 33, 36, 39, 40]
Row 1 (RS): Sc in 2nd ch from hook and in each ch across. (23 [24, 25, 26, 28, 32, 35, 38, 39] sts)
Row 2: Ch 3, turn, dc in next st and in each st across.
Row 3: Ch 1, turn, sc in each st across to last 2 sts, 2 sc in next st, sc in last st. (24 [25, 26, 27, 29, 33, 36, 39, 40] dc)
Repeat last 2 rows 5 [5, 6, 6, 6, 4, 4, 2, 2] more times (29 [30, 32, 33, 35, 37, 40, 41, 42] sts)
Sizes 2x [3x, 4x, 5x] only:
Next Row: Rep row 2
Next Row: Ch 1, turn, sc in each st across.
Repeat last 2 rows 2 [2, 4, 4] more times.
You should have worked a total of 13 [13, 15, 15, 15, 17, 17, 17, 17] rows for back right sleeve.

Back Right Shoulder
Continuing from right sleeve:
Row 1 (WS): Ch 63 [63, 63, 64, 62, 61, 58, 58, 58], turn, dc in 4th ch from hook and in next 57 [57, 57, 58, 56, 55, 52, 52, 52] chs, sc in next 2 chs, sc in next 2 sts, dc in each remaining st across. (90 [91, 93, 95, 95, 96, 96, 97, 98] sts)
These single crochets draw the fabric in slightly at the underarm for a smoother fit.
Row 2: Ch 1, turn, sc in each st across.
Row 3: Ch 3, turn, dc in next st and in each st across.
Repeat last 2 rows 8 [9, 10, 11, 13, 14, 15, 16, 18] more times.
You should have worked 19 [21, 23, 25, 29, 31, 33, 35, 39] rows for back right shoulder.
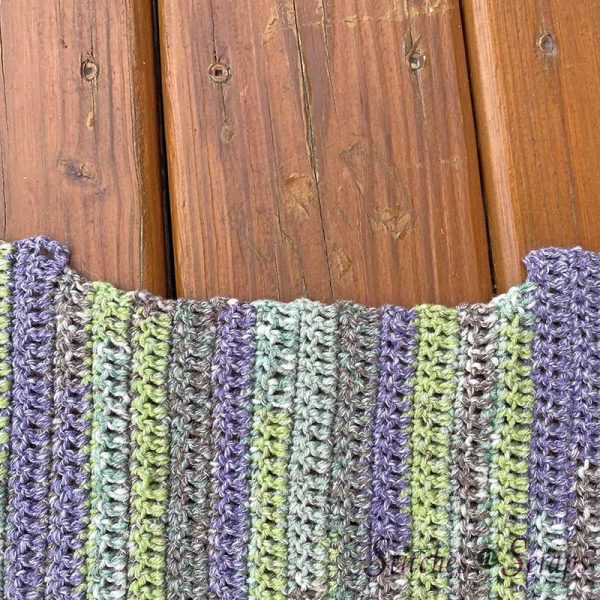
Back Neckline
Decreasing
Row 1 (RS): Turn, sl st in each of first 2 sts, sc in each remaining st across. (88 [89, 91, 93, 93, 94, 94, 95, 96] sts)
Row 2: Ch 3, turn, dc in next st and in each st across to last 3 sts, dc2tog, dc in last st. (87 [88, 90, 92, 92, 93, 93, 94, 95] sts)
Even
Row 1 (RS): Ch 1, turn, sc in each st across.
Row 2: Ch 3, turn, dc in next st and in each st across.
Repeat last 2 rows 5 [6, 7, 8, 8, 9, 9, 10, 10] more times.
Increasing
Row 1 (RS): Ch 1, turn, sc in first st, 2 sc in next st, sc in each remaining st across. (88 [89, 91, 93, 93, 94, 94, 95, 96] sts)
You should have worked 15 [17, 19, 21, 21, 23, 23, 25, 25] rows total in the back neckline section.
Back Left Shoulder
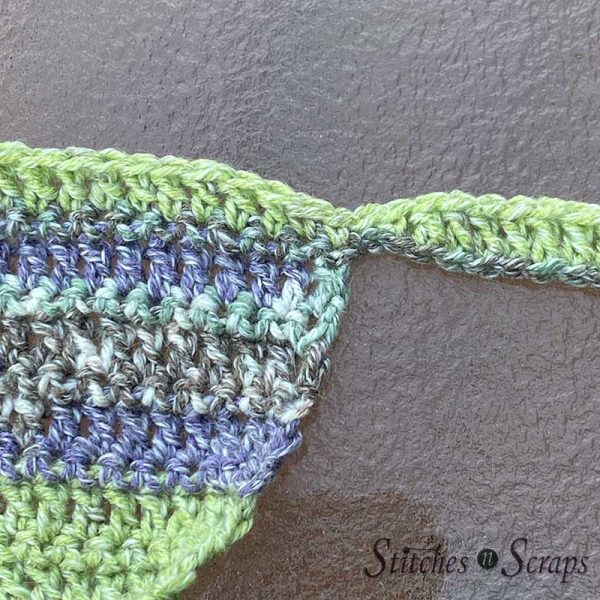
Row 1 (WS): Ch 3, turn, dc in next st and in each st across to last st, (2 dc, tr) in last st. (90 [91, 93, 95, 95, 96, 96, 97, 98] sts)
The bottom portion of this last treble forms the top corner of the neckline, as shown below. When working the neckline edging later, stop at that point.

Row 2: Ch 1, turn, sc in each st across.
Row 3: Ch 3, turn, dc in next st and in each st across.
Repeat last 2 rows 7 [8, 9, 10, 12, 13, 14, 15, 17] more times.
Repeat row 2 once more.
Next row: Ch 3, turn, dc in each of next 58 [58, 58, 59, 57, 56, 53, 53, 53] sts, sc in each of next 4 sts, dc in each remaining st across.
You should have worked 19 [21, 23, 25, 29, 31, 33, 35, 39] rows for back left shoulder.
Back Left Sleeve
Row 1 (RS): Ch 1, turn, sc in each of first 29 [30, 32, 33, 35, 37, 40, 41, 42] sts, leaving remaining sts unworked. (29 [30, 32, 33, 35, 37, 40, 41, 42] sts)
Sizes 2x [3x, 4x, 5x] only:
Row 2: Ch 3, turn, dc in next st and in each st across.
Row 3: Ch 1, turn, Sc in each st across
Repeat last 2 rows 2 [2, 4, 4] more times
All Sizes:
Next Row: Ch 2 (does not count as a st), turn, sk first st, dc in next st and in each st across. (28 [29, 31, 32, 34, 36, 39, 40, 41] sts)
Next Row: Ch 1, turn, sc in each st across.
Repeat last 2 rows 5 [5, 6, 6, 6, 4, 4, 2, 2] more times. (23 [24, 25, 26, 28, 32, 35, 38, 39] sts)
You should have worked 13 [13, 15, 15, 15, 17, 17, 17, 17] rows for back left sleeve.
Fasten off.
Back Edging
Wind a separate ball of about 25 yds of yarn to use for this section.
With RS facing, join yarn with sl st in top corner of right sleeve. This should be the first stitch of row 1 of the sleeve.

Row 1 (RS):
- Ch 1, working into sides of rows, work 36 [39, 42, 45, 51, 54, 57, 60, 66] sc evenly spaced across right sleeve and shoulder, to the edge of the neckline.

- Ch 1, place marker on the chain you just made, work 21 [23, 25, 28, 28, 30, 30, 32, 32] sc evenly spaced around neckline, ending in the bottom of the tr at the start of the left shoulder.

- Ch 1, work 36 [39, 42, 45, 51, 54, 57, 60, 66] sc evenly spaced across left shoulder and sleeve.
(93 [101, 109, 118, 130, 138, 144, 152, 164] total sts, 2 ch-1 sps)
Row 2: Ch 1, turn, sc in first st, (ch 5, sk next 2 sts, sc in next st) 11 [12, 13, 14, 16, 17, 18, 19, 21] times, ch 5, sk next 2 sts, sc in next ch-1 sp. Leave remaining stitches unworked. (12 [13, 14, 15, 17, 18, 19, 20, 22] ch-5 loops)

Secure working yarn with a stitch marker, do not fasten off.
Front
Front Left Sleeve
Work as for back right sleeve.
Front Left Shoulder
Work as for back right shoulder.
Front Neckline
Decreasing
Row 1 (RS): Turn, sl st in each of first 2 sts, sc in each remaining st across. (88 [89, 91, 93, 93, 94, 94, 95, 96] sts)
Row 2: Ch 3, turn, dc in next st and in each st across to last 3 sts, dc2tog, dc in last st. (87 [88, 90, 92, 92, 93, 93, 94, 95] sts)
Row 3: Ch 1, turn, sk first st, sc in each remaining st across. (86 [87, 89, 91, 91, 92, 92, 93, 94] sts)
Repeat last 2 rows 1 [1, 1, 2, 2, 2, 2, 2, 2] more times. (84 [85, 87, 87, 87, 88, 88, 89, 90] sts)
Sizes 2X [3X, 4X, 5X] only
Next Row: Ch 3, turn, dc in next st and in each st across.
Next Row: Repeat row 3. (87 [87, 88, 89] sts)
You should have worked 5 [5, 5, 7, 7, 9, 9, 9, 9] so far in the front neckline section.
Even
Row 1 (WS): Ch 3, turn, dc in next st and in each st across.
Row 2: Ch 1, turn, sc in each st across.
Repeat last 2 rows 2 [3, 4, 3, 3, 2, 2, 3, 3] more times.
You should have worked 11 [13, 15, 15, 15, 15, 15, 17, 17] rows so far in the front neckline section.
Increasing
Sizes 2X [3X, 4X, 5X] only
Next Row: Ch 3, turn, dc in next st and in each st across to last 2 sts, 2 dc in next st, dc in last st. (88 [88, 89, 90] sts)
Next Row: Ch 1, turn, sc in each st across.
All Sizes
Row 1 (WS): Ch 3, turn, dc in next st and in each st across to last 2 sts, 2 dc in next st, dc in last st. (85 [86, 88, 88, 88, 89, 89, 90, 91] sts)
Row 2: Ch 1, turn, sc in first st, 2 sc in next st, sc in each remaining st across. (86 [87, 89, 89, 89, 90, 90, 91, 92] sts)
Repeat last 2 rows 1 [1, 1, 2, 2, 2, 2, 2, 2] more times. (88 [89, 91, 93, 93, 94, 94, 95
, 96] sts)
You should have worked 15 [17, 19, 21, 21, 23, 23, 25, 25] rows total in the front neckline section.
Front Right Shoulder
Work as for back left shoulder.
Front Right Sleeve
Work as for back left sleeve.
Fasten off.
Front Edging
With RS facing, join yarn with sl st in top corner of left sleeve. This should be the first stitch of row 1 of the sleeve.

Row 1 (RS):
- Ch 1, working into sides of rows, work 36 [39, 42, 45, 51, 54, 57, 60, 66] sc evenly spaced across left sleeve and shoulder, to the edge of the neckline.
- Ch 1, place marker on the chain you just made, work 27 [30, 33, 36, 36, 39, 39, 42, 42] sc evenly spaced around neckline, ending in the bottom of the tr at the start of the right shoulder.
- Ch 1, work 36 [39, 42, 45, 51, 54, 57, 60, 66] sc evenly spaced across right shoulder and sleeve.
(99 [108, 117, 126, 138, 147, 153, 162, 174] total sts)
Row 2: Ch 1, turn, sc in first st, (ch 5, sk next 2 sts, sc in next st) 11 [12, 13, 14, 16, 17, 18, 19, 21] times, ch 5, sk next 2 sts, sc in next ch-1 sp. Leave remaining stitches unworked. (12 [13, 14, 15, 17, 18, 19, 20, 22] ch-5 loops)
Do not fasten off.

Assembly
Right shoulder seam
Continuing from front edging:
Row 3: Ch 5, with WS facing, sc in marked st on back right shoulder,

(ch 2, sl st in next ch-5 loop on front, sk next 2 sts on back, sc in next st on back) across to end of sleeve, ch 3, sl st in first st on row 2 of front edging.

Fasten off.
Left shoulder seam
Pick up working loop from back edging. Continuing from back edging:
Row 3: Ch 3, with WS facing, sc in marked st on front right shoulder, (ch 2, sl st in next ch-5 loop on back, sk next 2 sts on front, sc in next st on front) across to end of sleeve, ch 3, sl st in first st from row 2 of back edging.

Side seams
Fold at shoulder seams so that right sides of front and back are together.

Using stitch markers, tack corners together at edge of sleeve, underarm, and bottom hem.

Sew side seam along this edge, from sleeve to hem. You can use any type of seam you prefer, I used a mattress stitch.
Repeat for the other side seam.
Finishing
Collar Edging
With RS facing, join yarn with sl st in any st on neckline.
Rnd 1: Ch 1, sc in each st and ch around, join with sl st to first st. Fasten off. (58 [63, 68, 74, 74, 79, 79, 84, 84] sts)
Sleeve Edging
With RS facing, join yarn with sl st on sleeve edge, at the seam.
Rnd 1: Ch 1, sc in each st around, join with sl st to first st. Fasten off. (44 [46, 48, 52, 54, 64, 70, 76, 78] sts)
Repeat for the other sleeve.
Hem Edging
For the hem edging, the exact stitch count is not important, as long as your work does not either pucker or ruffle at the edge.
With RS facing, join yarn with sl st on bottom edge at either side seam.
Rnd 1: Ch 1, working into sides of rows, work 128 [142, 156, 170, 188, 202, 214, 228, 246] sc evenly spaced around bottom edge, join with sl st to first st. Fasten off. (128 [142, 156, 170, 188, 202, 214, 228, 246] sts)
Weave in all ends.
Wash and block.

I hope you enjoyed this sideways crochet top pattern. A downloadable pdf of this pattern is available on Ravelry for a small fee. The fee for the pdf format is to offset the advertising revenue lost when you print or download the pattern rather than viewing it online.
Do you want the best of Stitches n Scraps delivered right to your inbox? The Stitches n Scraps email newsletter includes highlights from the blog as well as special features not available elsewhere. Don’t miss a stitch – Subscribe now!


3 Comments
Alexandra
Such a pretty top! I like the vertical striping too.
GwenDaleAnn
I love this top, and I love your patterns because you always have tons of pictures. I’m really skilled, but I need to see what the designer wants, and pictures are the key. I have a few hats to make first, but this top is on the top of my list!
Pia Thadani
Thanks! I can’t wait to see how yours turns out 🙂