Tutorial – Felting/Fulling
Felting (or fulling) means compressing and combining fibers into a more dense and compact fabric. It’s a great way to change the texture of your projects. Felted or fulled fabric is stiffer and holds its shape much better, so it’s perfect for things like bags, appliques, and slipper soles.

This post contains affiliate links (click for more info). If you click one of these links and then make a purchase, I may be compensated. You get the same great prices, and you will be helping to support this site!
Is it Felting, or Fulling?
Technically, the term felting only applies to loose fiber. Common methods of felting with fiber include needle felting and wet felting. Fulling, on the other hand applies to fabrics (knit, crocheted, or woven). The most common method of fulling involves washing and agitating the fabric. That’s what I’ll be discussing in this tutorial.
Most people use the two terms interchangeably. If you see a pattern that involves knitting or crocheting something first and then “felting” it, that’s actually fulling. Felting is a much more commonly known (and searched) term though, so designers (including myself) tend to use that for both.
Materials:
Felting works best with wool, because wool fibers are not smooth. Each fiber contains microscopic scales. When the fibers are stressed and rubbed against each other, they mat and those scales lock together.

When choosing a wool, avoid anything that says superwash. Superwash wool has those scales stripped off or covered up with a coating, specifically to prevent felting. You may also have some difficulty with specialty “wools” such as camel. The wool of some animals is actually smoother and more like hair, so it won’t felt as easily as sheeps wool does. There are even differences between breeds of sheep, so some wool yarns may felt more easily than others.
Swatching:
Because felting compresses the fibers, your project will shrink when felted. The amount of shrinkage will vary depending on the fiber and how aggressively you felt it. It’s always a good idea to swatch first, and felt your swatch in the same way you plan to felt the finished project. This will give you a good idea of the shrinkage amount so you can plan your project accordingly.

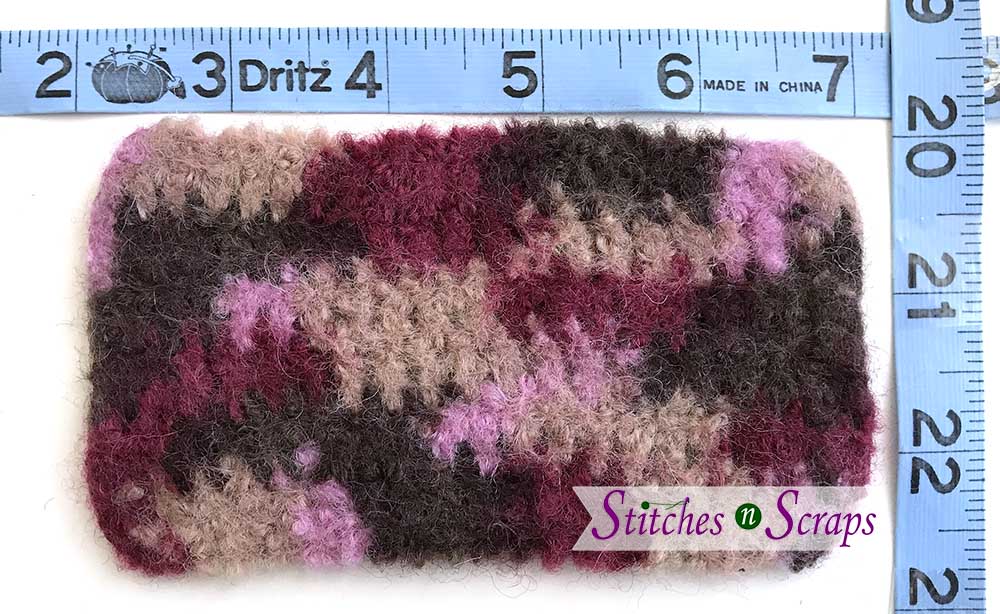
My swatch of double crochet started at about 6 inches x 3 inches. After felting, it shrunk to about 5 inches x 2.5 inches. That’s a loss of about 17% in size.
[the_ad_group id=”1362″]
Felting by hand
For smaller projects, felting is easily accomplished by hand. Normally washing instructions for wool are designed to avoid felting. Specifically, washing in cold water with gentle soap and as little agitation and wringing as possible. To felt, we’re going to do the exact opposite.
Heat: Use as hot of water as you can stand.
Soap: Ditch the gentle wool wash, and use a harsher soap instead. I like to use regular laundry soap or dish soap.
Agitation: Rub, twist, wring, squeeze…be as rough as you want with the wool. The more you agitate it, the faster it will felt. It’s also a great stress reliever!
Shocking: After a few minutes of agitation, shock the wool by rinsing it in ice cold water. If more felting is needed, repeat the process from the beginning. I have 2 sinks in my bathroom and like to fill one with hot soapy water and one with cold water. That way I can go back and forth between the two without wasting a lot of water.
Block to dry: Your project may loose a little of it’s shape in the felting process, particularly if some sections are a little more felted than others. When you’re done felting, tug it back into shape and lay flat to dry.
Protect your hands: Felting is intentionally rough on wool, but it can also be rough on your hands. Be careful not to scald them, and apply a soothing lotion when you’re done. Using dishwashing gloves is a good idea.
Felting in the washing machine:
For larger projects or if you are felting a lot of items, it may be easier to do it in the washing machine.
Settings: Hot wash, cold rinse. Use your normal laundry soap.
Agitation: If you are 100% sure that your yarn will not bleed in hot water (testing it first is a good idea!), you can wash it with other clothes (or dishrags). This helps to increase the amount of agitation, and speeds up the felting. Place your project to be felted into a pillow case and tie it shut, to keep fuzz from getting onto the other clothing.
Drying: If the shaping is important, laying it flat to dry is probably the best idea, because you can tug it into shape first. If not, it is ok to dry in the dryer. Use a cooler setting to stop felting, or use a hotter setting to encourage more shrinkage.
Ready to try it?
Give it a try yourself with my Edgewater Bag! For more felting fun, try this needle felted trim that I added too.


2 Comments
Katie Clary
Thanks for this tutorial! I’m having a hard time finding the exact hat I want, and have been considering making my own, but I wasn’t sure how big I needed to make the hat! I could easily make a swatch and test it, though!
Pia Thadani
Wonderful, I’m glad you found it helpful. Can’t wIt to see your hat!