Peg Doll Angel – Crochet Angel Pattern
Add a peg doll angel to a holiday display, on the tree, or as a gift. This crochet angel pattern is perfect for any time of year. Make them in birthstone colors for birthday gifts or to show mom she’s an angel on Mother’s Day.

This post contains sponsored content and/or affiliate links. If you click an affiliate link and make a purchase, I may get a commission.
Peg Dolls from Woodpeckers Crafts
The folks at Woodpeckers Crafts sent me free samples of several of their wood products to try out in various yarnie projects. I used their wood rings in my Fearless necklace earlier this year. These three peg dolls were part of that sample package as well.

Finishing the wood
The wood pieces come unfinished, so they can be stained, painted, or coated in any way you like. In the case of the peg dolls, this means you can paint them to match various skin tones if you want to. When I made the Fearless necklace, I rubbed the wood rings with a high gloss tung oil finish to make them shiny. While I was doing that, I did the same to the peg dolls.

Beads or picots
The peg doll angel dress has two options for the edging. You can choose a beaded edge or a picot edge, but you need to make the choice before starting on the dress. If you choose a beaded edge, the beads need to be pre-strung onto the thread before you start.

For tips on working with beads, see this Crocheting with Beads tutorial. For tips on making picots, see this Picot Two Ways tutorial.
Glue and stiffener:
You will need to stiffen the wings, and then glue them on to the peg doll angel. You can use the same glue for both tasks, or use different products if you prefer. The products I used are both samples I got free from the manufacturers at a conference.
To stiffen the wings, I used spray on Mod Podge. Using a spray on means that I can take my time positioning the item and pinning it in place, without worrying about it drying out or getting sticky. I also used this on my Mandala Earrings, and you can see it in use in the video for that pattern.

Both times I have used this spray on stiffener, I found that I had to use 2 coats to get the stiffness I wanted. With a liquid stiffener or glue, you can rub it into the fiber more thoroughly and don’t need the extra coat.
To glue the wings onto the angel, I used Ultra Bond Adhesive from iCraft. Really any glue that will stick to the thread and dry clear is fine. I like this bottle because it has a very thin tip that gives me a lot of control.

A note on gauge
I have not included a gauge measurement because the project itself is so small that it takes less time to make than a swatch would. The real key to sizing is the neckline and the length of the dress. The beginning chain circle at the neckline needs to be wide enough to fit over the peg doll angel’s head. It should just barely fit, and may need a little coaxing to go over. The dress should be long enough to cover the peg doll completely and flare out a bit at the bottom.
My gauge tends to vary a bit in thread because I don’t work with it that often. If you look closely, you may notice that all my wings are slightly different sizes. As long as you meet the two key measurements on the dress, the rest will be fine even if it’s a little bit off.
Peg Doll Angel


Add this to your Ravelry Queue
Materials
- 2″ (medium) peg doll angel, available at Woodpeckers Crafts
- 10-20 yds size 10 crochet thread
- Size 8 / 1.5mm crochet hook
- Darning needle
- Glue (to attach wings)
- Cardboard box or other square edge for shaping
- Wax paper to cover cardboard edge.
- 1″ x 2″ piece of cardboard (for shaping halo)
- Other fabric stiffener of choice (optional)
- 9 size 6/0 or 8/0 seed beads (optional)

Project Level
Intermediate: Thread crochet in the round, with beads or picots.
Size
To fit a 2″ peg doll angel
Gauge
Dress should just barely fit over peg doll’s head with some coaxing, and be long enough to reach the bottom and flare out a bit. Slight variations in gauge are OK.
Abbreviations used
(Pattern is written in US terms)
ch = chain
sc = single crochet
dc = double crochet
sb = set bead (see Special Stitches)
sk = skip
st(s) = stitch(es)
sl st = slip stitch
rnd = round
RS = right side
Recommended Resources
Special Stitches:
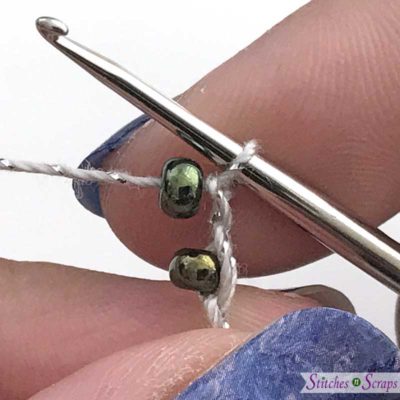
Set Bead (sb): (See beading tutorial)
Slide a bead up next to the last stitch you made, so that it gets wrapped up into the next chain.
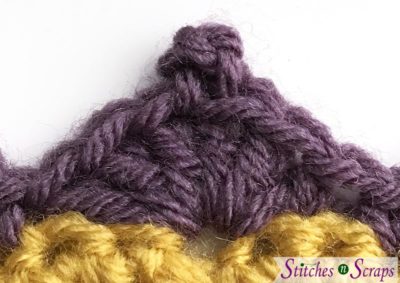
Picot: (See picot tutorial)
Ch 2, sl st in top of the previous stitch you made.
Instructions
Ch 3 at the start of a round counts as a dc.
Dress:
Ch 15, join with sl st to form a loop
Entire dress is worked on RS, without turning. Join rounds as indicated with a sl st in the first st unless otherwise specified.
Rnd 1: Ch 3, 18 dc in loop, join. (18 sts)
Slide work over peg doll’s head to make sure it fits. Adjust gauge if needed. Remove peg doll before continuing.
Rnds 2-4: Ch 3, dc in each st around, join.
Rnd 5: Ch 4 (counts as dc and ch 1), dc in same st, [sk next st, (dc, ch 1, dc) in next st] around to last st, sk last st, join. (9 ch-1 sps)
Put dress on peg doll and see that it reaches just to the bottom. If it does not, undo rnd 5 and add or subtract a round of dc if needed, then redo rnd 5.
Rnd 6 – with beads: Ch 1, sk first dc, [(3 sc, sb, ch 1, 3 sc) in next ch-1 sp, sk next 2 dc] across to last ch-1 sp, (3 sc, sb, ch 1, 3 sc) in next ch-1 sp, sk last st, join. (9 shells with beads)
OR
Rnd 6 – with picots: Ch 1, sk first dc, [(3 sc, picot, 3 sc) in next ch-1 sp, sk next 2 dc] across to last ch-1 sp, (3 sc, picot, 3 sc) in next ch-1 sp, sk last st, join. (9 shells with picots)
Fasten off and weave in all ends.
Sew an 8-inch thread through the stitches at the neckline of the dress, leaving the ends hanging out to act as a drawstring. We will later be tying these into a bow and trimming.
Wash and block dress, paying particular attention to straightening the beads or picots.
Wings:
Wings are worked back and forth in rows – do not join.
Row 1 (WS): Ch 2, 8 sc in 2nd ch from hook. (8 sts)
Row 2: Ch 4 (counts as dc and ch-1), turn, dc in next st, (ch 1, dc) in each st across. (8 ch-1 sps)
Row 3: Ch 3, turn, 2 dc in next ch-1 sp, sk next st, (3 dc in next ch-1 sp, sk next st) across to last ch-1 sp, 2 dc in last ch-1 sp, dc in last st. (24 sts)
Row 4: Ch 3, turn, sc in next st, (ch 3, sk next st, sc in next st) across to last st, dc in last st.
Edging: Do not turn. Rotate to work into sides of rows across top (flat edge) of wing. Ch 1, work 9 sc evenly spaced across top to center, ch 15 (halo), work 9 sc evenly spaced to end.
Fasten off and weave in all ends.

Stiffening the wings
- Cover cardboard strip and one edge of cardboard box with wax paper. This will keep the stiffener from sticking to it. (In the pictures, I forgot to put wax paper on my small cardboard strips).
- Wash wings and squeeze out as much water as possible with a towel.
- Add stiffener of your choice. You can use the same glue you will be using to attach the wings, or you can use a commercial fabric stiffener or starch. If using a spray on stiffener, skip this step.
- With right side facing out, arrange wings over edge of box, creating a fold along the center line. Pin in place and straighten out ch-3 loops along the edge.
- Place the small cardboard piece under the halo so that it is perpendicular to the box edge – basically, you want the halo not to have a fold in it, and to be propped forward just a bit. Pin cardboard and halo in place.
- If you’re using a spray on stiffener, spray that on now. Be sure to protect your surfaces and wipe up any drips.

- Allow to dry completely.
- Add additional coats of stiffener if needed, and allow to dry completely before removing from box.
Finishing
- Put dress on peg doll angel. Pull drawstring to cinch it tightly around the neck, then tie in a bow and trim ends.
- Glue wings to back of dress.
I hope you enjoy making this crochet, peg doll angel pattern. A downloadable pdf of this pattern is also available on Ravelry, for a small fee. The fee for the pdf format is to offset the advertising revenue lost when you print or download the pattern rather than viewing it online.
Do you want the best of Stitches n Scraps delivered right to your inbox? The Stitches n Scraps email newsletter includes highlights from the blog as well as special features not available elsewhere. Don’t miss a stitch – Subscribe now!
Rate this Peg Doll Angel crochet pattern!


One Comment
debbie
Very easy to make love it thank you great for Sunday school teacher