Quick Holiday Craft – Yarn Wrapped Tree
Add realistic looking trees to your holiday decor with this quick holiday craft! This yarn wrapped tree makes a great addition to a fireplace mantle, Christmas village, or any other holiday display. They’re also great for dioramas and other miniature crafts. For added sparkle, decorate your tree with pom poms, beads, or glittery thread. Learn how to make one in this photo and video tutorial.

Miniature Trees from Woodpeckers Crafts
Woodpeckers Crafts sent me free samples of several of their wood products to try out in various yarnie projects. I used their wood rings in my Fearless necklace earlier this year, and their peg dolls for my Peg Doll Angel pattern last week. I actually made these trees as a prop in the background for that picture.

Woodpeckers Crafts has lots of different wood pieces available, from three dimensional shapes, dowels, and toy pieces to flat wood cut outs and craft sticks. Lately I’ve been tossing around the idea of using their wooden beads on the edge of a rustic shawl. What do you think? Let me know in the comments!
Choosing a yarn
The yarn you choose will make a big difference in your finished tree. I chose a handspun yarn that was too rough to use for anything else. Here are some things to consider when choosing a yarn.

Size:
For these 2.75 inch trees, choose a yarn that is DK weight (#3) or lighter. A thinner yarn retains more of the original shape of the tree, but takes longer because you have to wrap it around more times. A thicker yarn goes faster, but rounds out the shape more. If you use a yarn that is too thick, you will end up with a smooth cone instead of a tree shape.
Fiber:
For a natural look, use a wool yarn that felts (not superwash). The glue and the friction of wrapping it will cause it to felt slightly and get fuzzy. You won’t see the individual strands of yarn as much. Acrylic, cotton, or bamboo yarns tend to have more definition, so you will see the individual strands of yarn. This can be a fun look too but is less natural. You could also experiment with various novelty yarns to get different looks.
Yardage:
Your yardage will vary depending on the yarn you choose and how thickly you wrap it. For my tree I used about 30 yds of DK weight yarn. With a thinner yarn, you would need more yardage.
Choosing a Glue
Pretty much any clear drying glue that sticks to yarn and wood will work for this project. I used Ultra Bond Adhesive from iCraft, which I had received for free in a goodie bag at a conference. It is the same glue I used to attach the wings on my peg doll angels. I like this bottle because it has a very thin tip that gives me a lot of control.

Be sure your glue dries clear (most do), because it does soak through the yarn. I did find that it soaked into the wood a bit too, so it dried faster than I could wrap and I ended up using quite a bit. Sealing or priming the wood first could have solved that issue.
Yarn Wrapped Tree Tutorial
Materials
For this project you will need:
- 2-3/4 inch Wooden Pine Tree from Woodpecker Crafts
- Yarn – see notes above regarding yarn choice and yardage
- Glue – see notes above regarding glue choice
- Marker, paint, or stain to color the base (optional)
- Wood sealer or oil finish (optional)
- Beads, pom-poms or other embellishments (optional)
Coloring the base
The wood trees from Woodpeckers Crafts come unfinished, and the base will be exposed. If you want to color and/or seal the wood, it’s easiest to do it before adding the yarn. For mine, I just colored it with a big Sharpie paint marker.

Coloring the tree
Coloring the tree portion is not necessary, since it will be covered with yarn. If the tree is fully wrapped in yarn, none of the wood should peek through. However, you could color your tree the same color as your yarn, and then it would be less important if there are gaps where you can see the wood.
Sealing or priming the wood may stop the glue from absorbing into the wood as much, which may help cut down on glue usage. It’s not entirely necessary though, and I did not seal or prime mine.
Yarn wrapping
Now we get to the really fun part of this quick holiday craft – wrapping the yarn around the tree!
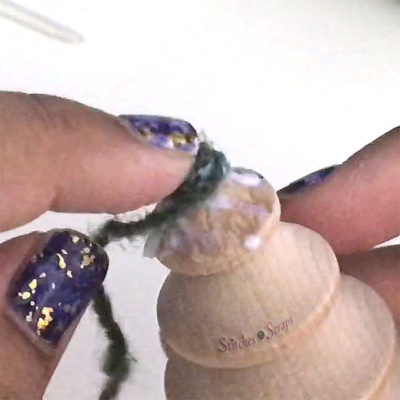
1 section at a time
To keep the glue from drying out before you can get to it, only add glue to one section of the tree at a time. Apply glue to the top section of the tree. Start your yarn at the very top, and leave a little extra yarn at the start so you can fill in the top later. With one finger on the top of the tree, wrap the yarn gently against your finger, with each wrap laying right up against the previous one, until you have several wraps in place.
Now you can remove your finger and continue wrapping, until you get to the edge of the first section.
Going over the edge
Getting the yarn to stick to the edges of each section is difficult, because it likes to slip off and fall down to the next section. So skip the edge, and start on the next section first. Once you have a bit of yarn built up on both sides of the edge, then you can cover the edge more easily.

The bottom edge
Continue working this way, section by section, until you reach the bottom edge. Turn your tree upside down, and start wrapping from the base. Carefully place each wrap so that you don’t create too much bulk at the bottom, working your way out towards the edge of the last section. Now with yarn on both sides of the edge, you can cover the edge as before.

Finishing touches
Break your yarn and glue the end down. Now you can use your fingers, a needle, or other pointy object to adjust strands of yarn and cover any gaps. If you have a large gap, cut a small piece of yarn and glue it into place over the gap. If any areas have dried out, feel free to add more glue as needed.
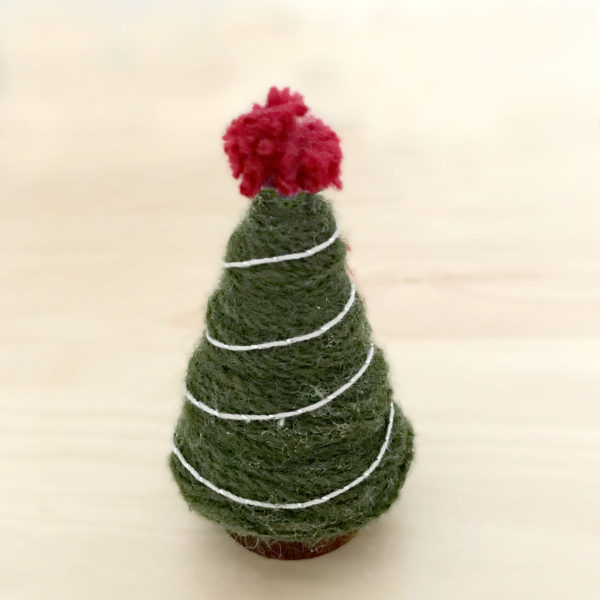
Allow your tree to dry completely, and it’s finished! If you want, you can glue on any embellishments such as beads, pom poms, sparkly threads, or whatever else you want to add. Here I used a strand of sparkly silver crochet thread, and a very tiny red pom pom.
Video Tutorial
I hope you enjoy making this quick holiday craft!
Do you want the best of Stitches n Scraps delivered right to your inbox? The Stitches n Scraps email newsletter includes highlights from the blog as well as special features not available elsewhere. Don’t miss a stitch – Subscribe now!
Rate this yarn wrapped tree project!


You May Also Like

Crochet Flower Necklace Pattern – Dew Drop Necklace

How a Pattern Happens – Publishing
