Keep all the essentials close at hand with this patio chair caddy! It wraps around the arm of a chair, with snaps to hold it securely in place. The arm size is adjustable, so it makes a great walker or wheelchair caddy too!
I used the color #1975 Sandbar Stripes. The changing colors of the stripes really help to highlight the spike stitch texture.
Open Arms
This patio chair caddy wraps completely around the arm of the chair, so it won’t work for chairs with solid sides. There needs to be a gap under the arm for the caddy to go all the way around.
It can also wrap around any sort of horizontal bar. Use it on railings, walkers, wheelchairs, or anywhere else you need a handy holder!
Adjust the Size
I designed this chair caddy to fit my patio chair, which has a rather wide arm. The section that wraps around the arm is plain half double crochet, so you can add or remove rows easily to fit any arm or bar you like! The pattern includes instructions for measuring your chair and adjusting the length accordingly.
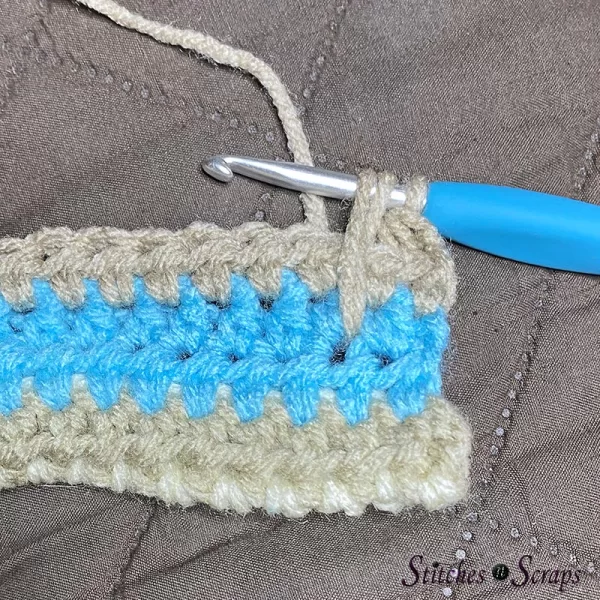
Spike Stitches
Spike stitches create the bold texture of this chair caddy. These stitches dip down into previous rows to create loops on the surface of the fabric. Take a closer look with this crochet spike stitch tutorial!
Since the spike stitch loops wrap all the way around the fabric, the texture looks great on both the right and wrong sides.
Alternative half double crochet decrease
This chair caddy pattern uses a slight variation on the half double crochet decrease. A traditional half double crochet 2 together (hdc2tog) can be a bit bulky. To minimize the bulk, skip one of the yarn overs! Check out this alternative hdc decrease tutorial for a closer look.
Mattress Stitch
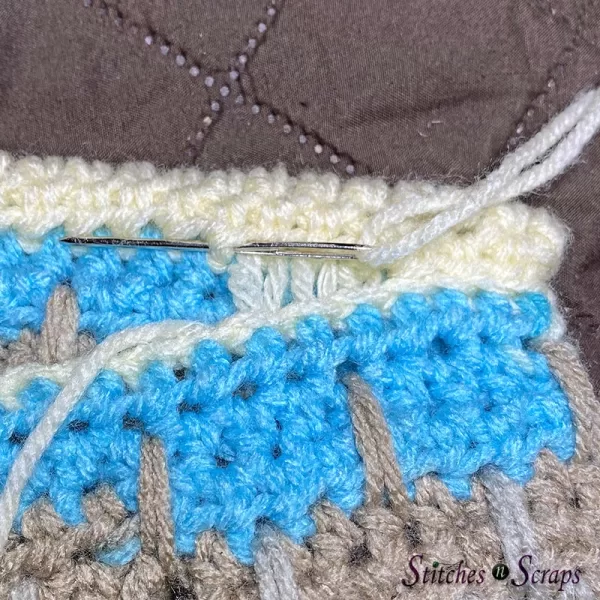
For a seamless look, use a mattress stitch seam to attach the side edges of the pocket. This invisible seam laces together loops from the middle of the stitch, so the lacing is completely hidden inside the crochet stitches. Here’s a tutorial for joining side edges.
You’ll be joining the bottom of the pocket to the middle of a row on the front. Since we’re working with half-double crochet, you can hide your seam neatly under the extra third loops!
Row 1 (WS): Hdc in 2nd ch from hook and in each remaining ch across. (35 hdc)
Rows 2-3: Ch1, turn, hdc in each st across.
Turn, fold bottom edge back and up, so that the foundation chain lines up behind row 3.
Row 4: Ch 1, working through both layers, hdc in each st across. Mark this row as RS of work.
You should now have a small tube along the bottom edge of your work. Later, you can put the dowel rod into this tube if desired. If you are not using a dowel rod, it just creates a nicely finished bottom edge. You should be able to see a ridge of third loops from row 3 on the right side of your work.
Rows 5-6: Ch 1, turn, hdc in each st across.
Row 7: Ch 1, turn, hdc in first st, [spike hdc, hdc in each of next 3 sts] across to last 2 sts, spike hdc, hdc in last st. (26 hdc, 9 spike hdc)
Row 8: Ch 1, turn, hdc in each st across. (35 hdc)
Row 9: Ch 1, turn, hdc in each of first 3 sts, [spike hdc, hdc in each of next 3 sts] across. (27 hdc, 8 spike hdc)
Row 10: Ch 1, turn, hdc in each st across. (35 hdc)
Rows 11-18: Repeat rows 7-10 twice more.
Rows 19-21: Repeat rows 7-9 once more.
Front Main Section Chart
Click image to expand
Top
Scroll down for chart of Front Top and Arm sections together.
Row 22 (RS): Ch 2 (does not count as a st throughout), sk first st, hdc in each st across to last 2 sts, dec in last 2 sts. (33 sts)
Row 23: Ch 2, turn, sk first st, [hdc in each of next 3 sts, spike hdc] across to last 4 sts, hdc in each of next 2 sts, dec in last 2 sts. (23 hdc, 7 spike hdc, 1 dec)
On rows 24-31, total stitch count will decrease by 2 sts on each row.
Rows 24-31: Repeat rows 22-23 four times more. (11 hdc, 3 spike hdc, 1 dec)
Arm
Scroll down for chart of Front Top and Arm sections together.
Rows 32-61: Ch 1, turn, hdc in each st across. (15 hdc)
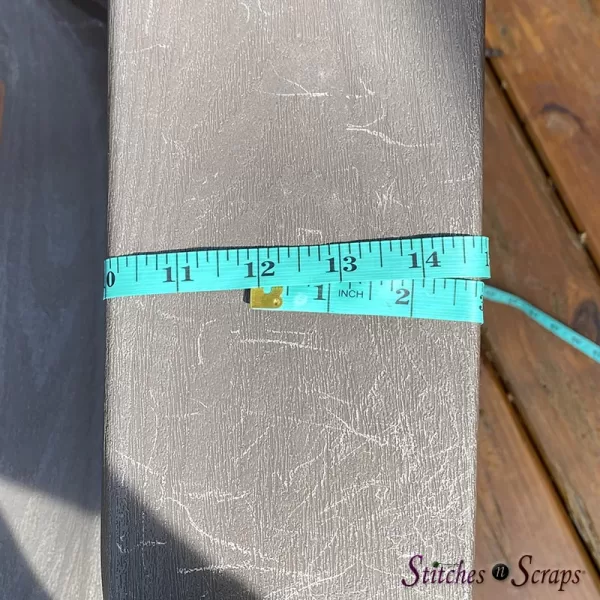
You can adjust this section to fit your specific patio chair, wheelchair or walker. Wrap a measuring tape around the arm of your chair / bar of the walker to measure the circumference.
Make your Arm section this length. You can add extra length if desired, but remember that the caddy will stretch a bit, particularly if it is holding heavier items.
Any adjustments will affect the yardage needed. End after a RS row.
Front Top & Arm Chart
Click image to expand
Back
Top
Scroll down for chart
Row 62: Ch 1, turn, 2 hdc in first st, hdc in each st across to last st, 2 hdc in last st. (17 hdc)
Row 63: Ch 1, turn, 2 hdc in first st, hdc in next st, [spike hdc, hdc in each of next 3 sts] across to last 3 sts, Shdc, hdc in next st, 2 hdc in last st. (15 hdc, 4 spike hdc)
On rows 64-71, total stitch count will increase by 2 sts on each row.
Rows 64-71: Repeat rows 62-63 four times more. (27 hdc, 8 spike hdc)
Back Top Chart
Click image to expand
Main Section
Row 72-87: Repeat rows 6-21 of Front Main Section.
Fasten off.
Back Main Section Chart
Click image to expand
Pocket
Ch 36
Row 1 (WS): Hdc in 2nd ch from hook and in each remaining ch across. Mark this row as RS. (35 hdc)
Rows 2-3: Ch 1, turn, hdc in each st across.
Row 4: Ch 1, turn, hdc in first st, [spike hdc, hdc in each of next 3 sts] across to last 2 sts, spike hdc, hdc in last st. (26 hdc, 9 spike hdc)
Row 5: Ch 1, turn, hdc in each st across. (35 hdc)
Row 6: Ch 1, turn, hdc in each of first 3 sts, [spike hdc, hdc in each of next 3 sts] across. (27 hdc, 8 spike hdc)
Row 7: Ch 1, turn, hdc in each st across. (35 hdc)
Rows 8-16: Repeat rows 4-7 twice, then repeat row 4 once more.
Fasten off.
Pocket chart
Click image to expand
Assembly
Snaps
The snaps will attach Back and Front together when caddy is folded at center of Arm. Row 5 of Front will line up with row 87 of Back.
On WS of Front, attach 1 end of 7 snaps as follows:
Sew 1 snap in each bottom corner at approximately row 5 and 1-2 stitches in from the edges.
Sew 3 snaps along the top of the Front Main Section at Row 21 (just before the decreases). Place one snap 1-2 stitches in from each edge, and the third snap in the center.
Sew 2 snaps at the top of the Front Top section at Row 30 (just before the Arm section)
Sew the other end of the snaps in matching positions on WS of Back.
Remove marker from Caddy (snaps now mark WS).
Pocket
Open snaps and lay caddy flat with RS up. Place Pocket with RS up on top of rows 4-19 of Front Main Section. Sew in place around side and bottom edges as follows, being careful not to sew over snaps.
Use a mattress stitch to sew first side seam.
Sew bottom edge in a similar manner, hiding your stitches under the exposed third loops from rnd 3 of Front.
Sew remaining side seam with a mattress stitch.
Place markers where you would like dividing seams. I did mine approximately 11 stitches in from each side. Sew vertical lines where marked, sewing through both layers, to divide pocket into sections.
Optional Dowel:
Insert dowel into open tube below pocket. You can sew the ends of the tube shut to secure the dowel, or leave them open so you can remove it easily for washing.
Weave in all ends and remove all markers.
Share this Patio Chair Caddy crochet pattern on Pinterest!
Here’s an image perfect for pinning.
Rate this Patio Chair or Wheelchair Caddy pattern!
I hope you enjoyed this caddy crochet pattern. A downloadable pdf of this pattern is available on Ravelry for a small fee. The fee for the pdf format is to offset the advertising revenue lost when you print or download the pattern rather than viewing it online.
Do you want the best of Stitches n Scraps delivered right to your inbox? The Stitches n Scraps email newsletter includes highlights from the blog as well as special features not available elsewhere. Don’t miss a stitch – Subscribe now!
What a neat idea! You are so creative and so generous to share your pattern. As soon as I saw the photo of the this patio chair caddy I knew I wanted it and in fact I said out loud “I could have used this years ago!!. (it’s OK, my cat was listening…not just talking to myself… lol)
I see in the pattern that you used acrylic yarn but I was thinking of using 100% cotton for durability considering what I might put in the pockets because I will use it with my camping chair. What would total yardage be for 1 chair caddy? I will definitly make one for myself and I think my friend, who only knits, needs 1 too. {I’ll make it for her} She takes her projects with her every time they go camping but she could use it on her deck chair too now that the days are warm. Thank you also for the alternative half double crochet decrease tutorial. All those little things help when working on a project. You are amazing!
hi Trish 🙂 I’m so glad you like the pattern! If it’s worsted weight cotton yarn, and you get a similar gauge to mine, it should be about the same yardage. But I’d be careful of cotton because it might sag and stretch with weight on it, particularly after washing. Maybe make one and test it out first to be safe, or try making fewer rows in the straight sections in case it does pull a bit.
Room for all the essentials, and I especially like it for a patio chair (or beach chair) since I always end up placing my items on the floor around me.


4 Comments
Trish
What a neat idea! You are so creative and so generous to share your pattern. As soon as I saw the photo of the this patio chair caddy I knew I wanted it and in fact I said out loud “I could have used this years ago!!. (it’s OK, my cat was listening…not just talking to myself… lol)
I see in the pattern that you used acrylic yarn but I was thinking of using 100% cotton for durability considering what I might put in the pockets because I will use it with my camping chair. What would total yardage be for 1 chair caddy? I will definitly make one for myself and I think my friend, who only knits, needs 1 too. {I’ll make it for her} She takes her projects with her every time they go camping but she could use it on her deck chair too now that the days are warm. Thank you also for the alternative half double crochet decrease tutorial. All those little things help when working on a project. You are amazing!
Pia Thadani
hi Trish 🙂 I’m so glad you like the pattern! If it’s worsted weight cotton yarn, and you get a similar gauge to mine, it should be about the same yardage. But I’d be careful of cotton because it might sag and stretch with weight on it, particularly after washing. Maybe make one and test it out first to be safe, or try making fewer rows in the straight sections in case it does pull a bit.
Alexandra
Room for all the essentials, and I especially like it for a patio chair (or beach chair) since I always end up placing my items on the floor around me.
Pia Thadani
right? that’s my problem too! Especially when we’re sitting around our tiny firepit – there’s nowhere to put anything except on the ground!