Independence Day Display with Rinea Paper and Ribb-Its
Project, Product Review, and Giveaway!
This post contains affiliate advertisements (click for more info). If you click one of these advertisements and then make a purchase, I may be compensated. You get the same great prices, and you will be helping to support this site!
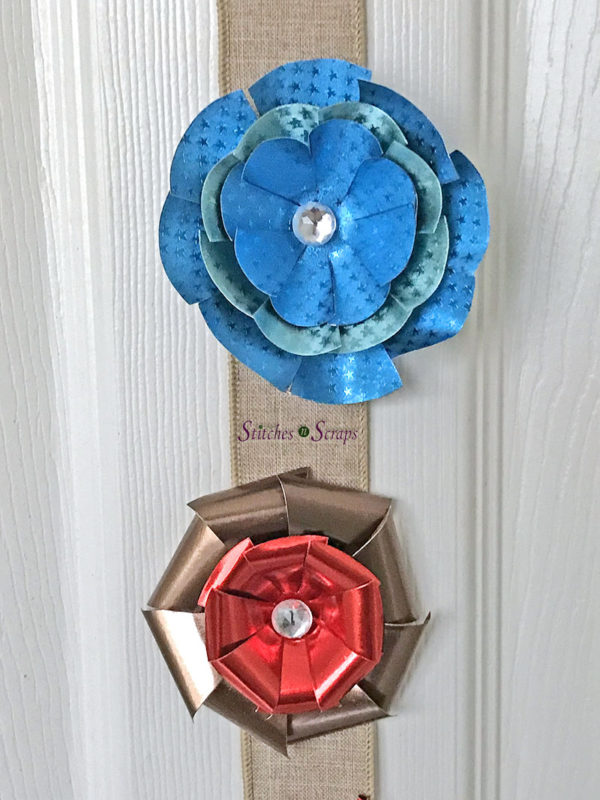
In my goodie bags at a recent trade show, I got some free samples from Rinea and Ribb-Its. I combined these products, along with some of my crochet star appliques, to create this fabulous, Independence Day display!

Keep reading for my review of these products and links to all the tutorials I used for this project. Plus, enter the giveaway below for a chance to win some to try out yourself!
Rinea Papers and Ghost Ink
Rinea gave me their Patriotic Foiled Paper variety pack, along with some pre-cut pieces, and a pad of Ghost Ink. I know it’s a little early for a 4th of July display, but that’s just what these papers needed to be, and I couldn’t wait to try them out! Plus, this way you have plenty of time to make one too.

The foiled paper is flexible, but stiff enough to hold whatever shape you give it. In the pack there were some solid papers, and others that had a raised star texture to them. The solid colors were gold on the back, while the textured ones were the same color on both sides.
Ghost Ink removes the color wherever it touches the paper, exposing a silver core. It comes in a stamp pad that can be used in lots of different ways.
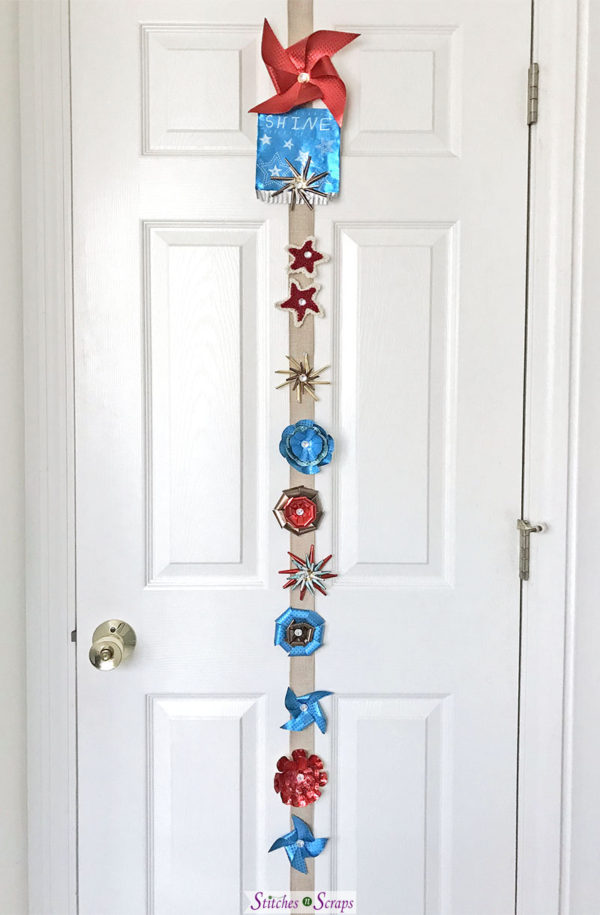
Ribb-Its Display Kit
Ribb-Its is a clever combination of ribbon, magnets, and a elastic clasp to hold it all together. The kit they gave me included a dozen clear magnets, a white clip, and more than enough ribbon to fit around a door.

This unique system allows you to turn any door into a display surface, without damaging the door. I cut my ribbon about an inch too big, then folded the ends over and secured them with some pretty washi tape. I don’t think the tape was technically necessary, but it was pretty!
When clasped in place, the elastic band was slightly stretched, which held the ribbon taut along the front.

I love the idea of being able to change out the display pieces whenever I want to, just by removing the magnets. After July 4th, I can easily replace my stars and flowers with photos or other decorations. This would be a great way to display children’s artwork too.
Stars
I posted the pattern for the crocheted star appliques a couple of days ago. They’re fast and easy to make, and look great when layered.

For the paper stars, I used the pre-cut circles of foil paper. Rinea sells a 3D Rolled Star Die Set to create these circles with a die cutter. If, like me, you don’t have a die cutter, you can use their Stars N More Templates to trace and cut them out by hand.

This Rinea tutorial shows how to roll each segment of paper around a pencil to create the star points. The first couple of points were hard for me to do. My pencil kept slipping and I wasn’t getting the shape I wanted. But by the time I finished all 8 points on the first piece, I got the hang of it and it was easy peasy!
Flowers
At the end of the tutorial video for the stars, they show some other designs that can be made with the die cuts. I needed to cut some more circles to get the colors I wanted, so I used the circles I had and traced them out onto the paper sheets from the pack.
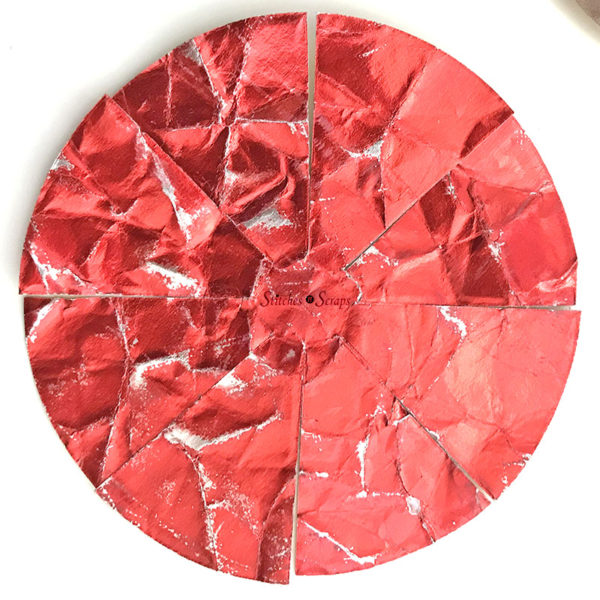
I made tonal red and blue flowers using these instructions from Stampartpapel. Then I made 2-color flowers by rolling the petals downwards, like these ones by Stephanie Ackerman.
To shape all the final flowers, I made a circle with my thumb and forefinger, and pushed the center of the flower into it. This pushed the center down and brought the petals up, for a more flower like shape.

Ghost Ink
Before making the all red flower, I crumpled the foil circles up and applied Ghost Ink, following this tutorial. This gave the paper a great distressed look. It’s a good idea to distress the paper before cutting out the circle shapes though. I came very close to tearing the petals off while trying to uncrumple it.
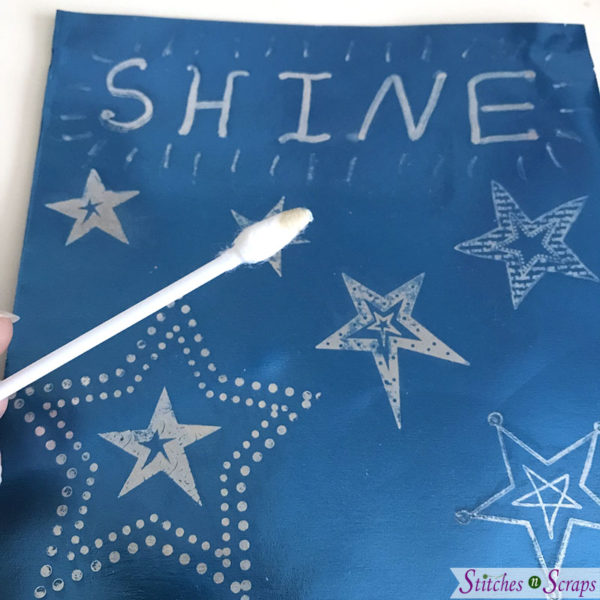
I used Ghost Ink again for the Shine banner. First, I applied it to some rubber stamps to make the stars. Then, using a pointed makeup applicator, I hand wrote the word “Shine” and drew some little lines around it. The color came away cleanly and easily.
Fringe
To finish the banner, I added a piece of fringe. Rinea actually gave me a die to cut fringe, but as I mentioned earlier, I don’t have a die cutter. So I cut it freehand instead.
Only cut about 2/3 of the way up the strip of paper, leaving a solid band on top to glue to the banner. To add a sense of movement, curl each section of fringe around a double pointed knitting needle.

Pinwheels
For the pinwheels, cut squares of paper and fold the corners in to mark the diagonals. Then cut along the diagonals from each corner, going only about halfway to the center.
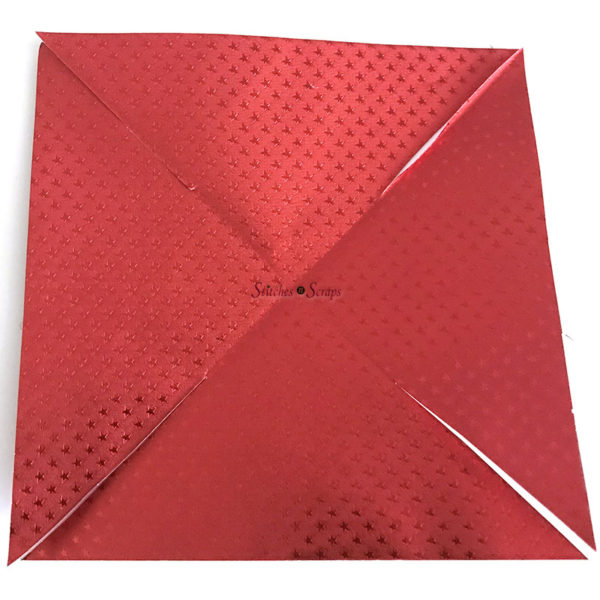
Place a glue dot in the center, then fold one corner of each section in and stick it to the glue dot. It’s important to use the same corner (either left or right) for each section. Finally, cover the center with a small circle.

Putting it all together
With all the pieces made, it’s time to attach them to the Ribb-Its display. The 2-piece magnets are easy to use. Each one consists of a metal disc that goes behind the ribbon, and a pretty magnet that goes in the front.

The magnets come in all different designs, but I love the simplicity of the clear magnets. They really added a great finishing touch to each of the pieces.
They are quite strong and had no trouble holding the paper pieces in place. The crochet stars were a little trickier. The magnets worked through one layer of fabric, but not through both layers.

To fix this, I inserted the magnets into the center of the star, somewhat like a button. Each magnet has a gem top, and then the magnetic shaft that sticks out beneath it. I stuck the shaft of the magnet into the star, through the center of the top layer.

This allowed the magnet to hold firmly, while the gem part still popped out on top. Had the magnets been totally flat, this would not have worked.
Overall Impression
The Ribb-Its system was easy to use, really pretty, and very versatile. Trying out some of the different things that Rinea paper can do was a lot of fun too, and I love my 4th of July display!
Ribb-Its is offering a special discount code! Use the code PIA25 to get 25% off your total order from Ribb-Its , not including tax and shipping. This discount is limited to items in stock only (no backorders) is valid through 11:59pm Pacific time on April 30th, 2019.
Giveaway Prizes
Both Rinea and Ribb-Its were kind enough to provide wonderful giveaway prizes, so that you can try the products yourself. One lucky winner will win both prizes!
Ribb-Its is providing a full display kit containing a 5 yard ribbon, 1 dozen two-piece magnets, and 1 double-ended clip. This prize is a $34.85 value, and the winner even gets to choose their ribbon, magnets, and clip color from what is in stock on the website at that time!


Rinea is providing a Patriotic Foiled Paper Variety Pack. This is the same pack I used and has 6 x12 inch sheets, with 2 sheets each of 6 colors. There are red, white, and blue papers with a star texture, and also red white and blue solid papers with gold backs.


Enter to win
To be eligible, you must be 18 years of age or older, with a valid, US shipping address. The winner will be contacted by email, and must reply to that email and provide their selections and shipping address within 1 week in order to receive the prizes. If the winner does not reply within 1 week, a new winner will be selected. The giveaway ends on April 15th, 2019 (at 11:59pm, central time). Hurry and enter below!
This giveaway is powered by Rafflecopter, and they may ask for some log-in information if you are not already logged in. See the Rafflecopter privacy policy for more information.
a Rafflecopter giveaway


4 Comments
Andrea
the foiled paper is so pretty, it would be nice to makes things with this
Kathleen Milkowski
I’m truly grateful for your variety of craft giveaways. I’d be non the wiser on the subject matter on a few of them
Pia Thadani
I’m so glad you said that, I was worried that these would be a little “off topic” and people wouldn’t be as interested. But it’s so much fun to play with new toys and I love sharing them all with you!
Kathleen Milkowski
This giveaway looks like a lot of fun. I can see me and the grandkids having a field day getting ready for our annual July 4th party or maybe even using this for grandpa’s 60th birthday party! I mean it is a celebration after all that I let him live this long…lol