How to Crochet Pet Stairs with Fairfield Project Foam
This post contains sponsored content and/or affiliate links. If you click an affiliate link and make a purchase, I may get a commission.
Sometimes our smaller fur babies need a little help to reach high places. Give them a boost with these crochet pet stairs! The sturdy foam insert makes the stairs a comfy place to rest too.

This content is protected by copyright. See this Terms of Use / Copyright page for more information.
Fairfield Project Foam
I asked the folks at Fairfield to provide some of their 5 inch project foam for this stair design. They’re so generous, that they sent me 2 pieces of foam, plus a roll of batting, and a whole bunch of other goodies too!
The project foam is exactly the consistency I had hoped for. It’s soft enough that I can squish it by pressing hard on it. But it’s also firm enough that it doesn’t compress when Millie walks on it.
For Small Pets Only
My Millie is about 23 lbs. (Check her out on Instagram!) So far, these stairs are holding up well to her weight, without a lot of give.

Since the filling is foam and not a rigid material like wood, it may compress more under a heavier animal. Anything above 25 lbs may be a bit too much for these stairs.
Crochet Pet Stairs and Chair Too!
These stairs were intended to help Millie climb up to her favorite perch where she can look out the window. She learned to use them right away and scrambles up and down them with ease. But sometimes, I find her just relaxing on the stairs themselves!

It turns out the stairs double as a firm but comfy chair. She loves to sit on the bottom step and rest her head on the top. Since Fairfield sent me an extra piece of foam, I plan to make a separate dog bed for her as well.
Red Heart With Love Yarn
For the removable, crochet cover on these pet stairs, Red Heart provided some With Love yarn. The yarn is soft enough that Millie enjoys laying on it, but still sturdy enough to hold up to her climbing up and down. It’s also machine washable, which makes it super easy to keep clean!
Clover Rotary Cutter
Clover sent me a free rotary cutter to try out and review, which I will be doing soon. I used it to score the foam for this project prior to cutting it all the way through. I found it really helped me create a smooth, clean cut line. You don’t absolutely need a rotary cutter to do this project. If you have one though, it does help give it a cleaner finish.
Gluing Foam
Foam is tricky to glue together because it’s a porous surface. Most glues tend to sink in rather than stick to the top. Spray glue is generally the best bet. There are several on the market specifically made for furniture foam and upholstery projects. Some of the stronger multi-purpose spray glues will do the job as well.
Elmers Spray Glue
I got a small bottle of Elmer’s Craft Bond Spray Adhesive in a goodie bag at a conference, so I decided to try it. My first attempt failed. The glue seemed to stick at first, and I left it to cure for a full 24 hours. But later, with a little movement, the top piece fell off.
After a bit of research, I tried again with the same glue. This time, I used about 3 times as much. I more or less emptied the rest of the bottle onto the foam. Again I waited 24 hours, and this time the glue held through some moderate tugging!
Millie has been using the stairs pretty frequently for the last few days, and so far everything is still in place.
Trial and Error
Since the cover on these stairs is removable, it’s ok if the glue doesn’t last forever. If it ever starts to come apart, you can just remove the cover and re-apply, or try something else.
My bottle is nearly empty, so I bought a different glue to try on my next foam project. It’s 3M super 77 and is supposed to be a bit stronger. I’m hoping that means I can use a bit less.
Materials
- Yarn: Red Heart With Love Yarn
- 740 yds #1801 Navy (2 skeins)
- 330 yds #1978 Baroque Stripe (about 1.5 skeins)
- Hook: Size K / 6.5 mm crochet hook or size needed to match gauge.
- Notions:
- Fairfield 5″ Project Foam (24 x 36 x 5 inches)
- Marker
- Large knife or cutting tool (a bread knife works well)
- Clover rotary cutter (optional)
- Spray Glue for foam
- 12 stitch markers
- Yarn Needle
Project Level
Intermediate: 3 dimensional project with chevrons and seaming.
Size
24 inches wide x 24 inches deep x 10 inches tall.
Gauge
10 dc x 6.5 rows = 4 inches.
Abbreviations used
(Pattern is written in US terms)
ch = chain
sc = single crochet
hdc = half double crochet
dc = double crochet
tr = treble crochet
sc2tog = single crochet next 2 stitches together (see Special Stitches)
sc3tog = single crochet next 3 stitches together (see Special Stitches)
st(s) = stitch(es)
Recommended Resources
Special Stitches
Single Crochet 2 Together (sc2tog): (Insert hook, yarn over and pull up a loop) in each of next 2 stitches, yarn over and pull through all 3 loops on hook.
Single Crochet 3 Together (sc3tog): (Insert hook, yarn over and pull up a loop) in each of next 3 stitches, yarn over and pull through all 4 loops on hook.
Instructions
Stair Form
Measure
Draw a line 12 inches from one short edge of the project foam, all the way around the top, sides, and bottom of your foam. This line should create a 12 x 24 x 5 inch section, and a 24 x 24 x 5 inch section. Double check your measurements before starting to cut.

Cut
This part will likely make a mess – do it outdoors or where you can easily clean up.
Cut through the foam straight down along the line.

I used a ruler and my rotary cutter from Clover to score a straight line all the way around, and then used a bread knife to finish the cut. Go slowly and be careful to keep your cut straight all the way through. A rotary or band saw may work well for this too, if you have one available.

Glue
Do this outdoors or in a well ventilated location. Follow any safety guidelines per your glue bottle.
Place the smaller section on top of the larger section so that both cut edges are lined up at the back. Make any last minute adjustments to the cut as necessary. Note the surfaces that touch – this is where you will spray the glue.

Using spray glue per the instructions on your bottle, spray the bottom of the smaller piece and place it back on top of the larger piece. Allow to set fully before moving.
Top Back
With A, Ch 62
Row 1: Sc in 2nd ch from hook and in each ch across. (61 sc)
Rows 2-9: Ch 3, turn, dc in next st and in each st across. (61 dc)
Check gauge – work should measure about 24 inches wide x 5.75 inches tall.
Row 10: Ch 1, sc in first st, sc in next st, hdc in next 2 sts, dc in next st, tr in next st, dc in next st, hdc in next 2 sts, sc in next st, (sl st in next st, sc in next st, hdc in next 2 sts, dc in next st, tr in next st, dc in next st, hdc in next 2 sts, sc in next st) across to last st, sc in last st. Change to B, fasten off A. (6 tr points)
Top & Front
In this section, place a marker at each end of rows 11, 37, 48, 74, and 85. These markers fall at the corners of the stairs, for seaming later.

With B,
Row 11: Ch 1, turn, sc2tog, sc in next 3 sts, 3 sc in next st, sc in next 3 sts, (sc3tog, sc in next 3 sts, 3 sc in next st, sc in next 3 sts) across to last 2 sts, sc in last 2 sts. (61 sts)
Rows 12-85 Repeat row 11.
Change to A, fasten off B
Bottom, and Bottom Back
In this section, place a marker at each end of row 123
With A
Row 86: Ch 3 (counts as tr), tr in same st, dc in next st, hdc in next 2 sts, sc3tog, hdc in next 2 sts, dc in next st, (3 tr in next st, dc in next st, hdc in next 2 sts, sc3tog, hdc in next 2 sts, dc in next st) across to last st, 2 tr in last st. (61 sts)
Rows 87-131: Ch 3 (counts as dc), dc in next st and in each st across.
Row 132: Ch 1, sc in each st across. Fasten off.

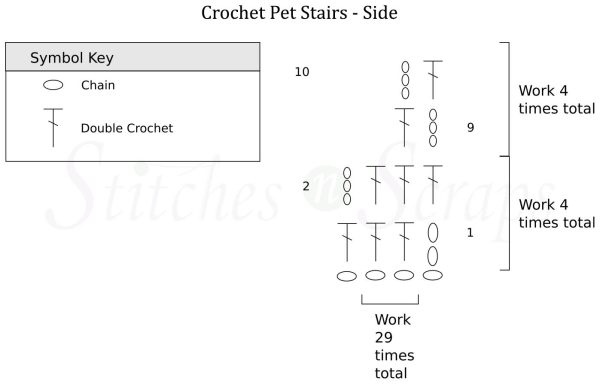
With A, Ch 62
Row 1: Dc in 4th ch from hook and in each ch across. (60 dc)
Rows 2-8: Ch 3, turn, dc in next st and in each st across. (60 dc)
Row 9: Ch 3, turn, dc in next 29 sts, leaving remaining sts unworked. (30 dc)
Rows 10-16: Ch 3, turn, dc in next st and in each st across. (30 dc). Fasten off.
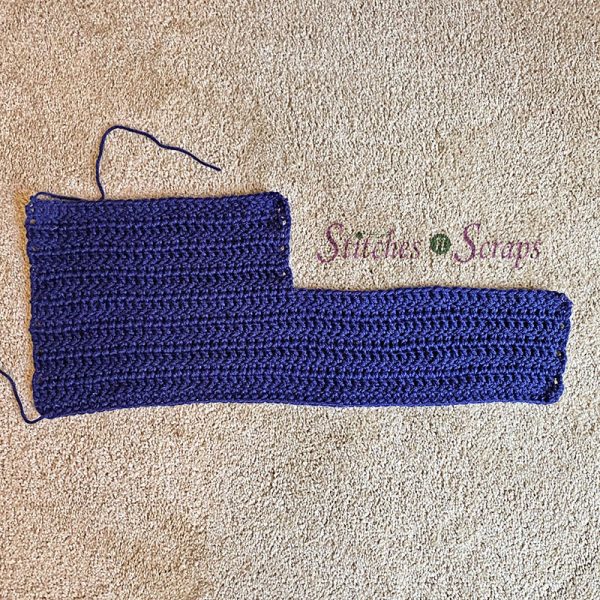
Assembly:
There is no right or wrong side to the fabric until after it is seamed. I found the seaming easier to do with the fabric in place on the stair form, but it can be done flat as well.
Seaming
- Line up stitch markers with corners of one side piece and pin or clip in place. The back sections should meet at the middle of the back.
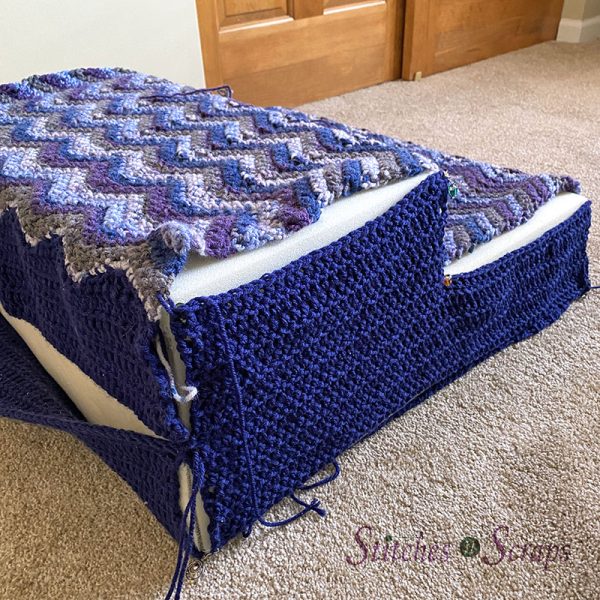
- Sew seam all the way around side piece.
- Repeat for other side – do not sew back opening closed.
- Weave in all ends.
- Remove stair form through back opening, and turn cover right side out so that seams are on the inside.

Drawstring and Back Closure
- Insert stair form.
- Cut a piece of B about 80 inches long.
- Starting at one end of the back opening, sew in large running stitches around the side, front and other side, ending at the other end of the back opening.
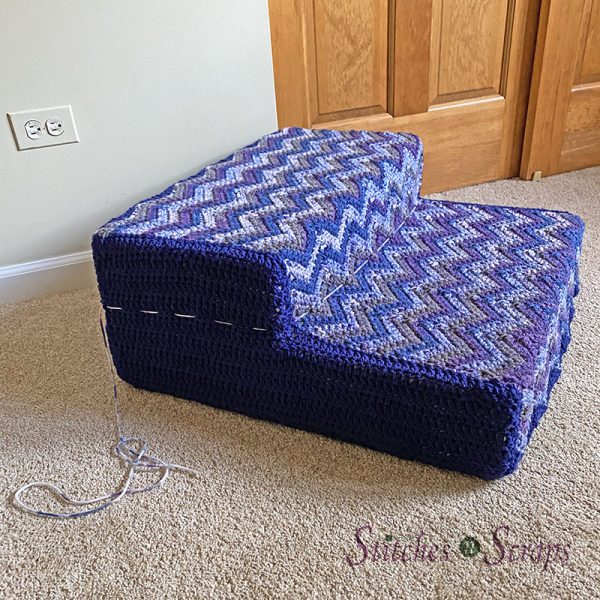
- Starting from the ends and meeting in the middle, sew opening closed using large whip stitches, like lacing a shoe.
- Pull strings snuggly, tucking in fabric to create a crisp line between the steps.
- Tie ends in a bow at the back and trim if necessary.

To remove cover for cleaning, undo the bow and back seam, then pull out stair form.
Rate this Crochet Pet Stairs Pattern!
I hope you enjoyed this crochet pet stairs pattern. A downloadable pdf of this pattern is available on Ravelry for a small fee. The fee for the pdf format is to offset the advertising revenue lost when you print or download the pattern rather than viewing it online.
Do you want the best of Stitches n Scraps delivered right to your inbox? The Stitches n Scraps email newsletter includes highlights from the blog as well as special features not available elsewhere. Don’t miss a stitch – Subscribe now!




One Comment
Alexandra
These are soooo awesome! And Millie seems quite happy with them too. One of my cats is a bit older, and I was thinking of getting him some stairs to make it easier for him to get on and off the bed. It seems to be my luck though that neither of my cats like to use things I buy. Hehe. That’s why I haven’t made one of those adorable little cat couches yet. Love to see Millie uses her stairs!