Tutorial – How to crochet a Romanian Cord
The Romanian cord is a flat cord with a striking texture that is the same on both sides. It’s a perfect option for things like drawstrings, ties, bag handles, straps, or even belts! The easy technique starts with 2 setup stitches, and then is just one simple stitch repeated for the desired length of your cord.

Romanian Cord – Photo Tutorial:
(Scroll down for video tutorial)
Note: It is very important to work all stitches loosely for this technique. You may want to use a larger hook than you would normally use for your yarn.
Set up stitches:
First, chain 2 and work a single crochet into the 2nd chain from your hook. As you do this, pay attention to your turning chain (the one you did not work into). It will fold up alongside your stitch, and create a small loop on the side.

Turn, and single crochet into this side loop.
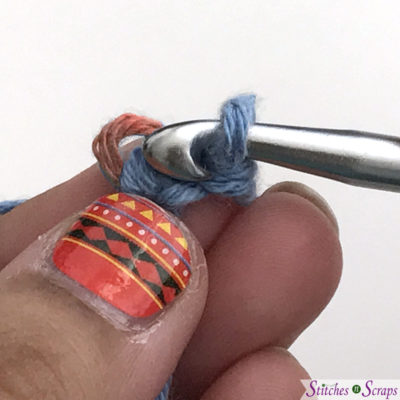
Notice as you do this that each single crochet (including the previous one you made), forms 2 little loops just under your hook. You will find the 2 loops from the previous stitch along the side edge.

Repeating Stitch:
Turn, and single crochet into the 2 side loops. These two loops were created by your very first stitch.

Repeat this last step until you reach your desired length. After a few more stitches, you should see a flat, textured cord start to form. Since we are turning with every stitch, it will look the same on both sides.

What will you do with your Romanian cords? Try using them in place of any drawstring or tie on your favorite patterns, tie one around a gift for that extra special touch, or sew the ends together to make a quick bracelet!
Romanian Cord – Video Tutorial:


11 Comments
Marianne Kiss
Thank you very much!
This is a good idea for me because I use to crochet little bag for mobil-phones and this kind of Romanian Cord will be the cord in the neck of the person.
Have a nice weekend
Marianne
Pia Thadani
nice! That’s a great use for it!
Sue
I have seen many tutorials but yours was by far the easiest to understand and replicate. Thankyou
Pia Thadani
Thanks! I’m glad it worked well for you 🙂
Karen
How would you at the start attach to a d-ring to use as a strap? Thank you!
Pia Thadani
If I absolutely wanted to crochet it on, I would make a length of cord about 1.5 – 2 inches long, wrap it around the ring and then work a single crochet into the bottom of it, right by the starting chain, Then continue the cord.
But for an even stronger join, I would just leave a long starting tail and make my cord. When finished, I would fold the end over the d-ring so it overlapped by an a half to 3/4 inch, then use the long tail to sew it securely in place.
Stephanie
Great technique. My Grandmother was from Romania and she was quite a crochete. I have a shawl that she made in 1959.
Barrie Barrett
I didn’t think mine was
Doing well at all then boom it straightened out and looked good but it doesn’t bounce back like yours hahaha
Pia Thadani
That could just be the yarn you’re using – some are more elastic than others 🙂
Karen N
I’ve been looking for this technique for a long time. Thanks for posting. Some curiousity questions:
I was thinking about ways to make a thick rug for a dog cage. Something that would hold up to the dog scarching the rug. I wondered if
– the Romanian cord be used as the foundation row of the rug and then have HDC made into the side loops for the next row?
– could you make an entire rug using the romanian cord technique?
What are your thoughts?
Pia Thadani
Hi Karen! I’m glad you found it 🙂
You COULD theoretically do either of the 2 things you suggested. For an entire rug, you could basically do one really long Romanian cord and then sew it together rag-rug style. But I feel like that would take forever.
My favorite pattern for quick pet rugs is this one: https://stitchesnscraps.com/free-pattern-linen-stitch-scrap-rug/ It’s also my most popular pattern by far, and if you check out the Ravelry projects you’ll see several that were made for cats. Both my dogs have liked mine.