Crochet Tutorials
Ready for a new crochet stitch, technique, or pattern? You’re in the right place! Browse all the crochet tutorials, or select a category from the dropdown menu. What will you learn today?

How to Attach Wood Handles to a Crochet Bag
When it comes to crochet bags, the right finishing details can make all the difference! Learn how to attach wood handles by crocheting them directly onto the bag. Try out this technique on the Shells and Cables Market Bag.

This content is protected by copyright. See this Terms of Use / Copyright page for more information.
This post contains sponsored content and/or affiliate links. If you click an affiliate link and make a purchase, I may get a commission.
Bag Along CAL
The bag shown in this video is the Shells and Cables Market Bag pattern. You can find the full written instructions for the bag in that pattern.
This is the fourth of 6 bag patterns in the 2022 Bag Along CAL. See the full schedule and learn how to join in the fun, in the main Bag Along CAL post.
Types of handles
Wood handles come in a large variety of shapes and sizes. For this example, I used circular wood handles that were about 5 inches in diameter.
You can use this same method to attach wood handles of other sizes and types as well. Try it with bamboo handles, oval handles, rectangular handles, or D-shaped handles.
Different ways to attach wood handles
Crocheting over the handles is only one method of attaching wood handles to a crochet bag. You can also sew them on in different positions to create different effects. They can be attached with separate tabs of rings. It’s also possible start your crochet from the handle, but that means crocheting the whole bag with a heavy handle attached.
How to Attach Wood Handles to a Crochet Bag Video Tutorial
Share this tutorial on Pinterest! Here’s an image perfect for pinning:

Rate this Wood Handles Tutorial!
Do you want the best of Stitches n Scraps delivered right to your inbox? Don’t miss a stitch – Subscribe now!

Shells and Cables Lace Stitch Tutorial
Combine lacy shells and twisty cables for a unique texture! In this tutorial, I’ll show you how to work this stitch pattern in the round. Try out this lovely shells and cables lace stitch in the Shells and Cables Market Bag.

This content is protected by copyright. See this Terms of Use / Copyright page for more information.
This post contains sponsored content and/or affiliate links. If you click an affiliate link and make a purchase, I may get a commission.
Bag Along CAL
The shells and cables lace stitch makes the main section of the Shells and Cables Market Bag pattern. You can find the full written instructions for the bag in that pattern.
This is the fourth of 6 bag patterns in the 2022 Bag Along CAL. See the full schedule and learn how to join in the fun, in the main Bag Along CAL post.
Shells and Cables Stitch Chart
As the chart version shows, the pattern is a repeat of 6 stitches, and a repeat of 2 rounds. The grayed-out stitches in the chart show how the start and end of each round meet.
The first round of single crochet is just a foundation round, and the shells and cables pattern starts with round 1. The foundation round does not have to be single crochet. Round 1 can be worked into any stitch, or into chains.
Notice that no round has both shells and cables. The shells are all on the odd-numbered rounds, and the cables are on the even-numbered rounds.
Shells
Each shell is (2 dc, ch 1, 2 dc) in the same stitch. Starting the round with the 2nd dc of a shell leaves you in the right place to start the next round.

Cables
The cables build on each other, so the first cable round is a set up row. On the first cable round, the cable is a pair of crossed dc stitches. Skip a sp and a st, dc in the next sp, ch 1, dc in the first skipped sp.
For all future cable rounds, the cable is a pair of crossed fptr stitches. Fptr in the last st of the cross below, ch 1, fptr in the first st of the cross below.

Shells and Cables Lace Stitch Written Pattern:
Rnd 1: Ch 4 (counts as dc and ch-1), 2 dc in first st, ch 1, sk next 2 sts, sc in next st, ch 1, sk next 2 sts, [shell in next st, ch 1, sk next 2 sts, sc in next st, ch 1, sk next 2 sts] around, dc in same st as beginning of rnd to complete first shell, join with sl st to first dc.
Rnd 2: Sl st in first ch-1 sp, ch 1, sc in same sp, ch 2, sk next 2 dc, dc cross, ch 2, [sc in next shell, ch 2, dc cross, ch 2] around to last 2 dc, sk last 2 dc, join with sl st to first sc.
Rnd 3: Ch 4, 2 dc in first sc, ch 1, sk next ch-2 sp, sc in next cross, ch 1, sk next ch-2 sp, [shell in next sc, ch 1, sk next ch-2 sp, sc in next cross, ch 1, sk next ch-2 sp] around, dc in same st as beginning of rnd to complete first shell, join with sl st to first dc.
Rnd 4: Sl st in first ch-1 sp, ch 1, sc in same sp, ch 2, sk next 2 dc, fptr cross, ch 2, [sc in next shell, ch 2, fptr cross, ch 2] around to last 2 dc, sk last 2 dc, join with sl st to first sc.
Shells and Cables Lace Stitch Video Tutorial
Share this tutorial on Pinterest! Here’s an image perfect for pinning:

Rate this Shells and Cables Lace Stitch Tutorial!
Do you want the best of Stitches n Scraps delivered right to your inbox? Don’t miss a stitch – Subscribe now!

Circular Bag Lining Tutorial
You can sew a zippered lining for a circular bag. It’s easier than you think! Let me show you how in this tutorial. This circular bag lining is part of my Crochet Mandala Bag Pattern but can be adapted for any bag with a similar construction.

This content is protected by copyright. See this Terms of Use / Copyright page for more information.
This post contains sponsored content and/or affiliate links. If you click an affiliate link and make a purchase, I may get a commission.
Bag Along CAL
The layered flower mandala is part of this Crochet Mandala Bag Pattern. You can find the full written instructions for the bag and the lining in that pattern.
This is the third of 6 bag patterns in the 2022 Bag Along CAL. See the full schedule and learn how to join in the fun, in the main Bag Along CAL post.
Overall Construction
Just like the bag, this lining is made up of 3 main pieces. Two circles are the front and the back of the bag. A thin, side strip connects the circles and gives the bag its depth.

To make the lining, first we attach the zipper to the side strip. Then we sew the strip around the edge of the front and back pieces, one at a time.
Zipper and Side Strip
The width of the side strip determines the depth of the bag. For this bag, I simply matched the width of the zipper tape.

If you want a deeper bag, you can sew additional fabric to each side of the zipper to add width. Then cut the side strip to match the overall width of your zipper and additional fabric.
Take it slow
Curved edges take patience to sew. Because we’re sewing at right angles, there’s no need to notch the fabric. But it’s still important to go slowly and make sure you’re not accidentally pinching the fabric into pleats.
Other shapes
Your bag and lining do not have to be circular. Use this technique to line any bag that has a matching front and back, connected by a side strip!
Circular Bag Lining Tutorial
Share this tutorial on Pinterest! Here’s an image perfect for pinning:

Rate this Circular Bag Lining Tutorial!
Do you want the best of Stitches n Scraps delivered right to your inbox? Don’t miss a stitch – Subscribe now!

Happy Lemon Softie Tutorial
Add a little happiness to your day with this adorable Happy Lemon Softie! In this tutorial, I’ll take you through the whole pattern, step-by-step. Get the free written pattern, and follow along!

This content is protected by copyright. See this Terms of Use / Copyright page for more information.
This post contains sponsored content and/or affiliate links. If you click an affiliate link and make a purchase, I may get a commission.
Lemon amigurumi crochet pattern
This Happy Lemon Softie crochet tutorial goes along with this Lemon Amigurumi Crochet Pattern. You may find it helpful to reference the pattern as you watch the video.

The pattern has all the written instructions for each round, stitch counts, notes, and other details.
Featured in this video: Fairfield Poly-Fil and Poly Pellets
Fairfield provided the Poly-Fil stuffing and Poly Pellets that I used in this video. I chose Ultra Plush Poly-Fil for a super squishy and smooth finish.

The Poly Pellets are an optional way to add a bit of weight to your lemon. Just a tablespoon or so in the very bottom will make your lemon hang nice and straight.

In the video you’ll see how I wrapped the pellets in a stocking to keep them from falling through the stitches.
Happy Lemon Softie video tutorial
Want to jump to a specific section? Click on the timestamp below to be taken to that spot in the video! These links open on YouTube, in a new window or tab.
Share this Happy Lemon Softie crochet tutorial on Pinterest! Here’s an image perfect for pinning:

Rate this amigurumi crochet tutorial video!
Do you want the best of Stitches n Scraps delivered right to your inbox? Don’t miss a stitch – Subscribe now!

Layered Flower Mandala Tutorial
Two layers of petals weave in and out of each other, coming together at the end with a circular border. Wall decoration, trivet, or part of a bag, use this layered flower mandala just about anywhere!

This content is protected by copyright. See this Terms of Use / Copyright page for more information.
This post contains sponsored content and/or affiliate links. If you click an affiliate link and make a purchase, I may get a commission.
Bag Along CAL
The layered flower mandala is part of this Crochet Mandala Bag Pattern, and you can find the full written instructions for the mandala there.
This is the third of 6 bag patterns in the 2022 Bag Along CAL. See the full schedule and learn how to join in the fun, in the main Bag Along CAL post.
Featured in this tutorial – Knit Picks Brava Bulky yarn
WeCrochet provided the Brava Bulky yarn that I used for the mandala bag design. This thick, acrylic yarn is light and lofty so it works up fast without weighing you down!

In the video, you will see the colors Brindle (brown), Solstice Heather (dark blue), and Denim (light blue).
Mandalas Everywhere
There are so many uses for crochet circles! This layered flower mandala is nice and thick because of the layers, so it makes a fabulous trivet. You can also use it as a decorative doily, part of a blanket, or half of a circular pillow.
Sew it onto a slightly larger embroidery hoop, and it makes a great wall hanging too! To do this, use a long piece of coordinating yarn or thread and whipstitch around both the hoop and the mandala. Make evenly spaced stitches all the way around, making sure the mandala stays centered. Here’s a great tutorial showing the same technique, with a different mandala.
Stitch Markers Matter
There are a lot of stitch markers in this pattern, and it’s important not to skip them. Stitches and spaces that are easy to find when you make them sometimes get much harder to find when you have 2 layers to work with.

I’ve mainly used stitch markers to mark stitches and spaces that I had a hard time finding on my first time through the design.
Third Loops
In addition to the normal front and back loops, half double crochet stitches have an extra, third loop. Working into this loop is a great way to add ridges and texture.

Check out this tutorial for a closer look at working into the third loops of hdc stitches.
Follow Along
The video works through the entire layered flower mandala, round by round. This mandala is part of the larger, Crochet Mandala Bag pattern.

For detailed written instructions, including stitch counts, follow along with the written pattern.
Layered Flower Mandala Video Tutorial
Share this tutorial on Pinterest! Here’s an image perfect for pinning:

Rate this Layered Flower Mandala video!
Do you want the best of Stitches n Scraps delivered right to your inbox? Don’t miss a stitch – Subscribe now!

Tapestry Crochet in the Round (Back Loops)
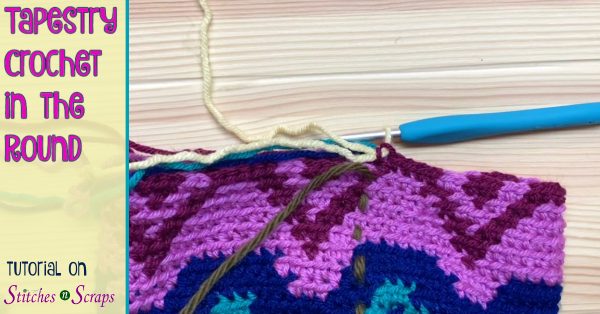
Create stunning, geometric designs with 2 or more colors! Learn how to work tapestry crochet in the round, using the back loops of your stitches.

This content is protected by copyright. See this Terms of Use / Copyright page for more information.
This post contains sponsored content and/or affiliate links. If you click an affiliate link and make a purchase, I may get a commission.
Bag Along CAL
The design shown in this video is the Tapestry Crochet Project Bag. This is the second of 6 bag patterns in the 2022 Bag Along CAL. See the full schedule and learn how to join in the fun, in the main Bag Along CAL post.

Featured in this tutorial – Knit Picks Brava Minis yarn
WeCrochet provided the Brava Minis yarn that I used for the project bag design. This is the same Brava yarn you know and love, but in mini skeins perfect for colorwork!

In the video, you will see the colors Custard, Lady Slipper, Fairy Tale, Marina, and Celestial.
Tapestry Crochet in the Round
Use the same techniques for other projects too! Any tapestry crochet colorwork design can be worked in the round this way. For a smaller, practice project, try this glasses case.
These designs use 2 colors at time, but you can also use the same technique with more colors!
Shifting rounds
Because of the way crochet stitches come together, working in the round without turning creates a natural shifting or spiraling effect. The start of the round shifts by half a stitch each round. See this post for a closer look at why continuous rounds shift. We need to counteract this shift in some way so that our design will line up straight.
Flat Circle
In a previous tutorial, we worked a flat circle for the bottom of this bag. Strategically placed increases shifted the design in the opposite direction and countered the shifting rounds.
For this tutorial, we don’t have increases to work with. But we can change the placement of our stitches instead.
Back Loops Only
Working into the back loops only, instead of both loops, makes the posts of the stitches line up much more closely. This eliminates the normal shift from working in the round.
Check out this tutorial for a closer look at the front and back loops of crochet stitches.
Reading the Chart
Charts are a great way to visualize the tapestry crochet design and see how it comes together.
Follow Along
In the video, we’ll take several minutes to go over the chart. Then as we work through the rounds, I’ve added the relevant chart section at the top of the video, so you can follow along.

If it’s too small in the video, you can see a larger chart image in the Tapestry Crochet Project Bag pattern. The pattern includes full written instructions for the whole bag, including the bottom circle.
2 chart versions
I’ve included 2 versions of the chart in the pattern. One is in color, showing each stitch in its indicated color. But that’s hard to see for some, and impossible to print on a black and white printer. So I also included the black and white version that you will see in the video.
All single crochet
Every stitch on this chart is a single crochet in the back loop only. To work the pattern, simply single crochet in the back loop only of the indicated stitch, in the indicated color.

2 colors at a time
Each round of this tapestry crochet pattern uses 2 colors. When working any stitch, always work over the yarn of the opposite color, so that it gets trapped or carried within the stitch.
If you are using more than 2 colors, work over all the unused colors at once. Keep in mind this will make your fabric thicker and more dense.
Running Stitch Marker
When working in continuous rounds, it’s always a good idea to mark the first stitch of each round. You can do this with a traditional stitch marker, or you can use a scrap of yarn as a running stitch marker.
I show the running stitch marker in the video. See this separate running stitch marker tutorial if you’d like a closer look.
Tapestry Crochet in the Round Video Tutorial
Share this tutorial on Pinterest! Here’s an image perfect for pinning:

Rate this tapestry crochet flower circle video!
Do you want the best of Stitches n Scraps delivered right to your inbox? Don’t miss a stitch – Subscribe now!

Join Crochet Rounds Without a Slip Stitch
Slip stitch joins can leave an unsightly seam in your crochet circles. Learn how to join crochet rounds without a slip stitch, and minimize that seam!

This content is protected by copyright. See this Terms of Use / Copyright page for more information.
This post contains sponsored content and/or affiliate links. If you click an affiliate link and make a purchase, I may get a commission.
Joining crochet rounds with a slip stitch
The traditional way to join crochet rounds is to make a slip stitch into the first stitch of the round. This extra stitch makes a bit of a bump, and over several rounds that bump can be very visible.

Joining crochet rounds without a slip stitch
To eliminate that bump, we need to join without creating that extra stitch. We need to connect the working loop from the last stitch to the top of the first stitch, without any extra stitches in between.
Start by pulling your working loop up big, and then remove your hook from the loop. Now insert your hook into the first stitch of the round. You can go in either direction – back to front or front to back.

Put the working loop back on your hook, and pull it through that first stitch.

That’s it! Your round is joined and you’re ready to start your next round, with no extra slip stitch bump.
Back to front or front to back
I said you could insert your hook in either direction, but it does make a very slight difference which direction you choose.
Inserting your hook from front to back will pull the first stitch of the round ever so slightly in front of the last stitch of the round. Conversely, inserting your hook from back to front will pull the last stitch of the round slightly in front of the first stitch of the round.
In this swatch, I went back to front on rnd 2, and front to back on rnds 3 and 4. Can you tell the difference?

This difference is barely noticeable, so for most situations either option will work fine. Use whichever is more comfortable for you!
Join crochet rounds video tutorial
Share this tutorial on Pinterest! Here’s an image perfect for pinning:

Rate this crochet tutorial video!
Do you want the best of Stitches n Scraps delivered right to your inbox? Don’t miss a stitch – Subscribe now!

Tapestry Crochet Flower Circle Tutorial
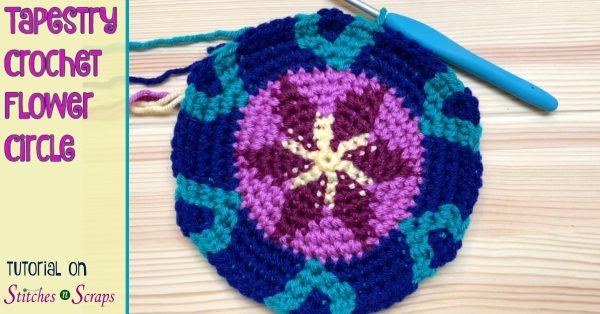
Learn how to make a 6-inch, tapestry crochet flower circle! Use it as the base of a bag or basket, or on its own as a trivet or doily. You can even make just the center for a set of coasters!

This content is protected by copyright. See this Terms of Use / Copyright page for more information.
This post contains sponsored content and/or affiliate links. If you click an affiliate link and make a purchase, I may get a commission.
Bag Along CAL
The flower circle design shown in this video is the bottom of the Tapestry Crochet Project Bag. This is the second of 6 bag patterns in the 2022 Bag Along CAL. See the full schedule and learn how to join in the fun, in the main Bag Along CAL post.

Featured in this tutorial – Knit Picks Brava Minis yarn
WeCrochet provided the Brava Minis yarn that I used for the project bag design. This is the same Brava yarn you know and love, but in mini skeins perfect for colorwork!

In the video, you will see the colors Custard, Lady Slipper, Fairy Tale, Marina, and Celestial.
Tapestry crochet in a flat circle
There are a few things to consider when designing a flat circle in tapestry crochet.
Make it flat
First, it needs to make a flat circle. Each round has to have the right number of increases (6, for single crochet) to make the circle grow without curling or flaring.
Shifting rounds
Second, it has to make the colorwork design, preferably without too much distortion. We’re working in the round without turning. Because of the way crochet stitches come together, this creates a natural shifting or spiraling effect. The start of the round shifts by half a stitch each round. See this post for a closer look.

Increases to the rescue!
By placing the increases strategically, we can make the design lean back in the opposite direction. This at least partially counteracts the shifting rounds.
In other tapestry crochet shapes and projects that don’t have the increases, we can change where we place the stitches for a similar effect. But that’s a story for a different tutorial!
Reading the Chart
Charts are a great way to visualize the tapestry crochet design and see how it comes together.
Follow Along
In the video, we’ll take the first few minutes to go over the chart. Then for each round, I’ve added the relevant chart section in the corner of the video, so you can follow along.

If it’s too small in the video, you can see a larger chart image in the Tapestry Crochet Project Bag pattern. The pattern includes full written instructions for this circle and the whole bag as well.
2 chart versions
I’ve included 2 versions of the chart in the pattern. One is in color, showing each stitch in its indicated color. But that’s hard to see for some, and impossible to print on a black and white printer. So I also included a black and white version. In this version, each stitch has a circle on top of it, indicating the color for that stitch.
All single crochet
Every stitch on this chart is a single crochet. It’s either 1 single crochet into 1 stitch, or 2 single crochet into the same stitch (for the increases). To work the pattern, simply single crochet in the indicated stitch and in the indicated color.

Sometimes this will mean working one single crochet in one color, and another single crochet in the other color, both into the same stitch.
2 colors at a time
With the exception of rnd 1, each rnd has 2 colors. When working any stitch, always work over the yarn of the opposite color, so that it gets trapped or carried within the stitch.

Tapestry Crochet Flower Circle Video Tutorial
Share this tutorial on Pinterest! Here’s an image perfect for pinning:

Rate this tapestry crochet flower circle video!
Do you want the best of Stitches n Scraps delivered right to your inbox? Don’t miss a stitch – Subscribe now!

Starry Skies Scarf Crochet Tutorial
The Starry Skies scarf is a perfect transitional accessory for spring or fall. The lacy, diamond design is open and lightweight, and the pattern includes 3 different size options. Learn how to make it as a cowl, infinity scarf, or full-length scarf, in this step-by-step crochet tutorial. Get the free written pattern, and follow along!

This content is protected by copyright. See this Terms of Use / Copyright page for more information.
This post contains sponsored content and/or affiliate links. If you click an affiliate link and make a purchase, I may get a commission.
Starry Skies Scarf crochet pattern
This scarf crochet tutorial goes along with the Starry Skies written pattern. You may find it helpful to reference the pattern as you watch the video.

The pattern includes all the charts shown in the video, plus written instructions for each row, stitch and repeat counts, notes, and other pattern details.
Starry Skies Scarf video tutorial
Want to jump to a specific section? Click on the timestamp below to be taken to that spot in the video! These links open on YouTube, in a new window or tab.
Share this Starry Skies scarf crochet tutorial on Pinterest! Here’s an image perfect for pinning:

Rate this scarf crochet tutorial video!
Do you want the best of Stitches n Scraps delivered right to your inbox? Don’t miss a stitch – Subscribe now!

Mattress Stitch Crochet Side Edges – Seaming Tutorial
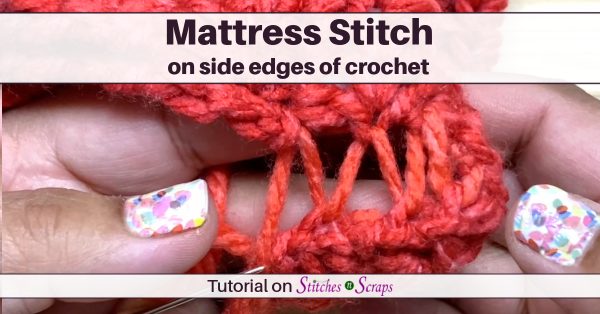
Many methods of seaming crochet, particularly along the sides of the rows, can create a visible seam or bulky ridge. Learn how to mattress stitch crochet side edges together for a nearly invisible seam!

This content is protected by copyright. See this Terms of Use / Copyright page for more information.
This post contains sponsored content and/or affiliate links. If you click an affiliate link and make a purchase, I may get a commission.
When mattress stitch is useful
I find mattress stitch particularly useful for stuffed items. When you get the last seam on a pillow, or in a lot of places on amigurumi, you can’t really turn your work inside out to sew the seam.
Since you work mattress stitch from the right side of your fabric, there’s no need to access the inside.
Textured Stripes Pillow
I used this technique in my Textured Stripes Pillow pattern. I first grafted the top and bottom ends of a rectangle together to make a seamless tube. Then I used mattress stitch to sew the side edges closed.

Side to side
In this tutorial, we’re specifically looking at how to mattress stitch two crochet side edges together.

You can also use mattress stitch on top and bottom edges, or even to join a top or bottom edge to a side edge. The technique is similar, but the loops you pick up will be different depending on the edge you are working with.
Nearly invisible
Mattress stitch creates a nearly invisible seam, particularly when working with a solid color. The pillow I’m working with has color changes, so there are parts where you can see the stitching a bit if you look for it. But it’s still pretty close to invisible!

The seam pulls the two crochet side edges together so they butt up against each other without truly overlapping. This means there’s no bulky ridge.
How to mattress stitch crochet side edges together
Cut a piece of yarn at least twice the length of your seam and join it at one corner. Then line up your two side edges. Placing stitch markers at even intervals along the edge can help you to keep your seam even all the way across.

Zig zag stitches
Starting from either side, choose one loop very close to the side edge. Look for a loop that is small and resting towards the wrong side of the fabric if possible.

Sew through this loop. You can choose to go either from the outside (top) to the inside (bottom) of your fabric, or from the inside to the outside.

Now make a similar stitch on the opposite side edge. Go in the same direction (outside to inside or inside to outside) that you did for the first stitch.
Continue making stitches, always in the same direction, alternating from one side edge to the other. After a few stitches, you’ll see a zig zag seam forming.

Straightening the seam
This is where the magic happens! Pull the seam taught so that zig zag turns into a straight line. As it does, it will bring the two side edges together.

Depending on the length of your seam, you can do this every few stitches, or wait and do it at the end. Be careful not to pull so tightly that you create gathers or ruffles, or even snap your yarn.

Gently ease more yarn into any tight areas before you weave in your tail.
Mattress stitch for crochet side edges video tutorial
Seam Strength
At the end of this mattress stitch process, you have just one straight line of yarn pulling the two side edges of crochet together. That one piece of yarn needs to hold up to whatever strain is going to be put on the seam.
For a throw pillow in this bulky, acrylic yarn, it’s more than strong enough. If I was using a particularly delicate or fragile yarn, I might choose a bulkier seam like whipstitch. The same holds true for objects that take a lot of abuse, like a child’s toy or a market bag.
If you really want to use a mattress stitch seam in these situations, try using 2 strands of yarn held together, sewing into 2 loops at a time instead of one, and/or making your stitches closer together.

Rate this mattress stitch for crochet side edges tutorial video!
Do you want the best of Stitches n Scraps delivered right to your inbox? Don’t miss a stitch – Subscribe now!


