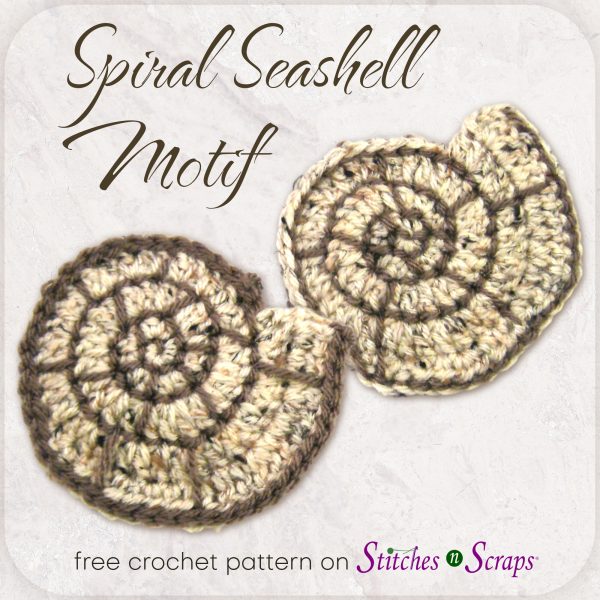
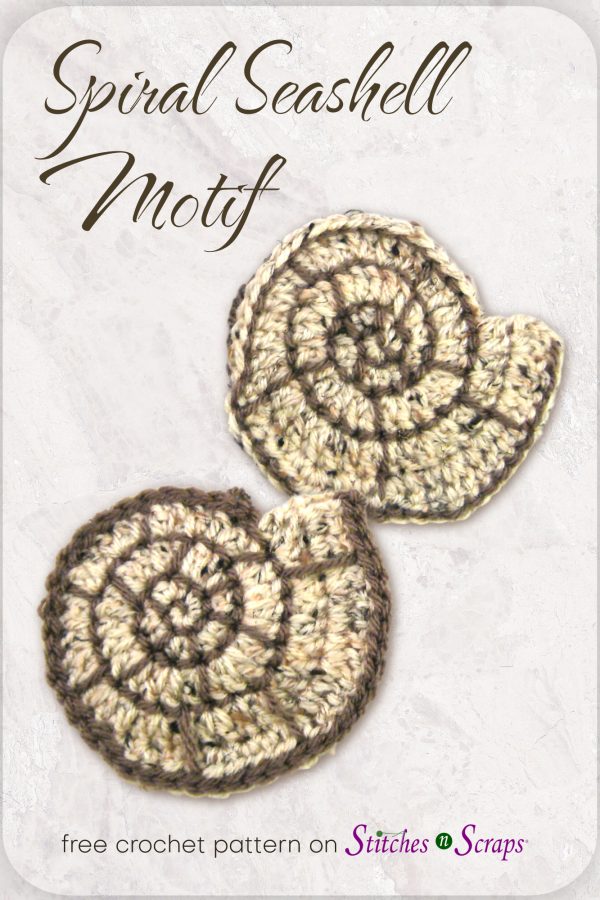
Spiral Seashell Motif Crochet Pattern
This quick and easy seashell motif crochet pattern offers two edging options for different uses. Use it as a coaster, an appliqué, or even a pocket. Get the whole set with patterns for a square and a bag based on this motif!
This content is protected by copyright. See this Terms of Use / Copyright page for more information.
This post contains sponsored content and/or affiliate links. If you click an affiliate link and make a purchase, I may get a commission.
Two Edging Options
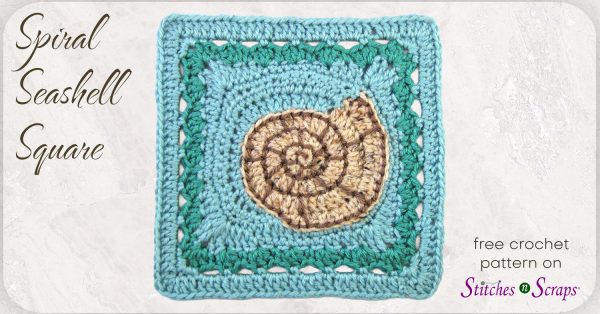
I’ve used this versatile, seashell motif crochet pattern as a starting point for both a blanket square and a bag. Each of the 2 edging options works well for a different application.
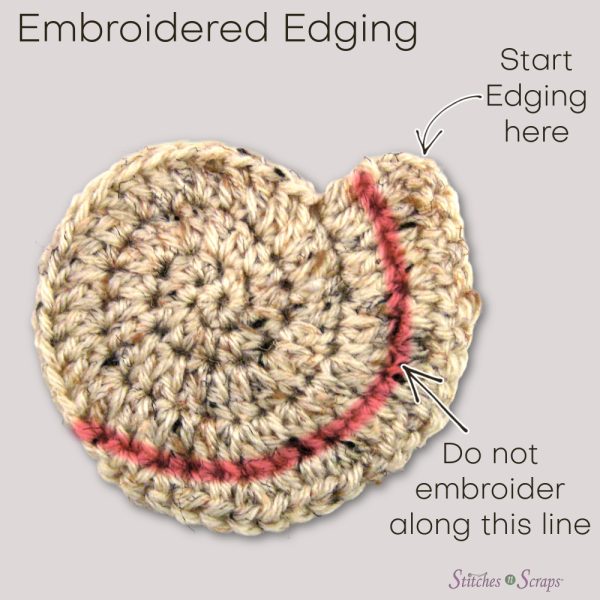
Sewn Edging
The lighter, embroidered edging leaves the last row of stitches exposed, so you can easily crochet into them. Using this option, the seashell motif becomes the center of the Spiral Seashell Square.
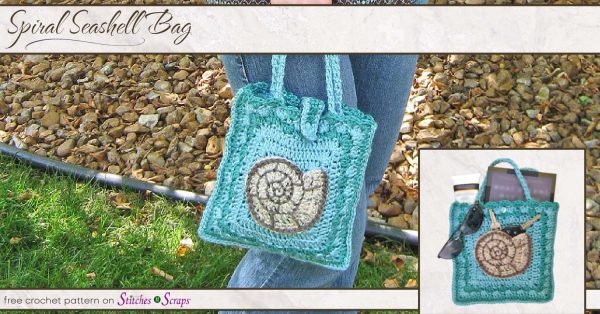
In the same way, the back panel of the Spiral Seashell Bag begins with a slightly modified version of this seashell crochet motif.
Crochet Edging
The thicker, crocheted edging gives a nice finish to the outside edge of the seashell motif. This is perfect for a stand-alone shell or to use the motif as an appliqué. On the front of the Spiral Seashell Bag, the stand-alone motif becomes a pocket!


Materials
- Yarn: Lion Brand Vanna’s Choice – worsted/medium weight yarn
- 12 yds 400D Oatmeal (A) – 92% acrylic, 8% rayon (145 yds / 3 oz / 85 g per skein)
- 5 yds 125B Taupe (B) – 100% acrylic (170 yds / 3.5 oz / 100 g per skein)
- Hook: Size H / 5 mm crochet hook or size needed to match gauge
- Notions:
- Scissors
- Tapestry Needle
- Stitch Markers (2)
Project Level
Easy: Magic circle, continuous rounds, some embroidery.
Size / Gauge
Use shell motif as gauge swatch.
Motif measures approximately 4.25 inches / 10.5 cm at widest point before edging.
Abbreviations used
This pattern uses US terms.
- ch = chain
- dc = double crochet
- hdc = half double crochet
- rnd = round
- RS = right side
- sc = single crochet
- sl st = slip stitch
- st(s) = stitch(es)
- WS = wrong side
Recommended Resources
Instructions
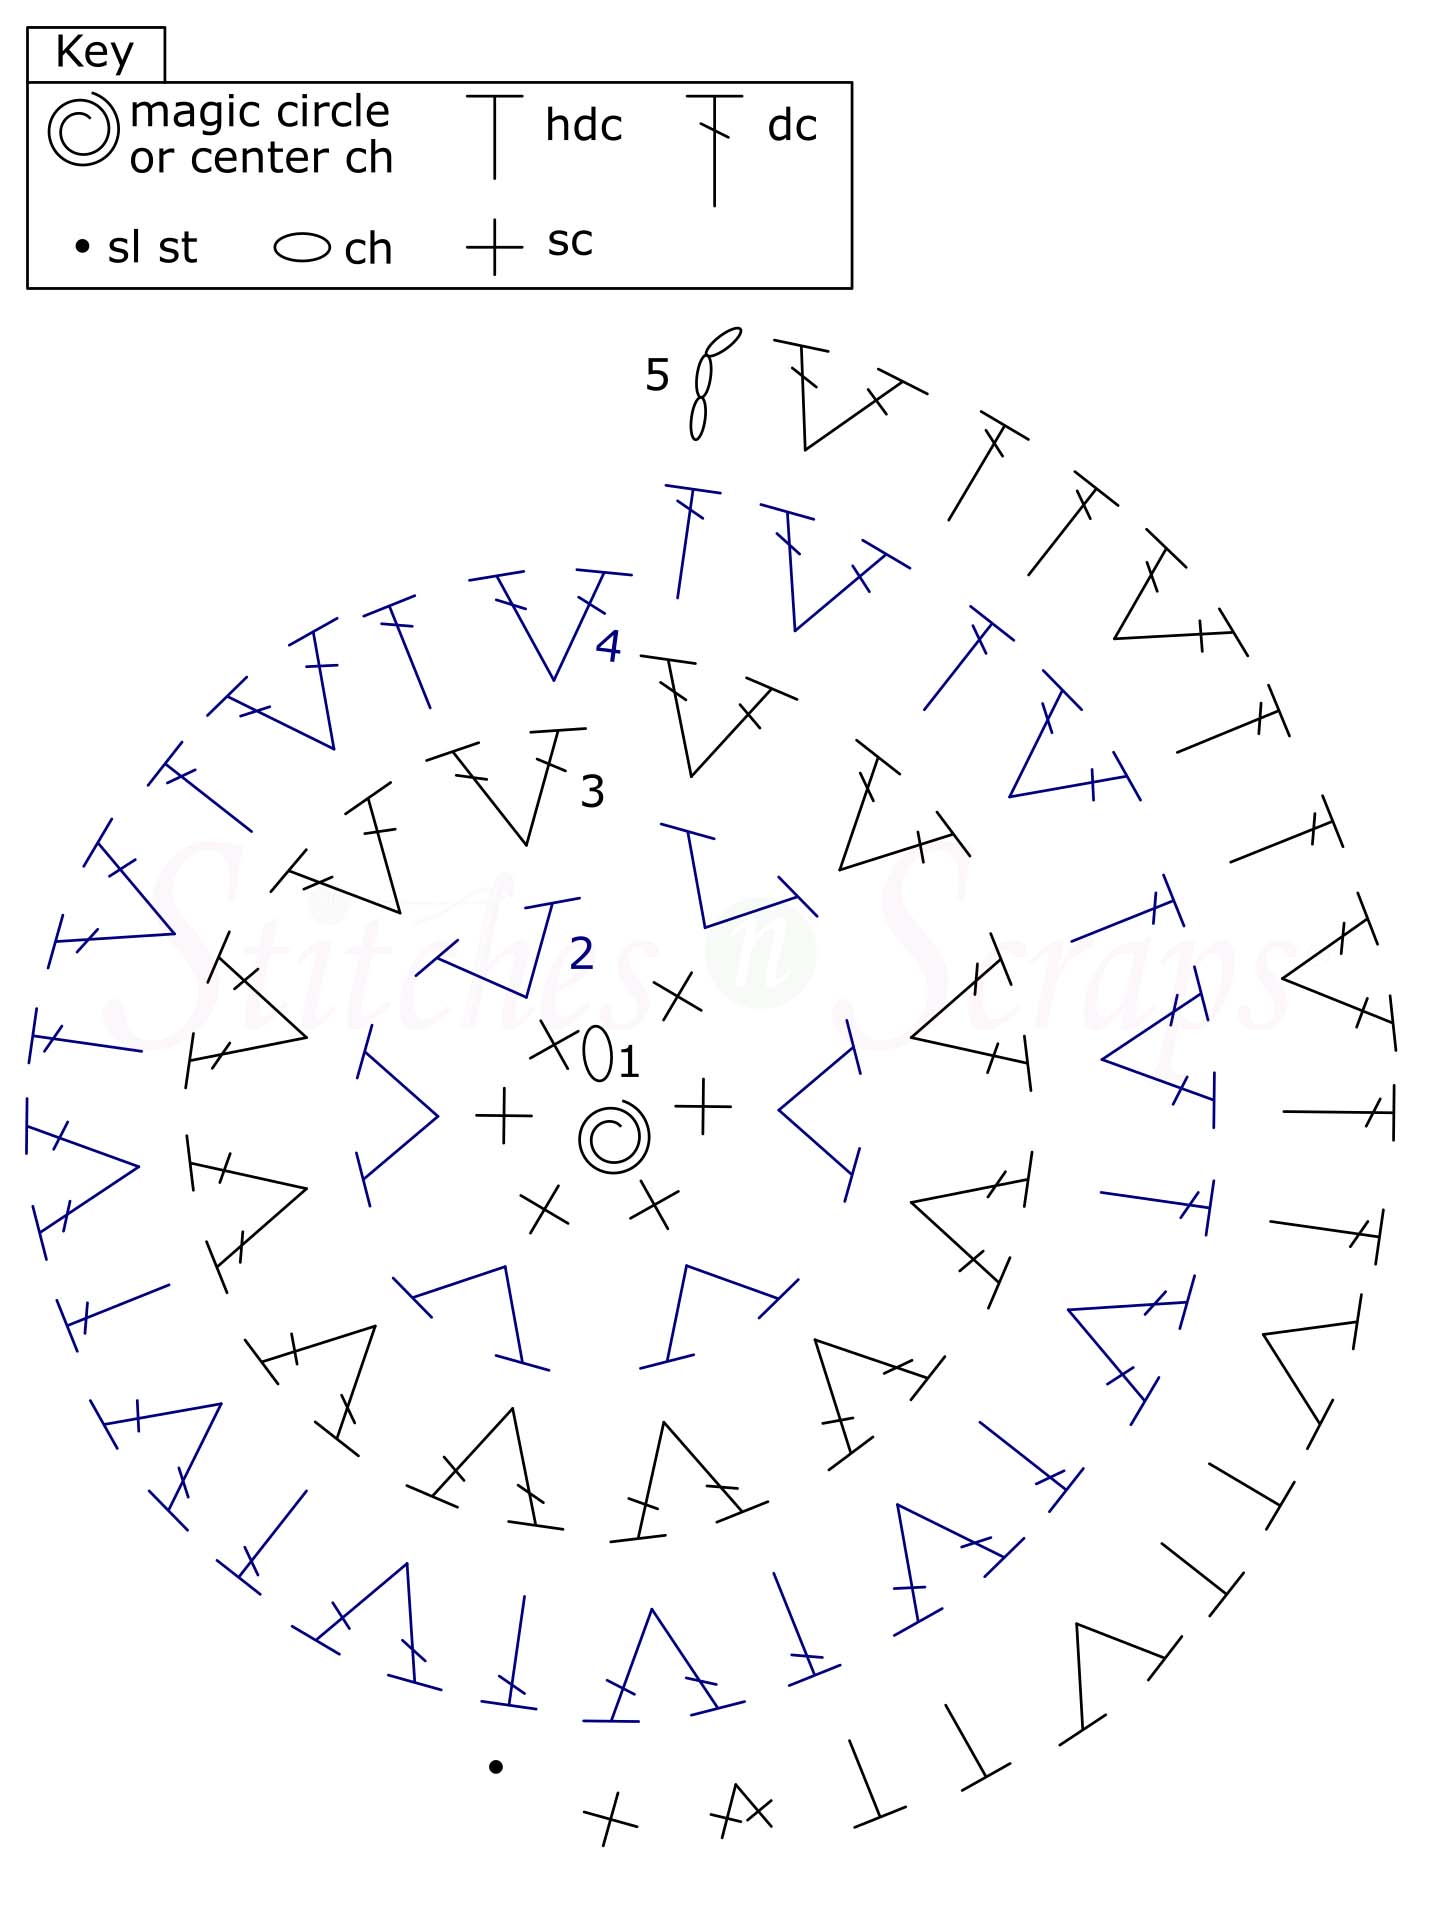
Shell:
Most of shell is worked in continuous rnds. Do not join or turn unless specifically indicated. Mark first st of each rnd.
With A, ch 2 or make a magic circle and ch 1.
Rnd 1 (RS): 6 sc in 2nd ch from hook or in magic circle, pull tail to close magic circle if used. (6 sc)
Rnd 2: 2 hdc in each st around. (12 hdc)
Rnd 3: 2 dc in each st around. (24 dc)
Rnd 4: [2 dc in next st, dc in next st] around. (36 dc)
Row 5 (WS): Ch 3 (counts as first dc), turn, [2 dc in next st, dc in next 2 sts] 3 times, [2 hdc in next st, hdc in next 2 sts] twice, 2 sc in next st, sc in next st, sl st in next st, leave remaining 19 sts unworked. Fasten off. (13 dc, 8 hdc, 3 sc)
Shell Chart
Edging
Option 1: Crocheted Edging
Rnd 6 (RS): With RS facing, join B with sl st in st at base of last st of Rnd 4. Sl st in each st around. Fasten off.
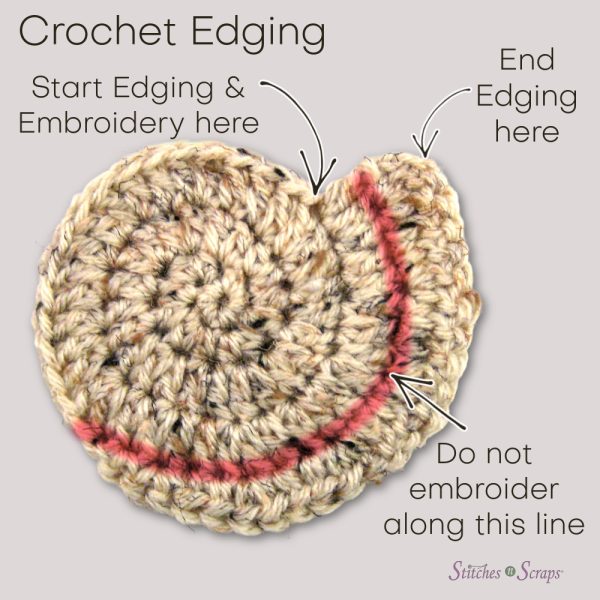
Embroidery: With yarn needle and B, embroider spiral detail. Start at first stitch of Edging Rnd and work inwards along spiral pattern between rnds. Do not embroider along the line between Rnd 4 and Row 5. Working outwards again, add the perpendicular lines, increasing the space between them as you go. Weave in all loose ends.
Option 2: Embroidered edging
With yarn needle and B, embroider edging and spiral detail. Start at top of the first stitch of Row 5, work inwards, stitching just under the tops of sts of Row 5, then under tops of unworked sts of Rnd 4, and finally along spiral pattern between rnds. Do not embroider along the line between Rnd 4 and Row 5. Working outwards again, add the perpendicular lines, increasing the space between them as you go. Weave in all ends.
Share this Spiral Seashell Motif crochet pattern on Pinterest!
Here’s an image perfect for pinning.
Rate this Spiral Seashell Motif crochet pattern!
I hope you enjoy this Spiral Seashell Motif crochet pattern. A downloadable pdf of this pattern is available on Ravelry for a small fee. The fee for the pdf format offsets the advertising revenue lost when you print or download the pattern rather than viewing it online.
Do you want the best of Stitches n Scraps delivered right to your inbox? Don’t miss a stitch – Subscribe now!


You May Also Like

Spiral Seashell Square Crochet Pattern
Striped Crochet Cowl – Bandy Cowl
9 Comments
Pingback:
Pingback:
Pingback:
Netagene
I accidentally found your seashell pattern, and sent the link to two friends who wear CIs (cochlear implants) because they are extremely hard of hearing so that regular HAs no longer help. I wear two HAs since 2005 and have been high partial legally blind since 2003. But that shell is so much like a cochlea shell! Thanks! I’ve been crocheting 60+ years.
Pia Thadani
I’m glad you like it! Thanks for passing on the link 🙂
Sonia
Hello! Thanks for the pattern. I would like to know how to continue this pattern for a really large shell motif. What is the proper rate of increase to keep going? Can you use even taller stitches as you progress? How can this be done?
Thank you!
Pia Thadani
That’s hard to answer because it would be largely trial and error to get the increases right. Generally the taller the rounds get, the more increases you would need to do per round. Adding really tall stitches would make the fabric a lot more flexible and less solid / stiff. Theoretically, if you used linked stitches, that would allow you to use taller and taller stitches while still keeping it more solid. I used the short row at the end instead, partly for this reason.
Cortez Grundmeier
this is really stunning! Thanks!
Susan Adams
I like this spiral shell pattern a lot. Going to see if I can make a bigger one, with double garden twine strands, for a little rug. IF I do, I’ll send a photo.