Rosette Stitch Knitting Tutorial – Left and Right Handed
Learn how to knit the rosette stitch! This lovely, textured stitch is easier than it looks. The simple, 4-row repeat works over any number of stitches.

This post contains sponsored content and/or affiliate links. If you click an affiliate link and make a purchase, I may get a commission.
Any Stitch Count
Rosette stitch works with stitches in pairs, so some tutorials suggest an odd or an even number of stitches. But you can actually do it either way! The pattern rows are offset by 1 stitch. This means that regardless of the stitch count, you will sometimes have an extra stitch at the end of the row. When you have an extra stitch, just knit it.
Making Rosettes (r)
Each rosette (r) is a combination of two decreases. First, working over 2 stitches, bring the yarn to the front and work a normal purl 2 together decrease (p2tog) over the next 2 stitches, but do not take those stitches off the needle.


If we stopped here we would have decreased by one stitch, but we don’t want to do that. We want to work into the same 2 stitches again, which is why we left them on the needle.
Next, bring the yarn to the back, and work a knit 2 together (k2tog) into the same stitch. We are done working those stitches, so now we can take them off the needle.
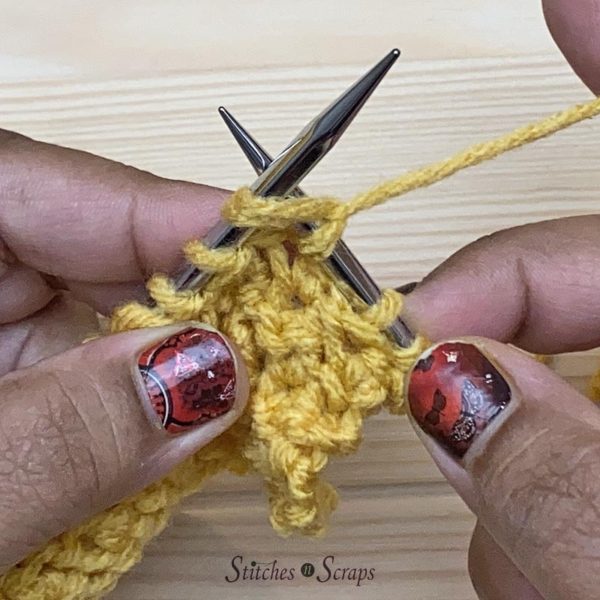
We have now worked into two stitches together, but have done it twice, creating 2 new stitches to keep the stitch count the same.
r = p2tog without removing the stitches, k2tog into the same 2 stitches and remove them.
4 Row Repeat
The full stitch pattern is a 4 row repeat. Rows 1 and 3 are right side rows. Knit these rows all the way across. Rows 2 and 4 are wrong side rows, and have the rosettes.
Row 1 (RS): K
Row 2: K 1, r across, (if there is an extra stitch at the end, k 1)
Row 3: K
Row 4: R across, (if there is an extra stitch at the end, k 1)
Notice that on row 2, we start with a k 1, and on row 4 we do not. This offsets the pattern by one stitch. If you are working with an even number of stitches, you will have an extra knit stitch at the end of row 2. If you are working with an odd number of stitches, you will have an extra knit stitch at the end of row 4.

Rosette Stitch Video Tutorial – Right Handed
Rosette Stitch Video Tutorial – Left Handed
Try it Out!
Ready to give it a try? Check out this scrunchie pattern!

Rate this Knitting Tutorial
Do you want the best of Stitches n Scraps delivered right to your inbox? The Stitches n Scraps email newsletter includes highlights from the blog as well as special features not available elsewhere. Don’t miss a stitch – Subscribe now!


You May Also Like

Swiss Cross – Mosaic Sampler Blanket MKAL Section 2

Scrappy Stitchers Link Party #29