Knitting Seams – How to Seam the Unbiased Pillow
The Unbiased pillow pattern has an unusual construction. It is knit on the bias (diagonally) and seamed diagonally as well. Those diagonal knitting seams are a design feature of the pillow, so they need to be neat and even. Learn how to create beautiful seams for your Unbiased Pillow in this photo and video tutorial!

This content is protected by copyright. See this Terms of Use / Copyright page for more information.
The seaming techniques I used for this pattern are similar to invisible knitting seams. In general, work back and forth, 1 stitch on 1 side, then 1 stitch on the other. This will create a zig-zag seam that looks like lacing a shoelace.
When you finish a section, pull on your seaming yarn to close the seam. The seam will flatten out, and the seaming yarn will all but disappear! Make sure your seams are snug, but not so tight that they pucker.

3 Types of Knitting Seams
Because of the striping pattern, there are three different types of seams to consider: stockinette to stockinette, garter to garter, and stockinette to garter. Let’s look at each.
Stockinette to Stockinette
The edges of the pillow have a 1-stitch, garter stitch selvedge, followed by either an increase or a decrease. For the stockinette sections, we’ll be working into that increase or decrease. On the increase sides, you’ll just see a diagonal line.
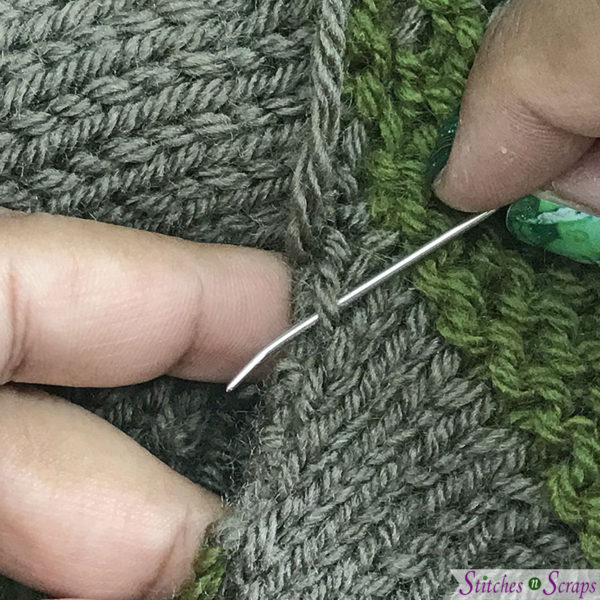
On the decrease side, you’ll see a V-shaped stitch. Work into the inside edge of this stitch (away from the garter stitch selvedge).
In both cases, always insert your needle so that it points towards the seam.
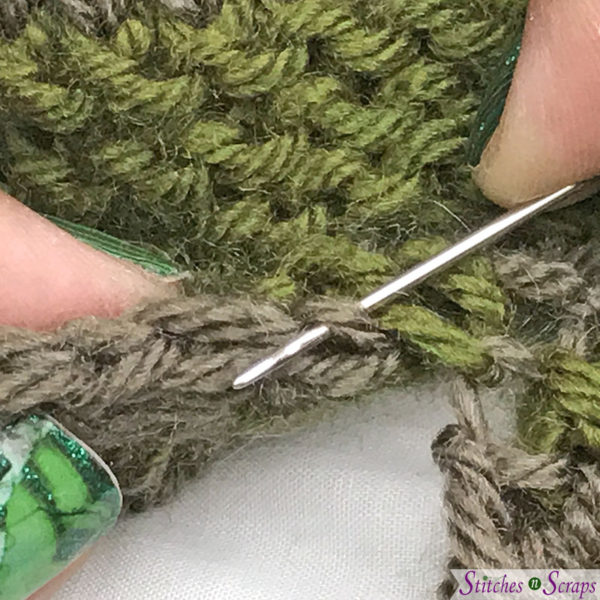
Garter to Garter
Each garter stitch ridge has 2 rows of bumps – a top and a bottom row.
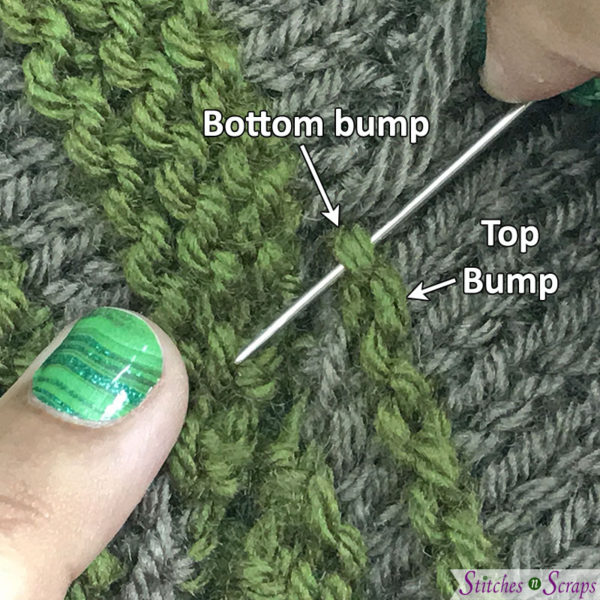
On the side that you start your seam on, insert your needle into the top bump. On the other side, work into the bottom bump. In both cases, insert the needle from top to bottom. In other words, from the seam you’ve already worked towards the open stitches that still need to be seamed.
Stockinette to Garter
The stockinette to garter seams are a combination of both of the above knitting seams. Line up each garter ridge with 1 row of stockinette. Even though the garter ridges are really 2 rows, because they are more compressed and it’s only for a few rows at a time, it works out well.
When working into the stockinette stitches, work into the increase or decrease as before. When working into the garter stitches, work into the bumps as before. Remember to work into the top bumps on one side of the work, and bottom bumps on the other side.
Other Seaming Options
I chose this seam for my pillow because it’s neat and pretty, but still low profile. Since the seam is a feature of the design, you can really add your own personal touch by trying various knitting seams. For something a little showier, try crocheting the edges together with a slip stitch. A whipstitch seam in a contrasting color could also be an interesting effect. Have fun with it, and be sure to share your creations on the Scrappy Stitchers Facebook group!
Video Tutorial – Seaming the Unbiased Pillow
Rate this Knitting Seams Tutorial!


You May Also Like

Halloween Projects – 20 Patterns to Knit and Crochet

Scrappy Stitchers Link Party #27