Free Crochet Patterns
Find the perfect, free crochet pattern for your next project! Browse them all, or select a category from the dropdown menu. Where will your creativity take you today?

4 Crochet Buttons
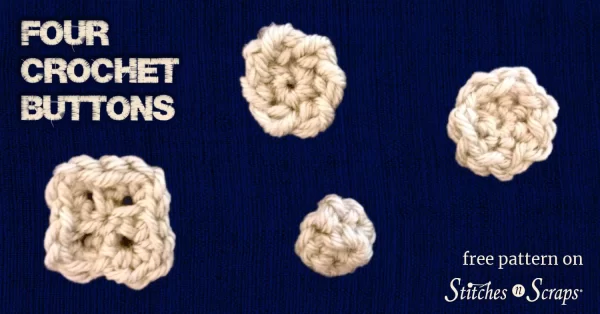
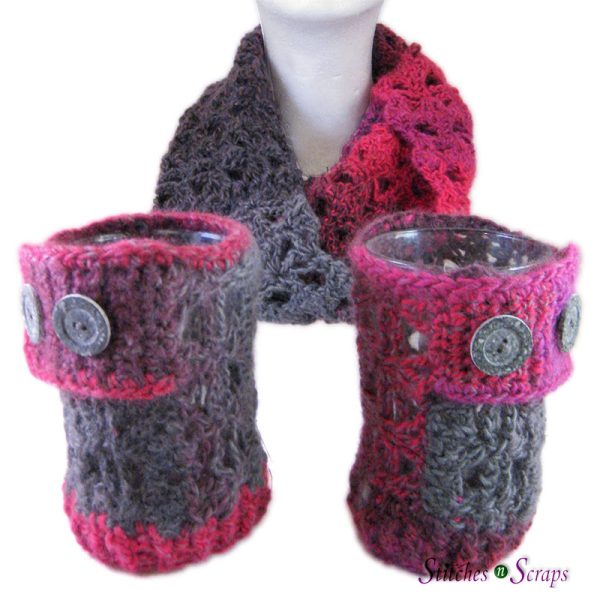
Buttons can make or break a project, and sometimes it’s hard to find just the right ones. So what do you do? Make them of course! Here are 4 crochet buttons you can make in minutes, perfect for any project.

This content is protected by copyright. See this Terms of Use / Copyright page for more information.
This post contains sponsored content and/or affiliate links. If you click an affiliate link and make a purchase, I may get a commission.
Mix or Match
Match your project perfectly by making them out of the same yarn, or use a contrasting yarn for a decorative pop. These crochet buttons are a great use of scrap yarn too. Whip a few up with leftover scraps and you’ll soon have a fabulous crochet button collection!
Materials
- Yarn: 5-10 yds worsted weight yarn
- Hook: Size I (5.5 mm) crochet hook
- Notions: Yarn needle
Project Level
Easy: Basic stitches worked in the round, crab stitch/reverse single crochet.
Size/Gauge
Buttons 1-3 are about 1″ across. Button 4 is about 1/2-3/4″ across.
Exact gauge is not critical for this project but may affect yardage needed.
Abbreviations used
This pattern uses US terms.
- ch = chain
- rev sc = reverse single crochet / crab stitch
- RS = right side
- sc = single crochet
- sc2tog =single crochet 2 stitches together
- sl st = slip stitch
- sp = space
- st(s) = stitch(es)
- WS = wrong side
Recommended Resources
Instructions
Leave long starting and/or ending tails. You can use these tails to attach the buttons to your project.
Button 1
Rnd 1 (RS): Ch 2, 6 sc in 2nd ch from hook, join with sl st in first st. (6 sc)
For a thicker button, make 2 separate pieces of rnd 1 and then work rnd 2 through both pieces together.
Rnd 2: Ch 1, working from left to right around the circle, rev sc in each st around. (6 rev sc)
Fasten off.
Use tail to sew rnd 2 closed.

Button 2:
Rnd 1 (RS): Ch 2, 6 sc in 2nd ch from hook, join with sl st in first st. (6 sc)
For a thicker button, make 2 separate pieces of rnd 1 and then work rnd 2 through both pieces together.
Rnd 2: (Ch 1, sl st) in each st around
Fasten off.

Button 3:
Rnd 1 (WS): Ch 4, sc in 4th ch from hook (skipped chs count as ch 2-sp), [ch 2, sc] 3 times in same ch, join with a sl st to first ch 2 sp. (4 sc, 4 ch-2 sps)
Rnd 2: Ch 1, turn, 2 sc in same ch-2 sp, sl st in next sc, [2 sc in next ch-2 sp, sl st in next sc] 3 times. (8 sc)
Fasten off.

Button 4:
Rnd 1 (WS): Ch 2, 6 sc in 2nd ch from hook, join with sl st in first st. (6 sc)
Rnd 2: Ch 1, turn, sc2tog in first 2 sts, [sc2tog in next 2 sts] twice. (3 sc2tog)
Fasten off.
Sew tail through each st on Rnd 2 and pull tightly to close.

Rate this crochet buttons pattern!
I hope you enjoy the pattern! Which button was your favorite?
Do you want the best of Stitches n Scraps delivered right to your inbox? Don’t miss a stitch – Subscribe now!

Free Pattern – Little Nubby Scrubbie
This textured scrubber is great for washing dishes, without scratching delicate finishes. Made with machine washable cotton, these should last a lot longer than store bought sponges.
The optional top flap makes a little pocket that you can slip your fingers into. This pattern works up quickly, so you can make a whole set in no time. Be sure to make some extras for gifts too!
This pattern is protected by copyright. Please do not distribute or share this pattern in any way other than by sharing a link to this page or to the pattern page on Ravelry. Click here for copyright information.
This pattern contains affiliate links (click for more info). If you click one of these links and then make a purchase, I may be compensated. You get the same great prices, and you will be helping to support this site!
Little Nubby Scrubbie
Add this to your Ravelry Queue
Materials:
- 25-35 yds, Worsted weight, cotton yarn (not mercerized cotton)
- Size J / 10 (6 mm) hook or size needed to obtain gauge
- Yarn or tapestry needle
Difficulty:
Easy – Basic stitches and simple construction.
Size:
Approximately 3.5 inches x 4.5 inches
Gauge:
First 7 rows of pattern should measure about 3.25 inches x 4.25 inches. Gauge is not critical for this project.
Abbreviations used:
- ch = chain
- sc = single crochet
- tr = treble crochet
- st(s) = stitch(es)
- sl st = slip stitch
- sk = skip
- sp(s) = space(s)
- RS = right side
- WS = wrong side
Recommended Resources:
Instructions:
Scrubbie:
With 2 strands of yarn held together, Ch 12. If you will be making a top flap/pocket for your fingers, leave a long tail for sewing.
Row 1 (RS): Sc in 2nd ch from hook and in each ch across. (11 sc)
Row 2: Ch 1, turn, sc in first st, (tr in next st, sc in next st) across. (6 sc, 5 tr)
Row 3: Ch 1, turn, sc in each st across.
Row 4: Ch 1, turn, sc in first 2 sts, (tr in next st, sc in next st) across to last st, sc in last st (7 sc, 4 tr)
Row 5: Repeat row 3.
Rows 6-7: Repeat rows 2-3.
Your work should now measure approximately 3.25 inches x 4.25 inches. If you do not want to make the top flap/pocket, you can fasten off now and sew in the ends. Otherwise, do not fasten off.
Top flap (optional):
Rotate work so that you are working into the sides of the stitches along the short edge.
Row 1 (RS): Ch 1, sc in each row across (7 sc)
Row 2: Ch 1, turn, sc in front loop only of each st across
Rows 3-8: Ch 1, turn, sc in each st across.Fasten off, leaving a long tail for sewing
Fold top flap over at row 2 (where you see the line of free loops from the front loop only stitches), so that right sides are together.
Use the long starting and ending tails to sew the flap into place, weaving in ends when done. Turn piece right-side-out.
I hope you enjoy the pattern – big thanks to MixedKreations & wilmalee for testing it!
A downloadable pdf of this pattern is also available in my Craftsy store, or as a on Ravelry, for a small fee. The fee for the pdf format is to offset the advertising revenue lost when you print or download the pattern rather than viewing it online.
Do you want the best of Stitches ‘N’ Scraps delivered right to your inbox? The Stitches ‘N’ Scraps email newsletter includes highlights from the blog as well as special features not available elsewhere. Don’t miss a stitch – Subscribe now!
Free Pattern – Starry Skies Boot Cuffs
These fun boot cuffs use the same stitch pattern as the Starry Skies cowl / scarf. When made with a sparkly yarn like in the original cowl / scarf pattern, the lace design can be very dressy. In the set shown here, I used a fuzzier, self striping yarn, which gives a more casual and fun look.

With ribbing on the bottom and an adjustable button band on the top, these cuffs can fit a wide range of sizes. The stitch pattern works up quickly, and because it is lacy, it uses less yarn while still being quite warm. The whole set shown here was made with only 2 skeins! These factors combined make this a great set for gifting.
This pattern is protected by copyright. Please do not distribute or share this pattern in any way other than by sharing a link to this page or to the pattern page on Ravelry. Click here for copyright information.
This pattern contains affiliate links (click for more info). If you click one of these links and then make a purchase, I may be compensated. You get the same great prices, and you will be helping to support this site!
Starry Skies Boot Cuffs


Add this to your Ravelry Queue
Materials:
- 150 yds Worsted weight yarn – shown in Universal Yarn Classic Shades – Color 732 “Stravinsky”
- Size J / 10 (6 mm) hook or size needed to obtain gauge
- Size I / 9 (5.5 mm) hook (or one size smaller than larger hook used).
- 4 buttons, 1 – 1.25″ (25 – 32mm)
- Yarn or tapestry needle
Difficulty:
Intermediate – Cluster stitches, front and back post stitches, and working in bottoms of stitches / ends of rows.
Size:
Approximately 6” x 6”
Gauge:
8 rows of pattern should be approximately 4.5” wide x 4” tall. The cuff will stretch quite a bit and is adjustable at the top, so exact gauge is not critical for this pattern.
Abbreviations used:
- ch = chain
- sc = single crochet
- dc = double crochet
- fpdc = front post double crochet
- bpdc = back post double crochet
- cl = cluster (see Special Stitches)
- bcl = beginning cluser (see Special Stitches)
- ecl = ending cluster (see Special Stitches)
- st(s) = stitch(es)
- sl st = slip stitch
- sk = skip
- sp(s) = space(s)
- YO = yarn over
- RS = right side
- WS = wrong side
Notes:
- The stitch pattern is provided in both written and chart forms, so you can follow either one (not both). Both are the same pattern.
- The ecl stitch here is the same as it was for the cowl / scarf, except that it’s not all the way at the end of the row, there is one more stitch after it
Special Stitch:
Cluster (cl):Worked over 3 ch 1 sps: (Yo, insert hook in next ch 1 sp, yo and draw up a loop, yo and pull through 2 loops on hook, sk next st), 3 times, yo and pull through all 4 loops on hook.

Beginning Cluster (bcl):Worked at beginning of row, over 2nd and 3rd sts, and first ch 1 sp: Yo, insert hook in next st, yo and draw up a loop, yo and pull through 2 loops on hook, sk next st, yo, insert hook in next sp, yo and draw up a loop, yo and draw through 2 loops on hook, yo and draw through all 3 loops on hook.
Ending Cluster (ecl):Worked at end of row, over last ch 1 sp and next 2 sts: Yo, insert hook in next ch 1 sp, yo and draw up a loop, yo and pull through 2 loops on hook, sk next st, yo, insert hook in next st, yo and draw up a loop, yo and draw through 2 loops on hook, yo and draw through all 3 loops on hook.

Instructions:
Cuff:
With larger hook, ch 22 (foundation). Mark 14th ch on right cuff, for edging (no need to mark for left cuff).
Row 1 (WS): Sc in 2nd ch from hook and in next 2 chs, (ch 1, sk next ch, sc in next ch) 8 times, sc in last 2 chs, turn.
Row 2: Ch 3 (counts as a dc now and throughout), bcl, (ch 5, sk next st, cl) twice, ch 5, ecl, dc in next st, turn.
Row 3: Ch 1, sc in first st, sc in top of ecl, (ch 5, sc in top of next cl) twice, ch 5, sc in top of bcl, sc in last st, turn.
Row 4: Ch 3, (dc, ch 1, dc) in second sc, [ch 1, sk next ch 5 sp, (dc, ch 1, dc, ch1, dc) in next sc] twice, ch1, sk next ch 5 sp, (dc, ch 1, dc) in next sc, dc in last sc, turn.
Row 5: Ch 1, sc in first 2 sts, sc in first ch 1 sp, (ch 1, sk next st, sc in next ch 1 sp) 8 times, sc in last 2 sts, turn.
Rows 6 – 23: Repeat rows 2-5 four more times, then repeat rows 2 – 3 once more.
Button flap for right cuff:
Row 24: Ch 3, (dc, ch 1, dc) in second sc, ch 1, sk next ch 5 sp, (dc, ch 1, dc) in next st, mark last ch sp for joining, (ch1, dc) in same sp, ch1, sk next ch 5 sp, (dc, ch 1, dc, ch1, dc) in next sc, ch1, sk next ch 5 sp, (dc, ch 1, dc) in next sc, dc in last sc, fasten off, turn.
Row 25: With WS facing, join yarn with sc in marked sp from row 24, sc in each st and in each ch sp across, turn. (7 sc)
Rows 26-27: Ch 1, sc in each st across, turn
Row 28: Ch1, sc in first 3 sc, ch 1, sk next sc (buttonhole made), sc in next 3 sc, turn.
Row 29: Ch1, sc in each st across, turn
Rows 30-35: Repeat rows 28 – 29 four times more, fasten off.
Edging for right cuff:
- Join with sc in marked ch on foundation, working in bottom of foundation, sc in next 5 sts, 3 sc in corner st.
- Working in sides of rows, 48 sc across top of cuff and button flap to corner, 3 sc in corner st.
- Sc in next 5 sts along end of button flap, 3sc in corner st.
- Working in sides of rows, 12 sc across bottom of button flap, fasten off
Button flap for left cuff:
Row 24: Ch 3, (dc, ch 1, dc) in second sc, ch1, sk next ch 5 sp, (dc, ch 1, dc, ch1, dc) in next sc, ch 1, sk next ch 5 sp, (dc, ch 1, dc, ch 1, dc) in next st, mark last ch sp for joining, ch1, sk next ch 5 sp, (dc, ch 1, dc) in next sc, dc in last sc, do NOT fasten off, turn.
Row 25: Sc in each st and in each ch sp across to marker, turn. (7 sc)
Rows 26-35: Repeat rows 26 – 35 of button flap for right cuff
Edging for left cuff:
- Join with sc in side of last st on Row 25 (next to the marker), working in sides of rows, 11 sc across bottom of button flap to corner, 3sc in corner st.
- Sc in next 5 sts along end of button flap, 3sc in corner st.
- Working in sides of rows, 48 sc across top of button flap and cuff to corner, 3 sc in corner st.
- Working in bottom of foundation, sc in next 6 sts, leaving remaining sts unworked. Fasten off.
Joining:
Fold cuff in half, right sides together. Sew edges together, starting at the bottom of the cuff and stopping just before the button band. Leaving a slight gap before the button band helps it to lay flat.
Ribbing:
Do not turn at end of rounds
Rnd 1: With smaller hook and with RS facing, join with sl st anywhere along bottom of cuff, ch 2 (counts as hdc), working in sides of rows, work 37 hdc, evenly spaced around bottom of cuff, join with sl st to first hdc. Don’t turn. (38 hdc)
Rnds 2-3: Ch 2 (counts as bpdc), (fpdc around next st, bpdc around next st) 18 times, fpdc around next st, join. Fasten off at end of round 3
Finishing:
- Sew 2 buttons on each cuff, on rows 3 & 7, aligned with button holes (see Fig 4 for placement)
- Sew in all ends.

I hope you enjoy the pattern! A downloadable pdf of this pattern and the matching boot cuffs is also available on Ravelry for a fee. The fee for the pdf format is to offset the advertising revenue lost when you print or download the pattern rather than viewing it online.
Do you want the best of Stitches n Scraps delivered right to your inbox? Don’t miss a stitch – Subscribe now!

Free Pattern – Rainbow Ripple Wrap Dress
A wrap style front creates a double layer across the chest, giving this dress a little added warmth for chilly spring weather. It also allows the top of the dress to stretch and move – perfect for active toddlers!
This pattern works well in one color changing and one solid yarn, or in 2 solid colors. It’s available in sizes 2T, 3T, and 4T, and is pictured here in size 2T.
This pattern is protected by copyright. Please do not distribute or share this pattern in any way other than by sharing a link to this page or to the pattern page on Ravelry. Click here for copyright information.
This pattern contains affiliate links (click for more info). If you click one of these links and then make a purchase, I may be compensated. You get the same great prices, and you will be helping to support this site!
Rainbow Ripple Wrap Dress
Add this to your Ravelry Queue
Materials:
- Worsted weight yarn
- 250-300 yds Variegated (A)
- 75-100 yds Solid (B)
- Size I / 9 (5.5 mm) hook or size needed to obtain gauge
- Yarn or tapestry needle
- Locking stitch markers or safety pins
Difficulty:
Intermediate – Increasing, decreasing, working along sides of rows, seaming, reverse single crochet (crab stitch).
Sizes:
2T, 3T & 4T. Pattern is written for 2T, with changes for larger sizes in parentheses.
Gauge:
12 sc x 13 rows = 4″. Gauge is important to ensure a good fit – take the time to check your gauge!
Abbreviations used:
- ch = chain
- sc = single crochet
- dc = double crochet
- tr = treble crochet
- YO = yarn over
- sc dec = single crochet 2 stitches together
- dc dec = double crochet 2 stitches together
- dbl dc dec = double dc decrease (See special stitch)
- sl st = slip stitch
- st(s) = stitch(es)
- sp(s) = space(s)
- RS = right side
- WS = wrong side
Special Stitch:
Double dc decrease (dbl dc dec): Double decrease worked over 3 sts: YO, draw up a loop in next st, YO and pull through 2 loops on hook, YO, draw up a loop in each of next 2 sts, [YO and pull through 2 loops on hook] twice, YO and pull through all 3 loops on hook. View full tutorial here.

Recommended Resources:
Note:
Ch 3 at beginning of rows counts as dc throughout. Ch 1 or ch 2 at the beginning of any row does NOT count as a stitch.
Instructions:
Back:
With A, Ch 33 [35, 37].
Row 1 (RS): Sc in 2nd ch from hook and in each ch across, turn. (32 [34, 36] sc). Mark this row as right side.
Row 2: Ch 1, sc in each st across, turn.
Row 3: Ch 3, dc in 2nd st and in each st across, turn.
Rows 4-5: Repeat row 2
Rows 6-8 [8, 11]: Repeat rows 3-5 once [once, twice] more
Size 2T only:
Row 9: Repeat row 3
Rows 10-11: Sl st in first st, ch 1, sc dec, sc across to last 3 stitches, sc dec, skip last st, turn (24 sts, ignoring sl st)
Rows 12-15: Repeat rows 3-5, then repeat row 3 once more.
Row 16: Ch 1, sc in first 8 sts, place stitch marker in last st worked (8th st of row), sc across, turn.
Right Strap:
Row 17(R): Ch 1, sc in first 6 sts, sc dec, turn, leaving remaining 16 sts unworked (7sc)
Row 18(R): Ch 2 (does NOT count as a st), sk first st, dc across, turn (6 sts)
Row 19(R): Ch 1, sc in first 4 sts, sc dec, turn (5 sts)
Row 20(R): Ch 1, sc across, fasten off.
Left Strap:
Row 17(L): With RS facing, Join A with sl st in marked st on row 16. Ch 1, sc dec, sc across, turn (7 sts)
Row 18(L): Ch 3, dc in 2nd st and in next 3 sts, dc dec, turn (6 sts)
Row 19(L): Ch 1, sc dec, sc in next 4 sts, turn (5 sts)
Row 20(L): Ch 1, sc across, fasten off.
Size 3T only:
Rows 9-10: Repeat rows 3 & 4
Row 11: Sl st in first st, ch 1, sc dec, sc across to last 3 stitches, sc dec, skip last st, turn (30 sts, ignoring sl st)
Row 12: Ch 2 (does NOT count as a st), sk first st, dc dec, dc across to last 3 sts, dbl dc dec, turn. (26 sts)
Row 13: Repeat row 2
Rows 14-16: Repeat rows 2-4.
Row 17: Ch 1, sc in first 8 sts, place stitch marker in last st worked (8th st of row), sc across, turn.
Left Strap:
Row 18(L): Ch 3, dc in next 5 sts, dc dec, turn, leaving remaining 18 sts unworked (7 sts)
Row 19(L): Ch 1, sc dec, sc in next 5 sts, turn (6 sts)
Row 20(L): Ch 1, sc across, turn
Row 21(L): Ch 3, dc in 2nd st and in each st across, fasten off.
Right Strap:
Row 18(R): With WS facing, join A with sl st in marked st on row 17. Ch 2 (does not count as a st), skip first st, dc across, turn (7 sts)
Row 19(R): Ch 1, sc in first 5 sts, sc dec, turn (6sts)
Row 20(R): Ch 1, sc across, turn
Row 21(R): Ch 3, dc in 2nd st and in each st across, fasten off.
Size 4T only:
Row 12: Ch 2 (does NOT count as a st), sk first st, dc dec, dc across to last 3 sts, dbl dc dec, turn. (32 sts)
Row 13: Sl st in first st, ch 1, sc dec, sc across to last 3 stitches, sc dec, skip last st, turn (28 sts, not counting sl st)
Rows 14 – 18: Repeat rows 2-6
Row 19: Ch 1, sc in first 9 sts, place stitch marker in last st worked (9th st of row), sc across, turn.
Left Strap:
Row 20(L): Ch 1, sc in first 7 sts, sc dec, turn, leaving remaining 19 sts unworked (8 sts)
Row 21(L): Ch 2 (does NOT count as a st), sk first st, dc across, turn (7 sts)
Row 22(L): Ch 1, sc across to last 2 sts, sc dec, turn (6 sts)
Row 23(L): Ch 1, sc across, fasten off
Right Strap:
Row 20(R): With WS facing, join A with sl st in marked st on row 19. Ch 1, sc dec, sc across, turn (8 sts)
Row 21(R): Ch 3, dc in 2nd st and in each st across to last 2 sts, dc dec, turn (7 sts)
Row 22(R): Ch 1, sc dec, sc across, turn (6 sts)
Row 23(R): Ch 1, sc across, fasten off
Right Front:
With A, ch 33 [35, 37]. Mark last ch for later joining.
Row 1 (RS): Sc in 2nd ch from hook and in each ch across, turn (32 [34, 36] sts). Mark row as right side.
Row 2: Ch 1, sc across to last 2 sts, sc dec (31 [33, 35] sts)
Row 3: Ch 2 (does NOT count as a stitch), sk first st, dc dec over next 2 sts, dc across, turn (29 [31, 33] sts)
Row 4: Ch 1, sc across to last 2 sts, sc dec (28 [30, 32] sts)
Row 5: Ch 1, sc dec, sc across, turn (27 [29, 31] sts)
Row 6: Ch 3, dc in 2nd st and in each st across to last 3 sts, dbl dc dec, turn (25 [27, 29] sts)
Row 7: Ch 1, sc dec, sc across, turn (24 [26, 28] sts)
Row 8: Ch 1, sc across to last 2 sts, sc dec (23 [25, 27] sts)
Row 9: Ch 2 (does NOT count as a stitch), sk first st, dc dec over next 2 sts, dc across, turn (21 [23, 25] sts)
Size 2T only:
Row 10: Sl st in first st, ch 1, sc dec, sc across to last 2 sts, sc dec, turn (18 sts, ignoring sl st)
Row 11: Ch 1, sc dec, sc across to last 3 sts, sc dec, turn leaving last st unworked. (15 sts)
Row 12-15: Repeat rows 6 – 9 (9 sts on row 15)
Rows 16-18: Repeat rows 4 – 6 (5 sts on row 18)
Rows 19 –20: Ch 1, sc in each st across, turn. Fasten off after row 20
Size 3T only:
Row 10: Repeat row 4 (22 sts)
Row 11: Ch 1, sc dec, sc across to last 3 sts, sc dec, turn, leaving last st unworked. (19 sts)
Row 12: Ch 2 (does NOT count as a stitch), sk first st, dc dec over next 2 sts, dc across to last 3 sts, dbl dc dec, turn. (15 sts)
Rows 13-15: Repeat rows 7-9 (11 sts on row 15)
Row 16-19: Repeat rows 4 – 7 (6 sts on row 19)
Row 20: Ch 1, sc in each st across, turn.
Row 21: Ch 3, dc in 2nd st and in each st across, fasten off.
Size 4T only:
Rows 10-11: Repeat rows 4 – 5 (23 sts on row 11)
Row 12: Ch 2 (does NOT count as a stitch), sk first st, dc dec over next 2 sts, dc across to last 3 sts, dbl dc dec, turn. (19 sts)
Row 13: Ch 1, sc dec, sc across to last 3 sts, sc dec, turn, leaving last st unworked. (16 sts)
Rows 14-15: Repeat rows 8-9 (13 sts on row 9)
Rows 16-20: Repeat rows 4 – 8 (7 sts on row 20)
Row 21: Ch 2 (does NOT count as a stitch), sk first st, dc in each st across, turn. (6 sts).
Row 22-23: Ch 1, sc in each st across, turn. Fasten off after row 23
Left Front:
With A, ch 33 [35, 37]. Mark first ch for later joining.
Row 1 (RS): Sc in 2nd ch from hook and in each ch across, turn (32 [34, 36] sts). Mark this row as right side.
Row 2: Ch 1, sc dec, sc across, turn (31 [33, 35] sts).
Row 3: Ch 3, dc in 2nd st and in each st across to last 3 sts, dbl dc dec, turn (29 [31, 33] sts)
Row 4: Ch 1, sc dec, sc across, turn (28 [30, 32] sts)
Row 5: Ch 1, sc across to last 2 sts, sc dec (27 [29, 31] sts)
Row 6: Ch 2 (does NOT count as a stitch), sk first st, dc dec over next 2 sts, dc across, turn (25 [27, 29] sts)
Row 7: Ch 1, sc across to last 2 sts, sc dec (24 [26, 28] sts)
Row 8: Ch 1, sc dec, sc across, turn (23 [25, 27] sts)
Row 9: Ch 3, dc in 2nd st and in each st across to last 3 sts, dbl dc dec, turn (21 [23, 25] sts)
Size 2T only:
Row 10: Ch 1, sc dec, sc across to last 3 sts, sc dec, turn leaving last st unworked. (18 sts)
Row 11: Sl st in first st, ch 1, sc dec, sc across to last 2 sts, sc dec, turn (15 sts, ignoring sl st)
Row 12-15: Repeat rows 6 – 9 (9 sts on row 15)
Rows 16-18: Repeat rows 4 – 6 (5 sts on row 18)
Rows 19 –20: Ch 1, sc in each st across, turn. Fasten off after row 20
Size 3T only:
Row 10: Repeat row 4 (22 sts)
Row 11: Sl st in first st, ch 1, sc dec, sc across to last 2 sts, sc dec, turn (19 sts, ignoring sl st)
Row 12: Ch 2 (does NOT count as a stitch), sk first st, dc dec over next 2 sts, dc across to last 3 sts, dbl dc dec, turn. (15 sts)
Rows 13-15: Repeat rows 7-9 (11 sts on row 15)
Row 16-19: Repeat rows 4 – 7 (6 sts on row 19)
Row 20: Ch 1, sc in each st across, turn.
Row 21: Ch 3, dc in 2nd st and in each st across, fasten off.
Size 4T only:
Rows 10-11:Repeat rows 4 – 5 (23 sts on row 11)
Row 12: Ch 2 (does NOT count as a stitch), sk first st, dc dec over next 2 sts, dc across to last 3 sts, dbl dc dec, turn. (19 sts)
Row 13: Sl st in first st, ch 1, sc dec, sc across to last 2 sts, sc dec, turn (16 sts, ignoring sl st)
Rows 14-15: Repeat rows 8-9 (13 sts on row 9)
Rows 16-20: Repeat rows 4 – 8 (7 sts on row 20)
Row 21: Ch 3, dc in 2nd st and in each st across to last 2 sts, dc dec, turn. (6 sts)
Row 22-23: Ch 1, sc in each st across, turn. Fasten off after row 23
All sizes: Using seaming diagram as a guide, hold left front and back pieces with right sides together, and sew left side seam only.
Skirt:
Turn work upside down, with right side facing you. Working in the bottom of the foundation chain, join B in marked ch on left front (see Seaming Diagram above):
Size 4T only:
Set up row: Ch 3, dc in 2nd st and in each st across, turn. (74 sts)
All Sizes:
Row 1 (RS [WS, WS]): Ch 1, sc in first 5 [3, 4] sts, (2 sc in next st, sc in next 10 [6, 4] sts) 5 [9, 13] times, 2 sc in next st, sc in last 5 [3, 4] sts, turn. (72 [80, 88] sts)
Row 2: Ch 3, hdc in 2nd st, (sc in next st, sl st in next 2 sts, sc in next st, hdc in next st, dc in next 2 sts, hdc in next st) 8 [9, 10] times, sc in next st, sl st in next 2 sts, sc in next st, hdc in next st, dc in next st, switching to A at end of row, turn.
Row 3: With A, ch 3, dc in same st and in next st. (dc dec twice, dc in next st, 2dc in each of next 2 sts, dc in next st) 8 [9, 10] times, dc dec twice, dc in next st, 2dc in next st, turn.
Row 4: Ch 4 (counts as tr), dc in same st, 2 dc in next st, (dc dec twice, 2 dc in next st, [dc, tr] in next st, [tr, dc] in next st, 2 dc in next st) 8 [9, 10] times, dc dec twice, 2 dc in next st, [dc, tr] in next st, turn. (90 [100, 110] sts)
Row 5: Ch 3, dc in same st and in next 2 sts, (dc dec twice, dc in next 2 sts, 2 dc in each of next 2 sts, dc in next 2 sts) 8 [9, 10] times, dc dec twice, dc in next 2 sts, 2 dc in next st, switching to B at end of row, turn.
Row 6: With B, repeat row 5, switching to A at end of row.
Row 7: With A, repeat row 5, but do not change colors at end of row.
Row 8: Ch 4, dc in same st, 2 dc in next st, (dc in next st, dc dec twice, dc in next st, 2 dc in next st, [dc, tr] in next st, [tr, dc] in next st, 2 dc in next st) 8 [9, 10] times, dc in next st, dc dec twice, dc in next st, 2 dc in next st, [dc, tr] in next st, turn. (108 [120, 132] sts)
Row 9: Ch 3, dc in same st and in next 3 sts. (dc dec twice, dc in next 3 sts, 2 dc in each of next 2 sts, dc in next 3 sts) 8 [9, 10] times, dc dec twice, dc in next 3 sts, 2 dc in next st, switching to B at end of row, turn.
Row 10: With B, repeat row 9, switching to A at end of row.
Row 11: With A, repeat row 9, but do not change colors at end of row.
Row 12: Ch 4, dc in same st, 2 dc in next st, (dc in next 2 sts, dc dec twice, dc in next 2 sts, 2 dc in next st, [dc, tr] in next st, [tr, dc] in next st, 2 dc in next st) 8 [9, 10] times, dc in next 2 sts, dc dec twice, dc in next 2 sts, 2 dc in next st, [dc, tr] in next st, turn. (126 [140, 154] sts)
Row 13: Ch 3, dc in same st and in next 4 sts. (dc dec twice, dc in next 4 sts, 2 dc in each of next 2 sts, dc in next 4 sts) 8 [9, 10] times, dc dec twice, dc in next 4 sts, 2 dc in next st, switching to B at end of row, do not turn.
Size 3T only:
Row 14: Turn. With B, repeat row 13, fasten off.
Join B with sl st in first st of row 14.
Size 4T only:
Row 14: Turn. With B, repeat row 13, but do not change colors at end of row.
All Sizes:
Next Row [RS]: With B, ch 1, reverse sc in each stitch across. Fasten off.
Using seaming diagram as a guide, sew seams as follows:
- Hold right front and back pieces with right sides together, and sew right side seam.
- Sew both shoulder seams.
Bodice Edging:
Turn work sideways, with right side facing. Join B with sc in marked ch on left front. (See seaming diagram) Work reverse sc around the edges of the bodice pieces as follows:
- Work 29 [30, 31] reverse sc in sides of rows, evenly spaced along left front
- Work 21 [24, 27] reverse sc evenly spaced along neckline.
- Work 30 [31, 32] reverse sc evenly spaced across right front, ending in marked ch on right front.
- Working in bottom of starting chain, reverse sc in each ch across bottom of right front, ending at right side seam. (33 [35, 37] reverse sc)
Armhole Edging:
With right side facing, join B with sc in any stitch on either arm hole. Work 30 [31, 33] reverse sc evenly spaced around, finish off. Using yarn needle, sew yarn end to first st as shown below. This joins the round with less bulk than a slip stitch. Repeat edging for other arm hole.
Finishing:
Using seaming diagram as a guide:
- With right sides together, sew side seam on skirt.
- Turn dress right side out. With 2 or 3 small stiches, tack marked stitch on right front corner to bottom of left side seam. If desired, this corner can be joined with a decorative button or tie instead.
- Sew in all ends.
I hope you enjoy the pattern! Special thanks to the unbelievably adorable model and her very patient mom. Also thanks to Kyla of Keep Me in Stitchez and my mom, for testing the pattern!
A downloadable pdf of this pattern is also available in my Craftsy store or on Ravelry for a $1 fee. The fee for the pdf format is to offset the advertising revenue lost when you print or download the pattern rather than viewing it online.
If you would like to receive notifications of new posts and patterns as they become available, please follow this blog. You can follow by e-mail (look at the sidebar on the right for the follow by email option), or via RSS feed, or via your WordPress.com reader: Follow Stitches ‘N’ Scraps on WordPress.com

Free Pattern – Chain of Flowers Headband
Brighten up your wardrobe with this pretty headband! The flower section of the headband is made all in one piece, so there aren’t a lot of ends to sew in. It can also easily be adjusted to any size, and can work in a variety of yarn weights, so is great for adults and children too. Make a bunch for quick gifts or craft fairs!

This pattern is protected by copyright. Please do not distribute or share this pattern in any way other than by sharing a link to this page or to the pattern page on Ravelry. Click here for copyright information.
This pattern contains affiliate links (click for more info). If you click one of these links and then make a purchase, I may be compensated. You get the same great prices, and you will be helping to support this site!
Chain of Flowers Headband


Add this to your Ravelry Queue
Materials:
- Worsted weight yarn – 50 yds as written (see Sizes for more information)
- Size G / 6 (4 mm) crochet hook or size needed to obtain gauge
- Yarn or tapestry needle
Difficulty:
Easy – Basic stitches and chains, with some atypical construction.
Size:
Written in adult size (one size fits most). As written, the flower chain section of the headband is approximately 13″ long. The size can be adjusted in a couple of ways. You can make more flowers or fewer flowers, and can adjust the length of the ties as needed. You can also use a lighter weight yarn for a thinner and smaller headband – this is a good choice if you’re making it for a baby or small child.
The yardage needed will vary depending on the adjustments you make. If using a different weight of yarn, be sure to adjust the hook size as well. You want a fairly tight gauge, so try to use a smaller hook than what is recommended on the yarn label.
Gauge:
Use the first flower as your gauge swatch – With worsted weight yarn, each flower should be approximately 1 1/2 to 1 1/3 inches across. Exact gauge is not critical for this project.
Abbreviations used:
- ch = chain
- sc = single crochet
- hdc = half double crochet
- dc = double crochet
- sl st = slip stitch
- st(s) = stitch(es)
- sp(s) = space(s)
- RS = right side
- WS = wrong side
Instructions:
First flower:
Make ring: Ch 8, join with sl st to first ch to form a ring.
Note: The petals should fit quite snugly into the circle – as you make each petal, slide it over as far as you can (even it if scrunches up a bit), to make room for the next one. When you’ve finished a whole flower, you can spread the petals back out again. If you tend to chain loosely, you may find your center ring is too big and the flower looks sloppy. If this is the case for you, try starting each flower with a ch 6 ring instead of the ch 8 ring.
Flower (RS): Turn, sl st in ring, (ch 1, sc, hdc, dc, ch 1, dc, hdc, sc, sl st) 5 times in ring. (5 petals)
Chain across back (WS): Turn, ch 7, sl st in ch sp at top of 3rd petal on flower.
Remaining flowers:
*Make ring: Ch 8, join with sl st to first ch to form a ring.
Flower (RS): Turn, sl st in ring, (ch 1, sc, hdc, dc, ch 1, dc, hdc, sc, sl st) 5 times in ring. (5 petals)
Chain across back (WS): Turn, ch 1, sl st around chain from back of previous flower (see image below), ch 7, sl st in ch sp at top of 3rd petal on flower.
Repeat from * 6 more times for a total of 8 flowers (you can adjust this number as needed). Do not fasten off.
Ties:
First tie: Chain 60 (or to desired length), fasten off.
Second tie: Join yarn with sl st around back chain at bottom of first flower (i.e. the other end of the flower section), chain 60 or to desired length, fasten off.
Sew in all ends.
I hope you enjoy this Chain of Flowers pattern. Special thanks to laurie2011, yarnaddict12, and Erika Loftin for testing the pattern!
A downloadable pdf of this pattern is available on Ravelry for a small fee. The fee for the pdf format offsets the advertising revenue lost when you print or download the pattern rather than viewing it online.
Do you want the best of Stitches n Scraps delivered right to your inbox? Don’t miss a stitch – Subscribe now!

Free Pattern – Storm Clouds
Diagonal puff stitch gives this 14″ pillow a soft, plush texture, which works well with the heathered tones of the Lion Brand Heartland yarn. When completed, the 3 blocks of color form diagonal striping patterns that are distinctly different on the front and on the back. The construction also makes it easy to take the pillow form out for washing when needed.
This pattern is protected by copyright. Please do not distribute or share this pattern in any way other than by sharing a link to this page or to the pattern page on Ravelry. Click here for copyright information.
This pattern contains affiliate links (click for more info). If you click one of these links and then make a purchase, I may be compensated. You get the same great prices, and you will be helping to support this site!
Storm Clouds
Add this to your Ravelry Queue
Materials:
- Lion Brand Heartland yarn:
- 175 yds Glacier Bay
- 250 yds Great Smoky Mountains
- 250 yds Mount Ranier
- Size I / 9 (5.5 mm) hook or size needed to obtain gauge
- Yarn or tapestry needle
- Locking stitch markers or safety pins
- 14″ square pillow form
Difficulty:
Intermediate – Diagonal puff stitch (a variation of diagonal box stitch) with no shaping and simple assembly.
Size:
14 inch square
Gauge:
12.5 dc x 6.5 rows = 4″. Each “box” of the diagonal box stitch should be just under 1 inch.
Abbreviations used:
- ch = chain
- sc = single crochet
- dc = double crochet
- puff = puff stitch (see Special Stitch)
- YO = yarn over
- sl st = slip stitch
- st(s) = stitch(es)
- sp(s) = space(s)
- RS = right side
- WS = wrong side
Special Stitch:
Puff Stitch (puff): YO, insert hook into specified stitch or space, draw up a loop to the same height as your current row. Repeat this 5 more times in the same stitch or space, for a total of 13 loops. YO and draw through all 13 loops. Finish with a slip stitch to close.
Recommended Resources:
Instructions:
Section 1 (increasing):
Note: In this section, each row will have one more “box” than the previous row.
Row 1 (WS): With Glacier Bay: ch 6, dc in 4th ch from hook, puff in next ch, dc in last ch. (1 box)
Row 2: Ch 6, turn, dc in 4th ch from hook, puff in next ch, dc in next ch, sl st in ch-3 sp from next box, ch 3, (dc, puff, dc) in same sp. (2 boxes)
Rows 3-16: Ch 6, turn, dc in 4th ch from hook, puff in next ch, dc in next ch, *sl st in ch 3 sp from next box, ch 3, (dc, puff, dc) in same sp, repeat from * in each box across. (16 boxes on row 16)
Note: The width of each straight edge should now be approximately 14 inches.
Section 2 (neither increasing nor decreasing):
Note: In this section, each row will have 16 boxes. This extends the piece to make it a rectangle instead of a square.
Row 17: Ch 6, turn, dc in 4th ch from hook, puff in next ch, dc in next ch, *sl st in ch 3 sp from next box, ch 3, (dc, puff, dc) in same sp, repeat from * in each box across to last box, sl st in ch 3 sp from last box.
Row 18: Ch 3, turn, *sl st in ch 3 sp from next box, ch 3, (dc, puff, dc) in same sp, repeat from * in each box across, changing to Great Smoky Mountains at the end of the row.
Row 19: With Great Smoky Mountains: Ch 6, turn, dc in 4th ch from hook, puff in next ch, dc in next ch, *sl st in ch 3 sp from next box, ch 3, (dc, puff, dc) in same sp, repeat from * in each box across to last box, sl st in ch 3 sp from last box.
Row 20: Ch 3, turn, *sl st in ch 3 sp from next box, ch 3, (dc, puff, dc) in same sp, repeat from * in each box across.
Rows 21-31: repeat rows 19 & 20 five times, then repeat row 19 once more.
Row 32: Ch 3, turn, sl st in ch 3 sp from next box, changing to Mount Ranier. With Mount Ranier: Ch 3, (dc, pucc, dc) in same sp, *sl st in ch 3 sp from next box, ch 3, (dc, puff, dc) in same sp, repeat from * in each box across.
Rows 33-38: Repeat rows 19 & 20 three times more. Mark last st on row 38 for edging
Note: Piece should now measure approximately 14 inches x 32 inches
Section 3 (decreasing):
Note: In this section, each row will have 1 fewer box than the previous row
Rows 39-52: Ch 3, turn, *sl st in ch 3 sp from next box, ch 3, (dc, puff, dc) in same sp, repeat from * in each box across to last box, sl st in ch 3 sp from last box. (2 boxes at the end of row 52)
Row 53: Ch 3, turn, sl st in ch 3 sp from first box, ch 3, (dc, puff, dc) in same sp, sl st in last box. (1 box).
Finishing: Ch 3, turn, sl st in ch 3 sp of adjacent box (corner), fasten off.
Edging:
- With RS facing, join Mount Rainier with sl st in marked stitch from Row 38.
- Working across long edge: Ch 3, sk first box, sl st in space before next box (see picture)
- (Ch 3, sk next box, sl st in space before next box) 6 times, change to Great Smoky Mountains.
- (Ch 3, sk next box, sl st in space before next box) 13 times, change to Glacier Bay
- (Ch 3, sk next box, sl st in space before next box) 17 times, ch 3, sl st in corner.
- Continuing across short edge: (Ch 3, sk next box, sl st in space before next box) 15 times, ch 3, sl st in corner, fasten off.
Note: You should now have a ch 3 space over every box around the entire edge.
Seaming / Finishing:
- Lay work flat, RS facing, with Mount Rainier on the top as shown below.
- Count 9 boxes up from the bottom on each side, and fold edge over. Then count 13 boxes down from the top and fold. (see fold lines on color chart). This should leave a square of 16 x 16 boxes on the front. On the back, the top and bottom edges should overlap by 6 boxes. Use stitch markers or safety pins to hold the edges in place. Make sure the ch 3 sps along front and back edges line up.
- Working through all layers, join any color with sl st in corner. Ch 1, 3 sc in each ch sp across, fasten off. Repeat for the other side.
- Weave in all ends, turn pillow right side out and insert pillow form.
I hope you enjoy the pattern! Special thanks to Alexandra of Eye Love Knots for testing the pattern!
A downloadable pdf of this pattern is also available in my Craftsy store for a $1 fee. The fee for the pdf format is to offset the advertising revenue lost when you print or download the pattern rather than viewing it online.
If you would like to receive notifications of new posts and patterns as they become available, please follow this blog. You can follow by e-mail (look at the sidebar on the right for the follow by email option), or via RSS feed, or via your WordPress.com reader: Follow Stitches ‘N’ Scraps on WordPress.com

Free Pattern – Twilight Reverie
With the Blueberry Hill shawl, we worked lover’s knots in a rectangle. This capelet uses the same basic stitch, but with added shaping. It’s just the right weight to warm bare shoulders on a breezy spring or summer evening, and can be worn with the opening in front, or over one shoulder. It works up quickly with the Red Heart Boutique Infinity and Twilight yarns. These soft, bulky yarns both have a little hint of metallic sparkle in them too.

This pattern is protected by copyright. Please do not distribute or share this pattern in any way other than by sharing a link to this page or to the pattern page on Ravelry. Click here for copyright information.
This pattern contains affiliate links (click for more info). If you click one of these links and then make a purchase, I may be compensated. You get the same great prices, and you will be helping to support this site!
Twilight Reverie
Add this to your Ravelry Queue
Materials:
- Red Heart Boutique Twilight in Romantic – Jumbo weight #7
- Red Heart Boutique Infinity in Enchanted – Bulky weight #5
- Size M/N (9 mm) hook or size needed to obtain gauge
- Yarn or tapestry needle
- 2 locking stitch markers (optional)
- 1.5 inch button or toggle
Difficulty:
Experienced – Solomon’s / Lovers knots with decreases, plus extending one row with foundation stitches.
Size:
Adult – one size fits most
Gauge:
8 sc x 8 rows = 4″ in Twilight. Exact gauge is not critical for this project, but try to get fairly close.
Abbreviations used:
- ch = chain
- sc = single crochet
- sc2tog = single crochet 2 stitches together
- lk = lover’s knot (see Special Stitches)
- elk = edge lover’s knot (see Special Stitches)
- dec = lover’s knot decrease (see Special Stitches)
- sl st = slip stitch
- st(s) = stitch(es)
- sp(s) = space(s)
- RS = right side
- WS = wrong side
Special Stitches:
Lover’s knot (lk): Pull working loop up to a length of 1.5 inches. YO, draw through but do not tighten – this makes an extended chain st. Sc in back bump of chain to secure. See full tutorial here.
Edge lover’s knot (elk): Work as for lk, but start by drawing the working loop up to 1 inch instead of 1.5 inches.
Lover’s knot Decrease (dec): Insert hook in next st and draw up a loop, sk next st, insert hook in next st and draw up a loop, yo and pull through both loops on hook.
Note: Whenever the pattern says to work into an lk or elk stitch, work into the sc part at the top of the stitch, just like you would into a normal sc, unless otherwise specified.
Recommended Resources:
Instructions:
Main Section:
Row 1 (foundation row): With Infinity, ch 2, sc in first ch, mark last st worked, 55 elk, mark last st worked.
Note: The stitch markers are used only to help identify the end of each row. Except for row 1 & rnd 11, every row in this section should end with an sc into the marked stitch. Remove the stitch marker as you complete each row, so you can use it again in the next row. Once the pattern is established, you may find you don’t need the markers anymore.
Row 2 (RS): Turn, 2 lk, sk first 3 sts from hook (the 2 just made, and 1 from the previous row), sc in next st, (2 lk, sk next st, sc in next st) 27 times.
Row 3: Turn, lk, sc in top of next st, mark last st worked, (2 lk, sk next st, sc in next st) 6 times, 2 lk, sk next st, dec, (2 lk, sk next st, sc in next st) 4 times, 2 lk, sk next st, dec, (2 lk, sk next st, sc in next st) 4 times, 2 lk, sk next st, dec, (2 lk, sk next st, sc in next st) 7 times.
Row 4: Turn, lk, sc in top of next st, mark last st worked, (2 lk, sk next st, sc in next st) 23 times.
Row 5: Turn, lk, sc in top of next st, mark last st worked, (2 lk, sk next st, sc in next st) 22 times.
Row 6: Turn, lk, sc in top of next st, mark last st worked, (2 lk, sk next st, sc in next st) 4 times, 2 lk, sk next st, dec, (2 lk, sk next st, sc in next st) 3 times, 2 lk, sk next st, dec, (2 lk, sk next st, sc in next st) 3 times, 2 lk, sk next st, dec, (2 lk, sk next st, sc in next st) 5 times.
Row 7: Turn, lk, sc in top of next st, mark last st worked, (2 lk, sk next st, sc in next st) 17 times.
Row 8: Turn, lk, sc in top of next st, mark last st worked, (2 lk, sk next st, sc in next st) 16 times.
Row 9: Turn, lk, sc in top of next st, mark last st worked, {(2 lk, sk next st, sc in next st) 2 times, 2 lk, sk next st, dec} 3 times, (2 lk, sk next st, sc in next st) 3 times.
Row 10: Turn, lk, sc in top of next st, mark last st worked, lk, elk, sk next st, sc in next st, (2 elk, sk next st, sc in next st) 9 times, elk, lk, sk next st, sc in next st.
Rnd 11 (edging rnd):
Note: When working around the chain parts of the lks / elks for the edging, several rows will have 2 lks right on top of each other (where you turned for a new row). For these rows, work over both lk’s together as though they were one.
- Turn, lk, sc in top of next st.
- Side edge: Turn, now working along side edge, ch 1, sc in same st, mark last st worked (corner), (3 sc around ch part of next st, sc in sc part of same st) 9 times, ending at bottom corner. (37 sc)
- Bottom edge: Ch 1, sc in same st (corner), 2 sc around the ch part of next st, sc in the sc part of same st, (2 sc around chain part of next st, 2 sc around chain part of next st, sc in sc part of same st) 26 times, 2 sc around the chain part of next elk, sc in the sc part of the same st (corner). (137 sc)
- Side edge: Ch 1, sc in same st (corner), (3 sc around ch part of next st, sc in sc part of same st) 9 times. (37 sc)
- Top edge: Ch 1, sc in same st (corner),2 sc around the chain part of next st, sc in the sc part of the same st, (2 sc around chain part of next st, 2 sc around chain part of next st, sc in sc part of same st) 9 times, 2 sc around the chain part of next elk, sc in the sc part of the same st (same corner as start of rnd), ch 1, join to first sc (52 sc)
Collar:
Row 1: Turn, sl st in corner ch sp, changing to Twilight. Ch 1, sc in sp, sc in each st across to next st, sc in sp, work 8 fsc to extend the row (for button flap). (62 sts)
Row 2: Ch 1, turn, sc in first st, ch 1, sk next st (buttonhole), sc in each st across. (61 sts, 1 sp)
Border:
- Top edge / button band: Ch 1, turn, sc in each st across to buttonhole sp, sc in sp, (sc, ch 1, sc) in last st, sc in side of next row, working across bottom of fsc stitches, (sc, ch 1, sc) in next st, sc in next 6 sts, sc2tog in next st and in first st from side edge. (73 sts)
- Side edge: sc in next st and each st across to next corner sp, sc in corner sp. (39 sc)
- Bottom edge: Ch 1, sc in same sp and in each st across to next corner sp, sc in corner sp (139 sc)
- Side edge: Ch 1, sc in same sp and in each st across, sc in side of collar rows, ch 1, join with sl st to first st of round. (40 sc)
Fasten off, weave in all ends, sew button to collar opposite button band.
I hope you enjoy the pattern! Special thanks to Red Heart Yarns for supplying the beautiful yarn, and to Abbie of Abbie’s Handmade Creations for testing the pattern!
A downloadable pdf of this pattern is also available in my Craftsy store for a $1 fee. The fee for the pdf format is to offset the advertising revenue lost when you print or download the pattern rather than viewing it online.
If you would like to receive notifications of new posts and patterns as they become available, please follow this blog. You can follow by e-mail (look at the sidebar on the right for the follow by email option), or via RSS feed, or via your WordPress.com reader: Follow Stitches ‘N’ Scraps on WordPress.com

Lover’s Knots Shawl – Blueberry Hill
This post contains sponsored content and/or affiliate links. If you click an affiliate link and make a purchase, I may get a commission.
Lover’s Knots
Lover’s knots, sometimes called Solomon’s Knots, are a combination of very long chains and single crochets. The length of the chains is what creates the open weave pattern. For a detailed look at this stitch pattern, check out my Lover’s Knots tutorial.
Carefully controlling the length of your chains is the key to an even tension. There’s a little wiggle room, longer chains will just appear a bit looser, but the more precise you can be, the more even your work will look.
Mill Ends
The yarn I used for my shawl was from a bag of “mill ends” that I picked up on sale. It wasn’t labeled with fiber content or size. I measured it using the wraps per inch method to determine that it was DK weight yarn.
Materials:
- Yarn: 350-400 yds DK weight yarn.
- Hook: Size G / 6 (4 mm) hook or size needed to obtain gauge
- Notions:
- Yarn needle
- 2 locking stitch markers (optional)
Project Level:
Intermediate – Great introduction to Solomon’s / Lover’s knots.
Size:
36 inches x 60 inches before blocking, 44 x 72 inches after blocking. Blocking is critical. Finished size may vary depending on how aggressively you block it and how springy your yarn is.
Gauge:
16 dc x 8 rows = 4″. Exact gauge is not important for this project.
Abbreviations used:
- ch = chain
- sc = single crochet
- dc = double crochet
- lk = lover’s knot (see Special Stitches)
- elk = edge lover’s knot (see Special Stitches)
- sl st = slip stitch
- st(s) = stitch(es)
- sp(s) = space(s)
- RS = right side
- WS = wrong side
Special Stitches:
Lover’s knot (lk): Pull working loop up to a length of 1.5 inches. YO, draw through but do not tighten – this makes an extended chain st. Sc in back bump of chain to secure. See full tutorial here.
Edge lover’s knot (elk): Work as for lk, but start by drawing the working loop up to 1 inch instead of 1.5 inches.
When working into an lk or elk stitch, work into the sc part at the top of the stitch, just like you would into a normal sc, unless otherwise specified.
Recommended Resources:
Instructions:
Main Section:
(Scroll down for chart)
If you want a wider shawl, you can add more elks on Row 1, in groups of 2. If you do, be sure to mark the last st, and add the appropriate number of repeats in the following rows – each additional group of 2 elks is one additional repeat.
Row 1 (foundation row): Ch 2, sc in first ch, mark last st worked, 30 elk, mark last st worked.
The stitch markers are used only to help identify the end of each row. Except for row 1, every row should end with an sc into the marked stitch. Remove the stitch marker as you complete each row, so you can use it again in the next row. Once the pattern is established, you may find you don’t need the markers anymore.
Row 2 (RS): Turn, lk, sk first 3 sts from hook (the 1 just made, and 2 from the previous row), sc in next st, (2 lk, sk next st, sc in next st) 14 times.
Rows 3-58: Turn, 2 elk, mark last st worked, lk, sk first 4 sts from hook (the 3 just made, and the first st from the previous row), sc in next st, (2 lk, sk next st, sc in next st) 14 times.
If you want a longer or shorter shawl, you can work fewer rows or add more rows, in groups of 2 (be sure to end on an even numbered row here, or the edging won’t work).
Row 59: Turn, (2 elk, sk next st, sc in next st) across. Do not fasten off.
Edging:
The top edge will be straight, and the other 3 will be scalloped.
Side: Ch 4 (counts as dc and ch 1), turn, (dc, ch 1) 3 times in first st (corner), dc in same st, {sc in next st, (dc, ch 1) 6 times in next st, dc in same st} across to corner, sc in corner.
Top: Ch 3, {4 dc around the chain part of the next st (working into the space below the st), dc in the sc part of the the same st) across to last st, 4 dc around chain part of last st, ch 3, sc in sc part of the same st (corner).
Side: {(dc, ch 1) 6 times in next st, dc in same st, sc in next st} across.
Bottom: Ch 1, sc in same st, {(dc, ch 1) 6 times in next st, dc in same st, sc in next st} across to corner, (dc, ch 1) 4 times in corner, join with sl st to first st.
Fasten off, weave in all ends.

Rate this Lover’s Knots Shawl pattern!
I hope you enjoy this lover’s knots shawl pattern. Special thanks to Kyla Marie of Keep Me in Stitchez for testing the pattern! A downloadable pdf of this pattern is available on Ravelry for a small fee. The fee for the pdf format is to offset the advertising revenue lost when you print or download the pattern rather than viewing it online.
Do you want the best of Stitches n Scraps delivered right to your inbox? The Stitches n Scraps email newsletter includes highlights from the blog as well as special features not available elsewhere. Don’t miss a stitch – Subscribe now!

Free Pattern – Pacific Sunset Mitts
I got a skein of Lion Brand Landscapes yarn in a goodie bag at the Knit and Crochet Show last year. It’s a soft and silky, worsted weight, acrylic yarn. It’s just a little bit fuzzy, so it has a nice, soft “halo” to it when it’s worked up.The lovely yarn does all the work in this basic fingerless mitts pattern. It works up fast, and is fun and easy to make!
3/2/2016 – Marie Segares of the Underground Crafter has made a podcast version of this pattern! Check it out!
This pattern is protected by copyright. Please do not distribute or share this pattern in any way other than by sharing a link to this page or to the pattern page on Ravelry. Click here for copyright information.
This pattern contains affiliate links (click for more info). If you click one of these links and then make a purchase, I may be compensated. You get the same great prices, and you will be helping to support this site!
Pacific Sunset Mitts
![]()
![]()
Add this to your Ravelry Queue
Materials:
- Lion Brand Landscapes yarn
– 1 skein of the “Tropics” colorway. - Size H / 8 (5 mm) hook or size needed to achieve gauge
- Size G / 6 (4.25 mm) hook or 1 size smaller than the other hook you are using.
- Yarn or tapestry needle
Difficulty:
Intermediate – Mostly easy double crochet in the round. Some increases, decreases, and front post / back post dc stitches make it Intermediate.
Sizes:
Adult – one size fits most.
Gauge:
13 dc x 7 rows = 4″ square.
Abbreviations used:
- ch = chain
- sc = single crochet
- fsc = foundation single crochet (optional)
- dc = double crochet
- csdc = chainless starting double crochet (optional)
- fpdc = front post double crochet
- bpdc = back post double crochet
- dc2tog = double crochet two stitches together
- sl st = slip stitch
- st(s) = stitch(es)
- sp(s) = space(s)
- rnd = round
- RS = right side
- WS = wrong side
Notes:
- Foundation single crochet is highly recommended for the first row, because it is stretchier and leaves a nice finished edge. An alternative starting round using a starting chain is provided if you prefer.
- Chainless starting double crochet stitches are recommended because it results in a more seamless look. However, if you prefer, you can replace “turn, csdc” with “ch 3 (counts as first dc), turn” anywhere it appears in the pattern.
- Join rounds with a sl st in the first st unless otherwise instructed.
- A pair off mitts uses only about 2/3 of the skein. If you like to start from the same spot in the color sequence so that the striping matches, there should be enough in a skein for you to be able to line that up.
Recommended Resources:
- Foundation Single Crochet by Moogly
- Joining Foundation Stitches to Work in the Round by Moogly
- Chainless Starting Double Crochet by Moogly
- Front & Back Post Crochet by Jessie at Home
- Double Crochet 2 Together by Jessie at Home
Instructions:
Row 1 (RS): With larger hook, work 22 fsc, join round. (22 fsc)
OR
Alternative Row 1 (RS): With larger hook, ch 23, sc in 2nd ch from hook and in each ch across, join round. (22 sc)
Switch to smaller hook.
Rows 2-3 (RS): Do NOT turn. Ch 2 (counts as bpdc), (fpdc around next st, bpdc around next st) around to last st, fpdc around last st, join. (22 sts)
Switch to larger hook
Row 4: Turn, csdc in first st, dc in each st around, join. (22 sts)
Your piece should now measure approximately 6.75 inches around and 1.5 inches tall.
Row 5: Turn, csdc in first st, dc in next 9 sts, (2 dc in next st) twice, dc in next 10 sts, join. (24 sts)
Row 6: Turn, csdc in first st, dc in next 10 sts, (2 dc in next st) twice, dc in next 11 sts, join. (26 sts)
Row 7: Turn, csdc in first st, dc in next 11 sts, (2 dc in next st) twice, dc in next 12 sts, join. (28 sts)
Row 8: Turn, csdc in first st, dc in next 12 sts, (2 dc in next st) twice, dc in next 13 sts, join. (30 sts)
Row 9: Turn, csdc in first st, dc in each st around, join. (30 sts)
Row 10: Turn, csdc in first st, dc in next 8 sts, dc2tog in next 2 sts, ch 2, sk next 8 sts (thumb hole), dc2tog in next 2 sts, dc in next 9 sts, join (20 sts, 2 chs)
Row 11: Turn, csdc in first st, dc in next 9 sts, dc in back bump of next 2 chs, dc in next 10 sts (22 sts)
Row 12-13: Turn, csdc in first st, dc in each st around, join. (22 sts)
/Switch to smaller hook
/Row 14: Do NOT turn. Ch 2 (counts as bpdc), (fpdc around next st, bpdc around next st) around to last st, fpdc around last st, join. (22 sts)
Fasten off, weave in ends. Repeat instructions for 2nd mitt.
I hope you enjoy the pattern! Special thanks to Lion Brand for supplying the lovely yarn, and to Wee Sandy and Kerianne of Boberry Fiber Arts for testing the pattern!
A downloadable pdf of this pattern is also available in my Craftsy store for a $1 fee. The fee for the pdf format is to offset the advertising revenue lost when you print or download the pattern rather than viewing it online.
If you would like to receive notifications of new posts and patterns as they become available, please follow this blog. You can follow by e-mail (look at the sidebar on the right for the follow by email option), or via RSS feed, or via your WordPress.com reader: Follow Stitches ‘N’ Scraps on WordPress.com

Free Pattern – Daydreamer Cardigan
This is the final piece of a 4 piece set, designed to match my Puffy Pinwheel Hat, Striped Booties and Dreaming of Pinwheels blanket. The Anne Geddes Baby yarn by Red Heart quickly became a favorite of mine through these projects, and I hope I have a chance to work with it again soon. It’s soft and squishy, but strong too, and comes in beautiful, bright colors!
This pattern has instructions for sizes 0-6 months, 6-12 months, and 12-24 months. The images show the 6-12 month size.
This pattern is protected by copyright. Please do not distribute or share this pattern in any way other than by sharing a link to this page or to the pattern page on Ravelry. Click here for copyright information.
This pattern contains affiliate links (click for more info). If you click one of these links and then make a purchase, I may be compensated. You get the same great prices, and you will be helping to support this site!
Daydreamer Cardigan
Add this to your Ravelry Queue
Materials:
- Anne Geddes Baby Yarn:
- 20-40 yds Bumble (A)
- 20-40 yds Grass (B)
- 250-350 yds Bluebell (C) (see notes)
- Size G / 6 (4.25 mm) hook or size needed to achieve gauge
- Yarn or tapestry needle
- 2 locking stitch markers
Difficulty:
Experienced – Made in several pieces with decreases, seaming, working into the back loop only, and working in the round.
Sizes:
Pattern is written for 0-6 months with changes for 6-12 months and 12-24 months in ( ). See assembly diagram for measurements.
Gauge:
15 hdc x 12 rows = 4″ square. Gauge matters for a proper fit, so be sure to check your gauge!
Abbreviations used:
- ch = chain
- sc = single crochet
- hdc = half double crochet
- fphdc = front post half double crochet
- bphdc = back post half double crochet
- hdc2tog = half double crochet two stitches together
- sl st = slip stitch
- st(s) = stitch(es)
- sp(s) = space(s)
- rnd = round
- RS = right side
- WS = wrong side
Notes:
- You should be able to get the largest size made with just one skein (340 yds) of color C, but it will be very close. You might want to buy an extra skein just to be on the safe side (plus that way you can make the booties and hat too!).
- Foundation stitches are highly recommended because they are stretchier and leave a nice finished edge. If you do decide to use starting chains instead, you may want to add a single crochet or slip stitch edging around the hemline when you’re done.
Recommended Resources:
- Foundation Crochet Stitches by Jessie at Home
- The Magic Circle by Moogly
- Alternative hdc2tog
- Whipstitch seam through wrong side loops only
- Front & Back Post Crochet by Jessie at Home
Back:
Row 1 (WS): With blue: Work 38 [40, 44] fhdc OR ch 39 [41, 45], hdc in 2nd ch from hook and each ch across. (38 [40, 44] sts)
Row 2: Ch 1, turn, hdc in each st across, switching to green at end of row
Row 3: With green, repeat row 2, switching to yellow at end of row
Row 4: With yellow, ch 3 (counts as dc), turn, dc in blo only of next st and each st across, switching to green at end of row
Row 5: With green, ch 1, turn, hdc in each st across, changing to blue in last st
Row 6: With blue, ch 1, turn, hdc in blo of each st across
Rows 7-31 [33, 34]: Ch 1, turn, hdc in each st across. Mark first and last st of row 21 [22, 24] for later joining.
Row 32 [34, 36]: Ch 1, turn, hdc in next 12 [13, 14] sts, mark last st worked, hdc in each st across.
Row 33 [35, 37] L: Ch 1, turn, hdc in next 10 [11, 12] sts, hdc2tog over next 2 sts, leaving remaining 26 [27, 30] sts unworked (11 [12, 13] sts)
Row 34 [36, 38] L: Ch 1, turn, hdc2tog over next 2 sts, hdc in next 9 [10, 11] sts. (10 [11, 12] sts)
Edging L: Ch 1, working in sides of rows, work 16 [17, 17] sc evenly spaced to marker, move marker to last st worked (for underarm placement), work 28 [30, 33] sc evenly spaced to bottom corner. Fasten off, leaving a long tail for sewing.
Row 33 [35, 37] R: With WS facing, join blue in marked st on row 32 [34, 36]. Ch 1, hdc2tog over next 2 sts, hdc in next 10 [11, 12] sts. (11 [12, 13] sts)
Row 34 [36, 38] R: Ch 1, hdc in next 9 [10, 11] sts, hdc2tog over last 2 sts. Fasten off. (10 [11, 12] sts)
Edging R: With right side facing, join blue with sl st in bottom right corner (last st of row 1). Working in sides of rows, work 28 [30, 33] sc evenly spaced to marker, sc in marked row, move marker to last st worked (for underarm placement), work 15 [16, 16] sc evenly spaced to top corner. Fasten off, leaving a long tail for sewing.
Left [Left, Right] Front:
Row 1 [WS]: With blue: Work 20 [21, 23] fhdc OR ch 21 [22, 24], hdc in 2nd ch from hook and each ch across. (20 [21, 23] sts)
Rows 2-26 [28, 29]: Repeat rows 2-26 [28, 29] of back. On row 21 [22, 24], only mark the last [first, last] stitch of the row.
Row 27 [29, 30]: Turn, sl st in first 2 sts, ch 1, hdc2tog over next 2 sts, hdc in next 16 [17, 19] sts. (17 [18, 20] sts)
Row 28 [30, 31]: Ch 1, turn, hdc in next 14 [15, 18] sts, hdc2tog over next 2 sts, leaving last st unworked. (15 [16, 18] sts)
Row 29 [31, 32]: Ch 1, turn, hdc2tog over next 2 sts, hdc in each st across. (14 [15, 17] sts)
Row 30 [32, 33]: Ch 1, turn, hdc in each st across to last 2 sts, hdc2tog in last 2 sts. (13 [14, 16] sts)
Rows 31-33 [33-35, 34-36]: Repeat rows 29-30 [31-32, 32-33], then repeat row 29 [31, 32] once more.(10 [11, 13] sts)
Sizes 0-6 months & 6-12 months only:
Row 34 [36]: Ch 1, turn, hdc in each st across. Fasten off. (10 [11] sts)
Edging row: With right side facing, join blue with sl st in bottom right corner (last st of row 1). Working in sides of rows along straight edge, work 28 [30, 33] sc evenly spaced to marker, sc in marked row, move marker to last st worked (for underarm placement), work 15 [16, 16] sc evenly spaced to top corner. Fasten off, leaving a long tail for sewing.
Size 12-24 months only:
Row 37: Repeat row 33. (12 sts)
Row 38: Ch 1, turn, hdc in each st across. Do not fasten off. (12 sts)
Edging row: Ch 1, working in sides of rows along straight edge, work 16 [17, 17] sc evenly spaced to marker. Move marker to last st worked (for underarm placement). Work 28 [30, 33] sc evenly spaced to bottom corner. Fasten off, leaving a long tail for sewing.
Right [Right, Left] Front:
Row 1 [WS]: With blue: Work 20 [21, 23] fhdc OR ch 21 [22, 24], hdc in 2nd ch from hook and each ch across. (20 [21, 23] sts)
Rows 2-26 [28, 29]: Repeat rows 2-26 [28, 29] of back. On row 21 [22, 24], only mark the first [last, first] stitch of the row
Row 27 [29, 30]: Turn, hdc in next 16 [17, 19] sts, hdc2tog over next 2 sts, leaving last 2 sts unworked. (17 [18, 20] sts)
Row 28 [30, 31]: Ch 1, turn, sl st in next st, hdc2tog over next 2 sts, hdc in next 14 [15, 18] sts. (15 [16, 18] sts)
Row 29 [31, 32]: Ch 1, turn, hdc in each st across to last 2 sts, hdc2tog in last 2 sts. (14 [15, 17] sts)
Row 30 [32, 33]: Ch 1, turn, hdc2tog over next 2 sts, hdc in each st across. (13 [14, 16] sts)
Rows 31-33 [33-35, 34-36]: Repeat rows 29-30 [31-32, 32-33], then repeat row 29 [31, 32] once more.(10 [11, 13] sts)
Sizes 0-6 months & 6-12 months only:
Row 34 [36]: Ch 1, turn, hdc in each st across. Fasten off. (10 [11] sts)
Edging row: Ch 1, working in sides of rows along straight edge, work 16 [17, 17] sc evenly spaced to marker. Move marker to last st worked (for underarm placement). Work 28 [30, 33] sc evenly spaced to bottom corner. Fasten off, leaving a long tail for sewing.
Size 12-24 months only:
Row 37: Repeat row 33. (12 sts)
Row 38: Ch 1, turn, hdc in each st across. Do not fasten off. (12 sts)
Edging row: With right side facing, join blue with sl st in bottom right corner (last st of row 1). Working in sides of rows along straight edge, work 28 [30, 33] sc evenly spaced to marker, sc in marked row, move marker to last st worked (for underarm placement), work 15 [16, 16] sc evenly spaced to top corner. Fasten off, leaving a long tail for sewing.
Sleeve:
(Make 2)
Row 1 WS: With blue: Work 23 [24, 24] fhdc, join with sl st to first st. (23 [24, 24] sts)
OR ch 24 [25, 26] being careful not to twist the chain, join with sl st to first ch to form a circle, ch 1, hdc in each ch around. (23 [24, 24] sts)
Rnd 2: Ch 1, turn, hdc in each st around, join with sl st to first st, changing to green.
Rnd 3: With green, ch 1, turn, hdc in each st around, join with sl st to first st, changing to yellow.
Rnd 4: With yellow, ch 3 (counts as dc), turn, sk first st, dc in blo of next st and each st around, join with sl st to first st, changing to green.
Rnd 5: With green, ch 1, turn, hdc in each st around, join with sl st to first st, changing to blue.
Rnd 6 [6, 6-7]: With blue, ch 1, turn, hdc in blo of each st around, join with sl st to first st.
Rnd 7 [7, 8]: Ch 1, turn, 2 hdc in first st, hdc in each st around, join with sl st to first st. (24 [25, 25] sts)
Rnd 8 [8, 9]: Ch 1, turn, hdc in each st around, join with sl st to first st.
Rnd 9 [9, 10]: Ch 1, turn, hdc in each st around to last st, 2 hdc in last st, join with sl st to first st. (25 [26, 26] sts)
Rnd 10 [10, 11]: Repeat rnd 8 [8, 9].
Rnds 11-23 [11-25, 12-27]: Repeat Rnds 7-10 [7-10, 8-11] three more times, then repeat rnd 7 [ 7-9, 8-11] once more. (32 [34, 34] sts)
Rnd 24 [26, 28]: Ch 1, turn, hdc in next 16 [17, 17] sts, mark last st worked, hdc in each st around, join with sl st to first st.
Fasten off, leaving a long tail for sewing.
Pocket:
(Make 2 – optional)
Row 1 (WS): With blue, work 10 (10, 11) fhdc OR ch 11 (11, 12), hdc in 2nd ch from hook and each ch across. (10 [10, 11] sts]
Rows 2-7 [7, 9]: Ch 1, turn, hdc in each st across, changing to yellow at end of last row. Do not fasten off blue.
Row 8 [8, 10]: With yellow, ch 1, turn, hdc in each st across, changing to green at end of row.
Row 9 [9, 11]: With green, sl st in each st across, fasten off green.
Edging round: With right side facing, insert hook into side of row 8 [8, 10] (directly below where you just fastened off the green, as shown in image below), and draw up the blue yarn that you dropped at the end of row 7 [7, 9].
With blue, working into sides of rows, work 10 [10, 12] sc evenly spaced to bottom corner. Working in bottom of row 1, work 3 sc in first st, sc across to last st, 3 sc in last st. Working into sides of rows, work 10 [10, 12] sc evenly spaced to corner. Working across row 8 [8, 10] (behind row 9 [9, 11] as shown in image below), 3 sc in first st, sc in each st across, 3 sc in last st, join with sl st to first st of edging round. Fasten off.
Assembly:
- With right sides facing:
- Sew back to each front piece at shoulder seams.
- Sew side seams from hem to underarm markers. Remove underarm markers.
- With right sides facing, line up sleeve with armhole opening so that the 1st stitch / joining on the sleeve (where the tail is) lines up with the underarm / side seam, and the marked stitch on the sleeve lines up with the shoulder seam. Sew together. Repeat for 2nd sleeve.

Button Band & Collar Edging:
Row 1L [WS]: With WS facing, join blue with sl st to bottom corner of left front as shown in assembly diagram. Work 33 [35, 37] hdc evenly spaced to neck opening, fasten off.
Row 1R [WS]: With WS facing, join blue with sl st to bottom of neck opening on right front as shown in assembly diagram.Work 33 [35, 37] hdc evenly spaced to hem, changing to green in last st.
Row 2:
- With green, ch 1, turn, hdc in next 2 [4, 2] sts, [ch 1, sk next st (buttonhole made), sc in next 6 [6, 7] sts] 4 times, ch 1, sk next st, sc in next st, 3 hdc in next st. (35 [37, 39] sts)
- Working along neckline, work 15 [15, 17] hdc evenly spaced to shoulder seam, work 18 [19, 21] hdc evenly spaced across back to next shoulder seam, work 15 [15, 17] hdc evenly spaced to corner. (48 [49, 55] sts)
- Working into row 1L, 3 hdc in next st, hdc in remaining 32 [34, 36] sts, changing to blue in last st. (35 [37, 39] sts)
Row 3: With blue, ch 1, turn, working in blo, hdc in next 33 [35, 37] sts, 3 hdc in next st, hdc in next 49 [50, 56] sts, 3 hdc in next st, hdc in next 33 [35, 37] sts. Fasten off. (122 [127, 137] hdc)
Finishing:
- Sew buttons onto front, lined up with button holes.
- Using picture as a guide, sew patch pockets into place. I like to use a backstitch or running stitch just under the top edge so the seam is hidden.
- Weave in any remaining ends.
I hope you enjoy the pattern! Thank you to Red Heart, for supplying the lovely yarn, and to Jen Mackenzie of AG Handmades for testing the pattern!
A downloadable pdf of this pattern is also available in my Craftsy store for a $1 fee. The fee for the pdf format is to offset the advertising revenue lost when you print or download the pattern rather than viewing it online.
If you would like to receive notifications of new posts and patterns as they become available, please follow this blog. You can follow by e-mail (look at the sidebar on the right for the follow by email option), or via RSS feed, or via your WordPress.com reader: Follow Stitches ‘N’ Scraps on WordPress.com


