Free Pattern – Storm Clouds
Diagonal puff stitch gives this 14″ pillow a soft, plush texture, which works well with the heathered tones of the Lion Brand Heartland yarn. When completed, the 3 blocks of color form diagonal striping patterns that are distinctly different on the front and on the back. The construction also makes it easy to take the pillow form out for washing when needed.

This pattern is protected by copyright. Please do not distribute or share this pattern in any way other than by sharing a link to this page or to the pattern page on Ravelry. Click here for copyright information.
This pattern contains affiliate links (click for more info). If you click one of these links and then make a purchase, I may be compensated. You get the same great prices, and you will be helping to support this site!
Storm Clouds

Add this to your Ravelry Queue
Materials:
- Lion Brand Heartland yarn:
- 175 yds Glacier Bay
- 250 yds Great Smoky Mountains
- 250 yds Mount Ranier
- Size I / 9 (5.5 mm) hook or size needed to obtain gauge
- Yarn or tapestry needle
- Locking stitch markers or safety pins
- 14″ square pillow form
Difficulty:
Intermediate – Diagonal puff stitch (a variation of diagonal box stitch) with no shaping and simple assembly.
Size:
14 inch square
Gauge:
12.5 dc x 6.5 rows = 4″. Each “box” of the diagonal box stitch should be just under 1 inch.
Abbreviations used:
- ch = chain
- sc = single crochet
- dc = double crochet
- puff = puff stitch (see Special Stitch)
- YO = yarn over
- sl st = slip stitch
- st(s) = stitch(es)
- sp(s) = space(s)
- RS = right side
- WS = wrong side
Special Stitch:
Puff Stitch (puff): YO, insert hook into specified stitch or space, draw up a loop to the same height as your current row. Repeat this 5 more times in the same stitch or space, for a total of 13 loops. YO and draw through all 13 loops. Finish with a slip stitch to close.

Recommended Resources:
Instructions:

Section 1 (increasing):
Note: In this section, each row will have one more “box” than the previous row.
Row 1 (WS): With Glacier Bay: ch 6, dc in 4th ch from hook, puff in next ch, dc in last ch. (1 box)
Row 2: Ch 6, turn, dc in 4th ch from hook, puff in next ch, dc in next ch, sl st in ch-3 sp from next box, ch 3, (dc, puff, dc) in same sp. (2 boxes)
Rows 3-16: Ch 6, turn, dc in 4th ch from hook, puff in next ch, dc in next ch, *sl st in ch 3 sp from next box, ch 3, (dc, puff, dc) in same sp, repeat from * in each box across. (16 boxes on row 16)
Note: The width of each straight edge should now be approximately 14 inches.
Section 2 (neither increasing nor decreasing):
Note: In this section, each row will have 16 boxes. This extends the piece to make it a rectangle instead of a square.
Row 17: Ch 6, turn, dc in 4th ch from hook, puff in next ch, dc in next ch, *sl st in ch 3 sp from next box, ch 3, (dc, puff, dc) in same sp, repeat from * in each box across to last box, sl st in ch 3 sp from last box.
Row 18: Ch 3, turn, *sl st in ch 3 sp from next box, ch 3, (dc, puff, dc) in same sp, repeat from * in each box across, changing to Great Smoky Mountains at the end of the row.
Row 19: With Great Smoky Mountains: Ch 6, turn, dc in 4th ch from hook, puff in next ch, dc in next ch, *sl st in ch 3 sp from next box, ch 3, (dc, puff, dc) in same sp, repeat from * in each box across to last box, sl st in ch 3 sp from last box.
Row 20: Ch 3, turn, *sl st in ch 3 sp from next box, ch 3, (dc, puff, dc) in same sp, repeat from * in each box across.
Rows 21-31: repeat rows 19 & 20 five times, then repeat row 19 once more.
Row 32: Ch 3, turn, sl st in ch 3 sp from next box, changing to Mount Ranier. With Mount Ranier: Ch 3, (dc, pucc, dc) in same sp, *sl st in ch 3 sp from next box, ch 3, (dc, puff, dc) in same sp, repeat from * in each box across.
Rows 33-38: Repeat rows 19 & 20 three times more. Mark last st on row 38 for edging
Note: Piece should now measure approximately 14 inches x 32 inches
Section 3 (decreasing):
Note: In this section, each row will have 1 fewer box than the previous row
Rows 39-52: Ch 3, turn, *sl st in ch 3 sp from next box, ch 3, (dc, puff, dc) in same sp, repeat from * in each box across to last box, sl st in ch 3 sp from last box. (2 boxes at the end of row 52)
Row 53: Ch 3, turn, sl st in ch 3 sp from first box, ch 3, (dc, puff, dc) in same sp, sl st in last box. (1 box).
Finishing: Ch 3, turn, sl st in ch 3 sp of adjacent box (corner), fasten off.
Edging:
- With RS facing, join Mount Rainier with sl st in marked stitch from Row 38.
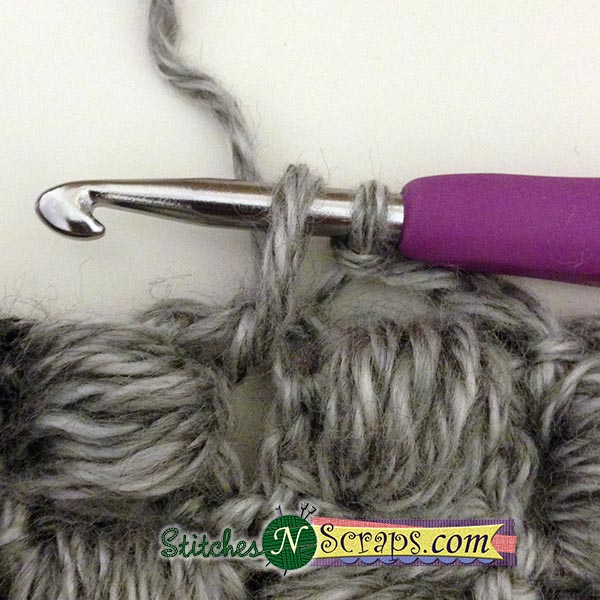
- Working across long edge: Ch 3, sk first box, sl st in space before next box (see picture)
- (Ch 3, sk next box, sl st in space before next box) 6 times, change to Great Smoky Mountains.
- (Ch 3, sk next box, sl st in space before next box) 13 times, change to Glacier Bay
- (Ch 3, sk next box, sl st in space before next box) 17 times, ch 3, sl st in corner.
- Continuing across short edge: (Ch 3, sk next box, sl st in space before next box) 15 times, ch 3, sl st in corner, fasten off.
Note: You should now have a ch 3 space over every box around the entire edge.
Seaming / Finishing:
- Lay work flat, RS facing, with Mount Rainier on the top as shown below.
- Count 9 boxes up from the bottom on each side, and fold edge over. Then count 13 boxes down from the top and fold. (see fold lines on color chart). This should leave a square of 16 x 16 boxes on the front. On the back, the top and bottom edges should overlap by 6 boxes. Use stitch markers or safety pins to hold the edges in place. Make sure the ch 3 sps along front and back edges line up.

- Working through all layers, join any color with sl st in corner. Ch 1, 3 sc in each ch sp across, fasten off. Repeat for the other side.

- Weave in all ends, turn pillow right side out and insert pillow form.


I hope you enjoy the pattern! Special thanks to Alexandra of Eye Love Knots for testing the pattern!
A downloadable pdf of this pattern is also available in my Craftsy store for a $1 fee. The fee for the pdf format is to offset the advertising revenue lost when you print or download the pattern rather than viewing it online.
If you would like to receive notifications of new posts and patterns as they become available, please follow this blog. You can follow by e-mail (look at the sidebar on the right for the follow by email option), or via RSS feed, or via your WordPress.com reader: Follow Stitches ‘N’ Scraps on WordPress.com


4 Comments
Kathryn McDowell Pless
How pretty! I love the colors and texture in this pillow.
Pia Thadani
Thank you!
Caissa McClinton @artlikebread
I love it! Very well done! I want to make one!
Pia Thadani
Thanks! I’m so glad you like it 🙂 I can’t wait to see how yours turns out