Free Pattern – Starry Skies Boot Cuffs
These fun boot cuffs use the same stitch pattern as the Starry Skies cowl / scarf. When made with a sparkly yarn like in the original cowl / scarf pattern, the lace design can be very dressy. In the set shown here, I used a fuzzier, self striping yarn, which gives a more casual and fun look.
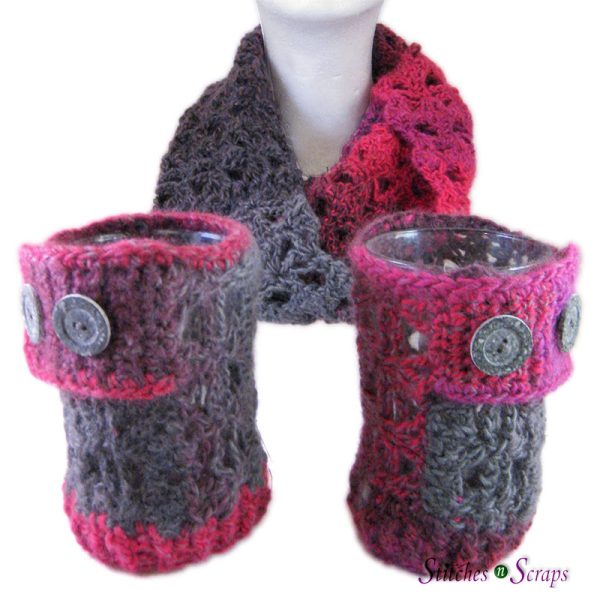
With ribbing on the bottom and an adjustable button band on the top, these cuffs can fit a wide range of sizes. The stitch pattern works up quickly, and because it is lacy, it uses less yarn while still being quite warm. The whole set shown here was made with only 2 skeins! These factors combined make this a great set for gifting.
This pattern is protected by copyright. Please do not distribute or share this pattern in any way other than by sharing a link to this page or to the pattern page on Ravelry. Click here for copyright information.
This pattern contains affiliate links (click for more info). If you click one of these links and then make a purchase, I may be compensated. You get the same great prices, and you will be helping to support this site!
Starry Skies Boot Cuffs


Add this to your Ravelry Queue
Materials:
- 150 yds Worsted weight yarn – shown in Universal Yarn Classic Shades – Color 732 “Stravinsky”
- Size J / 10 (6 mm) hook or size needed to obtain gauge
- Size I / 9 (5.5 mm) hook (or one size smaller than larger hook used).
- 4 buttons, 1 – 1.25″ (25 – 32mm)
- Yarn or tapestry needle
Difficulty:
Intermediate – Cluster stitches, front and back post stitches, and working in bottoms of stitches / ends of rows.
Size:
Approximately 6” x 6”
Gauge:
8 rows of pattern should be approximately 4.5” wide x 4” tall. The cuff will stretch quite a bit and is adjustable at the top, so exact gauge is not critical for this pattern.
Abbreviations used:
- ch = chain
- sc = single crochet
- dc = double crochet
- fpdc = front post double crochet
- bpdc = back post double crochet
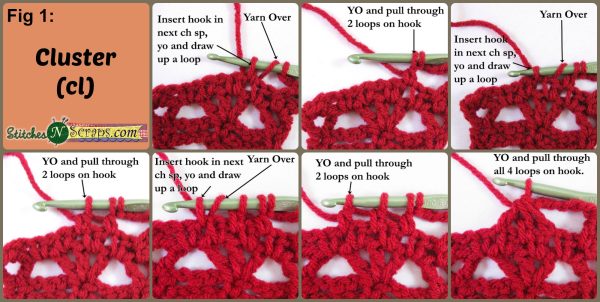
- cl = cluster (see Special Stitches)
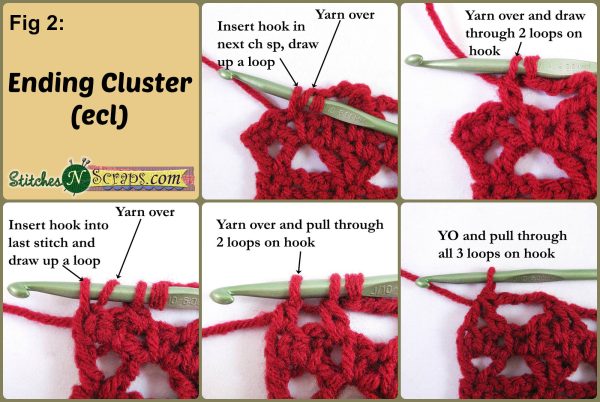
- bcl = beginning cluser (see Special Stitches)
- ecl = ending cluster (see Special Stitches)
- st(s) = stitch(es)
- sl st = slip stitch
- sk = skip
- sp(s) = space(s)
- YO = yarn over
- RS = right side
- WS = wrong side
Notes:
- The stitch pattern is provided in both written and chart forms, so you can follow either one (not both). Both are the same pattern.
- The ecl stitch here is the same as it was for the cowl / scarf, except that it’s not all the way at the end of the row, there is one more stitch after it
Special Stitch:
Cluster (cl):Worked over 3 ch 1 sps: (Yo, insert hook in next ch 1 sp, yo and draw up a loop, yo and pull through 2 loops on hook, sk next st), 3 times, yo and pull through all 4 loops on hook.
Beginning Cluster (bcl):Worked at beginning of row, over 2nd and 3rd sts, and first ch 1 sp: Yo, insert hook in next st, yo and draw up a loop, yo and pull through 2 loops on hook, sk next st, yo, insert hook in next sp, yo and draw up a loop, yo and draw through 2 loops on hook, yo and draw through all 3 loops on hook.
Ending Cluster (ecl):Worked at end of row, over last ch 1 sp and next 2 sts: Yo, insert hook in next ch 1 sp, yo and draw up a loop, yo and pull through 2 loops on hook, sk next st, yo, insert hook in next st, yo and draw up a loop, yo and draw through 2 loops on hook, yo and draw through all 3 loops on hook.
Instructions:
Cuff:
With larger hook, ch 22 (foundation). Mark 14th ch on right cuff, for edging (no need to mark for left cuff).
Row 1 (WS): Sc in 2nd ch from hook and in next 2 chs, (ch 1, sk next ch, sc in next ch) 8 times, sc in last 2 chs, turn.
Row 2: Ch 3 (counts as a dc now and throughout), bcl, (ch 5, sk next st, cl) twice, ch 5, ecl, dc in next st, turn.
Row 3: Ch 1, sc in first st, sc in top of ecl, (ch 5, sc in top of next cl) twice, ch 5, sc in top of bcl, sc in last st, turn.
Row 4: Ch 3, (dc, ch 1, dc) in second sc, [ch 1, sk next ch 5 sp, (dc, ch 1, dc, ch1, dc) in next sc] twice, ch1, sk next ch 5 sp, (dc, ch 1, dc) in next sc, dc in last sc, turn.
Row 5: Ch 1, sc in first 2 sts, sc in first ch 1 sp, (ch 1, sk next st, sc in next ch 1 sp) 8 times, sc in last 2 sts, turn.
Rows 6 – 23: Repeat rows 2-5 four more times, then repeat rows 2 – 3 once more.

Button flap for right cuff:
Row 24: Ch 3, (dc, ch 1, dc) in second sc, ch 1, sk next ch 5 sp, (dc, ch 1, dc) in next st, mark last ch sp for joining, (ch1, dc) in same sp, ch1, sk next ch 5 sp, (dc, ch 1, dc, ch1, dc) in next sc, ch1, sk next ch 5 sp, (dc, ch 1, dc) in next sc, dc in last sc, fasten off, turn.
Row 25: With WS facing, join yarn with sc in marked sp from row 24, sc in each st and in each ch sp across, turn. (7 sc)
Rows 26-27: Ch 1, sc in each st across, turn
Row 28: Ch1, sc in first 3 sc, ch 1, sk next sc (buttonhole made), sc in next 3 sc, turn.
Row 29: Ch1, sc in each st across, turn
Rows 30-35: Repeat rows 28 – 29 four times more, fasten off.
Edging for right cuff:
- Join with sc in marked ch on foundation, working in bottom of foundation, sc in next 5 sts, 3 sc in corner st.
- Working in sides of rows, 48 sc across top of cuff and button flap to corner, 3 sc in corner st.
- Sc in next 5 sts along end of button flap, 3sc in corner st.
- Working in sides of rows, 12 sc across bottom of button flap, fasten off
Button flap for left cuff:
Row 24: Ch 3, (dc, ch 1, dc) in second sc, ch1, sk next ch 5 sp, (dc, ch 1, dc, ch1, dc) in next sc, ch 1, sk next ch 5 sp, (dc, ch 1, dc, ch 1, dc) in next st, mark last ch sp for joining, ch1, sk next ch 5 sp, (dc, ch 1, dc) in next sc, dc in last sc, do NOT fasten off, turn.
Row 25: Sc in each st and in each ch sp across to marker, turn. (7 sc)
Rows 26-35: Repeat rows 26 – 35 of button flap for right cuff
Edging for left cuff:
- Join with sc in side of last st on Row 25 (next to the marker), working in sides of rows, 11 sc across bottom of button flap to corner, 3sc in corner st.
- Sc in next 5 sts along end of button flap, 3sc in corner st.
- Working in sides of rows, 48 sc across top of button flap and cuff to corner, 3 sc in corner st.
- Working in bottom of foundation, sc in next 6 sts, leaving remaining sts unworked. Fasten off.
Joining:
Fold cuff in half, right sides together. Sew edges together, starting at the bottom of the cuff and stopping just before the button band. Leaving a slight gap before the button band helps it to lay flat.
Ribbing:
Do not turn at end of rounds
Rnd 1: With smaller hook and with RS facing, join with sl st anywhere along bottom of cuff, ch 2 (counts as hdc), working in sides of rows, work 37 hdc, evenly spaced around bottom of cuff, join with sl st to first hdc. Don’t turn. (38 hdc)
Rnds 2-3: Ch 2 (counts as bpdc), (fpdc around next st, bpdc around next st) 18 times, fpdc around next st, join. Fasten off at end of round 3
Finishing:
- Sew 2 buttons on each cuff, on rows 3 & 7, aligned with button holes (see Fig 4 for placement)
- Sew in all ends.

I hope you enjoy the pattern! A downloadable pdf of this pattern and the matching boot cuffs is also available on Ravelry for a fee. The fee for the pdf format is to offset the advertising revenue lost when you print or download the pattern rather than viewing it online.
Do you want the best of Stitches n Scraps delivered right to your inbox? Don’t miss a stitch – Subscribe now!


You May Also Like
Children’s Fingerless Mitts Crochet Pattern

Tunisian Foundation Row Crochet Tutorial
