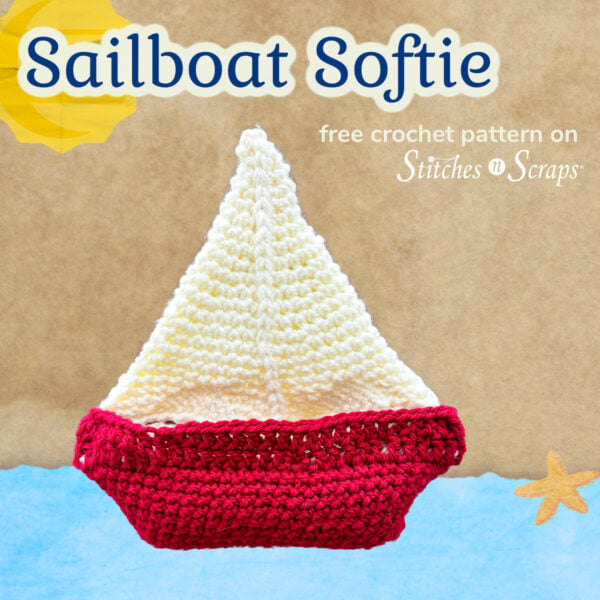
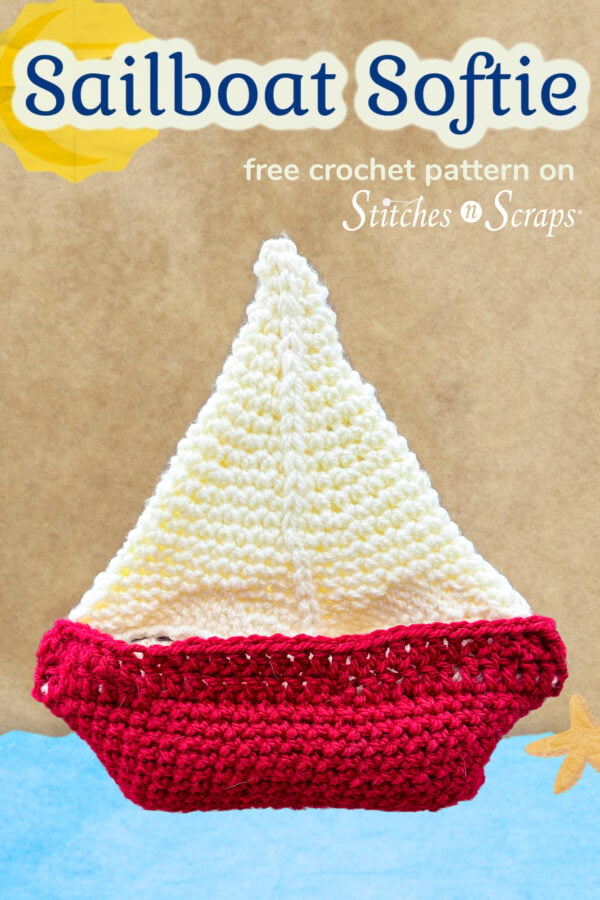
Crochet Sailboat Softie Toy Pattern
Set sail with this adorable crochet sailboat softie toy, whether bound for dreamland shores or faraway adventures! It makes a delightful toy or décor piece, with a tall, pointed sail rising above a sturdy hull. The pattern comes together easily with crocheted joins, so minimal sewing is involved. In worsted-weight yarn, it’s the perfect size for little hands to play with, or to bring a touch of seaside charm to any space.
This content is protected by copyright. See this Terms of Use / Copyright page for more information.
This post contains sponsored content and/or affiliate links. If you click an affiliate link and make a purchase, I may get a commission.
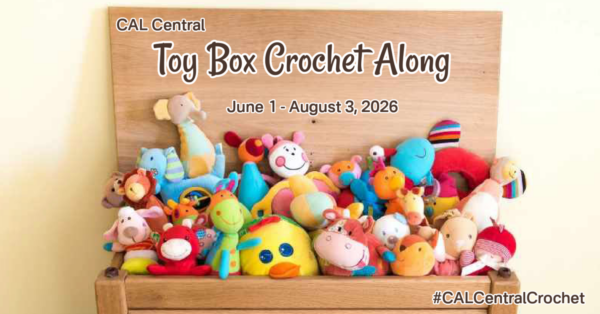
CAL Central Toybox Crochet Along
This crochet sailboat softie is my pattern for the 2026 CAL Central Toybox Crochet Along. Make a fun new toy pattern every week, and remember to sign up for the giveaway too! Share your work and see everyone else’s on the CAL Central Facebook group.
Yarn Choices
Choose any yarn you like for your crochet sailboat softie! The pattern includes yardage and size information for worsted-weight yarns, but you can use thinner or thicker yarns to make a smaller or larger boat. The sample uses a combination of different worsted-weight yarns from my stash.
Running Stitch Markers
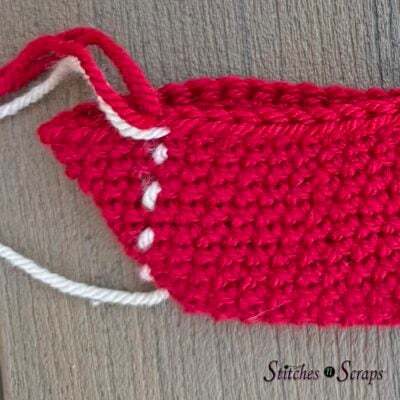
Instead of using a traditional stitch marker to mark the first stitch of each round, try a running stitch marker! It’s nothing more than a piece of scrap yarn, flipped back and forth over the first stitch of each round. Learn how in this tutorial.
Adding Weight
The sailboat softie should stand up fairly well on its own by adjusting the sail as needed to balance the weight. If you are making it to display, consider adding some weight to the hull stuffing to help stabilize it.
Fairfield sent me these Poly Pellets for a previous project, and I love to use them for exactly this purpose. Other options include beads, vase filler, gravel, or even a small stone.

Place smaller items into a section of nylon stocking and seal any open ends to prevent them from working their way out of the stuffing over time.
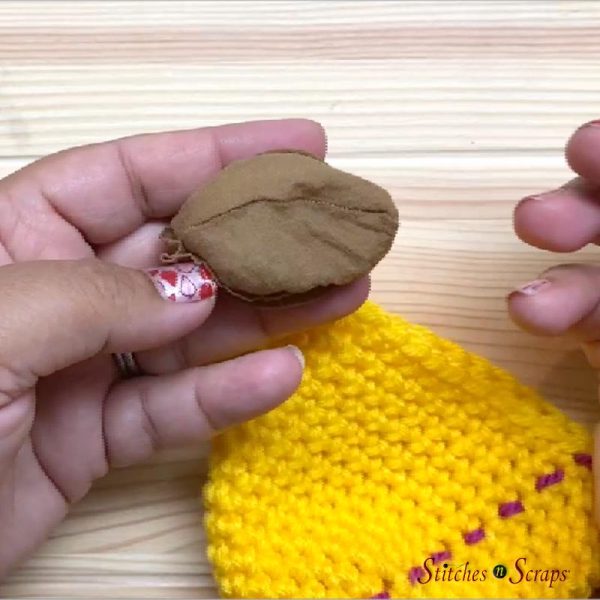
IMPORTANT: Please do NOT use this option if this will be a toy, particularly for small children. Any items that do work their way out could pose a choking hazard.


Materials
- Yarn: Worsted-weight yarn
- 35 yds A (hull color)
- 25 yds B (deck color)
- 40 yds C (sail color)
- Hook: Size H / 5 mm crochet hook or size needed to match gauge
- Notions:
- Fairfield Poly-Fil or other stuffing material
- Fairfield Poly Pellets or other weighted stuffing material (optional)
- Nylon stocking to hold weighted stuffing material (optional)
- Stitch markers
- Scissors
- Tapestry needle
Project Level
Easy: Some shaping. Working through 2 layers together. Minimal seaming.
Size
Length: 8″ / 20 cm
Height: 9″ / 22.5 cm
Width: 2″ / 5 cm
Gauge
14 yusc x 16 rows/rnds = 4″ / 10 cm
Exact gauge is not critical but will affect finished size and yardage needed.
Abbreviations used
This pattern uses US terms.
| ch | chain |
| dc | double crochet |
| rep | repeat |
| rnd | round |
| RS | right side(s) |
| sc | single crochet |
| sl st | slip stitch |
| sp | space |
| st(s) | stitch(es) |
| WS | wrong side(s) |
| yo | yarn over |
| yu | yarn under |
| yusc | yarn under single crochet (see Special Stitches) |
Recommended Resources
- Almost Invisible Single Crochet Increase
- Join Crochet Rounds Without a Slip Stitch
- Continuous rounds and running stitch markers (an alternative to traditional st markers)
- Why Continuous Rounds Shift
Special Stitches
Yarn Under (yu): Bring yarn under hook from back to front.
Yarn Under Single Crochet (yusc): Insert hook where indicated, yu and pull up a loop, yo and pull through both loops on hook.
Increase (inc): Yusc in back loop only of indicated st, yusc in both loops of same st. Inc counts as 2 yusc in stitch counts at end of rows/rnds. See this Almost Invisible Increase tutorial for a closer look.
Invisible Join: Remove working loop from hook. Insert hook from back to front through first st of rnd, place working loop back on hook and pull through from front to back. See this Joining Rounds tutorial for a closer look.
Instructions
Most of pattern is worked in continuous rounds, do not join or turn unless specified. Mark first st of rnd and move marker up with each rnd.
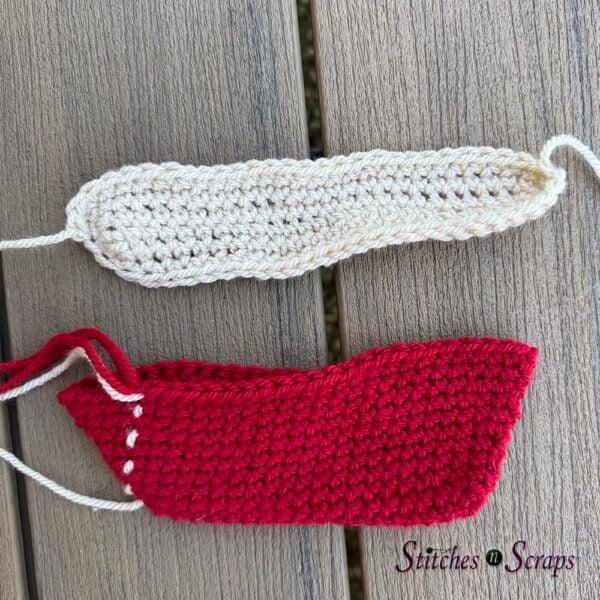
Deck
With B, ch 27
Rnd 1 (RS): Yusc in 2nd ch from hook and in next 24 chs, 3 yusc in last ch, place marker in last st made, working on opposite side of chains, yusc in next 24 chs, 2 yusc in last ch. (54 sts)
Rnds 2-3: 2 yusc in next st, yusc in each st to m, 3 yusc in marked st, move m to 2nd of 3 sts just made, yusc in each st around, yusc in same st as first st, join with invisible join. (58 sts)
Fasten off, weave in all ends
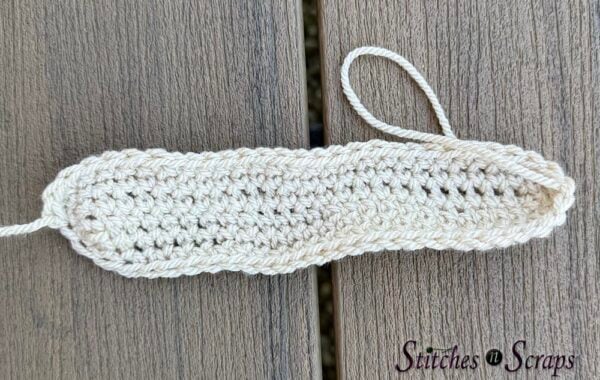
Hull
With A, ch 20.
Rnd 1 (RS): Yusc in 2nd ch from hook and in next 17 chs, 2 yusc in last ch, pm in last st made, working on opposite side of chains, yusc in next 18 chs. (38 sts)
Rnd 2: [Inc in next st, yusc in next 18 sts] twice. (40 sts)
Rnd 3: [Yusc in next 19 sts, inc in next st] twice (42 sts)
Rnd 4: Yusc in next st, inc in next st, yusc in next 20 sts, inc in next st, yusc in each st around. (44 sts)
Rnd 5: [Inc in next st, yusc in next 21 sts] twice. (46 sts)
Rnd 6: Yusc in next 2 sts, inc in next st, yusc in next 22 sts, inc in next st, yusc in each st around. (48 sts)
Rnd 7: Yusc in next st, inc in next st, yusc in next 23 sts, inc in next st, yusc in each st around. (50 sts)
Rnd 8: Yusc in next 3 sts, inc in next st, yusc in next 24 sts, inc in next st, yusc in each st around. (52 sts)
Rnd 9: Yusc in next 2 sts, inc in next st, yusc in next 25 sts, inc in next st, yusc in each st around. (54 sts)
Rnd 10: Yusc in next 4 sts, inc in next st, yusc in next 26 sts, inc in next st, yusc in each st around. (56 sts)
Rnd 11: Yusc in next 3 sts, inc in next st, yusc in next 27 sts, inc in next st, yusc in each st around, join with invisible join in first st, do not fasten off. (58 sts)
Join Hull and Deck
Arrange Deck around Rnd 11 of Hull, with RS facing up. Line up corner points and pin in place as desired with stitch markers.
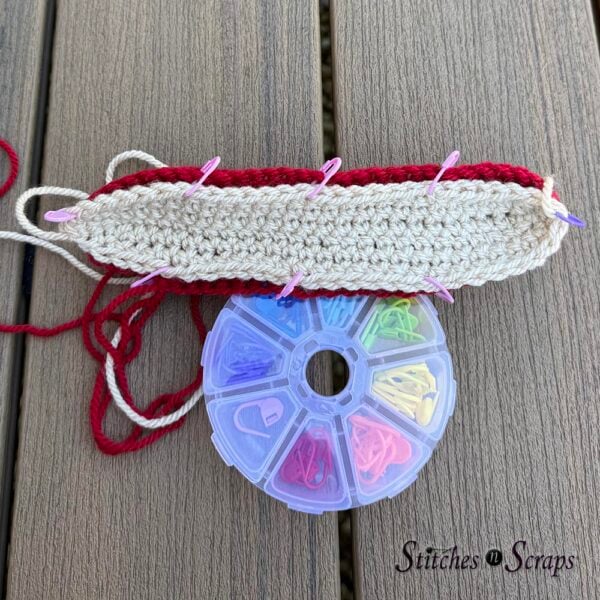
While working Rnd 12, begin stuffing Hull when the rnd is approximately 2/3 of the way completed. Do not overstuff. Deck should stay flat or slightly concave when stuffed – Sail will help it to maintain that position.
If desired, add weighted material to bottom of stuffing. If using beads or other small objects, wrap them in a stocking to keep them from working loose. IMPORTANT – do not use this option if making this for a small child, as any small objects that do come loose can become a choking hazard.
Rnd 12: Working through both layers (Hull and Deck), ch 2 (does not count as a st), dc in first and each st around, stuffing Hull lightly as you go, join with invisible join.
Rnd 13: Ch 3 (counts as dc), dc in next and each st around, join with invisible join, fasten off.

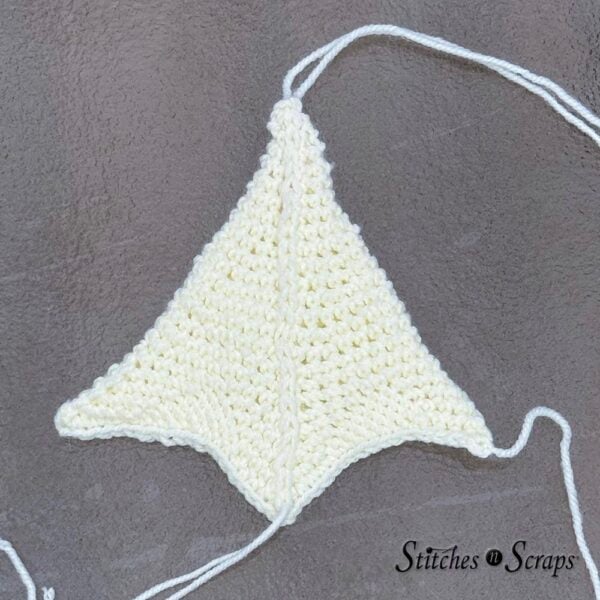
Sail
Top Section
With C, ch 2
Rnd 1: 4 yusc in 2nd ch from hook. (4 sts)
Rnd 2 and all even rnds through Rnd 18: Yusc in each st around.
Rnd 3: 2 yusc in each st around. (8 sts)
Rnd 5: [2 yusc in next st, yusc in next st] around. (12 sts)
Rnd 7: [2 yusc in next st, yusc in next 2 sts] around. (16 sts)
Rnd 9: [2 yusc in next st, yusc in next 3 sts] around. (20 sts)
Rnd 11: [2 yusc in next st, yusc in next 4 sts] around. (24 sts)
Rnd 13: [2 yusc in next st, yusc in next 5 sts] around. (28 sts)
Rnd 15: [2 yusc in next st, yusc in next 6 sts] around. (32 sts)
Rnd 17: [2 yusc in next st, yusc in next 7 sts] around. (36 sts)
Rnd 19: [2 yusc in next st, yusc in next 8 sts] around. (40 sts)
Curved Bottom Section
For this section, sl sts count as sts. Work into top of sl sts just as you would work into top of other sts.
Rnd 20: Yusc in next st, *(yusc, ch 1, yusc) in next st, yusc in next 3 sts, sl st in next 3 sts,** yusc in next 3 sts; rep from * 3 times more, ending at ** on last rep, yusc in last 2 sts. (32 yusc, 12 sl sts, 4 ch-1 sps)
Rnd 21: Yusc in first 2 sts, *(yusc, ch 1, yusc) in next ch-1 sp, yusc in next 3 sts, sl st in next 5 sts,** yusc in next 3 sts; rep from * 3 times more, ending at ** on last rep, yusc in last st. (32 yusc, 20 sl sts, 4 ch-1 sps)
Rnd 22: Yusc in first 3 sts, *(yusc, ch 1, yusc) in next ch-1 sp, yusc in next 3 sts, sl st in next 7 sts, yusc in next 3 sts; rep from * 3 times more times. (32 yusc, 28 sl sts, 4 ch-1 sps)
Rnd 23: Sl st in first st, *yusc in next 3 sts, (yusc, ch 1, yusc) in next ch-1 sp, yusc in next 3 sts,** sl st in next 9 sts; rep from * 3 times more, ending at ** on last rep, sl st in last 8 sts, sl st in each st to first ch-1 sp, sl st in ch-1 sp. (32 yusc, 36 sl sts, 4 ch-1 sps)
Flatten sail so working yarn is at 1 corner, oppsite ch-1 sp is at other corner, and remaining 2 ch-1 sps meet at center.
Joining Row (RS): Working through both layers, ch 3, yusc in each st across bottom of Sail to next ch-1 sp, 2 yusc in center ch-1 sp, sc in each st across bottom of Sail to opposite corner, ch 3, sl st in corner ch-1 sp. Fasten off. Do not stuff Sail.
Mast
Mast is made with surface crochet, and seals the 2 layers of sail together along the center line while creating a decorative ridge on the front.
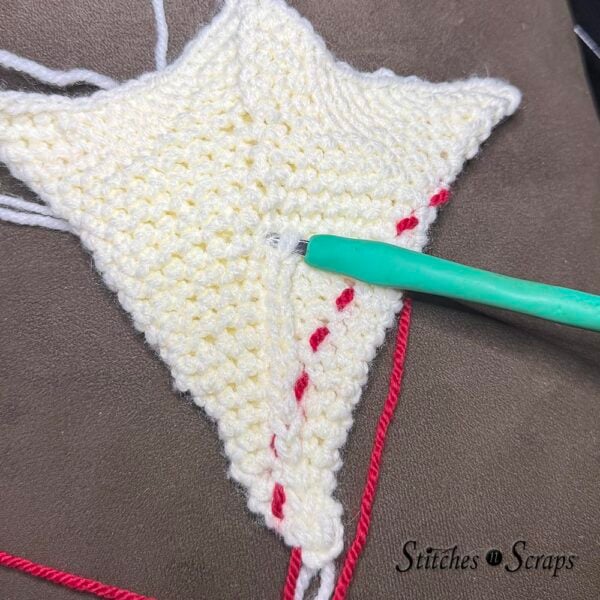
With RS up, working with 2 strands of C held together as one and with working yarn at back of work, insert hook through both layers as close as possible to top point, yo and pull a loop up from back, working through both layers in a straight line from top point to center point of bottom, *insert hook in next row, yo and pull a loop up and through loop on hook; rep from * to bottom. Fasten off, leaving a 1 strand of tail long for sewing.
Weave in all tails except long tail for sewing.
Assembly
Using long tail of B, sew center point of Sail to center of Deck. When finished sewing, pull end down through stuffing to bottom of boat and trim.
Pinch one corner of Rnd 13 of Hull together, trapping corner of Sail between layers of Hull. With A, sew through all 3 layers to hold corner of sail in place. Weave in end. Repeat for opposite corner.
Weave in any remaining ends, and set sail with your new sailboat softie!
Share this Crochet Sailboat Softie Pattern on Pinterest!
Here’s an image perfect for pinning:
Rate this Crochet Sailboat Softie Pattern!
I hope you enjoy this crochet sailboat softie pattern. A downloadable pdf of this pattern is available on Ravelry for a fee.
Interested in using this pattern for a class or workshop? Check out my Terms of Use for usage details.
Do you want the best of Stitches n Scraps delivered right to your inbox? The Stitches n Scraps email newsletter includes highlights from the blog as well as special features not available elsewhere. Don’t miss a stitch – Subscribe now!
