Tutorial – Knit Diagonal Basketweave
The Diagonal Basketweave stitch creates a lovely, cross hatched texture. It looks a little intimidating at first, but with a 2 stitch and 2 row repeat, it’s easier to learn than you might think!

Diagonal Basketweave Photo Tutorial:
(scroll down for video tutorial)
The diagonal basketweave pattern is created by crossing stitches over one another. You can think of it like mini, 2-stitch cables. The 2 row repeat makes the stitches cross in alternating directions from row to row.
Start with an odd number of stitches. We’re going to work the stitches in sets of 2, with one stitch left over at the end.
Right Side Row:
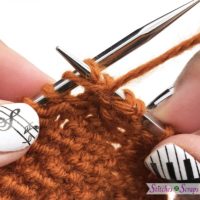
Skip over the first stitch on the left needle, and knit the 2nd stitch through the back loop. Do not take any stitches off the left needle yet.


Now go back and knit the first stitch like normal.

After both stitches in the pair have been knit, you can take them both off the left needle. Knitting them out of order like this makes the 2nd stitch cross over the first stitch to the left.

Continue working each pair of stitches the same way, across to the last stitch of the row, then knit the last stitch. This extra stitch is what makes the pairs of stitches offset on alternating rows, instead of being directly on top of each other.
Wrong side row:
Skipping the first stitch, purl the 2nd stitch. Do not remove it from the needle.

Now go back and purl the first stitch, and remove both stitches from the needle.

This also causes the 2nd stitch to cross over the first stitch to the left, but since we’re on the wrong side of our work it will be the opposite direction on the right side.
Repeat these two stitches across to the last stitch of the row, and knit the last stitch. Because this stitch pattern is worked with knits on the front and purls on the back, it will tend to curl just like stockinette.
Video Tutorial:
Ready to try it out? Tomorrow, I will post the pattern for the blanket square shown in this video, for the Harmony Blanket KAL!


You May Also Like

Tunisian Shells Crochet Blanket Square Pattern

Free Pattern – Bruges Lace Napkin Ring
