Making the most of your Ravelry project pages
Have you ever started a project, put it down for a while, and then forgotten which hook or needles you used, where you put the pattern, or what your stitch count was supposed to be at some particular point? Track all that and more with Ravelry project pages!
Updated on May 27, 2026
Note: I do not work for or represent Ravelry in any way. I use the site myself personally and to sell patterns. Screenshots from the site were used with permission from Ravelry for this post.
What is Ravelry?
Ravelry is a website (Ravelry.com) full of valuable tools and information for fiber artists. One of its most popular features is the detailed, searchable database of patterns that anyone can contribute to, as well as storefronts where you can buy patterns.
It also has groups and forums, and a personal “notebook” section where you can store information on your tools, yarn stash, and projects. Depending on your device, the “my notebook” link may be in the top toolbar, near your profile picture, or may be in a drop down menu when you tap on your profile picture. In this article, we’ll be looking at the project section of the notebook and how it connects to other information on the site.
Project Info
Link to the Pattern
You are finally ready to tackle that 2-year-old WIP (work in progress), but you can’t find the pattern and don’t remember what it was called. If you had entered the project in Ravelry, you could have linked it directly to the pattern or patterns you used!

For this November Tea Cozy project, I used parts of 2 different patterns to create a turkey. So in the project info section, I listed both patterns. One pattern is always the main pattern, and then multiple patterns can be listed as “incorporates”.
It’s easy to link to any pattern in the database – type the pattern name and click the little link icon in the box. A list of matches will pop up. Just click the correct one to link it.
What Does Linking Do?
When you link to a pattern, it shows up in the projects list attached to that pattern. If someone is looking at the pattern, they may visit your project page to see how yours turned out. Also, whenever you upload a photo to that project page, the owner of the related pattern page will get a notification.
Adding a Pattern
What if the pattern isn’t in the database? You don’t have to link to a pattern, but if you want to, you can add it! Hover over your profile picture to find the “contributions” tab. From there, you can add a pattern entry with whatever information you know about the pattern, even if it’s not your own pattern.
Organize With Tags
First, select the craft you are making. You can choose from knitting, crochet, weaving, machine knitting, or loom knitting. Then enter the type of project and size you are making. In the tags section, list any keywords you may want to search or filter on. Once you have enough project entries, you can organize them based on these terms. This makes it easy to find what you are looking for when you have a lot of projects to look through.
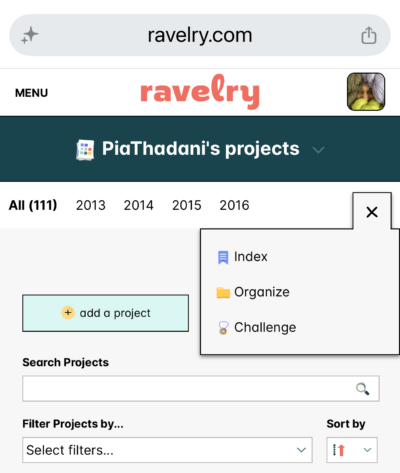
On the main projects page, there is an option to organize. Depending on your device this may be on a top toolbar or under a drop-down menu with three dots. This tool allows you to easily organize your projects into sets or folders, based on tags or other search terms.

Progress and Photos
As you progress through your project, you can track your work on the progress tracker. Enter your start date, then select a status. You can choose from In Progress, Finished, Hibernating, or Frogged. When finished, enter a completed date. You can also select your happiness level on a scale of 1-5, using adorable yarn ball icons. That way, next time you look at the project, you’ll know how you felt about the results.
It’s also a good idea to add photos throughout your progress, from the yarn to the finished object. These are fun to look at later, and can also be very helpful to other makers working on the same pattern.
Hooks, Needles & Yarn
We’ve all been there – you have a project to finish but took out the hook or needles, and now you don’t remember what size it was. Few things are more frustrating than trying to guess and getting it wrong. Next time, enter your hook and yarn in your project page and never forget again! You can select and add multiple tools if needed.

Linking Yarn to Stash
When entering yarn, you can link it to the yarn listing in the database in much the same way as linking the pattern. But my favorite yarn feature is the ability to link it to your stash entries.
Stash is a different section of your notebook where you can create detailed records for all your yarn. It’s like a digital, searchable yarn shelf. If you enter your yarn there, you can link your project entry directly to your stash entry!
This is a great way to keep track of your yarn usage and how much you have left in stash over time. Once you have linked projects, the stash entry will show how much yarn was used in each project, and how much is left. It also gives you a list of all the projects you used a particular yarn for. This can be helpful for accounting purposes if you keep track of your yarn usage for a knitting or crochet business.

Notes
Finally, we come to arguably the most important section of the project entry – the notes. There is a public notes section and a private notes section. Here, enter anything and everything you could possibly want to remember about the pattern or project.
What to Include
If you listed 2 needle sizes, you can write here which size you used for which part of the pattern. Did you make changes to a pattern? Make a mistake? Get confused about something? Enter all that info here. That way if you need to pick up your project later, or want to make it again, you won’t have to try to remember what you did. Some users make dated entries of where they stopped in the project, so they don’t have to guess what row they are on when they pick it up next.

Remember, these notes are public. If you have information that could help other makers with the pattern, include it here. The designer may see your notes, so it’s always good to be kind, even if you have a question or concern.
What Not to Include (Publicly)
One thing that should never be in your project entry is the text of the pattern itself. Unless it’s your pattern or you own the copyright, copying the pattern instructions into your project entry could be a copyright issue. It hurts the designer or copyright owner, because people could then follow the pattern directly from your project page, rather than getting a copy for themselves.
Private Notes
If there’s something you want to include but not make public, this is the place to put it. This section is just for you. It’s useful for things like body measurements that you may not necessarily want everyone to see. It’s also a good place to make notes when designing a pattern of your own. According to Ravelry, only you can see what you put in this section.
Share this Ravelry Project Pages Post on Pinterest!
Here’s an image perfect for pinning:
Rate this Ravelry Project Pages post!
I hope you find the Ravelry project pages helpful for your crafty record-keeping. Ravelry has lots of great tools to help manage all things fiber! Do you have any features that you love? Let us know in the comments!
Do you want the best of Stitches n Scraps delivered right to your inbox? Don’t miss a stitch – Subscribe now!


2 Comments
KellyM
Don’t feel bad about the notes section. I do almost exactly the same things that you do!!! I even try to date it so I get s stream-of-consciousness sort of thing going on with the project.
Happy crafting!!
Pia Thadani
OOOh dates, that’s a good idea… Having all the little details does help so much, doesn’t it? 🙂