Knitting Tutorials
Ready for a new knit stitch, technique, or pattern? You’re in the right place! Browse all the knitting tutorials, or select a category from the dropdown menu. What will you learn today?

Rust and Shadows Scarf Brioche Knitting Tutorial
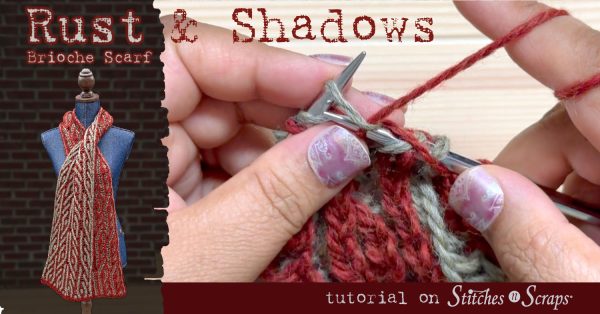
Learn the basics of brioche knitting with the Rust & Shadows Scarf! Increases and decreases create the meandering, 2-color brioche design. Make it all in one direction, or start in the middle for a mirrored design. Grab the pattern and follow along with this brioche knitting tutorial!

This content is protected by copyright. See this Terms of Use / Copyright page for more information.
This post contains sponsored content and/or affiliate links. If you click an affiliate link and make a purchase, I may get a commission.
Get the Pattern
Follow along with the written pattern for the Rust & Shadows Scarf. The video references the instructions in the pattern, including stitch counts and number of repeats.

This soft and squishy scarf is knit in 2-color brioche ribbing with a reversible pattern of meandering lines. Each side emphasizes an opposite color, creating a darkere side and a lighter side.
What is Brioche Knitting?
Brioche knitting is essentially a variation of double knitting, in that it creates two intertwined layers of fabric. Each row is worked in two passes, working half the stitches in each pass. The unworked stitches are paired with a yarn over and slipped. On the next pass, these slipped stitches are worked together with their associated yarn-overs.

This double-layer technique creates a lofty, warm, and reversible fabric. Rust and Shadows is made in brioche ribbing, with alternating columns of knits and purls. Decreases and increases add the movement, shifting the columns back and forth to create the design.
Mirrored Pattern Option
The 2-color brioche pattern goes from one end of the scarf to the other, meaning the 2 ends are not the same. If you prefer the ends to be mirrored, the pattern includes an alternate, mirrored option.
For the mirrored pattern option, start at the center back with a provisional cast-on. Work half the scarf, then remove the cast-on and work the other half of the scarf in the opposite direction.
Brioche Stitches
This tutorial covers all the brioche stitches used in this pattern. Click on the timestamp in the list below to jump to a specific technique in the video (opens YouTube in another tab or window).
- Brioche knit (brk) – 5:12
- Brioche purl (brp) – 11:09
- Brioche knit – yarn over – brioche knit increase (brkyobrk) – 22:04
- Brioche 4 stitch increase (br4st inc) – 32:19
- Brioche left slanting decrease (brLsl dec) – 24:13
- Brioche right slanting decrease (brRsl dec) – 20:20
- Slip 1 yarn over (sl1yo) – 2:18
Rust & Shadows Scarf Brioche Knitting Video Tutorial
Embed not working? Watch this video on YouTube.
Want to jump to a specific section? Click on the timestamp below to go directly to that spot in the video! These links open on YouTube, in a new window or tab.
- 00:00 Intro
- 00:13 Get the Pattern
- 00:29 Materials
- 00:39 Starting Single Color Hem
- 01:14 Cast On
- 01:51 Row 1
- 04:03 Row 2
- 07:01 2-Color Pattern
- 08:46 Row 3a
- 10:33 Row 3b
- 13:32 Row 4a
- 16:33 Row 4b
- 18:19: Row 5a
- 26:00 Row 5b
- 28:40 Row 6 & Repeats
- 29:45 Row 17a
- 34:37 Row 17b
- 36:32 Row 18 & Repeats
- 36:56 Ending Hem & Bind Off
- 38:48 Mirrored Pattern Option
Share this Brioche Knitting Tutorial on Pinterest!
Here’s an image perfect for pinning:

Rate this Brioche Knitting Tutorial!
Do you want the best of Stitches n Scraps delivered right to your inbox? Don’t miss a stitch – Subscribe now!

Wild Jasmine Textured Crochet Square Tutorial
Explore layers of texture with the Wild Jasmine Square! Fans, crosses, and puffs surround the jasmine stitch center circle that gives this square its name. Grab the pattern and follow along with this textured crochet square tutorial.

This content is protected by copyright. See this Terms of Use / Copyright page for more information.
This post contains sponsored content and/or affiliate links. If you click an affiliate link and make a purchase, I may get a commission.
Get the Pattern
Follow along with the written pattern for the Wild Jasmine Square. The video references the charts and instructions in the pattern, including stitch counts.
The tutorial starts at the center with a circle of Jasmine Stitch. The circle then transforms into a square, bordered by crossed post stitches. A ring of fans adds a lacy feel, followed by a simple outer border.
Puff Stitches
There are puff stitches of different kinds throughout this crochet square tutorial. For a closer look at crochet puff stitches in general, check out this Puff Stitch Tutorial.
Wild Jasmine Square Video Tutorial
Embed not working? Watch this video on YouTube. Want to jump to a specific section? Click on the timestamp below to go directly to that spot in the video! These links open on YouTube, in a new window or tab.
Share this Textured Crochet Square Tutorial on Pinterest!
Here’s an image perfect for pinning:

Rate this Textured Crochet Square Tutorial!
Do you want the best of Stitches n Scraps delivered right to your inbox? Don’t miss a stitch – Subscribe now!

Beach Day Lace Knit Scarf Tutorial
Capture the feel of coral reefs and crystal blue waters with the Beach Day Scarf. This lace knit scarf tutorial takes you through ribbons of drop stitch lace alternating with sections of eyelet lace ribbing. Grab the pattern and follow along, step by step!

This content is protected by copyright. See this Terms of Use / Copyright page for more information.
This post contains sponsored content and/or affiliate links. If you click an affiliate link and make a purchase, I may get a commission.
Get the Pattern
Follow along with the written pattern for the Beach Day Scarf. The video references the chart and instructions in the pattern, including stitch counts and number of repeats.
The lace knit scarf pattern starts with your choice of cast-on and a garter stitch border. From there, alternating sections of drop stitch lace and eyelet lace ribbing form the body of the scarf. It ends with a matching garter stitch border and your choice of bind-off. The sample shows a long tail cast-on and a decrease bind-off.
Cast-On
You can use any cast-on you like for this lace knit scarf. The sample scarf begins with a basic, long tail cast-on, which is not shown in the tutorial. For a refresher on this technique, check out the demo portion of Lunchtime Live episode 61.

Drop Stitch Lace
Yarn overs are secret to the magic of drop stitch lace. First, add 2 yarn overs for each stitch on the wrong side row. Then on the following right side row, drop those yarn. All the extra yarn from the yarn overs makes the stitches extra tall, creating the lovely lacey effect.

Eyelet Lace Ribbing
Yarn overs also form the eyelets in the eyelet lace ribbing. The easy, 4-stitch repeat includes 2 yarn overs, a double decrease, and a regular knit stitch. On the next lace row, the yarn overs line up directly above the previous yarn overs, while the decrease and knit stitches swap places.
Diamond shapes are more prominent on the right side of the fabric, while the columns of ribbing stand out more on the wrong side.
Bind-Off
You can also choose any bind-off you like for this pattern. The tutorial shows the decrease bind-off used in the sample. For a closer look at this technique, see this Decrease Bind-Off Tutorial.
Beach Day Scarf Video Tutorial
Embed not working? Watch this video on YouTube. Want to jump to a specific section? Click on the timestamp below to go directly to that spot in the video! These links open on YouTube, in a new window or tab.
Share this Lace Knit Scarf Tutorial on Pinterest!
Here’s an image perfect for pinning:

Rate this Lace Knit Scarf Tutorial!
Do you want the best of Stitches n Scraps delivered right to your inbox? Don’t miss a stitch – Subscribe now!

Resilience Rising Lattice Knit Hat Tutorial
A staggered pattern of slipped stitches creates the lovely lattice design of the Resilience Rising hat. Combined with decreases, the pattern extends all the way up to the top of the crown. Using only one color at a time, this stunning design is much easier to make than it looks. See how it all comes together in this Reilience Rising lattice knit hat tutorial. Grab the pattern and follow along step by step!

This content is protected by copyright. See this Terms of Use / Copyright page for more information.
This post contains sponsored content and/or affiliate links. If you click an affiliate link and make a purchase, I may get a commission.
Get the Pattern
Follow along with the written pattern for the Resilience Rising Hat. The video references the charts and instructions in the pattern, including stitch counts and number of repeats.

Once you have the pattern handy, scroll down to follow along step-by-step with the video tutorial!
Alternating Cable Cast-On
The lattice knit hat tutorial begins with an Alternating Cable Cast-On. It’s a nearly invisible cast-on when used with 1/1 ribbing. The video shows how to do the cast-on, but for a more in-depth look, check out this Alternating Cable Cast-On Tutorial.
Crown Decreases
Knit 2 Together (k2tog) and Slip Slip Knit (ssk) decreases shape the crown. These decreases are worked within the slip stitch lattice pattern, which continues all the way to the end. Both decreases are shown in the video. If you are not already familiar with these decreases, you may want to start with these Knit 2 Together and Slip Slip Knit tutorials.
Featured in this Video – Cascade Cantata Yarns
Cascade sent me the lovely Cantata yarns for this knit hat pattern and tutorial. It’s a unique yarn made of merino fibers blown into a cotton tube. The combination is soft, smooth, light, lofty, and perfect for transitional weather!

For my hat, I used color 207 Morning Light Handpaint as the main color, with original Cantata in 38 Maroon as the accent color.
Resilience Rising Lattice Knit Hat Video Tutorial
Want to jump to a specific section? Click on the timestamp below to go directly to that spot in the video! These links open on YouTube, in a new window or tab.
- 00:12 Get the Pattern
- 00:30 Materials
- 00:52 Cast-On
- 03:31 Magic Loop
- 04:37 Ribbing
- 07:25 Increase Round
- 09:24 Body Rnd 1
- 12:32 Body Rnds 2-5
- 16:15 Body Rnd 6
- 18:53 Body Rnd 7
- 20:17 Body Rnds 8-11
- 21:17 Body Rnd 12
- 22:44 Body Repeats
- 24:38 Crown Rnd 3
- 29:06 Crown Rnd 4
- 29:56 Crown Rnd 5
- 32:46 Crown Rnd 6
- 35:30 Crown Rnd 7
- 36:38 Crown Rnd 8
- 37:39 Crown Rnd 9
- 38:46 Crown Rnd 10
- 40:44 Finishing
Share this Lattice Knit Hat Tutorial on Pinterest!
Here’s an image perfect for pinning:

Rate this Lattice Knit Hat Tutorial!
Do you want the best of Stitches n Scraps delivered right to your inbox? Don’t miss a stitch – Subscribe now!

Favorite Jeans Knit Scarf Tutorial
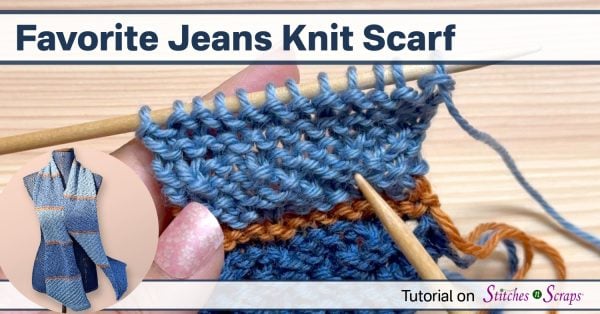
Knit the comfort of a favorite pair of jeans with this Favorite Jeans knit scarf tutorial! Panels of diagonal ribbing mimic the twill weave of denim, and are separated by bands of faux “seams” in garter stitch.

This content is protected by copyright. See this Terms of Use / Copyright page for more information.
This post contains sponsored content and/or affiliate links. If you click an affiliate link and make a purchase, I may get a commission.
Get the Pattern
Follow along with the written pattern for the Favorite Jeans Knit Scarf. The video references the charts and instructions in the pattern, including stitch counts and number of repeats.

The knit scarf pattern starts with a German twisted cast-on and a garter stitch border, followed by sections of diagonal rib separated by faux “seams”. It ends with a matching garter stitch border and decrease bind-off. Once you have the pattern handy, scroll down to follow along step-by-step with the video tutorial!
German Twisted Cast-On
The knit scarf tutorial begins with a German Twisted Cast-On. The video shows how to do the cast-on, but for a more in-depth look, check out this German Twisted Cast-On tutorial.
Diagonal Ribbing
The main sections of the scarf feature diagonal ribbing. It’s a simple, 3/1 ribbing of (k3, p1), but offset by one stitch on each row. This offset makes the purl bump shift to the right or the left on each row, forming diagonal lines.

This 3/1 ribbing pattern mimics the 3/1 twill weave commonly used in denim. In a 3/1 twill weave, the weft thread goes over 3 warp threads, then under 1. Every row (called a “pick”), the pattern is shifted by one warp thread so that the warp thread showing on top (similar to the purl bump in this knit version) shifts to the left or the right.
Garter Stitch Faux Seams
Jeans often feature visible seams and decorative stitch in a contrast color. Garter stitch “seams” mimic this effect in the scarf.
Normally, color changes in garter stitch are always done on right side rows for a smooth transition. If you change colors on the wrong side row, you get an intertwined line of the 2 colors. But that’s perfect for this knit scarf because it looks an awful lot like stitching! Wrong side color changes give the faux seams a stitched look.
Decrease Bind-Off
There is also a separate tutorial for the decrease bind-off used to end the scarf pattern. The bind-off is covered in this video as well, but you can get a closer look in the Decrease Bind-Off Tutorial.
Favorite Jeans Scarf Video Tutorial
Want to jump to a specific section? Click on the timestamp below to go directly to that spot in the video! These links open on YouTube, in a new window or tab.
- 00:00 Intro
- 00:12 Get the Pattern
- 00:26 Materials
- 00:39 Construction
- 01:33 Cast-On
- 03:48 Bottom Garter Stitch Border
- 04:22 Left Diagonal Rib
- 05:08 Row 9
- 07:15 Row 10
- 08:59 Row 11
- 09:53 Row 12
- 11:33 Row 41
- 12:46 Faux Seam
- 13:07 Rows 42-43
- 14:40 Row 44
- 16:03 Right Diagonal Rib
- 16:26 Row 45
- 17:43 Row 46
- 18:57 Row 47
- 19:51 Row 48
- 21:05 Row 77
- 22:11 Remainder of Scarf
- 23:12 Bind-Off
Share this Knit Scarf Tutorial on Pinterest!
Here’s an image perfect for pinning:

Rate this Knit Scarf Tutorial!
Do you want the best of Stitches n Scraps delivered right to your inbox? Don’t miss a stitch – Subscribe now!

Decrease Bind-Off Knitting Tutorial
The Decrease Bind-Off is quick, easy, and stretchy. It’s a great bind-off for ribbing, and pairs well with the German Twisted Cast-On. Learn the technique in this knitting tutorial!

This content is protected by copyright. See this Terms of Use / Copyright page for more information.
This post contains sponsored content and/or affiliate links. If you click an affiliate link and make a purchase, I may get a commission.
Knit 2 Together (k2tog)
This version of the Decrease Bind-Off uses the knit 2 together decrease. For more information on that decrease, check out this Knit 2 Together Tutorial.
Back Legs and Other Decreases
A common variation of the decrease bind-off uses k2tog decreases worked in the back legs of the stitches instead of the front legs. This gives it a slightly different look, more similar to a traditional, basic bind-off.
It can also be done with other single decreases such as slip-slip-knit (ssk), slip-slip-purl (ssp), or purl 2 together (p2tog). Which to use is a matter of personal preference and the look you are trying to achieve. Try a few different decreases to see how they look! Do you have a favorite?
How to Knit the Decrease Bind Off
(Scroll down for video tutorial)
Step 1: Knit 2 together (k2tog)
Hold the needle with all your stitches in your non-dominant hand, as though ready to knit a row or round. Insert your needle knitwise through both of the first 2 stitches together and knit them as though they were one stitch.

Step 2: Pass stitch back to other needle
There is now one stitch on the needle in your dominant hand (working needle). Transfer that stitch back to the other needle, being careful to insert your needle from the back of the stitch so that it is not twisted.

Finishing
Repeat Steps 1 & 2 to bind off as many stitches as needed. If binding off all stitches, repeat until only 1 stitch remains, ending after a repeat of Step 1.
Cut the yarn, leaving a tail to weave in. Pull up on the last stitch, making the stitch bigger and bigger, until the tail comes through.
Decrease Bind-Off Video Tutorial
Share this Tutorial on Pinterest!
Here’s an image perfect for pinning:

Rate this Decrease Bind-Off Tutorial!
Do you want the best of Stitches n Scraps delivered right to your inbox? Don’t miss a stitch – Subscribe now!

German Twisted Cast-On Knitting Tutorial
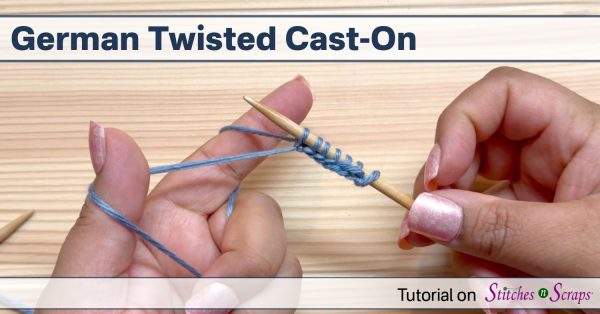
The German Twisted Cast-On is my go-to cast on for most projects. It’s a relatively stretchy cast-on that creates a first row of stitches. Learn the technique in this knitting tutorial!

This content is protected by copyright. See this Terms of Use / Copyright page for more information.
This post contains sponsored content and/or affiliate links. If you click an affiliate link and make a purchase, I may get a commission.
Long Tail Cast-On
Many of us learned a long tail cast-on early in our knitting journey. The German twisted cast-on is just a slight variation of that cast-on. See a demonstration of the long tail cast-on in Lunchtime Live Episode 61. The demo portion is near the end of the video.
How to Knit the German Twisted Cast-On
(Scroll down for video tutorial)
This cast-on requires only one needle. When you are first learning it, I suggest using a needle 1 size larger than you will be knitting with, as it tends to get tight until you are used to the motions.
First, make a slip knot leaving a tail about 3-4 times the length of your cast-on edge. Place the slip knot on your needle and hold it in your dominant hand. This slip knot counts as your first stitch cast on. Then lay both the tail and ball end of the yarn across your other palm and grip it with your last 3 fingers (middle, ring, and pinky).

Next, insert your thumb and index fingers between the two strands.

Turn your hand so that your thumb and index finger are pointing up, creating a V or Y shape with the yarn between your hand and the needle. There should be one loop around your thumb and one loop around your index finger. Each has an inner and outer strand.

Now begin the repeating steps to cast on each stitch: *Insert your needle under both strands on your thumb. Twist it backwards and insert it between the strands to twist the loop that is on your thumb.

Allow your thumb to bend, opening up the loop. Bring the needle over and around the inside strand on your index finger and pull that strand through the twisted loop on your thumb.

Release the loop from your thumb and tighten while repositioning your thumb as before. You have now cast on 1 more stitch.

Repeat these motions (from *) to cast on as many stitches as needed.
German Twisted Cast-On Video Tutorial
Share this Tutorial on Pinterest!
Here’s an image perfect for pinning:

Rate this German Twisted Cast-On Tutorial!
Do you want the best of Stitches n Scraps delivered right to your inbox? Don’t miss a stitch – Subscribe now!

Basic Bind-off – How to Bind Off Knitting
Learn to knit the basic bind-off! Also called the knit bind-off, this beginner-friendly technique is an easy way to finish your knitting. Pulling each stitch through the one before it secures your stitches and gives your knitting a smooth, finished edge.

This content is protected by copyright. See this Terms of Use / Copyright page for more information.
This post contains sponsored content and/or affiliate links. If you click an affiliate link and make a purchase, I may get a commission.
Learn to Knit
Before you can bind off, you first need some stitches on your needle. Here are some tutorials to get you started.
Knitted cast on
When I’m teaching in person, this is the cast-on method I usually use. It uses a slight variation of the knit stitch to add more stitches to your needle. Since it’s so similar, it’s a great introduction to the knit stitch itself. Learn the knitted cast-on in this tutorial.
The knit stitch
The swatch I used in this video is just a few rows of knit stitches. Knitting every row, back and forth, makes a bumpy pattern called garter stitch. Learn the knit stitch in this tutorial.
Basic Bind-Off
Scroll down for the video tutorial.
Any Knitting Style
The images in this tutorial all show right-handed, English-style knitting. But this bind-off works the same way for every style of knitting I can think of, whether you are left or right-handed.
First 2 stitches
Knit the first 2 stitches however you normally would knit. You should now have 2 stitches on your working needle.

Using the tip of the other needle, pull the first stitch up and over the 2nd stitch, and off the needle.

You now should only have one stitch on your working needle. The stitch on your needle is now coming up through the one before it, securing it in place.

Remaining Stitches
Knit the next stitch. You now again have 2 stitches on your working needle. As before, pull the previous stitch up and over the current stitch and off the needle.

Repeat this process for each stitch across, until you are left with only one stitch on your working needle, and your other needle is empty. It’s easy to make this bind off too tight, so be sure to keep your tension fairly loose as you go.
Fasten off
Cut your yarn, leaving a 4-6 inch tail to weave in later. Pull up on your working needle, so that the one remaining stitch gets bigger, until the tail eventually comes all the way out.

Your basic bind-off is complete! You should now have a smooth row of “V” shapes along the top edge of your work.

Basic Bind-Off video tutorial
Try it out!
With this technique, you can now finish and secure your knitting projects! Combine the basic bind-off with the knitted cast-on and the knit stitch to make this beginner Garter Stitch Headband pattern.
Share this tutorial on Pinterest!
Here’s an image perfect for pinning:

Rate this basic bind-off tutorial!
Do you want the best of Stitches n Scraps delivered right to your inbox? Don’t miss a stitch – Subscribe now!

Jacob’s Ladders in Knitting and Crochet
Jacob’s Ladders add bold texture to any project. See a few different ways of making the necessary loops in both crochet and knitting, then learn how to chain those loops together to form the ladder.

This content is protected by copyright. See this Terms of Use / Copyright page for more information.
This post contains sponsored content and/or affiliate links. If you click an affiliate link and make a purchase, I may get a commission.
What is a Jacob’s Ladder?
A Jacob’s ladder starts with a series of loops. These loops are then chained together to form a thick braid on the surface of your fabric.
Making the loops
Almost any method of making loops will work for Jacob’s ladders.
Crochet loops
In crochet, you can make several chains between two stitches. Making a chain loop on every row or every alternate row is a common way of forming a vertical ladder.

Very tall stitches also work well. A row of tall stitches make a horizontal ladder across the row. You can make every stitch tall, or separate your tall stitches with shorter ones in between.

Knit loops
The simplest way to make knit loops is to knit the same stitch multiple times in a row. The effect is the same as making a crochet chain.

Knit the stitch as normal, then put your other needle into the stitch and knit it again. Repeat until you have the length you want.
Binding off and casting on stitches every few rows is another option. Try I-cord loops to create even chunkier Jacob’s Ladders.
Arranging the Loops
Jacob’s ladders require a little advance planning. Where you place the loops, how big the loops are, and how much space there is between them all make a difference in the final look.
Separate loops with plain rows or stitches to make each section of the ladder longer. Longer loops make a chunkier, puffier ladder. For a super wide ladder, add extra stitches behind each loop so that it spans a wider distance.

The loops don’t have to be placed in straight rows. Make diagonal lines, zig zags, or even curves by shifting where you place each successive loop. You can even make multiple lines of loops and cross them over each other to make cables, like I did in this Jacob’s Ladder Cabled Throw.
Forming Jacob’s Ladders
Scroll down for video
Once you have the loops arranged as you like them, forming a Jacob’s ladder is easy. Simply pull each successive loop through the one before it as though making a chain.
For a neat, closed bottom, give the first loop a 1/2 twist. You can twist in either direction, but probably want to be consistent across a project.

Then pull the 2nd loop through the first one.

Continue pulling each loop through the one before it. Each loop will secure the one before it, just like links in a chain.

Hold the final loop in place with a stitch marker until you are ready to secure it.

Securing Jacob’s Ladders
After forming a Jacob’s ladder, the final loop needs to be secured in some way. If it is not, then the whole chain can unravel. One common way of securing Jacob’s ladders is to slip stitch into the top loop on the next row.

You can also simply sew the loop in place with a bit of yarn.
Try it out!
Now that you know how to form Jacob’s Ladders, try out your new skills on this Tropical Stripes Market Bag pattern! It uses a Jacob’s ladder to reinforce each corner of the bag.
I also used Jacob’s Ladders in:
- Dreaming of Pinwheels Blanket
- Jacob and Julia Bracelet
- Accidental Beanie
- Jacob’s Ladder Edging Tutorial
Jacob’s Ladders Video Tutorial
Share this tutorial on Pinterest! Here’s an image perfect for pinning:

Rate this Jacob’s Ladders tutorial!
Do you want the best of Stitches n Scraps delivered right to your inbox? Don’t miss a stitch – Subscribe now!

Knit Stitch – Right-Handed and Left-Handed
Learn to knit the knit stitch! This basic stitch is the foundation of knitting. See two different styles, called English (throwing) and continental (picking), for both left-handed and right-handed knitting.

This content is protected by copyright. See this Terms of Use / Copyright page for more information.
This post contains sponsored content and/or affiliate links. If you click an affiliate link and make a purchase, I may get a commission.
Casting On
Before you can knit, you need to get some stitches onto your needle. Creating this starting row is called casting on. When you’re first learning, I recommend using either the long tail cast on or knitted cast on method.
Knitted cast on
When I’m teaching in person, this is the cast on method I usually use. It uses a slight variation of the knit stitch to add more stitches to your needle. Since it’s so similar, it’s a great introduction to the knit stitch itself. But some students find it confusing to switch from the cast on to the regular knit stitch without mixing up the steps.
Learn the knit cast on in this tutorial.
Long tail cast on
This is the cast on I tend to use myself for most projects. It takes a little practice, but once you get the hang of it, it’s super fast. The difficult part for new knitters is learning how to hold and manage the yarn. But once you have that in place, it’s fairly easy.
Learn the long tail cast-on in the demo portion of this Lunchtime Live video. The demo begins at 5:22 on the video.
Scroll Down for Video
All the pictures here show right-handed knitting. The video includes both English and continental style for both right and left-handed knitting. Please see the video to see each variation separately.
Tensioning the yarn
In order to knit, you need to hold and control your working yarn with some tension on it, and at the same time hold your two needles. There are lots of different ways to do this.
With whichever hand I’m using, I like to place my yarn over my index finger, under the next 2 fingers, and then over my pinky.

When I close my hand, I can stick my index finger out to create a tensioned workspace. The rest of my fingers are free to hold one of the needles. Sometimes, I wrap the yarn around my index finger a 2nd time for more control.

The key is to find a grip that gives you control, while also being comfortable over long periods of time. If you start to feel any strain in your hand at all, you may want to adjust your grip to avoid repetitive strain injuries.
English vs. continental knitting
There are many styles and variations of knitting but these two are by far the most common. English style is sometimes referred to as throwing, and continental style is referred to as picking. The difference lies largely in which hand is holding the yarn.
Working needle
Your working needle is the needle that starts off empty. This is the one you will be using to create new stitches, and the new stitches will go onto this needle. For both English and continental styles, your working needle goes in your dominant hand. The other needle goes in your other hand.
Holding the yarn
For English style knitting, tension your yarn with your dominant hand. This is the same hand that is holding your working needle, as in the picture above.

For continental style knitting, tension your yarn with your other hand. This is the same hand that is holding your other needle.
Insert needle and yarn over
To start the knit stitch, insert your working needle from front to back into the first stitch. The working needle goes under the other needle, and your needles should touch as they cross. There should not be any yarn between the two.

Then, wrap the yarn around the needle to create a new stitch. Regardless of which method or hand you use, the yarn comes up between the two needles, then over the working needle, and down to the other side.

For right-handed knitting, this means up from the left, over the top, and down to the right. For left-handed knitting, it’s up from the right, over the top, and down to the left. In continental knitting, this step can be combined with the next step in one smooth motion.
Scoop the new stitch through
Use the tip of your needle to pull the new stitch you just created through the old one.

For continental knitting, you can wrap the yarn around the needle and scoop it through all in one scooping motion. Basically, create the new stitch by moving the needle instead of by moving the yarn.

Remove the old stitch
Finally, carefully drop the old stitch from your other needle.

Now you have a new knit stitch on your working needle and are ready to knit the next stitch.
Try it out!
Now that you know the knit stitch, you can make all sorts of easy knitting projects! Try out your new skills on this beginner Garter Stitch Headband pattern.
Knit Stitch video tutorial
Includes English and Continental styles for both left-handed and right-handed knitting.
Share this tutorial on Pinterest! Here’s an image perfect for pinning:

Rate this knit stitch tutorial!
Do you want the best of Stitches n Scraps delivered right to your inbox? Don’t miss a stitch – Subscribe now!


