Free Pattern – Serrana the Mermaid
Meet my new friend Serrana! This sweet, 19-inch doll is sure to delight mermaid fans and amigurumi enthusiasts alike. She’s a little bit sassy, completely adorable, and a whole lot of fun to make.

Serrana got her name from a 6-year-old buddy of mine. I’ve been told her full name is Serrana Charlotte Christian. She was designed for the CAL Central Softie Crochet Along. If you’re new to the CAL, check out some of the other patterns, and join in all the softie fun on our Facebook group!
Fairfield generously sent me a bag of Original Poly-Fil and a bag of Poly-Fil Royal Silk for free to use in this design. They are also providing a great grand prize for the giveaway! See the main CAL post for more information about the giveaway and how to enter.
This pattern is protected by copyright. Please do not distribute or share this pattern in any way other than by sharing a link to this page or to the pattern page on Ravelry. Click here for copyright information.
This pattern contains sponsored content and affiliate advertisements (click for more info). If you click one of these advertisements and then make a purchase, I may be compensated. You get the same great prices, and you will be helping to support this site!
Serrana the Mermaid

Add this to your Ravelry Queue
Materials:
- DK weight yarn:
- 100 yds Skin color
- 50 yds Tail color (blue)
- 40 yds Fin color (green)
- 60 -75 yds Hair color
- Size 10 crochet thread – less than 5 yds each:
- Black
- Eye color (blue)
- White
- Mouth color (Red – just 10-12 inches).
- Size F / 3.75 mm hook, or size needed to obtain gauge
- Size C / 2.75mm hook (for eyes)
- 2-4 oz Original Poly-Fil or Poly-Fil Royal Silk fiber fill.
- Yarn needle
- Scrap of yarn or thread to use as a running stitch marker (optional)
Skill Level:
Experienced – Working in front loops, back loops, and in 3rd loop of hdc, continuous rounds, short rows, and several pieces to assemble.
Size:
About 19″ tall.
Gauge:
After Rnd 6 of head, work should measure about 2.5 inches in diameter.
Exact gauge is not critical, but stitches should be fairly tight with no big gaps. Use head as a gauge swatch. If your head comes out to a size and texture you like, your gauge is fine.
For the eyes, if you want them smaller or bigger, adjust your hook accordingly. The eyes can seem too big on their own, so pin them in place on the head before deciding.
Abbreviations used:
(Pattern is written in US terms)
- ch = chain
- sc = single crochet
- dc = double crochet
- inc = invisible increase (see special stitches)
- dec = invisible decrease (see special stitch)
- blo = back loop only
- flo = front loop only
- st(s) = stitch(es)
- rnd = round
- RS = right side
Recommended Resources:
- Continuous rounds and running stitch markers
- Why Continuous Rounds Shift
- Invisible Single Crochet Decrease on Nicki’s Homemade Crafts
- Needle Sculpting an Amigurumi Doll Face
- Half Double Crochet in the Third Loop on Moogly
- Adding Hair to an Amigurumi Doll
- Edging – Crab Stitch & Twisted SC
Special Stitches:
Invisible increase (inc): Sc in back loop only of indicated st, then sc in both loops of same stitch.
Invisible decrease (dec): Insert hook into front loop only of both of next 2 stitches, yarn over and draw up a loop, yarn over and draw through both loops on hook.


This is an alternative to a single crochet 2 together (sc2tog) stitch. If you prefer, you can use the standard sc2tog instead.
Notes:
Most of the pattern is worked in continuous rounds. Do not join rounds or turn unless indicated. Use a stitch marker or scrap of yarn to mark the first stitch of each round. I highly recommend a running stitch marker. This is a piece of scrap yarn that you move back and forth across your work before the first stitch of each round. See this running stitch marker tutorial.
In the pictures, I have used running stitch markers, and have also used regular stitch markers to mark increase and decrease sections.

Instructions:
Head:
Before starting, cut a 24-36 inch piece of skin color yarn and set aside to use for face shaping later.
With skin color, ch 2
Rnd 1 (RS): 6 sc in 2nd ch from hook. (6 sts)
Rnd 2: Inc in each st around. (12 sts)
Rnd 3: (Inc in next st, sc in next st) 6 times. (18 sts)
Rnd 4: (Sc in next st, inc in next st, sc in next st) 6 times. (24 sts)
Rnd 5: (Inc in next st, sc in next 3 st) 6 times. (30 sts)
Rnd 6: (Sc in next 2 sts, inc in next st, sc in next 2 sts) 6 times. (36 sts)
You should now have a circle of about 2.5 inches in diameter.

Rnds 7-11: Sc in each st around.
Rnd 12: Sc in first 13 sts, inc in next st, sc in next st, mark next st on row 11 for eye placement, inc in next (marked) st, (sc in next st, inc in next st) 3 times, sc in next st, mark next st on rnd 11 for eye placement, inc in next (marked) st, sc in last 12 sts. (42 sts)
Rnd 13: Sc in first 13 sts, (inc in next st, sc in next 2 sts) 6 times, sc in last 11 sts. (48 sts)
Rnds 14-18: Sc in each st around.
Rnd 19: (sc in next 3 sts, dec, sc in next 3 sts) 6 times. (42 sts)
Begin stuffing head as you go.
Rnd 20: (Dec, sc in next 5 sts) 6 times. (36 sts)
Rnd 21: (Sc in next 2 sts, dec, sc in next 2 sts) 6 times. (30 sts)
Rnd 22: (Dec, sc in next 3 sts) 6 times. (24 sts)
Rnd 23: (Sc in next st, dec, sc in next st) 6 times. (18 sts)
Rnd 24: (Dec, sc in next st) 6 times. (12 sts)
Pull working loop up and secure it with a stitch marker so it doesn’t come undone. Stuff head firmly (but not overstuffed).
Eye (Make 2):
Rnd 1: With black, ch 2, 8 hdc in 2nd ch from hook, join with a sl st to first st, fasten off. (8 sts)
Rnd 2 (RS): Turn, join eye color in any st from rnd 1. Ch 1, 2 hdc in each st around, join with sl st to first st, fasten off. (16 sts)
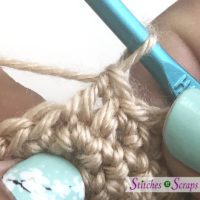
Rnd 3: Turn, working in third loops only, join white in any st from row 2. Ch 1, 2 sc in same st, *hdc in next st, 3 dc in next st, hdc in next st, 2 sc in next st, sc in next 3 sts,** 2 sc in next st, repeat from * to **, join with sl st to first st, fasten off leaving a 12-15 inch end for sewing. (24 sts)
Rnd 4:
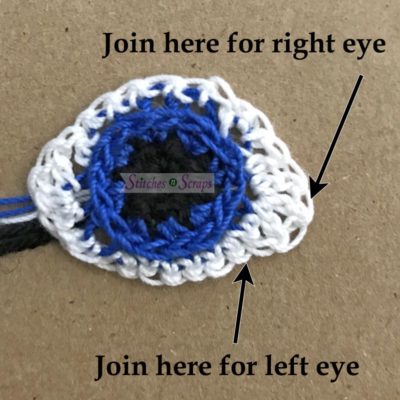
Right eye only: Turn, join black with sc in 2nd dc at one side of eye, sc in next 11 sts, 3 sc in next st, sc in next st, sl st in next st, fasten off, leaving a 10-12 inch tail for sewing eyebrow. ( 16 sts not counting sl st)

Left eye only: Join black with sl st in the hdc before the 3 dc at one side of eye, sc in next st, 3 sc in next st, sc in next 11 sts, (sc, sl st) in next st, fasten off, leaving a 10-12 inch tail for sewing eyebrow. (16 sts not counting sl sts)
Weave in all ends except for the long white end and long black end (for sewing with later).
Face:
(see Needle Sculpting tutorial)
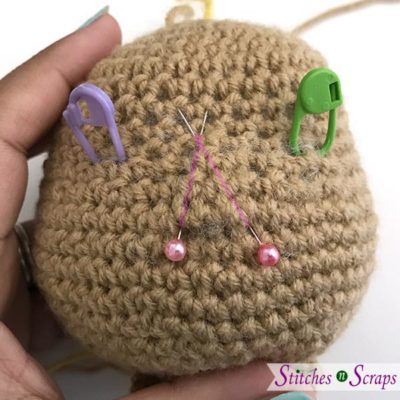
Between the two eye markers, use pins to mark a triangle for the nose.
Eye sockets:
Thread the 24-36 inch piece of skin colored yarn you set aside earlier onto a yarn needle. Sew in through the top of the head and bring it out the front at one of the eye markers. Leave a tail at the back to weave in later.
Sew over one stitch and bring the needle back out at the other eye marker.

Sew over one stitch and bring the needle out at the back of the head.
Pull firmly on working yarn and starting tail at the same time to form indentations for the eye sockets.

Optional: Bring yarn up and down again at each eye socket to further secure the indentation.
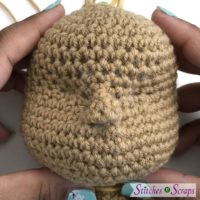
Nose:
Bring needle up at one side of nose, near the top where the pins cross.
Sew back and forth across the nose 2-3 times, working from top to bottom and following the lines of the pins. Pull slightly with each stitch to pinch nose up. When you reach the bottom, remove the pins.

Bring needle in from the side of the nose and out through the bottom of the nose, just to one side of the center.
Sewing over one stitch, go back up through the bottom of the nose, and out through the opposite side of the nose, near the top. Pull gently to curve bottom of nose.

Bring needle back down to the bottom of the nose, just to the other side of the center. Sewing over one stitch, go back up through the bottom of the nose and out through the opposite side near the top. Pull gently.
Add more stitches if necessary to adjust shaping. When satisfied, bring needle down and out through the back of the head. Weave in both tails.

Attach eyes:
(scroll down for video tutorial)
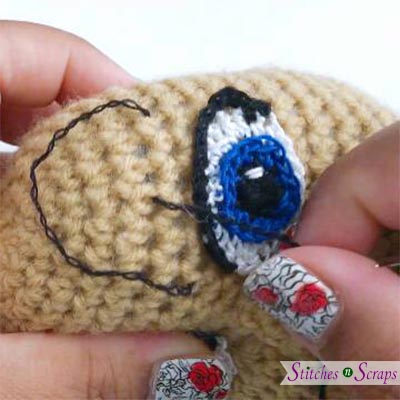
Using long white tail, make 2 small stitches at one side of the eye, where round 1 meets rnd 2, for a highlight.
Place eye onto eye socket so that inner edge is close to the nose. Sew eye onto head. Make your stitches in the white section, just under the edge of rnd 3.
Weave in tail, sew through to back of head and trim end.
Repeat for 2nd eye.

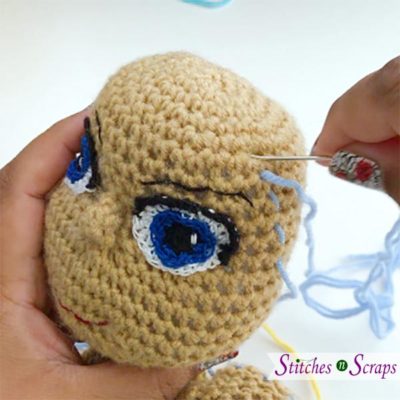
Eyebrows
Sew black tail down through eye, being careful not to deform any of the eye stitches. Bring it back up above the eye at one end of the eyebrow.
Make a horizontal stitch across to the other end of the eyebrow, and bring yarn back up in the middle, at the top of the eyebrow arch.
Sewing over the eyebrow, bring the needle back down in the same spot. This tiny stitch locks the eyebrow in place at the top of the arch. Sew one additional locking stitch on each side of center to shape eyebrow into a curve.
Sew through to back of head, weave in tail, and trim.
Repeat for 2nd eyebrow.
Mouth
The mouth is done the same way as the eyebrow, just arching down instead of up.
Secure mouth color thread by weaving in a tail at the back of the head. Bring needle up at one corner of the mouth.
Make a horizontal stitch to the other corner of the mouth.
Come out at the center bottom and make a small stitch to lock mouth in place at bottom. Make additional locking stitches at either side of center to shape mouth into a curve.

Sew through to back of head, weave in tail, and trim.
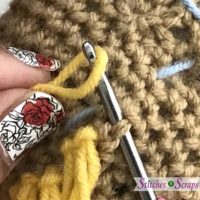
Torso:
Pick up working loop from head to continue crocheting torso.
Rnd 25: Inc in next 4 sts, sc in next 6 sts, inc in next 2 sts. (18 sts)
Note: This places all the increases for rnd 25 at the back of the head.
Rnd 26 – 27: Sc in each st around.
Rnd 28: (Sc in next 2 sts, inc in next st) 6 times. (24 sts)
Rnds 29-30: Sc in each st around.
Rnd 31: (Sc in next 3 sts, inc in next st) 6 times. (30 sts)
Rnds 32-33: Sc in each st around.
Rnd 34: (Sc in next 4 sts, inc in next st) 6 times. (36 sts)
Rnds 35-36: Sc in each st around.
Rnd 37: (Sc in next 5 sts, inc in next st) 6 times. (42 sts)
Rnds 38-50: Sc in each st around, fasten off skin color, leaving a 12-15 inch tail to make belly button.
Tail:

Ruffle: Working in front loops only, join fin color with sl st in any stitch at the back,*Sk next 2 sts, (dc, ch 1) 4 times in next st, dc in same st (fan made), sk next 2 sts, sl st in next st, repeat from * around – last sl st should be in same st as joining. Fasten off fin color. (7 fans)
Finish stuffing torso firmly. Continue stuffing tail as you go.
Rnd 51: Working in unused back loops from rnd 51, and continuing where you left off from torso, join tail color with sl st in next st. Ch 1, sc in same st and in each st around.

Rnd 52-54: (Sc in blo of next st, sc in flo of next st) around.
Rnd 55: *Dec, (sc in blo of next st, sc in flo of next st) twice, sc in blo of next st, repeat from * 6 times. (36 sts)
Rnds 56 – 59: (Sc in blo of next st, sc in flo of next st) around.
Rnd 60: *Dec, (sc in blo of next st, sc in flo of next st) twice, repeat from * 6 times. (30 sts)
Rnds 61 – 64: (Sc in blo of next st, sc in flo of next st) around.
Rnd 65: (Dec, sc in blo of next st, sc in flo of next st, sc in blo of next st) 6 times. (24 sts)
Rnds 66 – 69: (Sc in blo of next st, sc in flo of next st) around.
Rnd 70: (Dec, sc in blo of next st, sc in flo of next st) 6 times. (18 sts)
Rnds 71 – 74: (Sc in blo of next st, sc in flo of next st) around.
Rnd 75: (Dec, sc in blo of next st) 6 times. (12 sts)
Finish stuffing tail firmly.
Row 76: Pinch rnd 71 together so that it is flat at the front and back. You should have 6 pairs of stitches. If needed, slip stitch around to get to one side. Working through both loops of both layers, sc in each pair of sts across to close tail. (6 sc)
Weave in all ends on torso and tail.

Arm (Make 2):
With skin color, ch 2
Rnd 1 (RS): 6 sc in 2nd ch from hook. (6 sts)
Rnd 2: Inc in each st around. (12 sts)
Rnds 3 – 27: Sc in each st around. Fasten off, leaving a 12-18 inch tail for sewing.
Stuff arm.
Tail Fin:
(Scroll down for video tutorial)
1st fin piece:
With fin color, ch 21 (Foundation)


Row 1 (RS): Working into the back bump of the chains, sc in 2nd ch from hook and in next 12 chs, sl st in next ch, leaving remaining 6 chs unworked (13 sc)
For remainder of tail fin, when working into sc stitches, work into the back loop only.
Row 2: Ch 1, turn, sk sl st, sc in next 11 sts, sl st in next st, leaving remaining sc unworked (11 sc)
Row 3: Ch 1, turn,sk sl st, sc in next 11 sc, sc in turning ch-1 sp (above the skipped sl st from the previous row), sc in back bump of next skipped ch from foundation, sl st in back bump of next ch. (13 sc, 4 remaining unworked chs)
Row 4: Repeat row 2
Row 5: Repeat row 3 (13 sc, 2 remaining unworked chs)
Row 6: Repeat row 2
Row 7: Repeat row 3 (13 sc, no remaining unworked chs)
Row 8: Ch 1, turn, sk sl st, sc in next 11 sc, leaving remaining 2 sc unworked. (11 sc)
Row 9: Ch 3, turn, sc in 2nd ch from hook and in next ch, sc in next 9 sc, sl st in next sc, leaving remaining sc unworked. (11 sc)
Row 10: Ch 1, turn, sk sl st, sc in next 11 sc. (11 sc)
Rows 11-14: Repeat rows 9-10 twice.
Row 15: Ch 3, turn, sc in 2nd ch from hook and in next ch, sc in next 11 sc, (sc in next turning ch-1 sp, sc in next unworked st from previous row) 3 times, sc in last sl turning ch-1 sp. 20 sc. Fasten off.

2nd fin piece: Repeat as for first fin piece, but do not fasten off.
Joining:
Hold fin pieces with right sides together and lining up edges.
Working through wrong side (outside) loops only of both pieces together, ch 1, sc in each st across side.
Working through both pieces across bottom of tail, ch 1, work 23 sc evenly spaced across bottom.
Working through wrong side loops only of both pieces together, ch 1, sc in each st across side.
Turn tail fin right-side out. Stuff lightly if desired (I did not stuff mine).
Top edging: With right side facing and working through only one fin piece at a time, ch 1, work 8 sc evenly spaced around, join with a sl st into first st, fasten off, leaving a 10 – 12 inch tail for sewing. (8 sc).

Bikini Top:
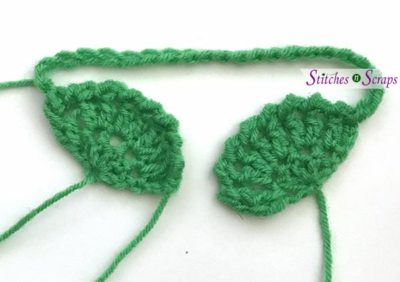
Shell 1:
Row 1: With fin color, ch 4 (counts as dc and foundation ch), 4 dc in 4th ch from hook. (5 sts)
Row 2: Ch 3 (counts as dc), turn, dc in first st, 2 dc in each remaining st across. (10 sts)
Crab Stitch Edging: Ch 1, do not turn, (sc in previous st) across. This is called “crab stitch” or “reverse sc”. See crab stitch tutorial. (10 sts) .
Fasten off, leaving a 24 inch tail for sewing.
Shell 2: Repeat as for Shell 1, but do not fasten off.
Strap: Ch 23, with RS facing, join with sl st to top left corner of shell 1. Fasten off, leaving a 24 inch tail for sewing.
Weave in all ends except for the long tails for sewing.
Assembly:
(Scroll down for video tutorial)
Note: If this is going to be given to a child, be especially careful to sew everything down very securely.
Using remaining tails for sewing, and using pictures as a guide:
Flatten ends of arms and sew them to torso at neckline. You may find it helpful to mark the placement of each arm with stitch markers first, to be sure they are positioned correctly.

Sew bikini top in place, being careful not to twist the strap. Be sure to sew all the way around each shell, and across the entire chain around the back.

Slide tail fin onto bottom of tail so that it is flat at the front and the back. Sew through all layers to attach.

Hair:
Guideline: Using a scrap piece of contrasting yarn, sew a guideline to mark the hairline. Sew across the front (forehead), down the sides, and across the back. Finally, sew a part line up the middle.
Make hair:
Wrap hair colored yarn 200 times around a hardcover book that’s at least 11 inches (or desired length). If you don’t have a book, you can use any stiff surface of appropriate length.

Cut through all wraps at one end only. You should end up with 200 strands of “hair” about 22 inches long.
How to attach a strand of hair: (see next step for where to attach). Fold a strand of hair in half, forming a loop. Insert hook into desired stitch and pull up that loop. Yarn over with both ends of the hair strand and pull all the way through.

Attach hair:
Hold head sideways with part line on top. Working along the side of the part closest to you, add hair evenly along part line. Add only 2 or 3 rows of hair for now, starting about a half inch from the front guideline and going down to the bottom guideline. (About 40 strands of hair)
Turn head around and work across the other side of the part in the same way. (About 40 strands of hair)

Turn head so that back of head is facing you and front guideline is on top. Add hairs along center of part line. Be sure not to snag or split your guideline or you will have trouble removing it later. (About 15 strands of hair)
Working along guideline around front (forehead), fill in a few rows of hair along the forehead. (about 40 strands of hair).
Rotate head to add a line of hair along the remainder of the guideline (sides and bottom). As you work, rotate the head so that the guideline is always on top. (about 40 strands of hair)

Shake out hair and pull it into two rough ponytails (just to look at – don’t tie them yet). Use remaining strands of hair to fill in any bare spots.
Trim hair:
Stand mermaid up or lay face down and comb through hair with your fingers until it is all smooth and straight.
Trim ends to make them even. Don’t worry about shorter strands near the top, this will add a layered effect.
Style hair:
Cut two 12-in pieces of fin color for hair ties.
Pull hair into 2 somewhat loose ponytails and tie with hair ties. I used a double knot to make sure my ties were secure.

Finishing:
Belly Button:
Weave in ending tail from body for a few stitches, then bring it out the back.
Bring needle up through the belly button, being careful not to pucker the fabric at the back.
Sew a small stitch at the belly button, coming back out the back, and pull tightly to make the fabric dimple.
Repeat this with a second stitch to secure if desired, then weave in end.
Remove all guidelines and stitch markers.
Weave in all ends.
Give your mermaid a name!
Video Tutorials:
Tail Fin Tutorial – This tutorial covers making the tail fin.
Assembly Tutorial – This tutorial covers attaching the eyes, sewing the eyebrows and mouth, attaching the arms and tail fin, and making the belly button.
I hope you enjoy making this pattern. Big thanks to MixedKreations for tech editing it!
A downloadable pdf of this pattern is also available in my Craftsy store or on Ravelry, for a small fee. The fee for the pdf format is to offset the advertising revenue lost when you print or download the pattern rather than viewing it online.
Do you want the best of Stitches ‘N’ Scraps delivered right to your inbox? The Stitches ‘N’ Scraps email newsletter includes highlights from the blog as well as special features not available elsewhere. Don’t miss a stitch – Subscribe now!


One Comment
bonnie morrison
fun