Halloween Crochet Amigurumi – Breezy the Baby Bat
Breezy the Baby Bat is a laid back kinda guy who loves hanging out with his batty friends. This Halloween crochet amigurumi pattern works up quickly, so you can make a whole colony!

This content is protected by copyright. See this Terms of Use / Copyright page for more information.
This post contains sponsored content and/or affiliate links. If you click an affiliate link and make a purchase, I may get a commission.
CAL Central Halloween CAL
I designed this Halloween crochet amigurumi pattern for the 2020 Halloween CAL at CAL Central Crochet. Follow along on the CAL Central Crochet Facebook group for more crochet amigurumi patterns. Share your CAL pictures (we love to see all the projects) and don’t forget to enter the giveaway!

Batty about Bats
Bats may look spooky, but they’re really our friends! They help pollinate plants and eat a lot of annoying bugs like mosquitoes. Just like real bats, Breezy is a sociable creature, used to hanging out (literally) with a large colony. So be sure to make him some friends too!
Baby Buddies
Breezy is similar in style and design to his friends, Awesome the Baby Elephant, Noble the Lion Cub, Bravo the Bear Cub, and Sunny the Baby Bunny. Make them all!


Color Choices
Real bats come in all shades of grey, black, and brown, and there are even a few white (albino) bats! I chose grey and black, but you can get creative with any color combination. Go neutral for a realistic look, or try something different for fun.
Poly Fil Premium Fiber Fill
Fairfield World generously sent me lots of Poly-Fil Premium Polyester Fiber Filling for these softie designs. This is my go to stuffing material for all my crochet amigurumi patterns because it’s so soft and squishy and easy to use.
My favorite stuffing tip is to tear the stuffing into small bits and stuff just a little at a time, rather than trying to put a whole handful in all at once. This creates a smoother finish and avoids clumps and lumps.


Materials
- Yarn: Worsted weight yarn
- 75 yds main color (A – shown in grey)
- 75 yds accent color (B – shown in black)
- Hook: Size H/ 5 mm crochet hook or size needed to match gauge.
- Notions:
- Fairfield Poly-Fil Premium Polyester Fiber Filling
- Yarn Needle
- Stitch Marker or scrap of yarn to use as marker.
Project Level
Intermediate: Mostly single crochet in the round, with some increases and multiple types of decreases.
Size
7 inches tall not counting ears.
Gauge
14 sc x 14 rows = 4 inches. Use pattern as gauge swatch – Rounds 1 – 4 should measure 2.25 inches in diameter. Exact gauge is not critical.
Abbreviations used
(Pattern is written in US terms)
ch = chain
sc = single crochet
dc = double crochet
fpdc = front post double crochet
sc3tog = single crochet next 3 stitches together (see Special Stitches)
inc = increase (see Special Stitches)
dec = decrease (see Special Stitches)
dbl dec = double decrease (see Special Stitches)
sk = skip
st(s) = stitch(es)
sl st = slip stitch
sp = space
ch-sp = chain space
rnd = round
RS = right side
Special Stitches
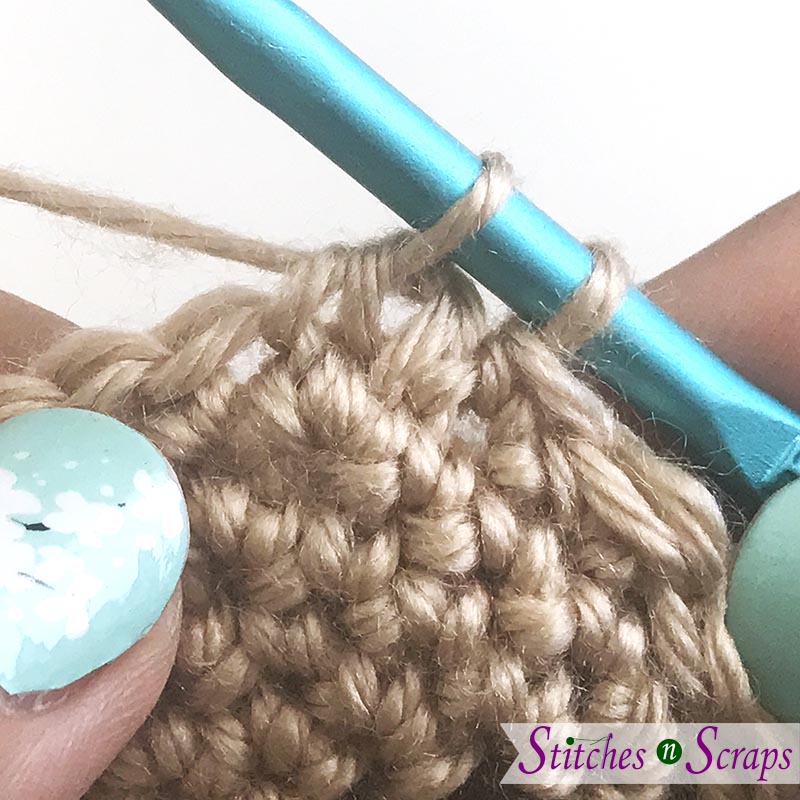
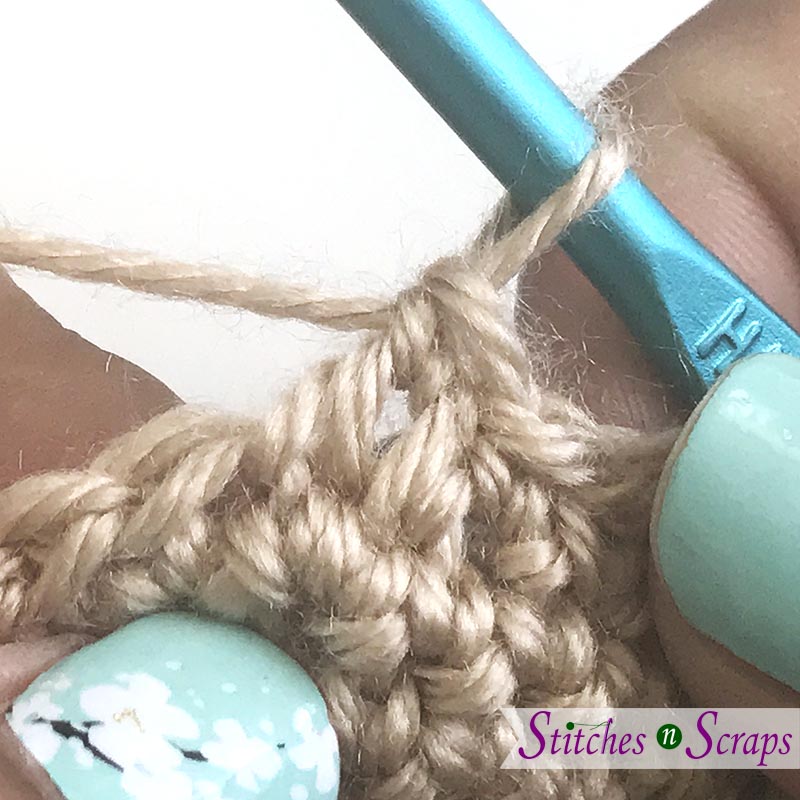
Increase (inc): Sc in back loop only of next st, then sc in both loops of the same st. See full tutorial here.

Decrease (dec): Insert hook into front loop only of both of next 2 stitches, yarn over and draw up a loop, yarn over and draw through both loops on hook. This is an alternative to a single crochet 2 together (sc2tog) stitch. If you prefer, you can use the standard sc2tog instead.

Double Decrease (dbl dec): Insert hook into front loop only of all of next 3 stitches, yarn over and draw up a loop, yarn over and draw through both loops on hook. This is a much less bulky alternative to an sc3tog, and is used at the tips of the ears only.
Single Crochet 3 Together (sc3tog): (Insert hook into next st, yo and pull up a loop) 3 times, yo and pull through all 4 loops on hook.
Picot: Ch 3, sl st into last st made before the ch 3. (See full tutorial here)
Instructions
Body
Body, head, and muzzle are worked in continuous rounds. Do not join or turn unless indicated. Mark first stitch of each round.
With A, ch 2
Rnd 1 (RS): 6 sc in 2nd ch from hook. (6 sc)
Rnd 2: Inc around. (12 sc)
Rnd 3: (Inc in next st, sc in next st) around. (18 sc)
Rnd 4: (Inc in next st, sc in each of next 2 sts) around. (24 sc)
Rnd 5: Sc in each st around.
Rnd 6: (Inc in next st, sc in each of next 3 sts) around. (30 sc)
Rnds 7-10: Sc in each st around.
Rnd 11: (Dec, sc in each of next 3 sts) around. (24 sts)
Rnds 12-15: Sc in each st around.
Rnd 16: (Dec, sc in each of next 2 sts) around. (18 sts)
Rnds 17-18: Sc in each st around.
Rnd 19: (Dec, sc in next st) around. (12 sts)
Stuff body most of the way full and continue stuffing as you go.

Head
Rnds 20-22: Repeat rnds 3-5
Rnd 23: Sc in next 6 sts, ch 6, sk next 6 sts, sc in last 12 sts. (18 sc and ch-6 sp for muzzle)
Rnd 24: Sc in each st and each ch around. (24 sc)
Rnd 25: Sc in each st around.
Rnd 26: (Dec, sc in next 2 sts) around. (18 sc)
Rnd 27: (Dec, sc in next st) around. (12 sc)
Rnd 28: Dec around. (6 sc)
Fasten off.
Using tails, sew top of head and bottom of body closed, then weave in all ends.
Finish stuffing head through muzzle opening.
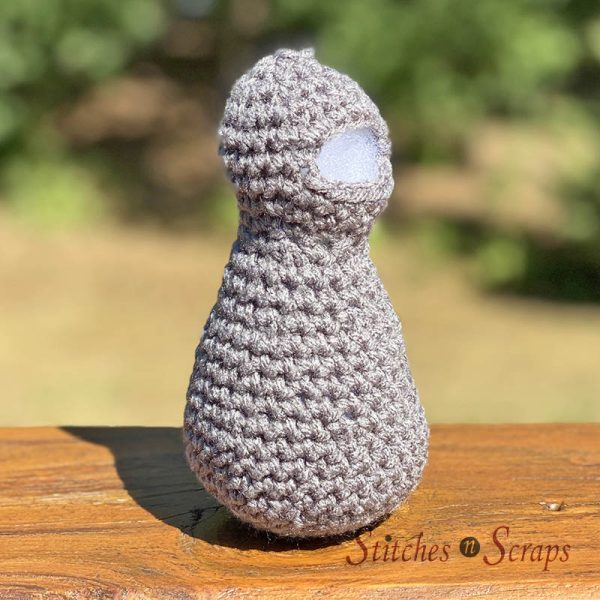
Muzzle
With RS facing, join A with sl st in any st or ch around muzzle opening.
Rnd 1: Work 14 sc evenly spaced around muzzle opening.
This works out to 1 sc in each st, 1 sc in the bottom of each ch, and 1 extra sc in each side, where the stitches and chains meet.
Rnd 2: (Dec, sc in next 5 sts) twice. (12 sts)
Rnd 3: (Dec, sc in next 2 sts) around. (9 sts)
Rnd 4: (Dec, sc in next st) around. (6 sts)
Fasten off leaving an 8 inch tail
Stuff muzzle.
If needed, you can use the back of your hook, a knitting needle, a chopstick, or other similar tool to push the stuffing into the muzzle.
Using tail, sew muzzle closed and weave in all ends.
Wings
With B, ch 38
Row 1: 2 sc in 2nd ch from hook, sc in next 6 chs, sk next ch, dc in next ch, sk next ch, sc in next 8 chs, 3 sc in next ch, sc in next 8 chs, sk next ch, dc in next ch, sk next ch, sc in next 6 chs, 2 sc in last ch. (35 sc, 2 dc)
Row 2: Ch 1, 2 sc in first st, sc in next 6 sts, sc3tog, sc in next 8 sts, 3 sc in next st, sc in next 8 sts, sc3tog, sc in next 6 sts, 2 sc in last st. (37 sts)
Row 3: 2 sc in first st, sc in next 6 sts, sk next st, fpdc in next dc one row below, sk next st, sc in next 8 sts, 3 sc in next st, sc in next 8 sts, sk next st, fpdc dc in next dc one row below, sk next st, sc in next 6 sts, 2 sc in last st. (35 sc, 2 fpdc)
Rows 4-7: Repeat rows 2-3 twice.
Edging Round
- Bottom: Ch 1, (dc, sc) in first st, sc in next 7 sts, sl st in next st, sc in next 9 sts, 3 sc in next st, sc in next 9 sts, sl st in next st, sc in next 7 sts, (sc, dc, ch-1) in next st. (39 sts, 2 sl sts)
- Side: Working in sides of rows, work 8 sc evenly spaced across to top. (8 sc)
- Top: Working in bottom of row 1, (sc, picot, sc) in first st, sc in next 7 sts, (sc, picot, sc) in next st, sc in next 9 sts, sl st in next st, sc in next 9 sts, (sc, picot, sc) in next st, sc in next 7 sts, (sc, picot, sc) in next st. (40 sc, 4 picots, 1 sl st)
- Side: Working in sides of rows, work 8 sc evenly spaced to beginning of round. (8 sc)
Fasten off
Weave in all ends. Wash and block wings.
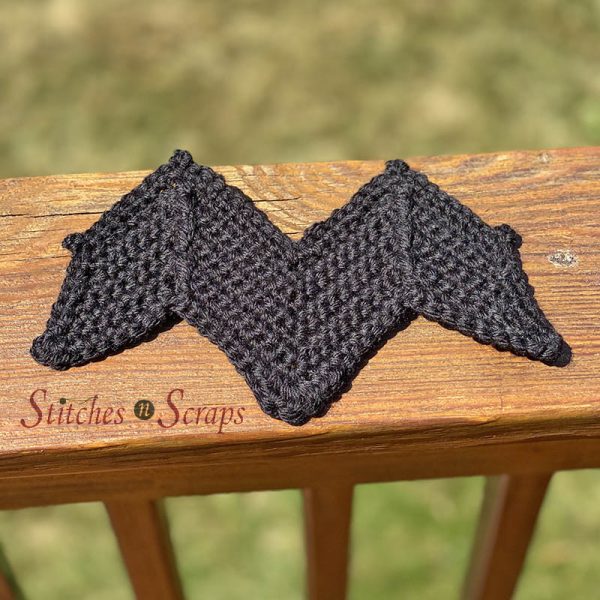
You can stiffen the wings with fabric stiffener or glue if desired – the sample shown has not been stiffened.
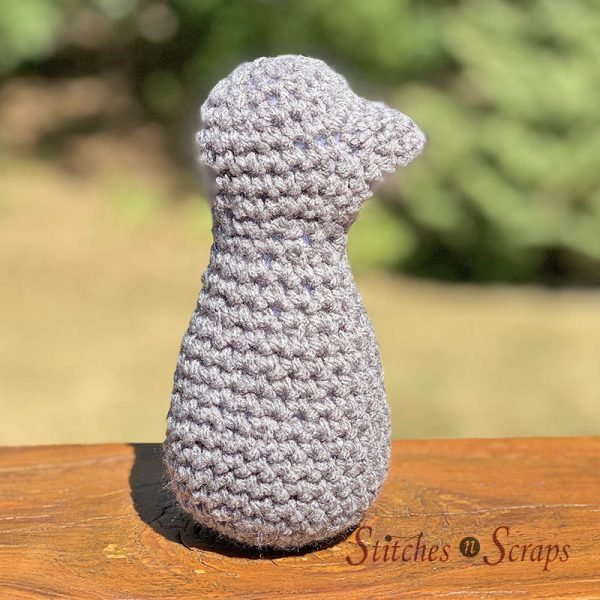
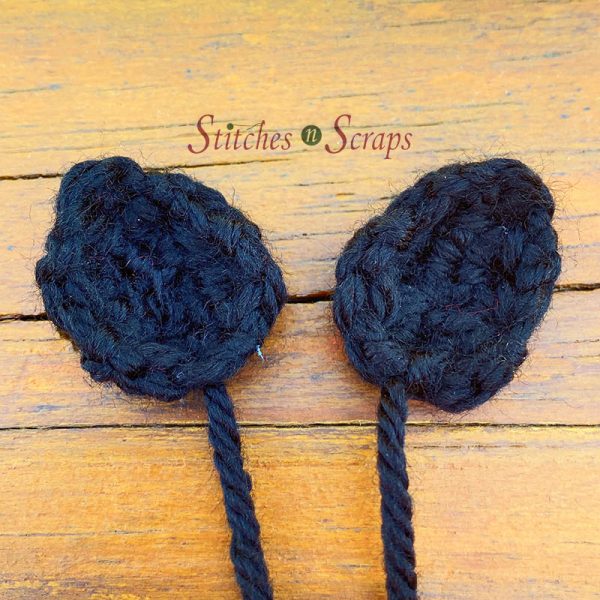
Ear (make 2)
With B, ch 2, leaving an 8 inch tail for sewing.
Row 1: 4 sc in 2nd ch from hook. (4 sc)
Row 2: Ch 1, turn, 2 sc in first st, sc in each of next 2 sts, 2 sc in last st. (6 sc)
Row 3: Ch 1, turn, sc in first st, dec twice, sc in last st. (4 sts)
Row 4: Ch 1, turn, sc in first st, dec, sc in last st. (3 sts)
Row 5: Dbl dec. (1 st)
Edging Rnd: Do not turn, working around outside edge of ear, work 10 sl st evenly spaced around. This should make the ear curl in slightly.
Fasten off. Weave in ending tail.
Finishing
Sew ears to head using the starting tail.
Weave in all ends.
With B, embroider nose and eyes.
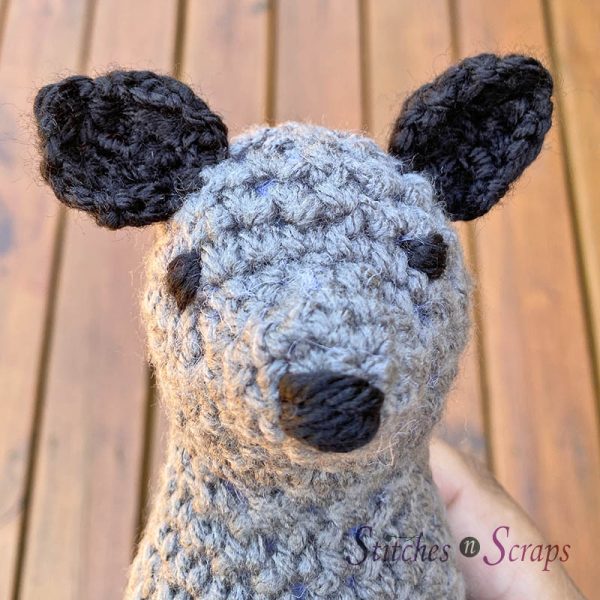
Center wings on back of body, starting at the base of the head, so that the post stitches show at the front. The picots should be on the top of the wings.

Sew wings to body down center line. Sew an additional seam one stitch over on each side of center line.
Share this Baby Bat Amigurumi Pattern on Pinterest!
Here’s an image perfect for pinning:

Rate this Halloween Crochet Amigurumi Pattern!
I hope you enjoyed this crochet amigurumi bat pattern. A downloadable pdf of this pattern is available on Ravelry for a small fee. The fee for the pdf format is to offset the advertising revenue lost when you print or download the pattern rather than viewing it online.
Do you want the best of Stitches n Scraps delivered right to your inbox? The Stitches n Scraps email newsletter includes highlights from the blog as well as special features not available elsewhere. Don’t miss a stitch – Subscribe now!


5 Comments
Alexandra
Breezy is very cute!
Sara
These little guys would make such cute pattern weights for sewing! <3
Pia Thadani
What a great idea!
brittany
This bat was way too hard to make. Instructions very unclear in some spots. Start was pretty simple and when I got to the point where it was way too confusing to follow, I was too far along to ditch the project.
Pia Thadani
Sorry you had that experience – if you let me know where you got stuck maybe I can help, or correct the pattern if needed.