Free Crochet Patterns – Home Décor
Find the perfect, free crochet pattern for your next project! Browse them all, or select a category from the dropdown menu. Where will your creativity take you today?

Lion Fridge Magnet Crochet Pattern
Go wild with an adorable, lion fridge magnet! This feline fridgie is a fun addition to any fridge or magnet board. They make a great gift too, so you may want to make a few!

This content is protected by copyright. See this Terms of Use / Copyright page for more information.
This post contains sponsored content and/or affiliate links. If you click an affiliate link and make a purchase, I may get a commission.
2021 Fridgies CAL
This lion fridge magnet is the July pattern in the 2021 Fridiges CAL! Crochet along through 12 magnet patterns. At the end of the year, you’ll have an adorable set of fridgies for yourself or for a gift! You may want to make 2 sets, so you don’t have to decide.

Enter the Giveaway
There will be several giveaways throughout the Fridgies CAL. This pattern kicks off the 3rd quarter and with it, a new prize! You could win 3 skeins of this sparkly, gorgeous, Date Nights yarn from Lion Brand!

Find all the giveaway details and learn more about the Fridgies Crochet Along here! Look for a new knitting pattern from me in this yarn soon. Once it’s ready, I’ll link it here.
Lion Brand DIY Yarn
Lion Brand provided all the yarn for this crochet along. Their DIY yarn comes in small balls, which is just perfect for the small amounts needed for each magnet. For the lion fridge magnet, you will need yellow, orange, and white, plus a small amount of black for the facial features.

If you’re not able to get this yarn or the colors you need, Lion Brand Vanna’s Choice or Basic Stitch are also good options. You can also substitute embroidery thread for the black yarn.
Xyron Glue Gun
The easiest way to attach your magnet to your crochet is with hot glue. For my magnets, I’m using this mini hot glue gun that Xyron gave me to try out.

I used it on this sun fridge magnet and on the previous magnets as well. I’ve been very happy with it. It heats up quickly and produced a nice steady bead of glue. Watch it in action in the tutorial video below!
Materials
- Yarn: Lion Brand DIY Yarn (100% acrylic, worsted weight, 65 yds / 30g per ball)
- 25 yds yellow
- 20 yds orange
- 10 yds white
- 1/2 yd black OR black embroidery thread
- Hook: Size H / 5 mm crochet hook or size needed to match gauge.
- Notions:
- Yarn Needle
- Strong, flat magnet that will fit inside the sun (sample shown is 1 inch diameter)
- Xyron hot glue gun and glue stick
- Stitch marker (optional)
Project Level
Intermediate: Worked in the round, some back / front loop only stitches, several separate pieces sewn together, some embroidery.
Size
About 3 inches in diameter, not counting ears.
Gauge
12 sc x 13 rounds = 4 inches
Use pattern as gauge swatch – After rnd 4, back circle should measure about 2.25 inches in diameter. Exact gauge is not critical. Your fabric should be tight enough that the magnet won’t show through.
Abbreviations used
(Pattern is written in US terms)
blo = back loop only
ch = chain
dc = double crochet
flo = front loop only
hdc = half double crochet
inc = increase (see Special Stitches)
RS = right side
sc = single crochet
sk = skip
sl st = slip stitch
st(s) = stitch(es)
WS = wrong side
Special Stitches
Increase (inc): Sc in back loop only of indicated st, then sc in both loops of same st. This counts as two stitches in the end of round stitch counts.
See this tutorial for a more detailed look.

Instructions
Join rounds where indicated with a slip stitch in the first stitch of the round. Slip stitches are not included in stitch counts unless otherwise specified. Mark first stitch of rounds if desired. Do not turn your work unless indicated.
Back
Back Circle
With yellow, ch 2.
Rnd 1 (RS): 6 sc in 2nd ch from hook, join. (6 sts)
Rnd 2: Ch 1, inc in each st around, join. (12 sts)
Rnd 3: Ch 1, inc in first st, sc in next st, (inc in next st, sc in next st) around, join. (18 sts)
Rnd 4: Ch 1, inc in first st, sc in next 2 sts, (inc in next st, sc in next 2 sts) around, join. (24 sts)
Do not fasten off.
Work should now measure about 2.25 inches in diameter.

Ears
Turn work to wrong side.
Row 1 (WS): Ch 1, (sc, hdc, dc, hdc, sc) in flo of first st, sl st in flo of each of next 3 sts, (sc, hdc, dc, hdc, sc) in flo of next st. Leave remaining 19 sts unworked. (2 ears)

Cut yellow, leaving a 24 inch tail for sewing.
Back Mane
Continuing from ears and working into the stitches from Rnd 4 of back circle:
Rnd 5 (WS): With orange, (sl st, ch 5, sl st) in each of next 19 sts, working behind ears, (sl st, ch 5, sl st) in blo of each of next 5 sts. (24 ch-5 loops)

Fasten off. Weave in all ends except for the 24 inch yellow tail.
Magnet
Using hot glue gun, glue magnet to center of back circle, on the WS of work.

Set back piece aside.
Front
Front Circle
With yellow, ch 2.
Rnds 1-3: Repeat rnds 1-3 of back circle. (18 sc)
Rnd 4: Ch 1, inc in first st, sc in next 2 sts, (inc in next st, sc in next 2 sts) around, do not join. (24 sts)

Front Mane
Rnd 5 (RS): With orange, (sl st, ch 3, sl st) in each st around, join with sl st in first st. (24 ch-3 loops)

Fasten off. Weave in all tails. Set Front aside.
Muzzle
Rnd 1 (RS): With white, ch 2, (sc, 3 dc) twice in 2nd ch from hook. (6 dc, 2 sc)

Fasten off leaving an 18 inch tail for sewing.
Eyes (Make 2)
Rnd 1 (RS): With white, ch 2, (2 sc, sl st) twice in 2nd ch from hook. (4 sc)

On one eye, fasten off leaving an 18 inch tail for sewing. On the other eye, fasten off as normal.
Assembly
Face Pieces
With tails, and using picture as a guide for placement, sew muzzle and eyes to RS of front circle. Muzzle should be along bottom edge, with the eyes centered above it. Do not let any of the pieces overlap the front mane.

Weave in all ends on WS of front circle.
Facial Embroidery
Cut a piece of black yarn about 18 inches long, and weave it in at the back of the work to secure it. With this yarn and using the picture as a guide, embroider nose, mouth, and black part of eyes.

Weave in ends.
Join Front and Back
Place the front and back together so that wrong sides are together and magnet is hidden between them. Ears should be centered on top of face.

Using the long yellow tail from the back circle, sew front and back circles together around the edge of rnd 4 on both pieces. This is the edge of the yellow circle, before it changes to orange.

Weave in any remaining tails.
Lion Fridge Magnet Video Tutorial
Watch This Video on YouTube

Rate this Lion Fridge Magnet Pattern!
I hope you enjoyed this lion fridge magnet pattern. Big thanks to Karen Navoy for testing it!
A downloadable pdf of this pattern is available on Ravelry for a small fee. The fee for the pdf format is to offset the advertising revenue lost when you print or download the pattern rather than viewing it online.
Do you want the best of Stitches n Scraps delivered right to your inbox? Don’t miss a stitch – Subscribe now!

Sun Fridge Magnet Crochet Pattern
Bring that summer sunshine indoors with the Sun Fridge Magnet! This happy little sun can brighten up even the gloomiest of days. They make great gifts too, so make a few!

This content is protected by copyright. See this Terms of Use / Copyright page for more information.
This post contains sponsored content and/or affiliate links. If you click an affiliate link and make a purchase, I may get a commission.
2021 Fridgies CAL
This bunny fridge magnet is the March pattern in the 2021 Fridiges CAL! Crochet along through 12 magnet patterns. At the end of the year, you’ll have an adorable set of fridgies for yourself or for a gift! You may want to make 2 sets, so you don’t have to decide.

Enter the Giveaway
There will be several giveaways throughout the Fridgies CAL. This quarter, you could win this gift set of fiber wash products from Unicorn Clean. It even includes an adorable plush!
Learn all about the Fridgies Crochet Along here, including how to enter the giveaways!
Lion Brand DIY Yarn
Lion Brand provided all the yarn for this crochet along. Their DIY yarn comes in small balls, which is just perfect for the small amounts needed for each magnet. For the sun fridge magnet, you will need yellow and orange, and a small amount of black for the facial features.

If you’re not able to get this yarn or the colors you need, Lion Brand Vanna’s Choice or Basic Stitch are also good options. You can also substitute embroidery thread for the black yarn.
Xyron Glue Gun
The easiest way to attach your magnet to your crochet is with hot glue. For my magnets, I’m using this mini hot glue gun that Xyron gave me to try out.

I used it on this sun fridge magnet and on the previous magnets as well. I’ve been very happy with it. It heats up quickly and produced a nice steady bead of glue. Watch it in action in the tutorial video below!
Materials
- Yarn: Lion Brand DIY Yarn (100% acrylic, worsted weight, 65 yds / 30g per ball)
- 25 yds yellow
- 10 yds orange
- 1/2 yd black OR black embroidery thread
- Hook: Size H / 5 mm crochet hook or size needed to match gauge.
- Notions:
- Yarn Needle
- Strong, flat magnet that will fit inside the sun (sample shown is 1 inch diameter)
- Xyron hot glue gun and glue stick
- Stitch marker (optional)
Project Level
Easy: Worked in the round with some sewing and embroidery required.
Size
About 2.5 inches in diameter, not counting rays.
Gauge
12 sc x 13 rounds = 4 inches
Use pattern as gauge swatch – After rnd 3, back circle should measure about 1.75 inches in diameter. Exact gauge is not critical. Your fabric should be tight enough that the magnet won’t show through.
Abbreviations used
(Pattern is written in US terms)
ch = chain
dc = double crochet
hdc = half double crochet
inc = increase (see Special Stitches)
RS = right side
sc = single crochet
sk = skip
sl st = slip stitch
st(s) = stitch(es)
WS = wrong side
Special Stitches
Increase (inc): Sc in back loop only of indicated st, then sc in both loops of same st. This counts as two stitches in the end of round stitch counts.
See this tutorial for a more detailed look.

Instructions
Join rounds where indicated with a slip stitch in the first stitch of the round. Slip stitches are not included in stitch counts unless otherwise specified. Mark first stitch of rounds if desired. Do not turn your work unless indicated.
Back
Back Circle
With yellow, ch 2.
Rnd 1 (RS): 6 sc in 2nd ch from hook, join. (6 sts)
Rnd 2: Ch 1, inc in each st around, join. (12 sts)
Rnd 3: Ch 1, inc in first st, sc in next st, (inc in next st, sc in next st) around, join. (18 sts)
Fasten off and weave in tails.
Work should now measure about 1.75 inches in diameter.

Rays
Turn back circle over to the wrong side. With WS facing, join orange by pulling up a loop in any stitch.
Rnd 4 (WS): [Ch 5, working into the back bumps of the chains, sl st in 2nd ch from hook, sc in next ch, hdc in next ch, dc in last ch, sk next st on back, sl st in next st on back] 8 times, ch 5, working into the back bumps of the chains, sl st in 2nd ch from hook, sc in next ch, hdc in next ch, dc in last ch, sk last st on back, sl st in same st as first st of rnd, where you joined the orange.

Fasten off, leaving an 18 inch tail for sewing.
Weave in all ends except for the long orange tail.
Magnet
Using hot glue gun, glue magnet to center of back circle, on the WS of work.

Set back piece aside.
Front
Front Circle
With yellow, ch 2.
Rnds 1-3: Repeat rnds 1-3 of back. (18 sc)
Rnd 4: (Sc, ch 1, sl st) in each st around.

Fasten off. Weave in all tails.
Face
Cut a piece of black yarn about 18 inches long, and weave it in at the back of the work to secure it. With this yarn and using the picture as a guide, make a French knot for each eye, and embroider a mouth.

Weave in any remaining tails on front.
Assembly
Place the front and back together so that wrong sides are together and magnet is hidden between them.

Using the long orange tail from the back, sew front and back together around the edge of rnd 3 on both pieces.

Weave in any remaining tails.
Sun Fridge Magnet Video Tutorial
Watch This Video on YouTube

Rate this Sun Fridge Magnet Pattern!
I hope you enjoyed this Sun fridge magnet pattern. Big thanks to Karen Navoy for testing it!
A downloadable pdf of this pattern is available on Ravelry for a small fee. The fee for the pdf format is to offset the advertising revenue lost when you print or download the pattern rather than viewing it online.
Do you want the best of Stitches n Scraps delivered right to your inbox? Don’t miss a stitch – Subscribe now!

Bluebird Fridge Magnet Crochet Pattern
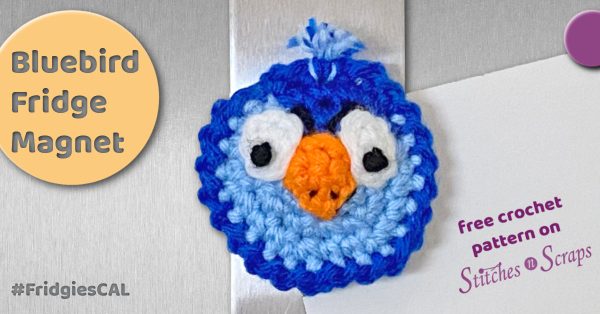
Got a refrigerator or magnet board? Put a bird on it! The Bluebird Fridge Magnet is a quick and easy way to bring a touch of spring indoors. They make great gifts too, so make a few!

This content is protected by copyright. See this Terms of Use / Copyright page for more information.
This post contains sponsored content and/or affiliate links. If you click an affiliate link and make a purchase, I may get a commission.
2021 Fridgies CAL
This bunny fridge magnet is the March pattern in the 2021 Fridiges CAL! Crochet along through 12 magnet patterns. At the end of the year, you’ll have an adorable set of fridgies for yourself or for a gift! You may want to make 2 sets, so you don’t have to decide.

Enter the Giveaway
There will be several giveaways throughout the Fridgies CAL. This quarter, you could win this gift set of fiber wash products from Unicorn Clean. It even includes an adorable plush!
Learn all about the Fridgies Crochet Along here, including how to enter the giveaways!
Lion Brand DIY Yarn
Lion Brand provided all the yarn for this crochet along. Their DIY yarn comes in small balls, which is just perfect for the small amounts needed for each magnet. For the bluebird fridge magnet, you will need 2 shades of blue, with small amounts of white, organge and black for the facial features.

If you’re not able to get this yarn or the colors you need, Lion Brand Vanna’s Choice or Basic Stitch are also good options.
Xyron Glue Gun
The easiest way to attach your magnet to your crochet is with hot glue. For my magnets, I’m using this mini hot glue gun that Xyron gave me to try out.

I used it on this bluebird fridge magnet and on the previous magnets as well. I’ve been very happy with it. It heats up quickly and produced a nice steady bead of glue. Watch it in action in the tutorial video below!
Materials
- Yarn: Lion Brand DIY Yarn (100% acrylic, worsted weight, 65 yds / 30g per ball)
- 30 yds royal blue (royal)
- 10 yds sky blue (sky)
- 3 yds each, orange and white
- 1/2 yd black OR black embroidery thread
- Hook: Size H / 5 mm crochet hook or size needed to match gauge.
- Notions:
- Yarn Needle
- Strong, flat magnet that will fit inside the bluebird (sample shown is 1 inch diameter)
- Xyron hot glue gun and glue stick
- Stitch marker
Project Level
Easy: Worked in the round with some sewing and embroidery required. Some color changes.
Size
About 2.5 inches in diameter, not counting tuft on top.
Gauge
12 sc x 13 rounds = 4 inches
Use pattern as gauge swatch – After rnd 4, back circle should measure about 2.25 inches in diameter. Exact gauge is not critical. Your fabric should be tight enough that the magnet won’t show through.
Abbreviations used
(Pattern is written in US terms)
ch = chain
inc = increase (see Special Stitches)
sc = single crochet
sc2tog = single crochet 2 together
sk = skip
sl st = slip stitch
st(s) = stitch(es)
RS = right side
WS = wrong side
Special Stitches
Increase (inc): Sc in back loop only of indicated st, then sc in both loops of same st. This counts as two stitches in the end of round stitch counts.
See this tutorial for a more detailed look.

Instructions
Join rounds where indicated with a slip stitch in the first stitch of the round. Slip stitches are not included in stitch counts unless otherwise specified. Mark first stitch of rounds if desired. Do not turn your work unless indicated.
Back
With royal, ch 2.
Rnd 1 (RS): 6 sc in 2nd ch from hook, join. (6 sts)
Rnd 2: Ch 1, inc in each st around, join. (12 sts)
Rnd 3: Ch 1, inc in first st, sc in next st, (inc in next st, sc in next st) around, join. (18 sts)
Rnd 4: Ch 1, inc in first st, sc in next 2 sts, (inc in next st, sc in next 2 sts) around, join with sl st in flo of first st. Fasten off. (24 sts)
Weave in tails.
Work should now measure about 2.25 to 2.5 inches in diameter.

Magnet
Using hot glue gun, glue magnet to center of back circle, on the WS of work.

Set back piece aside.
Front
This is the same pattern of increases as the back, but done with 2 colors. For a clean color change, start using the new color in the last “pull through” step of the last stitch in the previous color. See this tutorial for a more detailed look.
Do not work over the unused color. Instead, allow it to “float”, creating loose strands on the back of the work. Pick it up and work with it where you need it, making sure it stays loose at the back and doesn’t pull too tightly.

With sky, ch 2.
Rnd 1 (RS): 6 sc in 2nd ch from hook, join. (6 sts)
Rnd 2: Ch 1, inc in each of first 4 sts, sc in back loop only of next st changing to royal. With royal, sc in both loops of same st, inc in next st changing to sky, join with sky. (9 sky sts, 3 royal sts)

For the rest of the front, you will always be working royal stitches into royal stitches, and sky stitches into sky stitches.
Rnd 3: Ch 1, inc in first st, (sc in next st, inc in next st) 4 times, changing to royal. With royal, sc in next st, inc in next st, sc in next st changing to sky, join with sky. (14 sky sts, 4 royal sts)
Rnd 4: Ch 1, inc in first st, (sc in next 2 sts, inc in next st) 4 times, sc in next st, changing to royal. With royal, sc in next st, inc in next st, sc in last 2 sts, join. (19 sky sts, 5 royal sts)
Remove royal working loop from hook and place it onto a stitch marker to secure it. Fasten off sky only. Weave in all 3 tails.

Eyes (Make 2)
With white, ch 2
Rnd 1: (2 sc, sl st, 2 sc, sl st) in 2nd ch from hook, join. (4 sc)
Optional: For a neater join, try this sewn, invisible join technique!
Fasten off, leaving a 12 inch tail for sewing on one eye, and just a normal tail on the other.

Beak
With orange, ch 2
Row 1: 2 sc in 2nd ch from hook. (2 sc)
Row 2: Ch 1, turn, inc in each st across. (4 sc)
Row 3: Turn, sl st in first st, sc2tog, sl st in last st. (1 st)
Fasten off, leaving a 12 inch tail for sewing.

Assembly
Face
Place front circle with right side up and royal section centered at top. Using picture as a guide, place beak onto center of front circle, with point (row 1) at the bottom. The top of the beak should just overlap the bottom of the first royal stitches. Sew into place using the tail from the beak. Weave in end.

Place eyes on either side of the beak so that they just slightly overlap the beak at its widest point. The eyes are oval shaped. Orient them with the narrow slip stitches on the sides, and the wider sc stitches at the top and bottom. Use the one long tail from the first eye to sew both eyes into place. Weave in end.

Cut a piece of black yarn about 18 inches long, and weave it in at the back of the work to secure it. With this yarn, make a French knot at the center of each eye. Make two small stitches along the top edge of top edge of each eye to create shadows.
Split the remaining black yarn into its component plies – the DIY yarn has 4 plies, so can be split into 2 strands of 2 plies each. Using one of these 2 strands (2 plies), sew tiny stitches at the base of the nose for nostrils, and sew a line along the bottom edge of the nose for a shadow. Weave in all remaining ends.

Join front and back
Put royal working loop from front onto your hook and remove the stitch marker. Place the front and back together so that wrong sides are together and magnet is hidden between them. With front facing and working through both layers, (ch 1, sl st) in each st around. Fasten off and weave in ends.

Tuft
Cut a 4 inch length of each of the 2 blue yarns. Holding them together, fold in half to form a loop. With front facing you, insert hook from front to back through top of head, just below the edging. Place the loop on your hook and pull loop through, leaving 4 ends at the back.

Insert your hook into the loop and pull the ends through the loop.

Pull ends to tighten, then trim ends to about 1/2 inch. With your yarn needle, fray the ends so that each strand separates into its individual plies.

Bluebird Fridge Magnet Video Tutorial
Watch This Video on YouTube

Rate this Bluebird Fridge Magnet Pattern!
I hope you enjoyed this Bluebird fridge magnet pattern. Big thanks to Karen Navoy for testing it!
A downloadable pdf of this pattern is available on Ravelry for a small fee. The fee for the pdf format is to offset the advertising revenue lost when you print or download the pattern rather than viewing it online.
Do you want the best of Stitches n Scraps delivered right to your inbox? Don’t miss a stitch – Subscribe now!

Crochet Doily Pattern – Starflower Lace
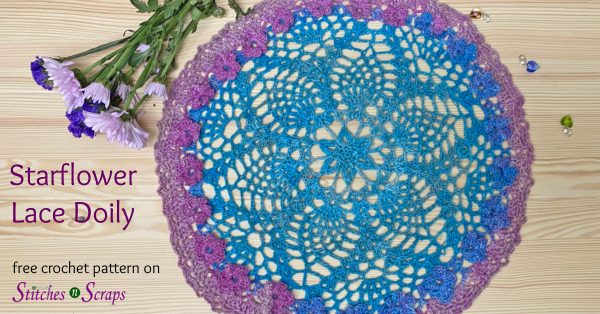
Dress up your table for spring with the Starflower Lace crochet doily! Tiny, 3-dimensional flowers encircle classic pineapple lace, creating the perfect backdrop for your favorite bowl or vase. Or showcase this beauty all by itself!

This content is protected by copyright. See this Terms of Use / Copyright page for more information.
This post contains sponsored content and/or affiliate links. If you click an affiliate link and make a purchase, I may get a commission.
Handspun yarn
In a short-lived spate of spring cleaning, I decided to make something from some unidentified scraps of fiber. I had little bits of bright magenta and teal, and some natural off-white colored wool as well.
By blending them together, I spun them into something of a gradient. My yarn was somewhat uneven, and not soft enough to wear against skin, but perfect for something decorative for spring!

Make it any size
This pattern will work with any size yarn, and a hook appropriate for the yarn you choose. Keep in mind though that the size and yardage will vary if you change the size of the yarn.
All the gauge and size measurements in the pattern are based on the tester’s project, using store bought, fingering weight yarn. Because my yarn was hand spun, it was not the most even in weight throughout. My doily ended up closer to 15 inches in diameter instead of 14.
3-D Flower Stitch
The tiny flowers circling the outside of the doily are made with the flower stitch. In this technique, the flower petals are worked around the posts of the stitches in the row below. Each flower starts and ends in almost the same position, so it’s possible to do the whole round without breaking the yarn. Check out this tutorial for a more in-depth look at this 3-dimensional stitch.

Materials
- Yarn: 225 yds fingering weight yarn
- Hook: Size E/ 3.5 mm crochet hook or size needed to match gauge.
- Notions:
- Yarn Needle
- Stitch marker (optional)
Project Level
Complex: Lace pattern worked in the round with uneven stitch counts in some places. 3-dimensional flower stitch.
Size
About 14 inches in diameter after blocking.
Gauge
20 dc x 10 rows = 4 inches
Use pattern as gauge swatch – After rnd 6, work should measure about 4 inches in diameter. Exact gauge is not critical.
Abbreviations used
(Pattern is written in US terms)
ch = chain
dc = double crochet
flower = flower stitch (see Special Stitches)
RS = right side
sc = single crochet
shell = shell stitch (see Special Stitches)
sk = skip
st(s) = stitch(es)
sl st = slip stitch
tr = treble crochet
Special Stitches
Shell Stitch (shell): (2 dc, ch 1, 2dc) in indicated st or sp. When working into a shell, work into the ch-1 sp at the center.

Flower Stitch (flower): Worked around the posts of 2 adjacent double crochets.
Rotate work sideways to work around post of 2nd dc. (Sl st, [ch 2, 2 dc, ch 2, sl st] 3 times) around post of 2nd dc.

Rotate work the other way to work around post of 1st dc.

(Sl st, [ch 2, 2dc, ch 2, sl st] 3 times) around post of 1st dc.

Sometimes it can be hard to see the dc immediately after the flower – turn and look from the back if needed to make sure you’re not accidentally missing that stitch. See this tutorial for a more detailed look.

Instructions
Entire project is worked on the right side, in joined rounds. Do not turn your work. Join rounds where indicated with a slip stitch in the first stitch of the round. You may find it helpful to mark the first st of each round.
Center Flower
(scroll down for full chart)
Ch 2, or make a magic loop
Rnd 1 (RS): 6 sc in 2nd ch from hook or in magic loop, join. (6 sts)
Rnd 2: Ch 1, (sc, ch 1) in each st around, join. (6 sc, 6 ch-1 sps).
Rnd 3: Sl st in first ch-1 sp, ch 1, (sc, ch 6, sc) in same sp, ch 1, sk next st, [(sc, ch 6, sc) in next sp, ch 1, sk next st] 5 times, join. (12 sc, 6 ch-6 sps, 6 ch-1 sps)

From this point forward, skip all stitches and work only into chain spaces unless otherwise specified. Ch 3 at the start of a rnd counts as a dc throughout.
Rnd 4: Ch 1, [(4 sc, ch 2, 4 sc) in next ch-6 sp, sl st in next ch-1 sp], do not join. (48 sc, 6 ch-2 sps)

Rnd 5: Ch 9 (first 4 chs count as a tr, last 5 chs count as a ch-5 sp), sc in next ch-2 sp, ch 5, [tr in next ch-1 sp from rnd 3, ch 5, sc in next ch-2 sp, ch 5] 5 times, join to 4th ch of starting ch 9 (top of 1st tr). (6 tr, 6 sc, 12 ch-5 sps)

Rnd 6: Sl st in first ch-5 sp, ch 3, (dc, ch 1, 2 dc) in same sp (counts as shell), [shell in next ch-5 sp] 11 times, join. (12 shells)
Work should now measure about 4 inches in diameter.
Pineapple Stitch Lace
(Scroll down for full chart)
Rnd 7: Sl st in next dc of first shell, sl st in center of first shell, ch 3, 6 dc in same sp, ch 1, shell in next shell, ch 1, [7 dc in next shell, ch 1, shell in next shell, ch 1] 5 times, join. (42 dc, 6 shells, 12 ch-1 sps)

Rnd 8: Ch 4 (counts as dc and ch-1), [dc in next dc, ch 1] 6 times, sk next ch-1 sp, shell in next shell, ch 1, sk next ch-1 sp, *[dc in next dc, ch 1] 7 times, sk next ch-1 sp, shell in next shell, ch 1, sk next ch-1 sp, repeat from * 4 more times, join. (42 dc, 6 shells, 48 ch-1 sps)

Rnd 9: Sl st in first ch-1 sp, ch 1, sc in same sp, [ch 3, sc in next ch-1 sp] 5 times, ch 2, sk next ch-1 sp, shell in next shell, ch 2, sk next ch-1 sp, *sc in next ch-1 sp, [ch 3, sc in next ch-1 sp] 5 times, ch 2, sk next ch-1 sp, shell in next shell, ch 2, sk next ch-1 sp, repeat from * 4 more times, join. (36 sc, 6 shells, 30 ch-3 sps, 12 ch-2 sps)

Rnd 10: Sl st in first ch-3 sp, ch 1, sc in same sp, [ch 3, sc in next ch-3 sp] 4 times, ch 2, sk next ch-2 sp, (2 dc, ch 1, 2 dc, ch 1, 2 dc) in next shell, ch 2, sk next ch-2 sp, *sc in next ch-3 sp, [ch 3, sc in next ch-3 sp] 4 times, ch 2, sk next ch-2 sp, (2 dc, ch 1, 2 dc, ch 1, 2 dc) in next shell, ch 2, sk next ch-2 sp, repeat from * 4 more times, join. (30 sc, 36 dc, 24 ch-3 sps, 12 ch-2 sps, 12 ch-1 sps)

Rnd 11: Sl st in first ch-3 sp, ch 1, sc in same sp, [ch 3, sc in next ch-3 sp] 3 times, ch 2, sk next ch-2 sp, shell in next ch-1 sp, ch 1, shell in next ch-1 sp, ch 2, sk next ch-2 sp, *sc in next ch-3 sp, [ch 3, sc in next ch-3 sp] 3 times, ch 2, sk next ch-2 sp, shell in next ch-1 sp, ch 1, shell in next ch-1 sp, ch 2, sk next ch-2 sp, repeat from * 4 more times, join. (24 sc, 12 shells, 18 ch-3 sps, 12 ch-2 sps, 6 ch-1 sps)

Rnd 12: Sl st in first ch-3 sp, ch 1, sc in same sp, [ch 3, sc in next ch-3 sp] twice, ch 3, sk next ch-2 sp, shell in next shell, ch 3, sc in next ch-1 sp, ch 3, shell in next shell, ch 3, sk next ch-2 sp, *sc in next ch-3 sp, [ch 3, sc in next ch-3 sp] twice, ch 3, sk next ch-2 sp, shell in next shell, ch 3, sc in next ch-1 sp, ch 3, shell in next shell, ch 3, sk next ch-2 sp, repeat from * 4 more times, join. (24 sc, 12 shells, 36 ch-3 sps)

Rnd 13: Sl st in first ch-3 sp, ch 1, sc in same sp, ch 3, sc in next ch-3 sp, ch 3, sk next ch-3 sp, shell in next shell, [ch 3, sc in next ch-3 sp] twice, ch 3, shell in next shell, ch 3, sk next ch-3 sp, *[sc in next ch-3 sp, ch 3] twice, sk next ch-3 sp, shell in next shell, [ch 3, sc in next ch-3 sp] twice, ch 3, shell in next shell, ch 3, sk next ch-3 sp, repeat from * 4 more times, join. (24 sc, 12 shells, 36 ch-3 sps)

Rnd 14: Sl st in first ch-3 sp, ch 1, sc in same sp, ch 3, sk next ch-3 sp, shell in next shell, ch 3, sc in next ch-3 sp, ch 1, dc in next ch-3 sp, [ch 1, dc in same sp] 4 times, ch 1, sc in next ch-3 sp, ch 3, shell in next shell, ch 3, sk next ch-3 sp, *sc in next ch-3 sp, ch 3, sk next ch-3 sp, shell in next shell, ch 3, sc in next ch-3 sp, ch 1, dc in next ch-3 sp, [ch 1, dc in same sp] 4 times, ch 1, sc in next ch-3 sp, ch 3, shell in next shell, ch 3, sk next ch-3 sp, repeat from * 4 more times, join. (18 sc, 30 dc, 12 shells, 24 ch-3 sps, 36 ch-1 sps)

Rnd 15: Ch 6 (counts as dc and ch 3), sk next ch-3 sp, shell in next shell, ch 3, sc in next ch-3 sp, ch 3, sk next ch-1 sp, dc in next ch-1 sp, [ch 1, dc in next ch-1 sp] 3 times, ch 3, sk next ch-1 sp, sc in next ch-3 sp, ch 3, shell in next shell, ch 3, sk next ch-3 sp, *dc in next sc, ch 3, sk next ch-3 sp, shell in next shell, ch 3, sc in next ch-3 sp, ch 3, sk next ch-1 sp, dc in next ch-1 sp, [ch 1, dc in next ch-1 sp] 3 times, ch 3, sk next ch-1 sp, sc in next ch-3 sp, ch 3, shell in next shell, ch 3, sk next ch-3 sp, repeat from * 4 more times, join. (12 sc, 30 dc, 12 shells, 36 ch-3 sps, 18 ch-1 sps)
Note: I have removed the images for Rnds 15-17 because I made a mistake in my sample and didn’t want it to be confusing. I will replace these with new images when I get a chance.
Rnd 16: Sl st in first ch-3 sp, ch 1, sc in same sp, [ch 3, sc] in each ch sp and in each shell around, ch 3, join. (66 sc, 66 ch-3 sps)
Rnd 17: Sl st in first ch-3 sp, Ch 3, 2 dc in same sp, 3 dc in each of next 9 ch-3 sps, 4 dc in next ch-3 sp, [3 dc in each of net 10 ch-3 sps, 4 dc in next ch-3 sp] 5 times, join.
Flower Stitch Border
Scroll down for full chart
Rnd 18 has 6 repeats of 4 flowers each, for a total of 24 flowers. Between the flowers are chain spaces over skipped stitches. Pay special attention to how many stitches it says to skip – you will not always be skipping over the same number of stitches. Sometimes there are a total of 6 skipped dc between flowers, and sometimes 8.
When the instructions say to sl st between the next 2 dc, insert your hook between the posts of the indicated stitches and work a sl st. There is no ch-sp here to work into, it’s just between the stitches. Skip both the stiches that you just worked between.

Rnd 18: Sl st in 2nd dc. Flower around 2nd and 3rd dcs, ch 3, sk next 2 dc, sl st between next 2 dc, ch 3, sk next 2 dc, flower around next 2 dc, ch 3, sk next 3 dc, sl st between next 2 dc, sk next 3 dc, [flower around next 2 dc, ch 3, sk next 2 dc, sl st between next 2 dc, ch 3, sk next 2 dc] twice, *flower around next 2 dc, ch 3, sk next 2 dc, sl st between next 2 dc, ch 3, sk next 2dc, flower around next 2 dc, ch 3, sk next 3 dc, sl st between next 2 dc, sk next 3 dc, [flower around next 2 dc, ch 3, sk next 2 dc, sl st between next 2 dc, ch 3, sk next 2dc] twice, repeat from * 4 times more, sl st in 2nd dc of rnd 17. (24 flowers, 48 ch-3 sps)

Rnd 19: Working behind the flowers, sl st in next ch-3 sp, ch 3, 3 dc in same sp, 4 dc in each of next 6 ch-3 sps, dc in next sl st, 4 dc in next ch-3 sp, [4 dc in each of next 7 ch-3 sps, dc in next sl st, 4 dc in next ch-3 sp] 5 times, join. (198 dc)

Rnd 20: Ch 1, sc in first st, ch 3, sk next st, (sc in next st, ch 3, sk next st) around, join. (99 sc, 99 ch-3 sps)

Rnd 21: Sl st in first ch-3 sp, ch 1, (sc, ch-3) in same sp and in each ch-3 sp around, join. Fasten off. (99 sc, 99 ch-3 sps).

Finishing
Wash and Block – this is important to open up the lace, for best results, do not skip this step.
Weave in all ends.

Rate this Crochet Doily Pattern!
I hope you enjoyed this crochet doily pattern. Big thanks to ET’s Crochet Creations for testing it!
A downloadable pdf of this pattern is available on Ravelry for a small fee. The fee for the pdf format is to offset the advertising revenue lost when you print or download the pattern rather than viewing it online.
Do you want the best of Stitches n Scraps delivered right to your inbox? Don’t miss a stitch – Subscribe now!

Unicorn Fridge Magnet Crochet Pattern
Add a little magic to your refrigerator with a Unicorn Fridge Magnet! With tiny flowers, pink cheeks, and of course a spiraling horn, they’re sure to brighten up your day. They make great gifts too, so make a few!

This content is protected by copyright. See this Terms of Use / Copyright page for more information.
This post contains sponsored content and/or affiliate links. If you click an affiliate link and make a purchase, I may get a commission.
2021 Fridgies CAL
This unicorn fridge magnet is the March pattern in the 2021 Fridiges CAL! Crochet along through 12 magnet patterns. At the end of the year, you’ll have an adorable set of fridgies for yourself or for a gift! You may want to make 2 sets, so you don’t have to decide.

Enter the Giveaway
There will be several giveaways throughout the Fridgies CAL. This quarter, you could win this gift set of fiber wash products from Unicorn Clean. It even includes an adorable plush!
Learn all about the Fridgies Crochet Along here, including how to enter the giveaways!
Lion Brand DIY Yarn
Lion Brand provided all the yarn for this crochet along. Their DIY yarn comes in small balls, which is just perfect for the small amounts needed for each magnet. For the unicorn fridge magnet, you will need mostly white, with small amounts of pink, yellow, and sky blue.

If you’re not able to get this yarn or the colors you need, Lion Brand Vanna’s Choice or Basic Stitch are also good options.
Xyron Glue Gun
The easiest way to attach your magnet to your crochet is with hot glue. For my magnets, I’m using this mini hot glue gun that Xyron gave me to try out.

I used it on this unicorn fridge magnet and on the previous 3 magnets as well. I’ve been very happy with it. It heats up quickly and produced a nice steady bead of glue. Watch it in action in the tutorial video below!
Materials
- Yarn: Lion Brand DIY Yarn (100% acrylic, worsted weight, 65 yds / 30g per ball)
- 40 yds white
- 10 yds hot pink (pink)
- 5 yds yellow
- 2 yds sky (blue)
- 1/2 yd black OR black embroidery thread
- Hook: Size H / 5 mm crochet hook or size needed to match gauge.
- Notions:
- Yarn Needle
- Strong, flat magnet that will fit inside the unicorn (sample shown is 1 inch diameter)
- Xyron hot glue gun and glue stick
- Stitch marker
Project Level
Intermediate: Worked in the round with some sewing and embroidery required. Working in front and back loops and with multiple layers.
Size
About 2.5 inches in diameter, not counting ears and horn.
Gauge
12 sc x 13 rounds = 4 inches
Use pattern as gauge swatch – After rnd 4, back circle should measure about 2.25 inches in diameter. Exact gauge is not critical. Your fabric should be tight enough that the magnet won’t show through.
Abbreviations used
(Pattern is written in US terms)
blo = back loop only
ch = chain
dec = decrease (see Special Stitches)
flo = front loop only
inc = increase (see Special Stitches)
sc = single crochet
sk = skip
sl st = slip stitch
st(s) = stitch(es)
RS = right side
WS = wrong side
Special Stitches
Increase (inc): Sc in back loop only of indicated st, then sc in both loops of same st. This counts as two stitches in the end of round stitch counts.
See this tutorial for a more detailed look.

Decrease (dec): Insert hook into front loop only of both of next 2 stitches, yarn over and draw up a loop, yarn over and draw through both loops on hook. This is an alternative to a single crochet 2 together (sc2tog) stitch. If you prefer, you can use the standard sc2tog instead.
Instructions
The unicorn has 2 main sections: The back with ears and magnet, and the front with the cheeks and embroidered face. You can make these 2 sections in any order you prefer. The horn and flowers are added after the front and back are joined together.
Join rounds where indicated with a slip stitch in the first stitch of the round. Slip stitches are not included in stitch counts unless otherwise specified. Mark first stitch of rounds if desired. Do not turn your work unless indicated.
Back
Back circle
With white, ch 2.
Rnd 1 (RS): 6 sc in 2nd ch from hook, join. (6 sts)
Rnd 2: Ch 1, inc in each st around, join. (12 sts)
Rnd 3: Ch 1, inc in first st, sc in next st, (inc in next st, sc in next st) around, join. (18 sts)
Rnd 4: Ch 1, inc in first st, sc in next 2 sts, (inc in next st, sc in next 2 sts) around, join with sl st in flo of first st. Do not fasten off. (24 sts)
Work should now measure about 2.25 to 2.5 inches in diameter.

Ears
First outer ear:
Continuing from the end of rnd 4.
Row 1 (RS): Ch 1, sc in flo of first st, sc in flo of next 2 sts, leave remaining sts unworked. (3 sc)
Place a marker in the base of the last stitch you worked. This will be used for joining later.

Row 2: Ch 1, turn, sk first st, dec. (1 st)
Fasten off.

2nd outer ear
Turn to RS. Skip next 3 unworked sts on back circle, join white with a sl st in flo of next st.

Row 1 (RS): Ch 1, sc in flo of same st (where the sl st was made), sc in flo of next 2 sts. (3 sc)
Row 2: Ch 1, turn, sk first st, dec. (1 st)
Fasten off.

Inner ear:
Stay on wrong side. Working into unused loops in front of either outer ear, join pink with sl st in flo of first st.
Row 1 (WS): Ch 1, sc in flo of same st (where the sl st was made), sc in flo of next 2 sts. (3 sc)
Row 2: Ch 1, turn, sk first st, dec. (1 st)
Fasten off.
Repeat inner ear instructions for the other inner ear.

Weave in all ends.
Magnet
Using hot glue gun, glue magnet to center of back circle, on the WS of work.

Set back piece aside.
Front
Front circle
With white, ch 2.
Rnds 1-3: Repeat rnds 1-3 of back circle. (18 sts)
Rnd 4: Ch 1, inc in first st, sc in next 2 sts, (inc in next st, sc in next 2 sts) around, join. Fasten off. (24 sts)
Cheeks (make 2)
With pink, ch 2
Rnd 1: 3 sc in 2nd ch from hook, do not join. Fasten off leaving an 8 inch tail for sewing.
Weave in the shorter, starting tail.

Face
Using the pictures as a guide:
- Sew cheeks into place, being careful not to interfere with the tops of the stitches in the last round. You’ll need to work into those for the assembly.

- Separate the black yarn into individual strands (plys). Using only one of the plies, embroider the eyes and eyelashes.
If you prefer, you can use thread or embroidery floss for the eyes instead.

Weave in all ends.
Assembly
Join front and back
Starting with back piece only and with WS (pink) facing, join white with sl st in marked st at base of ear.
Working through both layers of ear, ch 1, sl st in side of ear, ch 1, sl st in top of ear, ch 1, sl st in other side of ear, ch 1, sl st in base of ear. (4 sl sts)

Place the front circle on top of the back circle so that the right sides are facing out and wrong sides are together. Make sure the face is upright and centered between the ears.

Working through both the front and back layers, (ch 1, sl st) in each st around to base of other ear. (15 sl sts).

Working on back piece only, and through both layers of ear, ch 1, sl st at base of ear, ch 1, sl st in side of ear, ch 1, sl st in top of ear, ch 1, sl st in other side of ear, ch 1, sl st in base of ear. (5 sl sts)
There should be 9 remaining, unworked stitches on the front circle. 3 will be in front of each ear, and 3 in the center for the horn.

Fasten off
Weave in all ends.
Horn
Horn is worked in continuous rounds – do not join rounds, but rather continue working around in the same direction.
With RS facing, sk the first 3 stitches (in front of the first ear) on front circle. Join yellow with sl st in next st on front circle.

Rnd 1: Sc in same st and next 2 sts, turn to continue working into the 3 unworked sts between the ears on the back circle, sc in each of the 3 sts. (6 sc)

Rnd 2: Sc in blo of each st around. (6 sc)
Rnd 3: (Sk next st, sc in blo of next st) twice. (4 sc)
Fasten off
Weave tail through the back loops only of each of the 4 sts, and pull tight to form a point.

Weave in tails and stuff horns with the ends. If you need more stuffing, use a few tiny pieces of yellow yarn, cut to a length of 1 inch or less.
Flowers
Make 2 in blue and 1 in pink.
Ch 4, sl st in 4th ch from hook, (ch 3, sl st in same ch) 4 times.
Fasten off, leaving an 8 inch tail for sewing.

Arrange the two blue flowers at the base of the horn and sew them in place with their tails, sewing the front and back layers closed in front of the ears as you do.
Place the pink flower on top of the 2 blue flowers and sew that in place with its tail as well.
Weave in all ends.

Unicorn Fridge Magnet Video Tutorial
Watch This Video on YouTube

Rate this Unicorn Fridge Magnet Pattern!
I hope you enjoyed this Unicorn fridge magnet pattern. Big thanks to Karen Navoy for testing it!
A downloadable pdf of this pattern is available on Ravelry for a small fee. The fee for the pdf format is to offset the advertising revenue lost when you print or download the pattern rather than viewing it online.
Do you want the best of Stitches n Scraps delivered right to your inbox? Don’t miss a stitch – Subscribe now!

Bunny Fridge Magnet Crochet Pattern
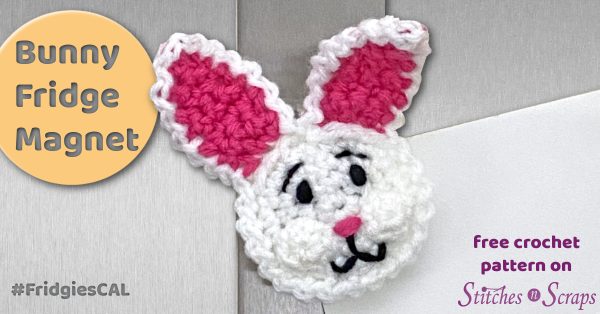
Hippity Hoppity, look who hopped by! This adorable bunny fridge magnet is looking for a home on your fridge or magnet board. They’re so fun to make they just might multiply like…well…bunnies. But that’s ok, because they make a great gift too!

This content is protected by copyright. See this Terms of Use / Copyright page for more information.
This post contains sponsored content and/or affiliate links. If you click an affiliate link and make a purchase, I may get a commission.
2021 Fridgies CAL
This bunny fridge magnet is the March pattern in the 2021 Fridiges CAL! Crochet along through 12 magnet patterns. At the end of the year, you’ll have an adorable set of fridgies for yourself or for a gift! You may want to make 2 sets, so you don’t have to decide.

Enter the Giveaway
There will be several giveaways throughout the Fridgies CAL. This quarter, you could win a zippered pouch from Global Backyard Industries!
Learn all about the Fridgies Crochet Along here, including how to enter the giveaways for a chance to win some fabulous prizes too! March is the last month for this prize, so be sure to get those entries in!
Lion Brand DIY Yarn
Lion Brand provided all the yarn for this crochet along. Their DIY yarn comes in small balls, which is just perfect for the small amounts needed for each magnet. For the bunny fridge magnet, you will need mostly white, with small amounts of pink and black. Brown or off white would be great color choices for the bunny as well!

If you’re not able to get this yarn or the colors you need, Lion Brand Vanna’s Choice or Basic Stitch are also good options.
Xyron Glue Gun
The easiest way to attach your magnet to your crochet is with hot glue. For my magnets, I’m using this mini hot glue gun that Xyron gave me to try out.

I used it on this fox fridge magnet and on the previous fox magnet and bear magnet. I’ve been very happy with it. It heats up quickly and produced a nice steady bead of glue. Watch it in action in the tutorial video below!
Materials
- Yarn: Lion Brand DIY Yarn
- 45 yds white
- 10 yds pink
- 2 yds black
- Hook: Size H / 5 mm crochet hook or size needed to match gauge.
- Notions:
- Yarn Needle
- Strong, flat magnet that will fit inside the bunny (sample shown is 1 inch diameter)
- Xyron hot glue gun and glue stick
- Stitch marker (optional)
- Black embroidery thread (optional for eyebrows)
Project Level
Intermediate: Worked in the round with some sewing and embroidery required.
Size
About 2.5 inches in diameter, not counting ears.
Gauge
12 sc x 13 rounds = 4 inches
Use pattern as gauge swatch – After rnd 4, back circle should measure about 2.25 inches in diameter. Exact gauge is not critical. Your fabric should be tight enough that the magnet won’t show through.
Abbreviations used
(Pattern is written in US terms)
ch = chain
sc = single crochet
dc = double crochet
inc = increase (see Special Stitches)
dec = decrease (see Special Stitches)
flo = front loop only
sk = skip
st(s) = stitch(es)
sl st = slip stitch
RS = right side
WS = wrong side
Special Stitches
Increase (inc): Sc in back loop only of indicated st, then sc in both loops of same st. This counts as two stitches in the end of round stitch counts.
See this tutorial for a more detailed look.

Decrease (dec): Insert hook into front loop only of both of next 2 stitches, yarn over and draw up a loop, yarn over and draw through both loops on hook. This is an alternative to a single crochet 2 together (sc2tog) stitch. If you prefer, you can use the standard sc2tog instead.
Instructions
The pattern is made in 2 separate sections: The back with ears and magnet, and the front with the cheeks and embroidered face. You can make these 2 sections in any order you prefer.
Join rounds where indicated with a slip stitch in the first stitch of the round. Slip stitches are not included in stitch counts unless otherwise specified. Mark first stitch of rounds if desired. Do not turn your work unless indicated.
Back
Back circle
With white, ch 2.
Rnd 1 (RS): 6 sc in 2nd ch from hook, join. (6 sts)
Rnd 2: Ch 1, inc in each st around, join. (12 sts)
Rnd 3: Ch 1, inc in first st, sc in next st, (inc in next st, sc in next st) around, join. (18 sts)
Rnd 4: Ch 1, inc in first st, sc in next 2 sts, (inc in next st, sc in next 2 sts) around, join with sl st in flo of first st. Do not fasten off. (24 sts)
Work should now measure about 2.25 to 2.5 inches in diameter.

Ears
First outer ear:
Continuing from the end of rnd 4.
Row 1 (RS): Ch 1, sc in flo of same st (where the sl st was made), sc in flo of next 2 sts. (3 sc)
Row 2: Ch 1, turn, sc in first st, inc in next st, sc in last st. (4 sc)
Rows 3-4: Ch 1, turn, sc in each st across. (4 sc)
Row 5: Ch 1, turn, sc in first st, dec, sc in last st. (3 sts)
Row 6: Ch 1, turn, sk first st, sc in each of next 2 sts. (2 sts)
Row 7: Ch 1, turn, sk first st, sc in last st. (1 st)
Fasten off.

2nd outer ear
Skip next st on back circle, join white with a sl st in flo of next st.

Rows 1-7: Repeat rows 1-7 of first outer ear.
Fasten off.

Inner ear:
Turn to wrong side. Working into unused loops in front of either outer ear, join pink with sl st in flo of first st.

Row 1 (WS): Ch 1, sc in flo of same st (where the sl st was made), sc in flo of next 2 sts. (3 sc)
Rows 2-7: Repeat rows 2-7 of outer ear.
Fasten off.
Repeat inner ear instructions for the other inner ear.

Weave in all ends.
Magnet
Using hot glue gun, glue magnet to center of back circle, on the WS of work.

Set back piece aside.
Front
Cheeks (make 2)
With white, ch 2
Rnd 1: 6 sc in 2nd ch from hook, join. Fasten off leaving an 8 inch tail for sewing.
Weave in the shorter, starting tail.

Front circle
With white, ch 2.
Rnds 1-3: Repeat rnds 1-3 of back circle. (18 sts)
Rnd 4: Ch 1, inc in first st, sc in next 2 sts, (inc in next st, sc in next 2 sts) around, join. Do NOT fasten off. (24 sts)
Secure working loop with a stitch marker and remove hook.

Face
IMPORTANT – When the front and back are joined, the working loop will be at the top center, between the ears. Keep this in mind when working on the face.
Using the pictures as a guide:
- Sew cheeks into place, being careful not to interfere with the tops of the stitches in the last round. You’ll need to work into those for the assembly.
- Embroider nose with pink yarn
- Embroider mouth, and eyes with black yarn.
- Optional: Separate the black yarn into individual strands (plys). Using only half the plies (2, for the Lion Brand DIY yarn), embroider the eyebrows.
If you are using a different yarn you may have more or fewer plys. If your yarn does not separate easily into plys, you can use thread or embroidery floss for the eyebrows.

Weave in all ends.
Assembly
Place working loop from front circle back onto hook and remove the stitch marker.
Hold front and back with wrong sides together. The active stitch on the front should be at the top center, between the ears.

Working through both front and back circle layers: (Ch 1, sl st) in the first st on the front circle and the skipped stitch between the ears on the back circle. (1 sl st)

Working through both ear layers, around the outside of the ear: (Ch 1, sl st) 7 times evenly spaced to the top point, (ch 1, sl st) at the top point, (ch 1, sl st) 7 times down the other side to the base of the ear. (15 sl sts)

Skip the next 3 sts on the front circle, the ones in front of the ear. Working through both front and back circle layers, (Ch 1, sl st) in each st around to the base of the other ear (17 sl sts)
There should be 3 remaining, unworked stitches on the front circle. This leaves 3 unworked front sts in front of each ear.

Working through both ear layers, around the outside of the other ear: (Ch 1, sl st) 7 times evenly spaced to the top point, (ch 1, sl st) at the top point, (ch 1, sl st) 7 times down the other side to the base of the ear. Join with sl st to first ch-1 of edging rnd. (15 sl sts not counting join.)

Fasten off leaving a 12-18 inch tail for sewing.
With the tail and working through front and back circle layers, sew across the 3 skipped stitches in front of each ear.

Weave in remaining ends
Bunny Fridge Magnet Video Tutorial
Watch This Video on YouTube

Rate this Bunny Fridge Magnet Pattern!
I hope you enjoyed this fox fridge magnet pattern. Big thanks to Karen Navoy for testing it!
A downloadable pdf of this pattern is available on Ravelry for a small fee. The fee for the pdf format is to offset the advertising revenue lost when you print or download the pattern rather than viewing it online.
Do you want the best of Stitches n Scraps delivered right to your inbox? Don’t miss a stitch – Subscribe now!

Corner to Corner Cables Crochet Pillow
Take post stitch textures in new directions with the corner to corner cables crochet pillow! The front features a diagonal cable, while the back has raised, horizontal stripes. With an overlapping closure, the cover comes off easily for washing.

This content is protected by copyright. See this Terms of Use / Copyright page for more information.
This post contains sponsored content and/or affiliate links. If you click an affiliate link and make a purchase, I may get a commission.
CAL Central Cozy at Home CAL
I designed this Corner to Corner Cables crochet pillow for the CAL Central Cozy at Home CAL. Follow along on the CAL Central Crochet Facebook group for more cozy home decor patterns. Share your CAL pictures (we love to see all the projects) and don’t forget to enter the giveaway!

New to Cables?
If you’re new to working post stitch cables, don’t be intimidated! Once you understand where to put your hook, they’re not as hard as you might think. In my Lunchtime Live videos, I did a 4 part series on how to work with post stitch cables. It covers all the skills you need for this pattern, and then some!
Please note that these are not full tutorial videos. Lunchtime Live is the equivalent of a video newsletter, and the demos are just a small portion at the end of each one. You may want to scroll forward a bit on each video, if you just want to see the demos.
From Corner to Corner
Most often, when people say “corner to corner” or “c2c”, they are talking about diagonal box stitch. But there are a surprising array of stitches that can be worked from corner to corner. In this pillow, working from corner to corner creates the striking diagonal cable, while building a post stitch frame around the edge at the same time.
Yarn Choices
Plain, solid color yarns tend to show off cables the best. Cables can sometimes get lost in yarns with lots of colors or unusual textures. For my pillow, I chose some Lion Brand Wool Ease yarn from my stash. My main color is #99 – Fisherman, and the accent color is #620 Aloe. Aloe has since been discontinued, but #087 Arrowwood would be fairly close.

Wool-Ease® Yarn
from: Lion Brand
The only reason this pillow has an accent color at all is that I didn’t have enough yarn in the main color. Because the stripes are made with post stitches, they have added texture as well as color. You can easily make your pillow in all one color, and you’ll still get the textural striping effect on the back.
Materials
- Yarn: Worsted Weight Yarn:
- 400 yds off-white (A)
- 100 yds brown (B)
- Hook: Size H / 5 mm crochet hook or size needed to match gauge.
- Notions:
- Yarn Needle
- 4 stitch markers, safety pins, or scraps of yarn.
- 14″ square pillow form
Project Level
Intermediate: Post stitches, increases, decreases, crocheted seams.
Size
14 inches square
Gauge
13 dc x 9 rows = 4 inches after blocking.
Abbreviations used
(Pattern is written in US terms)
CB = Cable border (see Special Stitches)
ch = chain
ch-sp = chain space
dc = double crochet
fphdc = front post half double crochet
fptr = front post treble crochet
fptr 2tog = front post treble crochet 2 together (see Special Stitches)
hdc = half double crochet
LC = Left cross (see Special Stitches)
RS = right side
sc = single crochet
sl st = slip stitch
st(s) = stitch(es)
WS = wrong side
Special Stitches
Left cross (LC) – 5 sts
Sk next 2 fptrs on row below, (fptr around next fptr on row below) twice,

hdc in center st on current row,

working in front of fptrs just made, fptr around each of the skipped fptrs on row below.

Cable border (CB) – 3 sts
At beginning of row: Fptr around first fptr on row below, hdc in next st on current row, fptr around next fptr on row below.
At end of row: Fptr around next fptr on row below, hdc in next st on current row, fptr around last fptr on row below.

Front Post Treble 2 together (fptr 2tog) – 1 st
Work a fptr around both of the next 2 fptrs on the row below, as though they were one stitch, by inserting your hook under the post of both stitches together at the same time.

Increasing
When working a post stitch, remember to skip the stitch behind it. Each row will add 2 stitches to the total stitch count.
Row 1 (RS): With A, ch 2, 3 hdc in 2nd ch from hook. (3 sts)
Row 2: Ch 2, turn, 2 hdc in first st, hdc in next st, 2 hdc in last st. (5 sts)
Row 3: Ch 2, turn, 2 hdc in first st, fptr around the 2nd (center) st of row 1, hdc in next st on row 2, fptr around the same center st from row 1, 2 hdc in last st (7 sts)
After this row, all post stitches will be worked around post stitches from the row below.
All even rows from 4-30: Ch 2, turn, 2 hdc in first st, hdc in each st across to last st, 2 hdc in last st.
Row 5: Ch 2, turn, 2 hdc in first st, fptr around first fptr from row below, hdc in next st on current row, fptr in same first fptr on row below, hdc in next st on current row, fptr in last fptr on row below, hdc in next st on current row, fptr in same last fptr on row below, 2 hdc in last st on current row. (11 sts)
Row 7: Ch 2, turn, 2 hdc in first st, fptr around first fptr on row below, hdc in next st on current row, (fptr around next fptr on row below, hdc in next st on current row, fptr around same fptr on row below, hdc in next st on current row) twice, fptr around last fptr on row below, 2 hdc in last st on current row. (15 sts)
Row 9: Ch 2, turn, 2 hdc in first st, CB, hdc in each of next 2 sts on current row, fptr around next fptr on row below, fptr around same fptr on row below, hdc in next st on current row (place a stitch marker in this stitch to mark it as center), fptr around next fptr on row below, fptr around same fptr on row below, hdc around next 2 sts on current row, CB, 2 hdc in last st on current row. (19 sts)
Move the stitch marker up with every row, when you work into the marked stitch.
Row 11: Ch 2, turn, 2 hdc in first st, CB, hdc in each st on current row across to 2 sts before marked center st, LC, hdc in each st on current row across to last 4 sts, CB, 2 hdc in last st on current row. (23 sts)
Row 13: Ch 2, turn, 2 hdc in first st, CB, hdc in each st on current row to 2 sts before marked center st, (fptr around next fptr on row below) twice, hdc in center st on current row, (fptr around next fptr on row below) twice, hdc in each st on current row across to last 4 sts, CB, 2 hdc in last st on current row. (27 sts)
Row 15: Ch 2, turn, 2 hdc in first st, CB, hdc in each st on current row to 3 sts before marked center st, (fptr around next fptr on row below) twice, hdc in next st on current row, hdc in center st on current row, hdc in next st on current row, (fptr around next fptr on row below) twice, hdc in each st on current row across to last 4 sts, CB, 2 hdc in last st on current row. (31 sts)
Row 17: Repeat row 13. (35 sts)
Rows 19-26: Repeat rows 11-18 (53 sts)
Rows 27-31: Repeat rows 11-15 (63 sts)
Decreasing
All even rows from 32-64: Ch 2, turn, sk first st, hdc in each st across to last 2 sts, hdc2tog.
Row 33: Ch 2, turn, sk first st, hdc in each of next 2 sts, CB, hdc in each st on current row to 2 sts before marked center st, (fptr around next fptr on row below) twice, hdc in center st on current row, (fptr around next fptr on row below) twice, hdc in each st on current row across to last 6 sts, CB, hdc in next st on current row, hdc2tog in last 2 sts on current row. (59 sts)
Row 35: Ch 2, turn, sk first st, hdc in each of next 2 sts, CB, hdc in each st on current row across to 2 sts before marked center st, LC, hdc in each st on current row across to last 6 sts, CB, hdc in next st on current row, hdc2tog in last 2 sts on current row. (55 sts)
Row 37: Repeat row 33. (51 sts)
Row 39: Ch 2, turn, sk first st, hdc in each of next 2 sts, CB, hdc in each st on current row to 3 sts before marked center st, (fptr around next fptr on row below) twice, hdc in next st on current row, hdc in center st on current row, hdc in next st on current row, (fptr around next fptr on row below) twice, hdc in each st on current row across to last 6 sts, CB, hdc in next st on current row, hdc2tog in last 2 sts on current row. (47 sts)
Rows 41-47: Repeat row 33-39 (31 sts)
Rows 49-53: Repeat rows 33-37 (19 sts)
You can now remove the center stitch marker.
Row 55: Ch 2, turn, sk first st, hdc in each of next 2 sts, CB, fptr 2tog, hdc in each of next 3 sts on current row, fptr 2tog, CB, hdc in next st on current row, hdc2tog in last 2 sts on current row. (15 sts)
Row 57: Ch 2, turn, sk first st, hdc in each of next 2 sts, fptr around first fptr on row below, fptr 2tog, hdc in next st on current row, fptr 2tog, fptr around last fptr on row below, hdc in next st on current row, hdc2tog in last 2 sts on current row. (11 sts)
Row 59: Ch 2, turn, sk first st, hdc in each of next 2 sts, fptr 2tog, hdc in next st on current row, fptr 2tog, hdc in next st on current row, hdc2tog in last 2 sts on current row. (7 sts)
Row 61: Ch 2, turn, sk first st, hdc in next st, fptr 2tog, hdc2tog in last 2 sts on current row. (3 sts)
Row 62: Ch 2, turn, sk first st, hdc2tog in last 2 sts. Do not fasten off. (1 st)
Edging
With right side facing and working in sides of rows around edge: (ch 1, work 47 sc evenly spaced across to next corner) 4 times, join with sl st to starting ch 1. (188 sc, 4 ch-1 sps)
47 stitches per side works out to approximately 2 stitches every 3 rows.
Fasten off and weave in all ends.

Back
Panel (make 2)
Each row has 45 sts. Starting ch 3 counts as dc throughout, including on first row. For a cleaner edge, try a chainless starting dc (csdc) instead of the ch-3. Do not fasten off when changing colors, you can carry the unused color up the side edge.
With A, ch 47.
Row 1 (RS): Dc in 4th ch from hook and in each ch across.
Row 2: Ch 3, turn, dc in each st across, changing to B at end of row.
Row 3: With B, ch 2, turn, hdc in each st across.
Row 4: Ch 2, turn, fphdc around each st across, changing to A at the end of the row.
Rows 5-6: Repeat row 2
Rows 7-16: Repeat rows 3-6 twice, then repeat rows 3-4 once more.
Place a marker at each end of row 16. Fasten off B.
Rows 17-22: Repeat row 2. Fasten off A.

Edging:
Place the two panels together with right sides up so that they form a square with the 6 rows of A overlapping in the center. The ends of row 22 on each piece should line up with the markers on the other piece. Pin in place if desired.

For Edging rnd, when working over the areas where the two panels overlap, work through both layers.
Edging Rnd (RS): Join A with a sl st in any corner of the square. (Ch 1, work 47 sts evenly spaced to next corner.) 4 times, join with sl st to starting ch-1. (188 sc, 4 ch-1 sps)

Fasten off and weave in all ends.
Seaming
Hold front and back with WRONG sides together.

Seam is worked on the RS of the fabric, through the wrong side loops only. This means the back loop of the piece facing you, and the front loop of the other piece. This will leave the unused loops visible on the RS of the fabric to form the decorative seam.

Working through both layers, Join B with sl st in any corner ch-1 sp. [(Ch 1, sl st in WS loops only of next st) across to next ch-1 sp, ch 1, sl st in ch-1 sp] 3 times, (ch 1, sl st in WS loops only of next st) across to starting ch-1 sp, join with sl st to first st.

Finishing:
Fasten off.
Remove any remaining markers.
Weave in remaining ends.
Insert pillow form through opening in back.

Rate this Corner to Corner Cables Pillow Pattern!
I hope you enjoyed this pillow pattern. A downloadable pdf of this pattern is available on Ravelry for a small fee. The fee for the pdf format is to offset the advertising revenue lost when you print or download the pattern rather than viewing it online.
Do you want the best of Stitches n Scraps delivered right to your inbox? Don’t miss a stitch – Subscribe now!

Fox Fridge Magnet Crochet Pattern
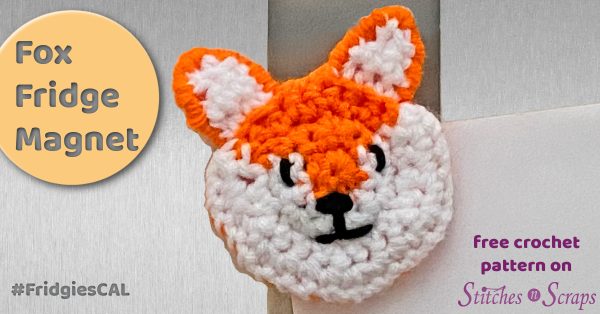
What has this sly fox been up to? Crochet your own with this quick fox fridge magnet pattern, and put them to work holding photos and notes on your fridge. There’s a complete video tutorial too!

This content is protected by copyright. See this Terms of Use / Copyright page for more information.
This post contains sponsored content and/or affiliate links. If you click an affiliate link and make a purchase, I may get a commission.
2021 Fridgies CAL
This fox fridge magnet is the February pattern in the 2021 Fridiges CAL! Crochet along through 12 magnet patterns. At the end of the year, you’ll have an adorable set of fridgies for yourself or for a gift! You may want to make 2 sets, so you don’t have to decide.

Enter the Giveaway
There will be several giveaways throughout the Fridgies CAL. This quarter, you could win a zippered pouch from Global Backyard Industries!
Learn all about the Fridgies Crochet Along here, including how to enter the giveaways for a chance to win some fabulous prizes too!
Lion Brand DIY Yarn
Lion Brand provided all the yarn for this crochet along. Their DIY yarn comes in small balls, which is just perfect for the small amounts needed for each magnet. For the fox fridge magnet, you will need: White, Orange, and a little bit of Black.

If you’re not able to get this yarn or the colors you need, Lion Brand Vanna’s Choice or Basic Stitch are also good options.
Xyron Glue Gun
The easiest way to attach your magnet to your crochet is with hot glue. For my magnets, I’m using this mini hot glue gun that Xyron gave me to try out.

I used it on this fox fridge magnet and on the previous bear magnet. I’ve been very happy with it. It heats up quickly and produced a nice steady bead of glue. Watch it in action in the tutorial video below!
Materials
- Yarn: Lion Brand DIY Yarn
- 20 yds each Orange and White
- 2 yds Black
- Hook: Size H / 5 mm crochet hook or size needed to match gauge.
- Notions:
- Yarn Needle
- Strong, flat magnet that will fit inside the fox (sample shown is 1 inch diameter)
- Xyron hot glue gun and glue stick
- Stitch marker (optional)
Project Level
Intermediate: Worked in the round with some sewing and embroidery required.
Size
About 2.5 inches in diameter, not counting ears.
Gauge
12 sc x 13 rounds = 4 inches
Use pattern as gauge swatch – After rnd 4, back circle should measure about 2.25 inches in diameter. Exact gauge is not critical. Your fabric should be tight enough that the magnet won’t show through.
Abbreviations used
(Pattern is written in US terms)
ch = chain
sc = single crochet
dc = double crochet
inc = increase (see Special Stitches)
dec = decrease (see Special Stitches)
flo = front loop only
st(s) = stitch(es)
sl st = slip stitch
RS = right side
WS = wrong side
Special Stitches
Increase (inc): Sc in back loop only of indicated st, then sc in both loops of same st. This counts as two stitches in the end of round stitch counts.
See this tutorial for a more detailed look.

Decrease (dec): Insert hook into front loop only of both of next 2 stitches, yarn over and draw up a loop, yarn over and draw through both loops on hook. This is an alternative to a single crochet 2 together (sc2tog) stitch. If you prefer, you can use the standard sc2tog instead.
Instructions
The pattern is made in 2 separate sections: The back with ears and magnet, and the front with the embroidered face. You can make these 2 sections in any order you prefer.
Join rounds where indicated with a slip stitch in the first stitch of the round. Slip stitches are not included in stitch counts. Mark first stitch of rounds if desired. Do not turn your work unless indicated.
Back
Back circle
With orange, ch 2.
Rnd 1 (RS): 6 sc in 2nd ch from hook, join. (6 sts)
Rnd 2: Ch 1, inc in each st around, join. (12 sts)
Rnd 3: Ch 1, inc in first st, sc in next st, (inc in next st, sc in next st) around, join. (18 sts)
Rnd 4: Ch 1, inc in first st, sc in next 2 sts, (inc in next st, sc in next 2 sts) around, join. (24 sts)
Work should now measure about 2.25 to 2.5 inches in diameter.

Rnd 5 (partial rnd): Ch 1, inc in first st, sc in next 3 sts, (inc in next st, sc in next 3 sts) 3 times, leaving remaining 8 sts unworked. Do not fasten off. (20 sts)

Ears
First outer ear:
Continuing from the end of rnd 5, sl st in flo of next st.
Row 1 (RS): Ch 1, sc in flo of same st (where the sl st was made), sc in flo of next 2 sts. (3 sc)
Row 2: Ch 1, turn, sc in each st across. (3 sc)
Row 3: Ch 1, turn, sk first st, dec. (1 st)
Fasten off.

2nd outer ear
Skip next 2 sts on back circle, join orange with a sl st in flo of next st.

Rows 1-3: Repeat rows 1-3 of first outer ear.
Fasten off.

Inner ear:
Turn to wrong side. Working into unused loops in front of either outer ear, join white with sl st in flo of first st.

Row 1 (WS): Ch 1, sc in flo of same st (where the sl st was made), sc in flo of next 2 sts. (3 sc)
Row 2: Ch 1, turn, sc in each st across. (3 sc)
Row 3: Ch 1, turn, sk first st, dec. (1 st)
Fasten off.

Repeat inner ear instructions for the other inner ear.

Weave in all ends.
Joining Ears
Attach a 24-36 inch strand of orange yarn at the end of rnd 5, just before the base of the foxes left ear.

Using a whipstitch, sew inner and outer ear together around the outside edges. Keep the stitches very close together so they fully cover the edge and create a solid edging.

Weave yarn through the 2 stitches between the ears, and bring it out at the base of the other ear.

Whipstitch the 2nd ear together in the same way as the first.
It’s ok to repeat both whipstitch seams if desired, to close any gaps or until you get a look you like.
Weave in all ends.

Magnet
Using hot glue gun, glue magnet to center of back circle, on the WS of work.

Set back piece aside.

Front
Front circle
With orange, ch 2.
Rnd 1 (RS): 6 sc in 2nd ch from hook, join. (6 sts)
Rnd 2: Ch 1, turn, with orange, inc in each of first 2 sts, change to white, with white inc in each of next 4 sts, join. (12 sts)

For the rest of the front, you will always be working white stitches into white stitches and orange stitches into orange stitches.
Rnd 3: Ch 1, turn, with white, inc in first st, sc in next st, (inc in next st, sc in next st) 3 times, change to orange, (inc in next st, sc in next st) twice, join. (18 sts)

Rnd 4: Ch 1, turn, with orange, inc in first st, sc in next 2 sts, inc in next st, sc in next 2 sts, change to white, (inc in next st, sc in next 2 sts) 4 times, join. (24 sts)

Rnd 5 (partial rnd): Ch 1, turn, with white, inc in first st, sc in next 3 sts, (inc in next st, sc in next 3 sts) 3 times, sl st in same st, leaving 8 orange sts unworked. (20 sts)

Fasten off both colors, leaving a 24 inch tail of each color for seaming.
Face
Using the pictures as a guide, embroider nose, mouth, and eyes with Black yarn. Place the nose a little lower than center – it should be in the white section, directly below the first round.

Weave in all ends except for the one long tail of each color for sewing.
Assembly
Hold front and back with wrong sides together.

Using the white yarn, sew the layers together around the outside edge with a whipstitch, only in the area that’s white on the front. Leave the orange part open.

Fold the face back at the opening and weave in the white tail on the inside.

With the remaining orange tail, sew the layers together as follows – sew across the first ear with a backstitch, whipstitch over the 2 stitches between the ears, then sew across the 2nd ear with a backstitch.

Weave in the orange tail on the back.
Fox Fridge Magnet Video Tutorial
Watch This Video on YouTube

Rate this Fox Fridge Magnet Pattern!
I hope you enjoyed this fox fridge magnet pattern. Big thanks to Karen Navoy for testing it!
A downloadable pdf of this pattern is available on Ravelry for a small fee. The fee for the pdf format is to offset the advertising revenue lost when you print or download the pattern rather than viewing it online.
Do you want the best of Stitches n Scraps delivered right to your inbox? Don’t miss a stitch – Subscribe now!

Bear Fridge Magnet Crochet Pattern
This darling little bear is happy to hold your photos and notes for you. Did you know a group of bears is called a sleuth? With this quick bear fridge magnet pattern, you can crochet a whole sleuth of bears for your fridge!

This content is protected by copyright. See this Terms of Use / Copyright page for more information.
This post contains sponsored content and/or affiliate links. If you click an affiliate link and make a purchase, I may get a commission.
2021 Fridgies CAL
This bear fridge magnet is the first pattern in the 2021 Fridiges CAL! Crochet along through 12 magnet patterns. At the end of the year, you’ll have an adorable set of fridgies for yourself or for a gift! You may want to make 2 sets, so you don’t have to decide.

Enter the Giveaway
There will be several giveaways throughout the Fridgies CAL. This quarter, you could win a zippered pouch from Global Backyard Industries!
Learn all about the Fridgies Crochet Along here, including how to enter the giveaways for a chance to win some fabulous prizes too!
Lion Brand DIY Yarn
Lion Brand provided all the yarn for this crochet along. Their DIY yarn comes in small balls, which is just perfect for the small amounts needed for each magnet. For the bear fridge magnet, you will need: White, Camel, Black, and Hot Pink.

If you’re not able to get this yarn or the colors you need, Lion Brand Vanna’s Choice or Basic Stitch are also good options.
Xyron Glue Gun
The easiest way to attach your magnet to your crochet is with hot glue. For my magnets, I’m using this mini hot glue gun that Xyron gave me to try out.

I used it on this bear fridge magnet and was very happy with it. It heated up quickly and produced a nice steady bead of glue. Watch it in action in the tutorial video below!
Materials
- Yarn: Lion Brand DIY Yarn
- 30 yds Camel
- 5 yds each Hot Pink (pink) and White
- 2 yds Black
- Hook: Size H / 5 mm crochet hook or size needed to match gauge.
- Notions:
- Yarn Needle
- Stitch marker or scrap piece of yarn.
- Strong, flat magnet that will fit inside the bear
- Xyron hot glue gun and glue stick
Project Level
Intermediate: Worked in the round with some sewing and embroidery required.
Size
About 2.5 inches in diameter, not counting ears.
Gauge
12 sc x 13 rounds = 4 inches
Use pattern as gauge swatch – back should measure about 2.5 inches in diameter. Exact gauge is not critical. Your fabric should be tight enough that the magnet won’t show through.
Abbreviations used
(Pattern is written in US terms)
ch = chain
sc = single crochet
hdc = half double crochet
dc = double crochet
inc = increase (see Special Stitches)
st(s) = stitch(es)
sl st = slip stitch
RS = right side
WS = wrong side
Recommended Resources
- To Knot or Not
- Back Loop Only and Front Loop Only
- Almost Invisible Single Crochet Increase
- 3 Ways to Weave in Ends
- How to Sew Crochet Pieces Together on Winding Road Crochet – shows both whipstitch and running stitch.
Special Stitch
Increase (inc): Sc in back loop only of indicated st, then sc in both loops of same st. This counts as two stitches in the end of round stitch counts.
See this tutorial for a more detailed look.

Instructions
The pattern is made in 3 separate sections: The back with ears and magnet, the front, and the muzzle. You can make these 3 sections in any order you prefer.
Join rounds where indicated with a slip stitch in the first stitch of the round. Slip stitches are not included in stitch counts.
Back
Back circle
With Camel, ch 2.
Rnd 1 (RS): 6 sc in 2nd ch from hook, join. (6 sts)
Rnd 2: Ch 1, inc in each st around, join. (12 sts)
Rnd 3: Ch 1, sc in first st, inc in next st, (sc in next st, inc in next st) around, join. (18 sts)
Rnd 4: Ch 1, sc in first 2 sts, inc in next st (sc in next 2 sts, inc in next st) around, do not join. (24 sts)
Remove loop from hook and secure it with a stitch marker or scrap piece of yarn.

Work should now measure about 2.25 to 2.5 inches in diameter.
Ears
Turn work over to WS.
First inner ear:
Join pink with sl st in front loop only of the first st from rnd 4 as shown. This should be the stitch next to the working loop.

(Sc, hdc, dc, hdc, sc, sl st) in same front loop, fasten off pink. (5 sts)

2nd inner ear
Skip next 6 sts, join pink with sl st in front loop only of next st.

(Sc, hdc, dc, hdc, sc, sl st) in same front loop, fasten off pink. (5 sts).

Turn work so that RS is facing, and place working loop of Camel back onto hook.
1st outer ear:
Row 1 (RS): Sl st in unused front loop of the same st as first inner ear, ch 1, (sc hdc, dc, hdc, sc, sl st) in same loop. (5 sts)


Row 2 (WS): Turn, working through both inner and outer layers, (ch 1, sl st) in each st across ear, do not fasten off.

Sl st in front loop only of next 6 sts on back circle. (These are the 6 stitches between the two ears.)
2nd outer ear:
Sl st in unused (back) loop of the same st as second inner ear, turn.

Row 1 (RS): Ch 1, (sc, hdc, dc, hdc, sc, sl st) in same loop. (5 sts)
Row 2 (WS): Turn, working through both inner and outer layers, (ch 1, sl st) in each st across ear, fasten off.
Weave in all ends on the wrong side (where the pink of the ears is showing).

Magnet
Using hot glue gun, glue magnet to center of WS of work.

Set back piece aside.

Front
Rnds 1-4: Repeat rnds 1-4 of back. At the end of rnd 4, join and fasten off Camel, leaving an 18 inch tail for sewing.

Muzzle
With White, ch 2
Rnd 1 (RS): (2 sc, hdc, 3 sc, hdc, sc) in 2nd ch from hook, join. (8 sts)
Rnd 2 (RS): Ch 1, sc in first st, [(sc, hdc) in next st, 2 hdc in next st, (hdc, sc) in next st], sc in next st, repeat [ ], join, fasten off leaving a 12 inch tail for sewing. (14 sts)
Assembly
Using long White tail, sew muzzle to right side of front, so it rests along the edge as shown. Place muzzle so that it covers up the “seam” where you joined your rounds.

Embroider nose, mouth, and eyes with Black yarn.

Line up front and back with wrong sides together. The magnet should be on the inside and the ears should line up appropriately with the face. With the face on top, you should be able to see the pink side of the ears.

Using long Camel tail, sew front and back pieces together around edge with a whipstitch up to the first ear.

When you get to the ear, use a running stitch across the front of the ear, and then continue whipstitching around to the next ear.

Use a running stitch across the second ear, and then continue whipstitching the rest of the way around.
Fasten off and weave in any remaining ends.
Video Tutorial
Watch This Video on YouTube

Rate this Bear Fridge Magnet Pattern!
I hope you enjoyed this Bear fridge magnet pattern. Big thanks to Karen Navoy for testing it!
A downloadable pdf of this pattern is available on Ravelry for a small fee. The fee for the pdf format is to offset the advertising revenue lost when you print or download the pattern rather than viewing it online.
Do you want the best of Stitches n Scraps delivered right to your inbox? Don’t miss a stitch – Subscribe now!

Scrappy Crochet Christmas Ball Ornament
Did you ever make Christmas ornaments by gluing wedges of scrap fabric to a foam ball? This Scrappy Crochet Christmas Ball Ornament is the same idea, but in crochet! Use up scraps or mini-skeins and add a touch of nostalgia to your tree.

I made these a couple of years ago, and the pattern was originally published in I Like Crochet Magazine.
This content is protected by copyright. See this Terms of Use / Copyright page for more information.
This post contains sponsored content and/or affiliate links. If you click an affiliate link and make a purchase, I may get a commission.
Fabric Christmas Ball Ornaments
I remember being very young and making these ornaments with fabric scraps. I think it might have been a project we did in girl scouts. We all brought in fabric scraps from home and cut them into wedge shapes. The adults may have actually done the cutting.
Then they helped us glue them on to foam balls with a hot glue gun. We used strips of rick rack to cover the messy seams. Mine had a red fabric, and a white fabric with tiny little strawberries on it.
I wish I could show you, but I’ve lost those ornaments now. They were on our tree every year when I was a child.
Lion Brand Bonbons Yarn
For my ornaments, I used Lion Brand Bonbons Metallic yarns in several different colors. I love BonBons because the color sets have colors that all go really nicely together, and the skeins are just the right size for small projects like this. You can get 2 ornaments out of 3 skeins.

I have lots of bon bons left over and they’re great for embellishments on amigurumi and other patterns. See what I did with the gold metallic color on my Trim the Tree Pillow pattern!
Note that Bonbons are not all the same size yarn. The metallic yarns are a size 2 (sport weight), while the solid colors are a size 3 (DK weight). The pattern will work with the different size yarn, but you will need a larger ball to stuff it with, or will need to use some other stuffing material.
Styrofoam balls or stuffing
I originally designed these to fit around 2 inch foam balls, but you can also stuff them with fiber fill if you prefer. In this picture, the ball on the right was stuffed with fiber fill, while the other two used a foam ball.
Styrofoam balls make a lighter and smoother ornament, while fiber fill makes a softer, denser, and more rustic looking ornament. I like Smoothfoam brand balls, because of the smooth and even finish. For fiber fill, my favorite choice is PolyFil Royal Silk, for the same reason.
Materials
- Yarn: Lion Brand Bonbons Metallic yarn – 3 mini skeins in different colors.
- Hook: Size D / 3.25 mm crochet hook or size needed to match gauge.
- Notions:
- Yarn Needle
- 2.5 inch foam ball or stuffing material
Project Level
Easy: Basic stitches with some increases, decreases, and seaming. Working into sides of rows for edging.
Size
Fits a 2.5 inch diameter ball.
Gauge
23 sc x 28 rows = 4”
Use pattern as gauge swatch – each section should measure approximately 1” x 3.75”.
Abbreviations used
(Pattern is written in US terms)
ch = chain
sc = single crochet
st(s) = stitch(es)
sl st = slip stitch
sk = skip
rnd = round
RS = Right side
WS = Wrong side
Recommended Resources
Instructions
Section
(Make 2 in each of the 3 colors – 6 total)
Ch 2
Row 1 (RS): Sc in 2nd ch (1 sc)
Row 2: Ch 1, turn, 3 sc in first st (3 sc)
Row 3: Ch 1, turn, sc in each st across
Row 4: Ch 1, turn, sc in first st, 3 sc in next st, sc in last st (5 sc)
Rows 5-19: Ch 1, turn, sc in each st across
Rows 20-23: Ch 1, turn, sk first st, sc in each remaining st. (1 sc)
Edging:
Rnd 1 (RS): Ch 1, turn, sc in first st, ch 1, sc in side of each row to end, ch 1, sc in bottom of row 1, ch 1, sc in side of each row to end, ch 1, join with sl st to first st. (48 sc, 4 ch-1 sps)
Rnd 2 (WS): Ch 1, turn, sl st loosely in each st and in each ch sp around. Fasten off, leaving a 10-12 inch tail. (52 sl sts)
Seaming:
Hold first 2 sections with right sides together. Using one of the long tails and working through only the slip stitches from rnd 2 of the edging, sew the pieces together. This should leave the tops of the stitches from rnd 1 of the edging visible on the right side. Continue for remaining sections but do not sew the last section to the first one yet.

Hanging loop:
Join any of the 3 colors with sl st at one end of any section. Ch 20 or to desired length of loop, sl st in same st as joining, fasten off.
Weave in all tails except for the one remaining long tail.
Finishing:
The remaining long tail should be at one end (top or bottom). Use the tail to sew that end closed.
With right sides facing, sew the final edges together about 2/3 of the way. Go as far as you can while still being able to fit the foam ball into the hole. If you are using stuffing, you can go almost all the way closed.
Turn work right side out, insert the foam ball, and carefully sew the remaining portion of the seam. It’s ok to switch to a running stitch at this point if that’s easier, just try to keep the seam hidden under the slip stitch edging.
Sew the other end shut the same way you did the first end, then weave in the tail.

Rate this Scrappy Crochet Christmas Ball Ornament Pattern!
I hope you enjoyed this ornament pattern. A downloadable pdf of this pattern is also available on Ravelry, for a small fee. The fee for the pdf format is to offset the advertising revenue lost when you print or download the pattern rather than viewing it online.
Do you want the best of Stitches n Scraps delivered right to your inbox? The Stitches n Scraps email newsletter includes highlights from the blog as well as special features not available elsewhere. Don’t miss a stitch – Subscribe now!


