Free Crochet Patterns – Home Décor
Find the perfect, free crochet pattern for your next project! Browse them all, or select a category from the dropdown menu. Where will your creativity take you today?
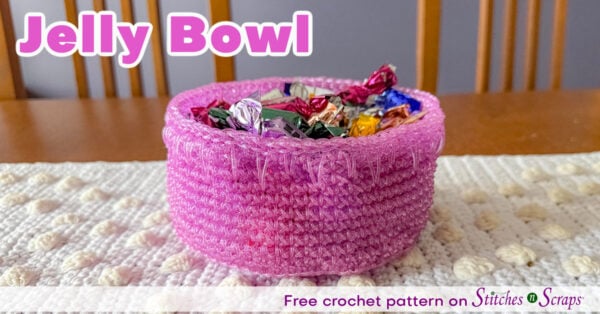
Linen Puff Textured Crochet Washcloth
Combine linen stitch and puff stitches in this totally textured crochet washcloth! The Linen Puff Washcloth is crocheted from the center out, in a simple, repeating pattern. Make it in one color, 2 colors, or more!

This content is protected by copyright. See this Terms of Use / Copyright page for more information.
This post contains sponsored content and/or affiliate links. If you click an affiliate link and make a purchase, I may get a commission.
Dishcloth of the Month Crochet Along
This textured crochet washcloth is my design for the 2025 Dishcloth of the Month Crochet Along (CAL) hosted by Oombawka Design Crochet and The Stitchin’ Mommy. Follow along for 3 new washcloth patterns every month throughout the year!

The other 2 patterns this month are a lovely Half Double Crochet V-Stitch dishcloth from The Stitchin Mommy and the Make it Quick Dishcloth from Oombawka Designs.
Free PDF with Coupon Code!
As part of the CAL, you can get the pdf version of this textured crochet washcloth pattern for FREE on Ravelry with a coupon code! But hurry, this code is only valid for a short time and then it’s gone!
Coupon Code: DishclothCAL2025
Terms: This code expires at 11:59pm Eastern time on Monday, June 9, 2025. Please make sure the discount shows in your cart before completing checkout. Due to the fees involved, I cannot refund accidental purchases.
Drops Paris Yarn
This textured, crochet washcloth is a great stashbuster. For the sample, I used some Drops Paris Yarn that was left over from a previous pattern several years ago. I originally received that yarn for free for that pattern, and really enjoyed working with it!

It’s a soft, absorbent, unmercerized cotton, with so many great colors to choose from! I used #37 Bordeaux and #17 Off White.
Materials
- Yarn: Drops Paris – 100% cotton yarn (82 yds / 1.8 oz / 50 g per skein)
- 150 yds 37 Bordeaux (A)
- 50 yds 17 Off White (B)
- Hook: Size H / 5 mm crochet hook or size needed to match gauge
- Notions:
- Scissors
- Tapestry Needle
Project Level
Easy: Single crochet and puff stitches in a repeating pattern.
Size
Approximately 12 inches / 30 cm square
Gauge
Rnds 1-10 of pattern = 6 inches / 15 cm square.
Abbreviations used
This pattern uses US terms.
- ch = chain
- puff = puff stitch (see Special Stitch)
- rep = repeat
- rnd = round
- RS = right side
- sc = single crochet
- sl st = slip stitch
- st(s) = stitch(es)
- WS = wrong side
- yo = yarn over
Special Stitch
Puff Stitch (puff): [Yo, insert hook in indicated st or sp, yo and pull a loop up to height of current row] 3 times (7 loops on hook), yo and pull through all 7 loops on hook, ch 1 to close.

Because of the closing ch-1, each puff st will have 2 “V” shapes at the top. The first is from pulling through all 7 loops and is slightly off to the side. The 2nd is from the ch-1 and is directly above the puff. When working back into a puff st on following rnds, work into the ch-1 so that the puffs line up vertically.
Instructions
Scroll down for chart
Center
With A, ch 2.
Rnd 1: [Puff, ch 1] 4 times in 2nd ch from hook, join with sl st in first puff. (4 puff sts, 4 ch-1 sps)
Color changes happen in the first sl st of the rnd. To change colors, drop the previous color and work the sl st using the new color as indicated.
Rnd 2: With B, sl st in first ch-1 sp, ch 1, (sc, ch-2, sc) in same sp, ch 1, sk next puff, [(sc, ch-2, sc) in next ch-1 sp, ch 1, sk next puff] around, join with sl st in first sc. (8 sc, 4 ch-1 sps, 4 ch-2 sps)
When working into a puff below a ch-1 sp, work over/around the ch-1 sp so that the ch is encapsulated within the stitch.
Rnd 3: With A, sl st in first ch-2 sp, ch 1, (puff, ch-1, puff) in same sp, sk next sc, puff in skipped puff below next ch-1 sp, sk next sc, [(puff, ch-1, puff) in next ch-2 sp, sk next sc, puff in skipped puff below next ch-1 sp, sk next sc] 3 times, join with sl st in first puff. (12 puffs, 4 ch-1 sps)
Repeating Pattern
When instructed to “sc in sp before next puff st”, insert your hook between the posts of the next puff st and the previous one as though there were a ch-1 sp between them even though there is not.
Rnd 4: With B, sl st in first ch-1 sp, ch 1, (sc, ch 2, sc) in same sp, ch 1, sk next puff, [sc in sp before next puff, ch 1, sk next puff] across to next ch-1 sp, *(sc, ch 2, sc) in ch-1 sp, ch 1, sk next puff, [sc in sp before next puff, ch 1, sk next puff] across to next ch-1 sp; rep from * twice more, join with sl st in first sc. (16 sc, 12 ch-1 sps, 4 ch-2 sps)
Rnd 5: With A, sl st in first ch-2 sp, ch 1, (puff, ch-1, puff) in same sp, sk next sc, [puff in skipped puff below next ch-1 sp, sk next sc] across to next ch-2 sp, *(puff, ch-1, puff) in ch-2 sp, sk next sc, [puff in skipped puff below next ch-1 sp, sk next sc] across to next ch-2 sp; rep from * twice more, join with sl st in first puff. (20 puffs, 4 ch-1 sps)
Rnds 6-19: [Rep Rnds 4-5] 7 times. (76 puffs, 4 ch-1 sps)
To adjust size, work more or fewer repeats, ending after a repeat of Rnd 5.
Edging Rnd: Continuing with A, ch 1, sc in first puff, 3 sc in next ch-1 sp, *sc in next puff, [sc in sp before next puff, sc in next puff] to next ch-1 sp, 3 sc in ch-1 sp; rep from * twice more, [sc in next puff, sc in sp before next puff] to end, join with sl st in first sc. (160 sc)
Fasten off both colors. Weave in ends.
For best results, wash and block.
Chart

Share this Linen Puff textured crochet washcloth pattern on Pinterest!
Here’s an image perfect for pinning.

Rate this Linen Puff textured crochet washcloth pattern!
I hope you enjoyed this textured crochet washcloth pattern! A downloadable pdf of this pattern is available on Ravelry for a small fee.
Do you want the best of Stitches n Scraps delivered right to your inbox? Don’t miss a stitch – Subscribe now!

Crochet Snowman Post Topper
At the top of my stairs, there is a post with a ball-shaped cap. Do you have one like that? Dress it up for the holiday season with a crochet Snowman Post Topper!

This content is protected by copyright. See this Terms of Use / Copyright page for more information.
This post contains sponsored content and/or affiliate links. If you click an affiliate link and make a purchase, I may get a commission.
A Friend’s Suggestion
My first post-topper pattern was a Pumpkin Post Topper for fall.

I shared this pattern on social media just before Halloween, and a friend said I should make a snowman for Christmas. So I did. Thanks for the idea, Melissa!
Holiday Stashdown Crochet Along
This crochet snowman post topper is my design for the 2024 Holiday Stashdown CAL, hosted by CAL Central Crochet. This is our 10th annual holiday stashdown, and it’s always our most popular CAL of the year.

See the full schedule in the main CAL post. While you’re there, be sure to enter the giveaway for a chance at some fabulous prizes! Then crochet along and join in the fun on the CAL Central Facebook group.
A Newel Post Finial?
If you didn’t know, these staircase posts are called “newel posts” and the caps are called “finials.” Don’t have a ball-shaped finial or similar object? This adorable snowman is just as happy to sit on the edge of a ledge or shelf!
Since the gauge is quite tight, it should be able to sit nicely without any stuffing. If you do want to stuff it, you can do that too and then add a base. Crochet a small circle for the base following the instructions for Rnds 1-4 of the Hat and matching the color of the Scarf. After attaching the Scarf, stuff your Snowman and sew the Base in place around the bottom edge of the scarf.
Button Safety
In general, the tops of newel posts should be too high up for little fingers to reach. Also, since we don’t have small children, it was safe enough for me to glue buttons to the face for the eyes and mouth. For added security you can sew the buttons in place instead.
If there is any chance of a small child (or pet) playing with the Snowman, I recommend skipping buttons altogether and embroidering the entire face.
Materials
- Yarn: Worsted weight yarn
- 40 yds color A (shown in red)
- 40 yds color B (shown in off-white)
- 2 yds orange (for nose)
- Hook: Size H / 5 mm crochet hook or size needed to match gauge
- Notions:
- Scissors
- Tapestry Needle
- 1/2 inch / 12.5 mm buttons – 2 (for eyes)
- 3/8 inch / 9 mm buttons – 5 (for mouth)
- 1″ / 2.5 cm pom pom
- Hot glue and hot glue gun OR needle and thread in matching colors (for attaching buttons and pom pom)
Project Level
Intermediate: Continuous rounds, front and back post double crochet, some seaming and embroidery.
Sizes
3.5 inches / 8.8 cm diameter at widest point. Designed to fit a 3.5″ / 8.8 cm ball-shaped newel post finial.
Gauge
13 sc x 14 rnds = 4 inches / 10 cm
Abbreviations used
This pattern uses US terms.
- ch = chain
- dec = decrease (see Special Stitches)
- inc = increase (see Special Stitches)
- rem = remain(s/ing)
- rep = repeat
- rnd = round
- RS = right side(s)
- sc = single crochet
- sl st = slip stitch
- sp = space
- st(s) = stitch(es)
- yo = yarn over
Special Stitches
Increase (inc): Sc in back loop only of indicated st, sc in both loops (like normal) of same st. (See increase tutorial here)
Decrease (dec): Insert hook into front loop only of both indicated sts, yo and draw up a loop, yo and draw through both loops on hook.
This is an alternative to a single crochet 2-together (sc2tog) stitch. If you prefer, you can use the standard sc2tog instead.


Instructions
Hat
Hat is worked in continuous rnds. Do not join or turn unless indicated. Mark first st of each rnd.
With A, ch 2.
Rnd 1 (RS): 6 sc in 2nd ch from hook. (6 sts)
Rnd 2: Inc in each st around. (12 sts)
Rnd 3: [Sc in next st, inc in next st] around. (18 sts)
Rnd 4: Sc in next st, inc in next st, [sc in each of next 2 sts, inc in next st] around to last st, sc in last st. (24 sts)
Rnd 5: [Inc in next st, sc in each of next 3 sts] around to last st, sc in last st. (30 sts)
Rnd 6: Sc in each of next 2 sts, inc in next st, [sc in each of next 4 sts, inc in next st] around to last 2 sts, sc in each of last 2 sts. (36 sts)
Rnd 7: Sc in each st around, join with sl st to first st.
Rnd 8: Ch 1, hdc in each st around, join with sl st to first st.
Rnd 9: Ch 1, [fpdc around next st, bpdc around next st] around, join with sl st to first st.
Fasten off.
Head
Head is worked in continuous rnds. Do not join or turn unless indicated. Mark first st of each rnd.
With RS facing and working into unused tops of sts of Rnd 12 behind fpdc of rnd 13, join white with sl st in st behind any fpdc

Rnd 10 (RS): Inc in same st, sk st in front of next bpdc, [inc in st behind next fpdc, sk st in front of next bpdc] around. (36 sts)
Rnds 11-14: Sc in each st around.
Rnd 15: Sc in next 2 sts, dec, [sc in next 4 sts, dec] around to last 2 sts, sc in last 2 sts. (30 sts)
Rnd 16: [Dec, sc in next 3 sts] around. (24 sts)
Rnd 17: Sc in each st around, join with sl st in first st.
Fasten off.

Scarf
Scarf is reversible. Either side can be RS or WS.
With C, ch 8.
Row 1: Sc in 2nd ch from hook and each ch across. (7 sts)
Rows 2-49: Ch 1, turn, sc in blo of each st across.
Work more rows if desired for a longer scarf. Make a note of how many rows extra you worked.
Fasten off.
Fringe
Cut 14 lengths of C, 6 in / 15 cm long each.
For each strand of fringe, fold 1 length in half. Insert hook through desired st and pull folded end of strand about halfway through, forming a loop. Pull cut ends of strand through loop and pull ends to tighten.
Place 1 strand of fringe in each st along both short edges of Scarf. Trim fringe ends as desired.

Assembly
Weave in all ends prior to assembly.
Scarf
Scarf has 49 rows. 12 rows on one end and 13 rows on other end become tails of Scarf, leaving 24 rows in the center to sew to Head. If you added extra rows to make Scarf longer, add 1/2 of number of added rows to each tail of Scarf.
Sk first 12 rows from either short end of Scarf, plus 1/2 of any added rows (rounded up). Decide where you would like the center front of Head to be.
Beginning with next row of scarf and at center front of head, sew long edge of scarf to RS of bottom of head, matching 1 stitch on head for every row of scarf. This will stretch scarf slightly so that after sewing, it will stretch and contract over the post, drawing the bottom of the head in and holding it in place. After sewing all the way around head, there should be 13 rows (plus half of any extra rows) remaining.

Fold one end of scarf back on itself at an angle so that tail hangs nearly straight downwards but not quite completely straight. Sew fold in place.

Lay other end of scarf on top of first tail and fold at a similar angle. Sew fold in place.

Face
Using image as guide, embroider a triangle-shaped nose with orange in center of face, directly above scarf tails.
Glue or sew buttons in place for eyes and mouth, being careful not to glue layers of head together. You may find it helpful to arrange buttons first without gluing, and then mark location of each button with a marker. Be careful doing this as it will stain the fabric.

Pom Pom
Glue or sew pom pom to top of hat.
Finishing
Weave in any remaining ends.
Share this crochet Snowman Post Topper pattern on Pinterest!
Here’s an image perfect for pinning.

Rate this crochet Snowman Post Topper pattern!
I hope you enjoyed this crochet baby sweater pattern! A downloadable pdf of this pattern is available on Ravelry for a small fee.
Do you want the best of Stitches n Scraps delivered right to your inbox? Don’t miss a stitch – Subscribe now!

Around the Corner Mitered Square Crochet Washcloth Pattern
Your favorite waschloth pattern is right around the corner with the Around the Corner mitered square crochet washcloth. Build a square outwards from a starting corner, then wrap it in a simple border. Optional surface crochet adds an extra finishing touch. Mix and match colors as desired for a washcloth that’s uniquely yours!

This content is protected by copyright. See this Terms of Use / Copyright page for more information.
This post contains sponsored content and/or affiliate links. If you click an affiliate link and make a purchase, I may get a commission.
Washcloth of the Month Crochet Along
I designed this washcloth for the 2024 washcloth of the Month CAL. This year-long event is hosted by Rhondda from Oombawka Designs and Amy from The Stitchin Mommy. Follow along for 3 new washcloth patterns every month! The other two patterns this month are the V-stitch Washcloth by Rhondda and the Ribbed Single Crochet Washcloth by Amy.
Free PDF with Coupon Code!
As part of the CAL, you can get the pdf version of this mitered square washcloth pattern for FREE on Ravelry with a coupon code! But hurry, this code is only valid for a short time and then it’s gone!
Coupon Code: WashclothCAL
Terms: This code expires at 11:59 pm Eastern time on Monday, October 14th, 2024. Please make sure the discount shows in your cart before completing checkout. Due to the fees involved, I cannot refund accidental purchases.
Lion Brand 24/7 Yarn
For my washcloth, I chose Lion Brand 24/7 Cotton yarn from my stash. Lion Brand had previously given me this yarn for other projects. This soft, durable, mercerized cotton yarn is my go-to for home decor items like washcloths and coasters.
It comes in a wide palette of colors from soft pastels to bright, bold jewel tones, and everything inbetween. I chose an autumn combination of 158R Goldenrod, 133 Tangerine, 172H Grass, and 122D Taupe.

Fun With Mitered Squares
Mitered squares can become building blocks for larger patterns. In the Modular Mitered Pillow, 2 different, 2-color mitered squares are combined in a variety of arrangements.

Mitered Crochet Rectangles too!
Mitered crochet is not just for squares! Try mitered rectangles for a fun pair of Mitered Mitts. This pattern works particularly well with self-striping yarns.

Materials
- Yarn: 85 yds Lion Brand – 100% acrylic, worsted-weight yarn (257 yds / 3.5 oz / 100 g per skein). Sample shown in:
- 9 yds 172H Grass
- 12 yds 158R Goldenrod
- 24 yds 133 Tangerine
- Hook: Size H / 5 mm crochet hook or size needed to match gauge
- Notions:
- Scissors
- Tapestry Needle
Project Level
Easy: Basic stitches in rows. single crochet edging round. Optional surface crochet.
Size
9″ square.
Gauge
Use pattern for gauge swatch: Rows 1-5 should measure approximately 3″ square. Gauge is not critical for this pattern as it can be made to any size. Any changes to gauge or size will affect amount of yarn needed.
Abbreviations used
This pattern uses US terms.
- ch = chain
- dc = double crochet
- rnd = round
- RS = right side
- sc = single crochet
- sl st = slip stitch
- sp = space
- st(s) = stitch(es)
- WS = wrong side
Recommended Resources
Instructions
Change colors as desired throughout pattern.
Square
Row 1: Ch 4, (dc, ch 1, 2 dc) in 4th ch from hook (3 skipped chs count as dc). (4 dc, 1 ch-1 sp)
Row 2: Ch 3 (counts as dc throughout), dc in next st, (2 dc, ch 1, 2 dc) in ch-1 sp, dc in each of last 2 sts. (8 dc, 1 ch-1 sp)
Row 3: Ch 3, dc in each st to ch-1 sp, (2 dc, ch 1, 2 dc) in ch-1 sp, dc in each remaining st across. (12 dc, 1 ch-1 sp)
Rows 4-14: [Rep Row 3] 11 times. (56 dc, 1 ch-1 sp)
Work should now measure 8.5″ square. To adjust size, work more or fewer repeats of row 3. Each row adds 4 dc to st count. Last row worked will be a WS row.
Border
Edging Rnd (RS): Ch 1, sc in each st to ch-1 sp, (sc, ch 2, sc) in ch-1 sp, sc in each st across, ch 2, working in sides of rows, 2 sc in each row to corner, (sc, ch 2, sc) in ch-1 sp at base of Row 1, 2 sc in each row to beginning corner, ch 2, join with sl st in first st. Fasten off. (60 sc, 1 ch-1 sp)
Surface Crochet (optional)
A round of surface crochet hides bottoms of edging sts for a neater finish.
With RS up and holding working yarn under washcloth, insert hook at base of 2nd st after any ch-2 sp of Edging Rnd, pull up a loop, [sl st in base of each st to next ch-2 sp, sk ch-2 sp, sk next st] 4 times, sl st in base of same st as beginning of rnd. Fasten off.
Finishing
Wash and block. Weave in ends.
Around the Corner Washcloth Chart
Chart does not show optional surface crochet.

Share this mitered square crochet washcloth pattern on Pinterest!
Here’s an image perfect for pinning.

Rate this mitered square crochet washcloth pattern!
I hope you enjoyed this crochet washcloth pattern! A downloadable pdf of this pattern is available on Ravelry for a small fee.
Do you want the best of Stitches n Scraps delivered right to your inbox? Don’t miss a stitch – Subscribe now!

Moon Phases Wall Hanging Crochet Pattern
Easy to follow and fun to make, this Moon Phases Wall Hanging crochet pattern adds a touch of magic to any room. Filet crochet lace illuminates the moon phases on a solid background, creating an ethereal effect perfect for Halloween / Samhain, and beyond.

This content is protected by copyright. See this Terms of Use / Copyright page for more information.
This post contains sponsored content and/or affiliate links. If you click an affiliate link and make a purchase, I may get a commission.
CAL Central Halloween Crochet Along
This Moon Phases Wall Hanging is my design for the 2024 Halloween Crochet Along at CAL Central. Join in the fun on the Facebook Group. See the main post for the full schedule, other patterns, and giveaway information too!
Not Just for Halloween!
This Moon Phases Wall Hanging is a beautiful decoration for Samhain / Halloween, and also for the rest of the year! Display it on a wall or door, or use it as a table runner or altar cloth. Hang it in a window to cast lunar shadows as light filters through the filet crochet mesh.
Caron One Pound Yarn
Yarnspirations gave me the Caron One Pound Yarn to use for this project. I chose this yarn because it’s a sturdy, hard-wearing acrylic that’s still soft and enjoyable to work with. It will hold up to the repeated rounds of hanging, washing, and storing that this piece is likely to face.
Choosing Black (635) gave the greatest contrast against a white wall or door, but this design would look equally lovely in other colors. For a bit of color, try Deep Violet (547), Dark Grey Mix (618), or Midnight Blue (546).

Filet Crochet
The Basics
If you’re not familiar with Filet crochet, it’s a fun and easy technique to learn! It uses double crochet and chain spaces to create solid blocks and open mesh blocks. Learn the basics of filet crochet, including how to read the charts, in this filet crochet tutorial. For this pattern, I’ve made a few changes from the tutorial.
- The tutorial uses double crochet (dc), where this pattern uses extended double crochet (edc).
- Instead of a “beginning mesh”, the first edc of each row is worked separately.
- Working into each chain directly where applicable, rather than working into the chain spaces. This adds just a bit more structure to the design. If you prefer though, you can work into the chain spaces instead.
Advanced Stitches
The center (full moon) of this Moon Phases Wall Hanging design uses 2 advanced filet crochet stitches: the lacet stitch and the rectangle. Though these are considered advanced, they are no more difficult than the basic stitches.
The rectangle uses a chain-5 space to create a large open rectangle across 2 blocks. The lacet stitch also covers 2 blocks, but has a single crochet in the middle. Paired together, they create a wider, open space with a curvy shape to it.

Materials
- Yarn: 380 yds Caron One Pound – 100% acrylic, worsted-weight yarn (812 yds / 16oz / 454g per skein), shown in #635 Black
- Hook: Size I / 5.5 mm crochet hook or size needed to match gauge
- Notions:
- Scissors
- Tapestry Needle
Project Level
Easy: Filet crochet with lacet and rectangle stitches.
Sizes
15″ wide x 48″ tall not counting hanging loops
Gauge
13 edc x 5 rows = 4″, after blocking.
Note: The added height of the edc helps make each block/mesh more square. The width of 3 sts or chs should approximately equal the height of 1 row. If you find that your stitches are too tall, you can switch to regular dc instead.
Abbreviations used
This pattern uses US terms.
- ch = chain
- dc = double crochet
- edc = extended double crochet (see Special Stitches)
- RS = right side
- sc = single crochet
- sk = skip
- sl st = slip stitch
- sp = space
- st(s) = stitch(es)
- yo = yarn over
Recommended Resources
- How to Crochet Without a Slip Knot
- Basic Filet Crochet (see note below)
Note: The Basic Filet Crochet tutorial has some differences from this pattern, but is a great general foundation in the technique. That tutorial uses dc instead of edc. It also defines a “beginning mesh” which is a mesh with an extra dc. Here the starting edc is written separately. Finally, it shows working into chain spaces whereas this pattern works into each chain.
Special Stitches
Extended Double Crochet (edc)
Yo, insert hook in indicated st or ch, yo and pull up a loop, yo and pull through 1 lp on hook, [yo and pull through 2 loops on hook twice].
Mesh
Ch 2, sk next 2 sts/chs, edc in next st.
Block
Edc in each of next 3 sts/chs.
Note: When edc are worked into chs, you can work them into the ch-sp instead, if preferred. For example, you can work 2 edc in a ch-2 sp, instead of 1 edc in each of the 2 chs.
Lacet stitch (lacet)
Worked over 2 blocks/mesh.
Ch 2, sk next 2 sts/chs, sc in next st/ch, ch 2, sk next 2 sts/chs, edc in next st.
Rectangle (rect)
Worked over 2 blocks/mesh.
Ch 5, sk next 5 sts/chs, edc in next st.

Instructions
Section 1
Scroll down for chart.
Row 1 (RS): Ch 51, edc in 4th ch from hook (3 skipped chs count as first edc), edc in each rem ch across. (49 edc)
Row 2: Ch 3 (counts as first edc throughout), turn, block across. (1 edc, 16 blocks)
Rows 3 & 4: Ch 3, turn, 2 blocks, 1 mesh, 10 blocks, 1 mesh, 2 blocks. (1 edc, 14 blocks, 2 mesh)
Row 5: Ch 3, turn, 2 blocks, 2 mesh, 8 blocks, 2 mesh, 2 blocks. (1 edc, 12 blocks, 4 mesh)
Row 6: Ch 3, turn, 2 blocks, 3 mesh, 6 blocks, 3 mesh, 2 blocks. (1 edc, 10 blocks, 6 mesh)
Row 7: Ch 3, turn, 2 blocks, 4 mesh, 4 blocks, 4 mesh, 2 blocks. (1 edc, 8 blocks, 8 mesh)
Row 8: Ch 3, turn, 3 blocks, 10 mesh, 3 blocks. (1 edc, 6 blocks, 10 mesh)
Row 9: Ch 3, turn, 4 blocks, 8 mesh, 4 blocks. (1 edc, 8 blocks, 8 mesh)
Row 10: Ch 3, turn, 5 blocks, 6 mesh, 5 blocks. (1 edc, 10 blocks, 6 mesh)
Row 11: Ch 3, turn, block across. (1 edc, 16 blocks)
Sections 1 & 5 Chart
Note: The starting ch-3 (first edc) of each row is not shown separately on the chart. For all charts in this pattern, start each row with a ch-3, which counts as the first stitch.
This same chart is used for Rows 1-11 of Section 1, and Rows 50-59 of Section 5.
Section 2
Scroll down for chart.
Row 12: Ch 3, turn, block across. (1 edc, 16 blocks)
Row 13: Ch 3, turn, 3 blocks, 1 mesh, 8 blocks, 1 mesh, 3 blocks. (1 edc, 14 blocks, 2 mesh)
Row 14: Ch 3, turn, 2 blocks, 2 mesh, 8 blocks, 2 mesh, 2 blocks. (1 edc, 12 blocks, 4 mesh)
Row 15: Ch 3, turn, 2 blocks, 3 mesh, 6 blocks, 3 mesh, 2 blocks. (1 edc, 10 blocks, 6 mesh)
Row 16: Ch 3, turn, 2 blocks, 4 mesh, 4 blocks, 4 mesh, 2 blocks. (1 edc, 8 blocks, 8 mesh)
Rows 17-19: Ch 3, turn, 2 blocks, 12 mesh, 2 blocks. (1 edc, 4 blocks, 12 mesh)
Row 20: Ch 3, turn, 3 blocks, 10 mesh, 3 blocks. (1 edc, 6 blocks, 10 mesh)
Row 21: Ch 3, turn, 4 blocks, 8 mesh, 4 blocks. (1 edc, 8 blocks, 8 mesh)
Row 22: Ch 3, turn, 5 blocks, 6 mesh, 5 blocks. (1 edc, 10 blocks, 6 mesh)
Row 23: Ch 3, turn, block across. (1 edc, 16 blocks)
Section 3
Scroll down for chart.
Row 24: Ch 3, turn, block across. (1 edc, 16 blocks)
Row 25: Ch 3, turn, 5 blocks, 6 mesh, 5 blocks. (1 edc, 10 blocks, 6 mesh)
Row 26: Ch 3, turn, 4 blocks, 1 mesh, 3 lacet, 1 mesh, 4 blocks. (1 edc, 8 blocks, 2 mesh, 3 lacet)
Row 27: Ch 3, turn, 3 blocks, 2 mesh, 3 rect, 2 mesh, 3 blocks. (1 edc, 6 blocks, 4 mesh, 3 rect)
Row 28: Ch 3, turn, 2 blocks, 2 mesh, 4 lacet, 2 mesh, 2 blocks. (1 edc, 4 blocks, 4 mesh, 4 lacet)
Row 29: Ch 3, turn, 2 blocks, 2 mesh, 4 rect, 2 mesh, 2 blocks. (1 edc, 4 blocks, 4 mesh, 4 rect)
Row 30: Ch 3, turn, 2 blocks, 1 mesh, 5 lacet, 1 mesh, 2 blocks. (1 edc, 4 blocks, 2 mesh, 5 lacet)
Row 31: Ch 3, turn, 2 blocks, 1 mesh, 5 rect, 1 mesh, 2 blocks. (1 edc, 4 blocks, 2 mesh, 5 rect)
Rows 32 & 33: Repeat Rows 28 & 29.
Row 34: Ch 3, turn, 3 blocks, 2 mesh, 3 lacet, 2 mesh, 3 blocks. (1 edc, 6 blocks, 4 mesh, 3 lacet)
Row 35: Ch 3, turn, 4 blocks, 1 mesh, 3 rect, 1 mesh, 4 blocks. (1 edc, 8 blocks, 2 mesh, 3 rect)
Row 36: Repeat Row 25.
Row 37: Ch 3, turn, block across. (1 edc, 16 blocks)
Section 4:
See Section 2 for chart.
Rows 38-49: In reverse order, repeat rows 23-12 of Section 2.
Section 5:
See Section 1 chart above and Row 60 chart below.
Rows 50-59: In reverse order, repeat rows 11-2 of Section 1.
Row 60: Ch 10, turn, sl st in 8th ch from hook (counts as first dc and ch-7 loop), [edc in next 6 sts, ch 7, sl st in edc just made] across. (49 edc, 9 ch-7 hanging loops)—
Row 60 Chart:

Finishing
Weave in ends.
Wash and block. Blocking is important in this pattern, to open up the lace.
Share this Moon Phases Wall Hanging crochet pattern on Pinterest!
Here’s an image perfect for pinning.

Rate this Moon Phases Wall Hanging crochet pattern!
I hope you enjoyed this Moon Phases Wall Hanging crochet pattern! A downloadable pdf of this pattern, formatted for easy printing, is available on Ravelry for a small fee.
Do you want the best of Stitches n Scraps delivered right to your inbox? Don’t miss a stitch – Subscribe now!

Summer Sunset Crochet Coasters
Indoors or out, bring the gold and orange hues of a summer sunset to your next gathering with Summer Sunset coasters! Layers of stitches worked into rounds below create the beautifully blended rays of color in this lovely crochet coaster pattern. They are perfect for picnics, parties, or every day.

This content is protected by copyright. See this Terms of Use / Copyright page for more information.
This post contains sponsored content and/or affiliate links. If you click an affiliate link and make a purchase, I may get a commission.
Afternoon Delight Crochet Along
I designed this crochet coaster pattern for the CAL Central Afternoon Delight CAL. See the full schedule of patterns and all the event details in the main CAL post. Then, join in the fun and share your projects on the CAL Central Crochet Facebook group!

Lion Brand 24/7 Cotton Yarn
For my Summer Sunset coasters, I dug into my stash for leftover 24/7 cotton yarn that Lion Brand had previously provided for other projects. This is one of my go-to yarns for summer and home decor projects. It has the strength and sheen of mercerized cotton, in a large variety of colors.

For the gold and orange hues of sunset, I chose #158R Goldenrod and #133 Tangerine. Then, the fiery colors fade into a summer evening sky of #108G Denim. Change the mood with floral or pastel colors instead, or use up any worsted weight cotton scraps you have!
Full Video Tutorial!
Need more help? See the full video tutorial for this pattern!
Materials
- Yarn: Lion Brand 24/7 Cotton – 100% mercerized cotton yarn, 186 yds / 3.5 oz / 100 g per skein.
10 yds each of #158R Goldenrod (yellow), #133 Tangerine (orange), and #108G denim (blue) per coaster (40 yds each for a set of 4 coasters). - Hook: Size 7 / 4.5 mm crochet hook or size needed to match gauge
- Notions:
- Scissors
- Tapestry Needle
Project Level
Intermediate: Working into rounds below.
Size
Approximately 4.5″ diameter.
Gauge
Use pattern as gauge swatch. Each coaster measures approximately 4.5″ in diameter.
Exact gauge is not critical for this project but will affect yarn usage.
Abbreviations used
This pattern uses US terms.
- ch = chain
- dc = double crochet
- rnd = round
- sc = single crochet
- sk = skip
- sl st = slip stitch
- sp = space
- st(s) = stitch(es)
- yo = yarn over
Instructions
When working into rnds below, work over all sts or ch-sps in the previous round so that they are encapsulated within the new st.
Center
Rnd 1: With yellow, ch 2, 6 sc in 2nd ch from hook, join with sl st in first st. (6 sc)
Rnd 2: Ch 1, sc in first st, ch 1, [sc in next st, ch 1] around, join with sl st in first st. (6 sc, 6 ch-1 sps)

In Rnd 3, all sts are worked into sts of Rnd 1, all of which have already been worked into. Place the new Rnd 3 sts in the same spot, working over the Rnd 2 sts.

Rnd 3: Working into sts from Rnd 1: 2 dc in first st, ch 1, [2 dc in next st, ch 1] around, shift first 2 dc of this rnd forward slightly to uncover first st of Rnd 2, sl st in first st of Rnd 2. (12 dc, 6 ch-1 sps)

In Rnd 4, shift the sts of Rnd 3 forward to uncover the sts of Rnd 2.

Rnd 4: Ch 3 (counts as dc), dc in first st of Rnd 2 (same st as join), ch 2, sk next 2 sts of Rnd 3, [3 dc in next st of Rnd 2, ch 2, sk next 2 sts of Rnd 3] around, dc in same st as beginning of rnd, using orange, join with sl st in first st, cut yellow, leaving a tail to weave in later. (18 dc, 6 ch-2 sps)

Middle Ring
Rnd 5: With orange, ch 3 (counts as ch-2 sp), sk next st of Rnd 4, [2 dc in next st of Rnd 3, ch 2] twice, *sk next 3 sts of Rnd 4, [2 dc in next st of Rnd 3, ch 2] twice; repeat from * around to last st of Rnd 3, sk last st of Rnd 3, join with sl st in beginning ch-2 sp. (24 dc, 12 ch-2 sps)

Rnd 6: Ch 1, 2 dc in first st of Rnd 4 (2nd dc of 3-dc group directly below), ch 2, sk next 2 sts of Rnd 5, 2 dc in next ch-2 sp of Rnd 4, ch 2, sk next 2 sts of Rnd 5, [2 dc in 2nd st of next 3-dc group on Rnd 3, ch 2, sk next 2 sts of Rnd 5, 2 dc in next ch-2 sp of Rnd 4, ch 2, sk next 2 sts of Rnd 5] around, using blue, join with sl st in first st, cut orange, leaving a tail to weave in later. (24 dc, 12 ch-2 sps)

Outer Border
Rnd 7: With blue, ch 1, sc in first 2 sts of Rnd 6, dc in 2 sts of Rnd 5 directly below next ch-2 sp, [sc in next 2 sts of Rnd 6, dc in next 2 sts of Rnd 5] around, join with sl st to first st. (24 sc, 24 dc)

Fasten off. Weave in all ends.
Share this summer crochet coaster pattern on Pinterest!
Here’s an image perfect for pinning.

Rate this crochet coaster pattern!
I hope you enjoyed this crochet coaster pattern! A downloadable pdf of this pattern is available on Ravelry for a small fee. The fee for the pdf format offsets the advertising revenue lost when you print or download the pattern rather than viewing it online.
Do you want the best of Stitches n Scraps delivered right to your inbox? The Stitches n Scraps email newsletter includes highlights from the blog as well as special features not available elsewhere. Don’t miss a stitch – Subscribe now!

Winter Whites Wreath
Dress up your doorway (or that bare spot on the wall…you know the one) with this crochet embroidery hoop wreath! It’s fast, easy, and all wrapped up with a big, chunky bow. Decorate it with pom poms, floral picks, or anything else you like!

This content is protected by copyright. See this Terms of Use / Copyright page for more information.
This post contains sponsored content and/or affiliate links. If you click an affiliate link and make a purchase, I may get a commission.
Cozy at Home Crochet Along
I designed this crochet embroidery hoop wreath for the CAL Central Cozy at Home CAL. See the full schedule of patterns and all the event details in the main CAL post. Then join in the fun and share your projects on the CAL Central Crochet Facebook group!

Yarn Choices
The pattern is written for 2 strands of worsted-weight yarn held together. You can substitute a single strand of chunky or super bulky yarn instead if you like, or you could hold more strands of a lighter yarn together.
I used some leftover yarn in two different shades of off-white. One is slightly more yellow than the other. Using similar but different shades adds a tonal quality to the finished wreath. You can also do it in 2 strands of the same color, or use completely different colors for a more variegated look. It’s a great way to play with different options!
Perfect Tails
The bow on top has a secret. A little hole allows the tails to cross through each other so that they lie perfectly flat! Once it’s finished, the wrap in the center hides the hole.

Choosing Decorations
Weaving creates a large amount of “loom waste”. This is all the yarn between the beam where the yarn is tensioned and the weaving area where you can actually weave it. Throwing that away after every project just kills me. So instead, I make pom poms!


For my wreath, I chose some multi-colored pom poms made from the loom waste of this backpack project. You can choose any decorations you like for your wreath. Try buttons, beads, or other embellishments, or grab a few floral picks from the craft store and weave them into the ring. Anything goes!
Materials
- Yarn: Worsted weight yarn – 50 yds each of 2 different skeins/balls.
Note: The 2 yarns will be held together throughout and can be the same color or different colors. Shown in 2 different shades of off-white / cream. - Hook: Size J / 6 mm hook or size needed to match gauge
- Notions:
- Scissors
- Tapestry Needle
- Pom Poms or other decorations as desired
- Hot glue gun and glue (or other type of glue as desired)
- 7″ diameter embroidery hoop
- Optional: Cardboard to provide added support behind decorations.
Project Level
Easy: Basic stitches, crocheting around an embroidery hoop.
Size
7.25″ diameter, not including bow.
Gauge
10 dc x 5 rows = 4 inches. Exact gauge is not critical for this project.
Abbreviations used
This pattern uses US terms.
- ch = chain
- dc = double crochet
- sc = single crochet
- sk = skip
- sl st = slip stitch
- sp = space
- st(s) = stitch(es)
- yo = yarn over
Recommended Resources
Instructions
Use 2 strands of yarn (1 strand from each ball/skein) held together throughout this pattern.
The pattern uses a fully assembled/tightened embroidery hoop with both layers. If you prefer, you can use just the inner layer.
Cover the Hoop
Insert your hook through the fully assembled hoop, just after the top screw, and pull up a loop.

Working around the hoop, yarn over and pull through the loop on your hook.


Ch 1, *insert hook through the hoop, yo and pull a loop up and through the loop on your hook (sl st made), ch 1;


Repeat from * until hoop is completely covered around to the other end of the screw, fasten off. (Approximately 120 total sl sts and 120 chs)
Rotate stitches so the tops of the stitches are inside the hoop, Use tail to sew first and last sts together.

Weave in ends.
Bow
Row 1: Ch 7, working in back bumps of chains, dc in 4th ch from hook (skipped chs count as first dc) and in each ch across. (5 dc)
Rows 2-8: Ch 3 (counts as dc throughout), turn, dc in next st and each st across.
Row 9: Ch 3, turn, dc in first st, dc in each st across to last st, 2 dc in last st. (7 dc)
Rows 10-12: Ch 3, turn, dc in next st and each st across.
Row 13: Ch 2 (does not count as a st throughout), turn, sk first st, dc in each st across to last st, sk last st. (5 dc)
Rows 14-16: Ch 3, turn, dc in next st and each st across.
Rows 17-21: Repeat rows 9-13
Row 22: Ch 6 (counts as dc and ch-3 sp), sk all sts to last st, dc in last st. (2 dc, 1 ch-3 sp)
Row 23: Ch 3, 4 dc in ch-3 sp, sk last st. (5 dc)
Rows 24-29: Ch 3, turn, dc in next st and each st across.
Fasten off. Weave in ends.

Assembly
Form the Bow
Pull the solid end of the bow through the ch-sp on the other end, forming a loop, and adjust so that the two tails are even. Right and wrong sides are not particularly important in this, but if you like the look of it one way more than the other, do it that way.

Lay the bow so that the tails are flat on the table, and push down on the top (loop) of the bow so that the narrowest part rests in the middle, on top of where the tails cross. The narrowest parts of each section of the bow should now all line up in the middle.

Cut a 16-inch piece of both yarns held together, and wrap it tightly around the center several times to form the bow. Pull the tails down at an angle and fluff out the loops.

Once you are happy with the shape of the bow, weave in the ends, sewing them through the middle several times to hold everything firmly in place.
Hanging Loop
Cut a 12-inch piece of both yarns held together. Fold it in half, and tie a knot at the desired height of your loop. Pass the tails around the center of the screw (one in front, one in back) so that the knot rests on top of the screw. Tie the tails in another knot underneath the screw. Weave in remaining ends.

Bow placement
Glue the center of the bow in place on top of the embroidery hoop screw, so that the screw is completely hidden. Glue the tails to the sides of the hoop as desired.

Decorations
Glue pom poms or other decorations in place as desired.

Hold the wreath up by the hanging loop and see if the decorations stay in place. If they are too floppy or don’t stay in place, add the optional cardboard backing.
Optional Cardboard Backing
Trace around your decorations and the adjacent portion of the hoop on a piece of cardboard.

Cut this piece out and trim it as needed so that it overlaps the wreath, but doesn’t show behind the decorations.

Glue this cardboard to the back of your decorations and to the back of the wreath to help stabilize the decorations.
Share this crochet embroidery hoop wreath on Pinterest!
Here’s an image perfect for pinning.

Rate this crochet embroidery hoop wreath pattern!
I hope you enjoyed this crochet embroidery hoop wreath pattern. A downloadable pdf of this pattern is available on Ravelry for a small fee. The fee for the pdf format offsets the advertising revenue lost when you print or download the pattern rather than viewing it online.
Do you want the best of Stitches n Scraps delivered right to your inbox? The Stitches n Scraps email newsletter includes highlights from the blog as well as special features not available elsewhere. Don’t miss a stitch – Subscribe now!

Chunky Crochet Basket – Task-it Basket
Toys, snacks, knick-knacks, or (of course) yarn, the Task-it Basket is perfect for small storage tasks. This chunky, crochet basket works up fast in super bulky yarn. A hidden ring of plastic mesh helps it hold its shape and can be easily removed for washing.

This content is protected by copyright. See this Terms of Use / Copyright page for more information.
This post contains sponsored content and/or affiliate links. If you click an affiliate link and make a purchase, I may get a commission.
Lion Brand Super Bulky yarns
I dug deep in my stash for the yarns for this basket. The grey yarn still has its label, so I know it’s Lion Brand Wool Ease Thick and Quick in #148P Slate.

The other 2 don’t have a label but I’m fairly certain they are Lion Brand Hometown yarn in #130K Green Bay and #153I South Dakota Black.
Both yarns are very similar in size, so you can use either, or mix and match like I did.
Perfect Stripes
Stripes in crochet can create a jagged line, where the bottoms of the stitches in the new color intersect the tops of the stitches in the old color. This bulky crochet basket pattern uses slip stitches and working in the back loop to eliminate that jagged line.
First, a round of slip stitches, worked in the back loop only, covers the top of the old color stitches. The unused front loops create a straight line of the old color.

Next, work the first round of the new color into the back loops of both the slip stitch and the stitch below it (the same back loop that the slip stitch was worked into). Working into both back loops, instead of just the back loop of the slip stitches, gives the new round more stability.

The unused front loops of the new color now create a straight line of the new color, resting on top of the straight line of the old color.
Materials
- Yarn: Lion Brand Wool Ease Thick and Quick yarn (80% acrylic, 20% wool; 170 g / 106 yds per skein) OR Lion Brand Hometown yarn (100% acrylic; 142g / 81 yds per skein)
- 50 yds each black (A) & green (B)
- 100 yds grey (C)
- Hook: Size L / 8 mm hook or size needed to match gauge
- Notions:
- Scissors
- Tapestry Needle
- Stitch Marker
- Stiff plastic mesh canvas (1-2 sheets measuring 10.4″ x 13.5″ OR 1 sheet measuring 12″ x 18″)
- 1-2 yds of waste yarn or thread thin enough to fit the plastic mesh holes, for sewing mesh together
Sample is shown in Lion Brand Hometown #130K Green Bay (A) and #153I South Dakota Black (B), and Lion Brand Wool Ease Thick and Quick #148P Slate.
Project Level
Intermediate: Working in rounds, working in back loops, back post stitches, working into rounds below.
Size
28.5 inches outer circumference x 6 inches tall
Gauge
9 sc = 4.75 inches; 8 rnds = 4 inches
Abbreviations used
This pattern uses US terms.
- blo = back loop only
- ch = chain
- hdc = half double crochet
- rnd = round
- sc = single crochet
- sk = skip
- sl st = slip stitch
- sp = space
- st(s) = stitch(es)
- yo = yarn over
Instructions
Use a stitch marker (or running stitch marker) to mark the first st of each rnd.
Join rounds where indicated with sl st in first st of rnd.
Bottom Circle
Rnd 1: With A, ch 2, 6 sc in 2nd ch from hook, join. (6 sc)
Rnd 2: Ch 1, 2 sc in each st around, join. (12 sc)
Rnd 3: Ch 1, 2 sc in first st, sc in next st, [2 sc in next st, sc in next st] around, join. (18 sc)
Rnd 4: Ch 1, sc in first st, 2 sc in next st, [sc in next 2 sts, 2 sc in next st] around to last st, sc in last st. (24 sc)
Rnd 5: Ch 1, 2 sc in first st, sc in next 3 sts, [2 sc in next st, sc in next 3 sts] around, join. (30 sc)
Rnd 6: Ch 1, sc in first 2 sts, 2 sc in next st, [sc in next 4 sts, 2 sc in next st] around to last 2 sts, sc in last 2 sts, join. (36 sc)
Rnd 7: Ch 1, 2 sc in first st, sc in next 5 sts, [2 sc in next st, sc in next 5 sts] around, join. (42 sc)
Rnd 8: Ch 1, sc in first 3 sts, 2 sc in next st, [sc in next 6 sts, 2 sc in next st] around to last 3 sts, sc in last 3 sts, join. (48 sc)
Rnd 9: Ch 1, 2 sc in first st, sc in next 7 sts, [2 sc in next st, sc in next 7 sts] around, join. (54 sc)

Sides
Begin working in continuous rnds. Do not join unless indicated.
When instructed to change colors, use the new color to complete the last “pull-through” step of the indicated stitch.

Bottom stripe
Rnd 10: Ch 1, bphdc around each st around. (54 bphdc)
Rnd 11: Hdc in each st around, change to B in last st. (54 hdc)
Rnd 12: With B, sl st in blo of each st around. (54 sl sts)
Middle Stripe
Rnd 13: Ch 1, [hdc in (blo of next sl st and blo from 2 rows below – same loop that the sl st was worked into) together] around. (54 hdc)

Rnds 14-16: Hdc in each st around, change to C in last st of last rnd.
Rnd 17: With C, sl st in blo of each st around. (54 sl sts)
Top Stripe
Rnd 17: Rep rnd 13. (54 hdc)
Rnd 18: Hdc in each st around, join. (54 hdc)
Lining
Rnd 19: Ch 1, bpdc in each st around. (54 bpdc)
Rnds 20-25: Hdc in each st around. (54 hdc)
Rnd 26: Hdc in each st around, join, sl st in next st.

Fasten off. Fold lining to inside of basket.
Handle
Rnd 1: Working into the unused tops of sts from Rnd 18, join C with sl st in first st, ch 1, sc in first 11 sts, ch 5, sk next 5 sts, sc in next 22 sts, ch 5, sk next 5 sts, sc in last 11 sts, join. (44 sc, 2 ch-5 sps).
Rnd 2: Ch 1, sc in each of first 11 sts, 5 sc in next ch-5 sp, sc in next 22 sts, 5 sc in next ch-5 sp, sc in last 11 sts, join. (54 hsc)
In Rnd 3, you will be working into rounds below. As you do, work over and around any sts above, so that they are encapsulated within the new sts. This creates a double-thick top rnd, for a sturdier handle and edge. Do not work any chs at the start of the rnd.

Rnd 3: Working over and around sts from previous row(s), hdc in each of first 11 sts 3 rows below (Rnd 18 of sides), 5 hdc in next ch-5 sp 2 rows below (Rnd 1 of handle), hdc in next 22 sts 3 rows below, 5 hdc in next ch-5 sp 2 rows below, hdc in last 11 sts 3 rows below, join. (54 hdc)
Fasten off.

Plastic Mesh Insert
Measure the height of the lining portion of your basket. It should be about 4 inches.

Cut strips of plastic mesh as tall as your lining measurement, until you have at least 26 inches of total length, plus 1/2 inch extra for each strip (this should be 2 strips if you use either of the recommended mesh sheet sizes).
Overlap the ends of the strips by 1/2 inch and sew together with scrap yarn to create one long strip. The final strip should be at least 26.5 inches long (if it’s longer, do not trim yet). Be sure all cut edges of mesh are smooth, trimming away any small bumps, so that they don’t snag on the yarn.

Roll the mesh strip into a tube and place it inside the basket, expanding it to fit tightly along the edge. Make sure the bottom edge is lined up neatly with the bottom edge of the basket. Stretch it to fit snuggly, and use a piece of scrap yarn to mark where the ends overlap.

Take the mesh ring out of the basket and baste the ends together with scrap yarn so they overlap as marked. Place the ring back in the basket and check the fit. Adjust as necessary. If you need more length, you can add additional pieces of mesh, sewing them together as before. Be sure the ends overlap by at least 1/2 inch at each seam.

Once you are happy with the fit, you can sew the ends of the ring together more securely and trim away any excess plastic if you want to. I left mine as-is so I can more easily adjust later if the fabric stretches over time.
Optional Bottom Insert (not shown):
Cut a circle of plastic mesh the same size as the Bottom circle and place it on the bottom. You can leave it as a separate piece or sew it to the plastic mesh ring. This will require additional plastic mesh.
If you would like the mesh to be hidden, crochet a 2nd Bottom circle to cover the mesh. Fasten off and weave in ends. This will require additional yarn.
Finishing
Weave in any remaining ends.
Place the plastic mesh insert into the basket, making sure it’s lined up straight along the bottom edge. Fold the lining to the inside of the basket, over the mesh.
If you made the Optional Bottom Insert as a separate piece, place it in the bottom. Insert the extra crochet Bottom circle to hide the mesh if desired. Do not sew this crochet circle to the basket, or you will not be able to remove the insert.

The plastic mesh insert can be easily removed for washing, and then replaced in the same way.
Share this chunky, crochet basket on Pinterest!
Here’s an image perfect for pinning.

Rate this chunky, crochet basket pattern!
I hope you enjoyed this chunky, crochet basket pattern. A downloadable pdf of this pattern is available on Ravelry for a small fee. The fee for the pdf format offsets the advertising revenue lost when you print or download the pattern rather than viewing it online.
Do you want the best of Stitches n Scraps delivered right to your inbox? The Stitches n Scraps email newsletter includes highlights from the blog as well as special features not available elsewhere. Don’t miss a stitch – Subscribe now!

Crochet Pencil Draft Stopper
Feeling the chill where you shouldn’t be? Block drafty windows and doors with a Crochet Pencil Draft Stopper! Customize the colors and length for a whimsical way to stay warm this season. It’s great for offices and kids of all ages, and makes a great gift too!

This content is protected by copyright. See this Terms of Use / Copyright page for more information.
This post contains sponsored content and/or affiliate links. If you click an affiliate link and make a purchase, I may get a commission.
Giftstravaganza Crochet Along
I designed this crochet pencil draft stopper for the 2023 Giftstravaganza CAL hosted by Underground Crafter. Get ready for holiday gifting with daily patterns, and enter for a chance to win fun prizes too! Each week has a theme, and this week’s theme is “Gifts for Home”. See the full schedule and all the other great patterns in the main CAL post.
Poly Fil Premium Fiber Fill
Fairfield World generously gave me lots of Poly-Fil Premium Polyester Fiber Filling for previous projects, like Playful the Baby Penguin shown below. It’s my go-to for all my amigurumi and stuffed designs because it’s so soft and squishy and easy to use!

My favorite stuffing tip is to tear the stuffing into small bits and stuff just a little at a time, rather than trying to put a whole handful in all at once. This creates a smoother finish and avoids clumps and lumps.
Project Level
Intermediate: Mostly basic stitches worked in the round. Some 3rd loop of half double crochet, and some spike stitches.
Size
Without stuffing: 3.25 inches diameter x 36 inches long
With stuffing: 4 inches diameter x 39 inches long. Note that how firmly you stuff your pencil will have an impact on the finished size.
Gauge
14 sc x 15 rnds = 4 inches.
Abbreviations used
This pattern uses US terms.
- blo = back loop only
- ch = chain
- dec = decrease
- hdc = double crochet
- inc – increase
- rnd = round
- RS = right side
- sc = single crochet
- sk = skip
- sl st = slip stitch
- sp = space
- st(s) = stich(es)
- tlo = third loop only
- yo = yarn over
Special Stitches
Increase (inc): Sc in blo of next st, sc in both loops (like normal) of same st. (See increase tutorial here)
Decrease (dec): Insert hook into front loop only of both of next 2 stitches, yarn over and draw up a loop, yarn over and draw through both loops on hook.
This is an alternative to a single crochet 2-together (sc2tog) stitch. If you prefer, you can use the standard sc2tog instead.


Spike Fan: Worked over 3 sts and counts as 3 sts.
Insert hook in first st, yo and pull up a loop (2 loops on hook), insert hook 2 rows below second st, yo and pull up a loop to height of current row (3 loops on hook), yo and pull through all 3 loops on hook (first stitch made).

Insert hook in same st 2 rows below second st, yo and pull up a loop to height of current row, yo and pull through both loops on hook (2nd stitch made).
Insert hook in same st 2 rows below second st, yo and pull up a loop to height of current row (2 loops on hook), insert hook in 3rd st and pull up a loop (3 loops on hook), yo and pull through all 3 loops on hook (3rd stitch made).

When working back into a spike fan, work into all 3 sts individually.

Instructions
Join rnds where indicated with a sl st in first st of the rnd.
Eraser
Rnd 1: With pink, ch 2, 6 sc in 2nd ch from hook, join. (6 sts)
Rnd 2: Ch 1, inc in each st around, join. (12 sts)
Rnd 3: Ch 1, inc in first st, sc in next st, [inc in next st, sc in next st] around, join. (18 sts)
Rnd 4: Ch 1, inc in first st, sc in each of next 2 sts, [inc in next st, sc in each of next 2 sts] around, join. (24 sts)
Rnd 5: Ch 1, sc in each of first 2 sts, inc in next st, [sc in each of next 3 sts, inc in next st] around to last st, sc in last st, join. (30 sts)
Rnd 6: Ch 1, inc in first st, sc in each of next 4 sts, [inc in next st, sc in each of next 4 sts] around, join. (36 sts)
Rnds 7-11: Sc in each st around, join, change to grey when joining last rnd.
Ferrule
Rnd 12: With grey, ch 1, hdc in each st around, join.
Rnd 13: Ch 1, hdc in tlo of each st around, join.
Rnd 14: Ch 1, sc in tlo of each st around, join.
Rnds 15-17: Rep Rnds 12-14, change to main color when joining last rnd.
Body
Rnd 18: With main color, ch 1, sk first st, sc in each remaining st around, do not join.
Rnd 19: Sc in first ch-1 sp and in each st around, do not join.
Continue to sc in each st around in continuous rnds until pencil measures about 30 inches (or about 8-9″ shorter than desired finished length) from beginning of eraser. There is no need to mark the first st of the rnds, you can end the last rnd wherever you like.
Ending the last rnd: Sl st in next 2 sts, fasten off.

Turn pencil inside out and weave in all ends.
Stuff pencil firmly and evenly, but not so full that stuffing shows through the stitches. For best results, add small pieces of stuffing at a time. Roll pencil back and forth on a hard surface a few times to even out the stuffing.
Point
Leave all tails on RS of work going forward, so that you can weave them in more easily once pencil is finished. Continue stuffing as you go.
Join beige with a sl st in any st on last rnd of body.
Rnd 1: Sc in first 3 sts, spike fan, [sc in next 3 sts, spike fan] around, join. (18 sc, 6 spike fan)
Rnd 2: Ch 1, sc in first 5 sts, dec, [sc in next 10 sts, dec] twice, sc in last 5 sts, join. (33 sts)
Rnd 3: Ch 1, sc in first 9 sts, dec, [sc in next 9 sts, dec] twice, join. (30 sts)
Rnd 4: Ch 1, sc in each st around, join.
Rnd 5: Ch 1, sc in first 4 sts, dec, [sc in next 8 sts, dec] twice, sc in last 4 sts, join. (27 sts)
Rnd 6: Ch 1, sc in first 7 sts, dec, [sc in next 7 sts, dec] twice, join. (24 sts)
Rnd 7: Ch 1, sc in each st around, join.
Rnd 8: Ch 1, sc in first 3 sts, dec, [sc in next 6 sts, dec] twice, sc in last 3 sts, join. (21 sts)
Rnd 9: Ch 1, sc in first 5 sts, dec, [sc in next 5 sts, dec] twice, join. (18 sts)
Rnd 10: Ch 1, sc in each st around, join.
Stuff pencil tip.
Rnd 11: Ch 1, sc in first 2 sts, dec, [sc in next 4 sts, dec] twice, sc in last 2 sts, join. (15 sts)
Rnd 12: Ch 1, sc in first 3 sts, dec, [sc in next 3 sts, dec] twice, join and change to black. (12 sts)
Rnd 13: With black, ch 1, sc in each st around, join.
Finish stuffing (use back of crochet hook to push stuffing into tip if needed).
Rnd 14: Ch 1, sc in first st, dec, [sc in next 2 sts, dec] twice, sc in last st, join. (9 sts)
Rnd 12: Ch 1, sc in first st, dec, [sc in next st, dec] twice, join. (6 sts)
Rnd 13: Ch 1, dec around, fasten off. (3 sts)
Use tail to sew tip of pencil closed as needed.
Weave in all remaining ends, going through the stuffing so that they don’t show on the RS.
Share this Crochet Pencil Draft Stopper on Pinterest!
Here’s an image perfect for pinning.

Rate this Crochet Pencil Draft Stopper Pattern!
I hope you enjoyed this crochet pencil draft stopper pattern. A downloadable pdf of this pattern is available on Ravelry for a small fee. The fee for the pdf format offsets the advertising revenue lost when you print or download the pattern rather than viewing it online.
Do you want the best of Stitches n Scraps delivered right to your inbox? The Stitches n Scraps email newsletter includes highlights from the blog as well as special features not available elsewhere. Don’t miss a stitch – Subscribe now!

Halloween Cauldron Crochet Pattern
Stir up some Halloween fun with this cauldron crochet pattern! Get creative with overflowing stuffing, or crochet the optional cover. What’s brewing in your cauldron?

This content is protected by copyright. See this Terms of Use / Copyright page for more information.
This post contains sponsored content and/or affiliate links. If you click an affiliate link and make a purchase, I may get a commission.
CAL Central Halloween Crochet Along
This crochet cauldron pattern is the first pattern in the 2023 Halloween Crochet Along at CAL Central. Join in the fun on the Facebook Group. See the main post for the full schedule, other patterns, and giveaway information too!
Beyond Halloween
This charming cauldron isn’t just for Halloween. It makes a lovely addition to an equinox or Samhain altar. Instead of stuffing, line the inside with a bit of paper or foil, then fill it with herbs, dried berries or pot pourri. For Samhain, use it to hold small mementos of those you are remembering.
You can also fill your cauldron with small candies, jewelry, or trinkets. For St. Patrick’s Day, try gold beads to turn your cauldron into a pot of gold. With the optional cover, it’s a fun pincushion too!
Watch the Video Tutorial!
Need a little help with the pattern? Follow along step by step with the full video tutorial!

Materials
- Yarn:
- 60 yds worsted weight yarn for cauldron
- 15 yds worsted weight yarn for cover (optional)
- Hook: Size H (5mm) crochet hook or size needed to match gauge
- Notions:
- Scissors
- Tapestry Needle
- Fiberfill, wool roving, or other material to fill the cauldron
- 12-inch pipe cleaner
Project Level
Intermediate: Single crochet worked in the round with increases, decreases, and bobbles. Some tricky construction for the handles, but an easier option is also included.
Size
3.25 inches tall x 3.25 inches wide, not including handles.
Gauge
14 sc x 18 rnds = 4 inches in continuous rnds
Abbreviations used
This pattern uses US terms.
- bo = bobble (see Special Stitches)
- ch = chain
- dec = decrease (see Special Stitches)
- inc = increase (see Special Stitches)
- rnd = round
- sc = single crochet
- sk = skip
- sl st = slip stitch
- sp = space
- st(s) = stich(es)
- yo = yarn over
Special Stitches
Increase (inc): Sc in blo of next st, sc in both loops (like normal) of same st. (See increase tutorial here)
Bobble (bo): [Yo, insert hook in indicated st, yo and pull up a loop, yo and pull through 2 loops on hook] 7 times, yo and pull through all 8 loops on hook. Push bobble to right side of fabric. (See bobble tutorial here)

Decrease (dec): Insert hook into front loop only of both of next 2 stitches, yarn over and draw up a loop, yarn over and draw through both loops on hook. This is an alternative to a single crochet 2-together (sc2tog) stitch. If you prefer, you can use the standard sc2tog instead.
Instructions
Cauldron
Pattern is worked in continuous rounds, do not join or turn unless indicated. Mark first stitch of each round.
Rnd 1 (RS): Ch 2, 6 sc in 2nd ch from hook. (6 sc)
Rnd 2: Inc in each st around. (12 sc)
Rnd 3: [Sc in next st, inc in next st] around. (18 sc)
Rnd 4: [Inc in next st, sc in next st, bo in next st, sc in next st, inc in next st, sc in next st] 3 times. (21 sc, 3 bo)

Rnd 5: [Inc in next st, sc in each of next 3 sts] around. (30 sc)
Rnd 6: Sc in each of next 2 sts, inc in next st, [sc in each of next 4 sts, inc in next st] around to last 2 sts, sc in each of last 2 sts. (36 sc)
Rnds 7-9: Sc in each st around. (36 sc)
Rnd 10: [Dec, sc in each of next 4 sts] around. (30 sts)
Rnd 11: Sc in each st around (30 sts)
For an easier version with separate (sewn on) handles, or for no side handles, scroll down for aternative Rnd 12
Rnd 12: Sc in each of next 4 sts, [ch 4, turn, sl st in 2nd ch from hook, sc in next ch, sl st in next ch, (handle made) sl st in last sc worked before handle.

Turn, keeping the handle on the RS of the work, sc in each of next 2 sts, remove working loop from hook, insert hook from bottom to top through free end of handle, put working loop back on hook and pull through handle].


Sc in each of next 13 sts, repeat between [ ], sc in each of last 9 sts. (30 sc, 2 handles)

Alternative Rnd 12: Sc in each st around. (30 sc)
In rnd 13, skip the handles only. Be sure to work into the 2 sc behind each handle.
Rnd 13: Skipping handles, sc in each st around. (30 sc)
Rnd 14: [Dec, sc in each of next 3 sts] around. (24 sts)
Rnd 15: [Inc, sc in each of next 3 sts] around, join with sl st or invisible join in first st. (30 sts)
Weave in ends.
Separate handles (Optional)
Use this option if you used Alternative Rnd 12 and want to make handles separately and sew them on.
Handle (make 2): Ch 4, sl st in 2nd ch from hook, sc in next ch, sl st in last ch, fasten off, leaving an 8-inch tail for sewing. (1 sc, 2 sl sts)

Use tails to sew handles to opposite sides of cauldron, along rnd 12. Weave in ends.
Cover (Optional)
Use this option if you prefer to have a solid cover over the stuffing.
Rnds 1-3: Repeat rnds 1-3 of Cauldron.
Rnd 4: Sc in next st, [Inc in next st, sc in each of next 2 sts] around to last 2 sts, inc in next st, sc in last st, join with sl st or invisible join in first st. (24 sc)
Fasten off.
Cut a length of yarn the same color as the cauldron for seaming. Attach this yarn to the cauldron by weaving in the end, close to any stitch on rnd 14 (the narrowest rnd at the top).
Stuff cauldron about 2/3 full.
Place cover inside cauldron, on top of stuffing, so that it lines up with rnd 14
Sew cover in place along rnd 14 of cauldron as follows, or using your preferred seaming technique.
For each stitch, sew from top to bottom through the stitch on the cover, bringing the needle back out through the same hole on the cauldron that it came in from.

Then sew a horizontal stitch on the outside of the cauldron, bringing the needle back in through the next stitch on the cauldron without sewing through the cover.

Continue in this manner for all remaining stitches, adding additional stuffing before finishing the seam if needed.
Weave in any remaining ends.

Finishing
Stuffing: If you did not work the optional cover, stuff cauldron generously with stuffing material of your choice. Add beads, sequins, glitter, or other decorations to the stuffing as desired.
Top handle: Stick one end of the pipe cleaner through the side of the cauldron (either from inside to outside or outside to inside, just be consistent) at approximately rnd 14.

Fold about an inch up at the end and twist the end around the remaining pipe cleaner to secure. Repeat with the other end on the opposite side of the cauldron, trimming away any excess pipe cleaner if necessary.

Share this Halloween Cauldron Crochet Pattern on Pinterest!
Here’s an image perfect for pinning.

Rate this Halloween Cauldron Crochet Pattern!
I hope you enjoyed this Halloween cauldron crochet pattern. A downloadable pdf of this pattern is available on Ravelry for a small fee. The fee for the pdf format offsets the advertising revenue lost when you print or download the pattern rather than viewing it online.
Do you want the best of Stitches n Scraps delivered right to your inbox? The Stitches n Scraps email newsletter includes highlights from the blog as well as special features not available elsewhere. Don’t miss a stitch – Subscribe now!

String of Pearls Crochet Table Scarf
Bobble “pearls” dance in intertwining lines over a plain background, forming circles to cradle a centerpiece or other table decorations. The simple, tone-on-tone elegance of the String of Pearls crochet table scarf is perfect for holidays, weddings, or any time your table needs a special touch.

This content is protected by copyright. See this Terms of Use / Copyright page for more information.
This post contains sponsored content and/or affiliate links. If you click an affiliate link and make a purchase, I may get a commission.
King Cole Big Value Recycled Dischloth Cotton
King Cole yarns provided the Big Value Recycled Dishcloth Cotton yarn for this design. A little bit of polyester mixed in makes this softer than other cotton yarns I’ve used. I also love that it’s made with recycled materials.

It comes in 2 colors, white and cream. Both would make an excellent base for dyeing, and both are equally lovely as-is.
Changing Colors
For neat color changes, always switch to the new color in the last “pull through” step of the previous stitch. So if you’re going to change to cream for a bobble, finish the stitch before the bobble with the cream yarn. See this Changing Colors Tutorial for a closer look.
Carrying Colors
Between each bobble row on this crochet table scarf, there are 3 plain rows. You can think of this in terms of 4-row blocks, with one bobble row followed by 3 plain rows.
Carry yarn across for 2 rows
To make cream-colored bobbles on a white background, you will need to use both colors on the bobble rows. Just like for tapestry crochet, make each stitch in one color while carrying/working over the other color so it’s hidden inside the stitch.
In the next row after the bobble row, you don’t need to make any cream-colored stitches, but you will need to get the cream color yarn back across to the other side. Carry the cream yarn through every stitch, in the same way as before.

Carry yarn up for 2 rows
For the next 2 rows, you don’t need to move the cream yarn across the row at all. Instead, carry it up the side edge, so it’s ready for the next bobble row.
Carrying the yarn in 2 rows and then not carrying it in the other 2 rows creates a very subtle, striped effect behind the bobbles.
If you prefer, you can carry the unused yarn across every row. This will use almost twice as much of the cream yarn and will make your fabric thicker.
Dye Your Crochet Table Scarf!
If cream-on-white isn’t your thing, you can dye it! The two shades should take dye slightly differently, so you will still get the tone-on-tone look. You can dye the yarn before you start, or dye the crochet table scarf when it’s finished. Just be sure to test it on a small swatch first!
Here are a few yarn dyeing tutorials you might enjoy:
- How to Dye Cotton Yarn Beautifully from Nicki’s Homemade Crafts
- How to Hand Dye Yarn at Home from Dora Does
- Adventures in Yarn Dyeing from Jessie at Home
- How to Dye Yarn with Avocado Skins from Thoresby Cottage
Materials
- Yarn: King Cole Big Value Recycled Dishcloth Cotton – 85% cotton / 15% polyester, worsted weight yarn (175 yds / 100g per skein)
- 410 yds #5061 white
- 175 yds #5060 cream
- Hook: US size H (5 mm) hook or size needed to match gauge
- Notions:
- Scissors
- Yarn needle
Project Level
Intermediate: Bobbles, working with 2 colors, working in sides of rows.
Size
11″ x 45″ not including fringe
Gauge
15 sc x 16 rows = 4 inches.
Use pattern as gauge swatch: After row 16, work should measure 8.75″ wide x 4″ tall.
Abbreviations used
(Pattern is written in US terms)
ch = chain
hdc = half double crochet
RS = right side(s)
sc = single crochet
sc2tog = single crochet 2 stitches together
sk = skip
sl st = slip stitch
sp = space
st(s) = stitch(es)
WS = wrong side(s)
yo = yarn over
Special Stitch
Bobble (bo): With cream yarn, [yo, insert hook in indicated st and pull up a loop, yo and pull through 2 loops on hook] 5 times, yo and pull through all 6 loops on hook. Ch-1 to close.

When working into a bobble, work into the ch-1.
Instructions
Color Management:
Work bobbles in cream. Work all other stitches in white.
Change colors as indicated in the last “pull through” step of the previous stitch.

On bobble rows and the row immediately after a bobble row, carry/work over the unused color in each st so that it is hidden in the st.

On the remaining rows, work only with white and carry the cream yarn up the side edge.
Section 1
(Scroll down for chart)
Angled Portion:
With white, ch 2.
Row 1 (WS): (Hdc, sc, hdc) in 2nd ch from hook. (3 sts)
Your total stitch count will increase by 2 sts on each row through row 19.
Rows 2-4: Ch 1, turn, (hdc, sc) in first st, sc in each st across to last st, (sc, hdc) in last st. (9 sts)
Begin carrying/working over cream yarn in row 5.
Row 5: Working over unused color in every st, ch 1, turn, (hdc, sc) in first st, sc in each of next 3 sts, bo in next st, sc in each of next 3 sts, (sc, hdc) in last st. (2 hdc, 8 sc, 1 bo)
Row 6: Working over cream yarn in every st, ch 1, turn, (hdc, sc) in first st, sc in each st across to last st, (sc, hdc) in last st. (13 sts)
Rows 7-8: Carrying cream yarn up sides of rows and working only with white yarn, ch 1, turn, (hdc, sc) in first st, sc in each st across to last st, (sc, hdc) in last st. (17 sts)
Row 9: Working over unused color in every st, ch 1, turn, (hdc, sc) in first st, sc in each of next 3 sts, [bo in next st, sc in each of next 3 sts] 3 times, (sc, hdc) in last st. (2 hdc, 14 sc, 3 bo)
Rows 10-12: Repeat rows 6-8. (25 sts)
Row 13: Working over unused color in every st, ch 1, turn, (hdc, sc) in first st, sc in each of next 3 sts, [bo in next st, sc in each of next 5 sts, bo in next st, sc in each of next 3 sts] twice, (sc, hdc) in last st. (2 hdc, 21 sc, 4 bo)
Rows 14-16: Repeat rows 6-8. (33 sts)
Row 17: Working over unused color in every st, ch 1, turn, (hdc, sc) in first st, sc in each of next 3 sts, bo in next st, sc in each of next 5 sts, bo in next st, sc in each of next 11 sts, bo in next st, sc in each of next 5 sts, bo in next st, sc in each of next 3 sts, (sc, hdc) in last st. (2 hdc, 29 sc, 4 bo)
Rows 18-19: Repeat rows 6-7. (39 sts)

Straight portion
The overall stitch count will now remain the same until the end of section 5.
Row 20: Carrying cream yarn up sides of rows and working only with white yarn, ch 1, turn, sc in each st across.
Row 21: Working over unused color in every st, ch 1, turn, sc in each of first 5 sts, bo in next st, sc in each of next 5 sts, bo in next st, sc in each of next 15 sts, [bo in next st, sc in each of next 5 sts] twice. (35 sc, 4 bo)
Row 22: Working over cream yarn in every st, ch 1, turn, sc in each st across.
Rows 23-24: Carrying cream yarn up sides of rows and working only with white yarn, ch 1, turn, sc in each st across.
Rows 25-32: Repeat rows 21-24 twice.
Row 33: Working over unused color in every st, ch 1, turn, sc in each of first 7 sts, bo in next st, sc in each of next 5 sts, bo in next st, sc in each of next 11 sts, bo in next st, sc in each of next 5 sts, bo in next st, sc in each of last 7 sts. (35 sc, 4 bo)
Rows 34-36: Repeat rows 22-24.
Row 37: Working over unused color in every st, ch 1, turn, sc in each of first 11 sts, bo in next st, sc in each of next 5 sts, bo in next st, sc in each of next 3 sts, bo in next st, sc in each of next 5 sts, bo in next st, sc in each of last 11 sts. (35 sc, 4 bo)
Rows 38-40: Repeat rows 22-24.
Row 41: Working over unused color in every st, ch 1, turn, sc in each of first 15 sts, [bo in next st, sc in each of next 3 sts] twice, bo in next st, sc in each of last 15 sts. (36 sc, 3 bo)
Section 2:
(Scroll down for chart)
Rows 42-44: Repeat rows 22-24.
Row 45: Repeat row 37.
Rows 46-48: Repeat rows 22-24.
Row 49: Repeat row 33.
Rows 50-52: Repeat rows 22-24.
Rows 53-64: Repeat rows 21-24 three times.
Rows 65-73: Repeat rows 33-41.

Section 3:
(Scroll down for chart)
Rows 74-84: Repeat rows 42-52.
Row 85: Working over unused color in every st, ch 1, turn, sc in each of first 5 sts, bo in next st, sc in each of next 3 sts, bo in next st, sc in each of next 19 sts, bo in next st, sc in each of next 3 sts, bo in next st, sc in each of last 5 sts. (35 sc, 4 bo)
Rows 86-88: Repeat rows 21-24 three times.
Rows 89-96: Repeat rows 85-88 twice.
Rows 97-105: Repeat rows 33-41.

Section 4:
Use same chart as Section 2.
Rows 106-137: Repeat rows 42-73. (Section 2)
Section 5:
(Scroll down for chart)
Straight Portion:
Rows 138-145: Repeat rows 42-49.
Rows 146-148: Repeat rows 22-24.
Row 149: Repeat row 21.
Rows 150-157: Repeat rows 146-149 twice.
Row 158: Working over cream yarn in every st, ch 1, turn, sc in each st across.

Angled Portion
Total stitch count will now decrease by 2 sts in every row.
Rows 159-160: Carrying cream yarn up sides of rows and working only with white yarn, ch 1, turn, sc2tog in first 2 sts, sc in each st across to last 2 sts, sc2tog in last 2 sts. (37 sts)
Row 161: Working over unused color in every st, ch 1, turn, sc2tog in first 2 sts, sc in each of next 3 sts, bo in next st, sc in each of next 5 sts, bo in next st, sc in each of next 11 sts, bo in next st, sc in each of next 5 sts, bo in next st, sc in each of next 3 sts, sc2tog in last st. (2 sc2tog, 29 sc, 4 bo)
Row 162: Working over cream yarn in every st, ch 1, turn, sc2tog in first 2 sts, sc in each st across to last 2 sts, sc2tog in last 2 sts. (33 sts)
Rows 163-164: Repeat rows 159-160. (29 sts)
Row 165: Working over unused color in every st, ch 1, turn, sc2tog in first 2 sts, sc in each of next 3 sts, [bo in next st, sc in each of next 5 sts, bo in next st, sc in each of next 3 sts] twice, sc2tog in last 2 sts. (2 sc2tog, 21 sc, 4 bo)
Row 166: Repeat row 162. (25 sts)
Rows 167-168: Repeat rows 159-160. (21 sts)
Row 169: Working over unused color in every st, ch 1, turn, sc2tog in first 2 sts, sc in each of next 3 sts, [bo in next st, sc in each of next 3 sts] 3 times, sc2tog in last 2 sts. (2 sc2tog, 14 sc, 3 bo)
Row 170: Repeat row 162. (17 sts)
Rows 171-172: Repeat rows 159-160. (13 sts)
Row 173: Working over unused color in every st, ch 1, turn, sc2tog in first 2 sts, sc in each of next 3 sts, bo in next st, sc in each of next 3 sts, sc2tog in last 2 sts. (2 sc2tog, 6 sc, 1 bo)
Fasten off cream. Continue with white only.
Rows 174-176: Ch 1, turn, sc2tog in first 2 sts, sc in each st across to last 2 sts, sc2tog in last 2 sts. (3 sts)
Row 177: Ch 1, turn, sk first st, sc2tog in last 2 sts. (1 st)
Do not fasten off.
Edging:
With white, and continuing from section 5:
Ch 1, turn, working in sides of rows, sc in each row across angled edge to corner, ch 1, sc in each row along straight edge to next corner, ch 1, sc in each row along angled edge to point, ch 3, sc in each row across angled edge to next corner, ch 1, sc in each row along straight edge to next corner, ch 1, sc in each row along angled edge to starting point, ch 3, join with sl st to first st. (354 sc, 1 ch-3 sp)

Fasten off. Weave in all ends.
Fringe:
Cut 16 10-inch pieces of yarn.
Hold 8 pieces together and fold them in half to form a loop, matching the cut ends.
Locate the ch-3 sp at either point of the table scarf. Using your crochet hook, pull the loop about halfway through the ch-3 sp, from RS to WS.

Pull the tails of the fringe through the loop, so that they wrap over the chains of the ch-3 sp, then pull the ends to tighten the knot.

Attach the remaining 8 strands of yarn to the opposite point of the table scarf in the same manner.
Trim the fringe evenly to the same length on both points.

Share this crochet table scarf pattern on Pinterest!
Here’s an image perfect for pinning.

Rate this Crochet Table Scarf Pattern!
I hope you enjoyed this crochet table scarf pattern.
A downloadable pdf of this pattern is available on Ravelry for a small fee. The fee for the pdf format is to offset the advertising revenue lost when you print or download the pattern rather than viewing it online.
Do you want the best of Stitches n Scraps delivered right to your inbox? Don’t miss a stitch – Subscribe now!


