Free Crochet Patterns – Pets
Find the perfect, free crochet pattern for your next project! Browse them all, or select a category from the dropdown menu. Where will your creativity take you today?

Holiday Dog Bandana Crochet Pattern
Even the pickiest of pups will be ready to party in this sparkly, holiday dog bandana! Slide it onto a collar for easy wear. With 6 sizes to choose from, find the perfect fit for all your furry friends.

This content is protected by copyright. See this Terms of Use / Copyright page for more information.
This post contains sponsored content and/or affiliate links. If you click an affiliate link and make a purchase, I may get a commission.
Christmas in July Make Along
The Holiday Sparkle Dog Bandana is my pattern for the 2023 Christmas in July Make Along hosted by Underground Crafter. Check out the full schedule of crochet, knitting, and even sewing patterns in the main MAL post. While you’re there, be sure to scroll down and enter the giveaway too!
Donate to Shelters and Rescues
Shelter dogs deserve some sparkle too. Consider donating a few of these quick and easy bandanas to a shelter or rescue near you! Cute accessories like these bandanas make fantastic photos, which help these dogs find their forever homes.
King Cole Glitz DK Yarn
When I closed my yarn store, I had some of this lovely, King Cole Glitz DK yarn left over. It’s a super soft, acrylic yarn with a sparkly thread running through it. The vibrant, jewel-tone colors make it a great choice for all sorts of holiday projects.

I used the colors 3504 Flame, 3499 Sapphire and 3307 Christmas Green as the main colors, with 483 Diamond White as the contrasting accent color.
Choose a Size by the Collar
To choose the right size for your dog, measure the length of their collar. The bandana needs to be at least 3 inches shorter than the collar in order to fit nicely without bunching up.

If your dog’s collar is wider than the pattern for your chosen size, don’t worry! The casing is just a flat rectangle folded in half. You can make it as wide as you need it to be by adding extra rows.
See the Video Tutorial
Grab your pattern and follow along with the Holiday Sparkle Dog Bandana Video Tutorial! It walks you step by step through making the bandana, plus choosing a size and reading the chart.
Materials
- Yarn: King Cole Glitz DK – DK weight acrylic/polyester yarn (317 yds / 100 g per skein);
- 25 [35, 70, 90, 150, 225] yds Main Color (MC)
- 10 [20, 25, 35, 40, 50] yds Contrasting Color (CC)
- Hook: Size H (5mm) crochet hook or size needed to match gauge
- Notions: Tapestry Needle
Project Level
Easy: Puff stitches, front post puff stitches, working evenly across sides of rows.
Sizes
XS [S, M, L, XL, XXL]
All measurements are shown in inches
| Size | Min Collar Length | Bandana Length | Max Collar Width | Casing Width |
|---|---|---|---|---|
| XS | 8 | 5 | 0.5 | 1.25 |
| S | 10.5 | 7.5 | 0.5 | 1.25 |
| M | 12 | 9 | 0.75 | 1.5 |
| L | 15 | 12 | 0.75 | 1.5 |
| XL | 18.5 | 15.5 | 1 | 1.75 |
| XXL | 21 | 18 | 1 | 1.75 |
You can easily adjust the casing width to fit any width of collar. In the picture, Diamond is wearing size L.

Gauge
18 sc x 20 rows = 4 inches
Use pattern as gauge swatch – after row 6, work should measure 2.5 inches wide across the top x 1.5 inches tall at the center point.
Abbreviations used
This pattern uses US terms.
- ch = chain
- fp puff = front post puff stitch (see Special Stitches)
- puff = puff stitch (see Special Stitches)
- RS = right side
- sc = single crochet
- sk = skip
- sp = space
- st(s) = stich(es)
- WS = wrong side
- yo = yarn over
Special Stitches
Puff Stitch (puff):
[Yo, insert hook in indicated ch-2 sp and pull up a loop] twice, yo and pull through all 5 loops on hook.

Front Post Puff Stitch (fp puff):
[Yo, insert hook from front to back to front again around indicated st and pull up a loop] twice, yo and pull through all 5 loops on hook.


Fp puff counts as a puff in stitch counts at end of row.
Instructions
Triangle
Scroll down for chart of this section.
With MC, ch 2
Row 1 (WS): (Sc, ch 2, sc) in 2nd ch from hook. (2 sc, 1 ch-2 sp)
Row 2: Ch 1, turn, sc in first st, ch 1, (sc, ch 2, sc) in ch-2 sp, ch 1, sc in last st. (4 sc, 2 ch-1 sps, 1 ch-2 sp)
Row 3: Ch 1, turn, sc in first st, ch 1, [sc in next ch-1 sp, ch 1, sk next sc] across to ch-2 sp, (sc, ch 2, sc) in ch-2 sp, [ch 1, sk next sc, sc in next ch-1 sp] across to last st, ch 1, sc in last st. (6 sc, 4 ch-1 sps, 1 ch-2 sp)
Repeat row 3 3 [3, 7, 15, 23, 29] times more. Change to CC at end of last row. (12 [12, 20, 36, 52, 64] sc, 10 [10, 18, 34, 50, 62] ch-1 sps, 1 ch-2 sp)

Sizes [S, M, L, XL, XXL] only:
With CC, repeat row 3 twice, change to MC at end of last row. ([16, 24, 40, 56, 68] sc, [14, 22, 38, 54, 66] ch-1 sps, 1 ch-2 sp)
With MC, repeat row 3 4 times, change to CC at end of last row. ([24, 32, 48, 64, 76] sc, [22, 30, 46, 62, 74] ch-1 sps, 1 ch-2 sp)
All Sizes
With CC, repeat row 3 twice, change to MC at end of last row. (16 [28, 36, 52, 68, 80] sc, 14 [26, 34, 50, 66, 78] ch-1 sps, 1 ch-2 sp)
With MC, repeat row 3 twice, change to CC at end of last row. (20 [32, 40, 56, 72, 84] sc, 18 [30, 38, 54, 70, 82] ch-1 sps, 1 ch-2 sp)
With CC, repeat row 3 once, do not change colors. (22 [34, 42, 58, 74, 86] sc, 20 [32, 40, 56, 72, 84] ch-1 sps, 1 ch-2 sp)
Edging Row (RS): Sk first st, sl st in first ch-1 sp, fp puff around next st, [ch 1, sk next ch-1 sp, fp puff around next st] across to ch-2 sp, ch 1, puff in ch-2 sp, ch 1, fp puff around next st, [ch 1, sk next ch-1 sp, fp puff around next st] across to last ch-1 sp, sl st in last ch-1 sp, leave last st unworked, change to MC, fasten off CC. (21 [33, 41, 57, 73, 85] puffs, 20 [32, 40, 56, 72, 84] ch-1 sps)

Casing
Row 1 (RS): Do not turn. With MC and working in sides of rows, 23 [34, 41, 55, 70, 82] sc evenly spaced across top of triangle. (23 [34, 41, 55, 70, 82] sc)
Row 2: Ch 1, sc in each st across.
Repeat row 2 11 [11, 13, 13, 16, 16] times more.
To adjust casing size, repeat row 2 until casing measures 2 times the width of your collar + 1.5 inches
Fasten off, leaving a long tail for sewing.

Fold casing in half, with top edge at wrong side of work. Sew top edge of casing to top of triangle with a whipstitch.

Finishing
Weave in all ends.
Wash and block.
Insert collar into casing.
Share this Holiday Sparkle Dog Bandana on Pinterest!
Here’s an image perfect for pinning.

Rate this Holiday Sparkle Dog Bandana!
I hope you enjoyed this holiday dog bandana pattern. A downloadable pdf of this pattern is available on Ravelry for a small fee. The fee for the pdf format is to offset the advertising revenue lost when you print or download the pattern rather than viewing it online.
Do you want the best of Stitches n Scraps delivered right to your inbox? The Stitches n Scraps email newsletter includes highlights from the blog as well as special features not available elsewhere. Don’t miss a stitch – Subscribe now!

Snuggle Square Crochet Pet Blanket
Pamper your pet with a snuggly new blanket! The Snuggle Square crochet pet blanket is a soft, cozy, and sturdy project for your furry friends.

This content is protected by copyright. See this Terms of Use / Copyright page for more information.
This post contains sponsored content and/or affiliate links. If you click an affiliate link and make a purchase, I may get a commission.
Cozy at Home Crochet Along
I designed this crochet pet blanket for the CAL Central Cozy at Home CAL. See the full schedule of patterns and all the event details in the main CAL post. Then join in the fun and share your projects on the CAL Central Crochet Facebook group!
Caron One Pound yarn
Yarnspirations gave me all the Caron One Pound yarn for this crochet pet blanket design. This worsted weight, acrylic yarn is soft, durable, and affordable too. The giant, 1 pound skeins come in a wide range of rich colors to mix and match for your perfect color combination!

The texture of this stitch pattern reminded me of tiny ripples or wavelets, so I went with a gradient of blue and grey shades. I chose 10546 Midnight Blue, 10611 Ocean, 10523 Azure, and 10616 Soft Gray Mix. Which color palette will you choose?
Crochet Crunch Stitch
Crunch stitch is a dense and squishy pattern of alternating half double crochet and slip stitches. That’s what creates the wavy, textured stripes of this crochet pet blanket.
Extended half double crochet
Rows of extended half double crochet (ehdc) separate the crunch stitch stripes. These stitches are half double crochet stitches with an added chain in the middle. They are a little taller and narrower than regular half double crochet, but not quite as tall or narrow as double crochet. For a closer look, see this Extended Half Double Crochet Tutorial.
Not just for pets!
Durable yarn and a solid stitch are a perfect combination for pets! There are no large loops or holes for little paws to get caught on. The soft yarn and squishy texture make it an extra cozy spot for your furry friend.

All these same factors make it great for babies, and for grown-ups too! Make one for yourself or for someone you love (whether or not they have fur).
Materials
- Yarn: Caron One Pound – 100% acrylic, worsted weight yarn (812 yds / 453.6g per skein) – 300 [550, 850] yds each of 4 different colors. Shown in:
- #10546 Midnight Blue (A)
- #10611 Ocean (B)
- #10523 Azure (C)
- #10616 Soft Gray Mix (D)
- Hook: US size I (5.5 mm) hook or size needed to match gauge
- Notions:
- Scissors
- Yarn needle
Project Level
Easy: Extended half double crochet. Working into sides of rows for edging.
Sizes
Small [Medium, Large]
36 [48, 60] inches square.
Gauge
12 ehdc x 8 rows = 4 inches.
Gauge swatch in pattern: Ch 13, work rows 1-11 of pattern as for size Small. Swatch should measure approximately 4 inches square.
Exact gauge is not critical for this pattern but will affect yarn usage.
Abbreviations used
(Pattern is written in US terms)
ch = chain
ehdc = extended half double crochet (see Special Stitch)
hdc = half double crochet
RS = right side
sc = single crochet
sl st = slip stitch
st(s) = stitch(es)
WS = wrong side
Special Stitch
Extended half double crochet (ehdc): Yo, insert hook in indicated st, yo and pull up a loop, yo and pull through 1 loop on hook, yo and pull through all 3 loops on hook.
See this extended half double crochet tutorial for a closer look.
Instructions
(Scroll down for chart for sections 1-4)
Section 1
With A, ch 110 [146, 182] (Multiple of 2)
Row 1 (RS): Ehdc in 3rd ch from hook and in each ch across. (108 [144, 180] ehdc)
Row 2: Ch 1, turn, hdc in first st, sl st in next st, [hdc in next st, sl st in next st] across. (54 [72, 90] hdc, 54 [72, 90] sl sts)
Rows 3-5 [3-7, 3-9]: Ch 1, turn, hdc in first sl st, sl st in next hdc, [hdc in next sl st, sl st in next hdc] across.
Row 6 [8, 10]: Ch 2, turn, ehdc in each st across. (108 [144, 180] ehdc)
Rows 7-26 [9-36, 11-46]: Repeat rows 2-6 [2-8, 2-10] 4 times more.
Change to B; fasten off A.
Section 2
Row 1 (RS): Ch 2, turn, ehdc in each st across. (108 [144, 180] ehdc)
Rows 7-26 [9-36, 11-46]: Work as for Section 1.
Change to C; fasten off B.
Section 3
With C, repeat section 2 up to color change.
Change to D; fasten off C.
Section 4
With D, repeat section 2 up to color change.
Do not fasten off.
Edging Round (RS)
- Ch 1, turn, 2 sc in first st, sc in each st across to last st, 2 sc in last st. (110 [146, 182] sc)
- Working in sides of rows, work 27 [36, 45] sc evenly spaced across each section, changing colors to match each section. (108 [144, 180] sc)
- Working across bottom of row 1, 2 sc in first st, sc in each st across to last st, 2 sc in last st. (110 [146, 182] sc)
- Working in sides of rows, work 27 [36, 45] sc evenly spaced across each section, changing colors to match each section. (108 [144, 180] sc)
- Join with sl st to first st of edging round. (436 [580, 724] sc total)
Fasten off.
Weave in all ends.
Share this crochet pet blanket on Pinterest!
Here’s an image perfect for pinning.

Rate this crochet pet blanket pattern!
I hope you enjoyed this crochet pet blanket pattern. A downloadable pdf of this pattern is available on Ravelry for a small fee. The fee for the pdf format is to offset the advertising revenue lost when you print or download the pattern rather than viewing it online.
Do you want the best of Stitches n Scraps delivered right to your inbox? Don’t miss a stitch – Subscribe now!

Dog Snood Crochet Pattern – Little Red Doggie Snood
My, what cute ears they have! Protect your dog’s sensitive ears from cold and wind, or just keep them out of the water bowl, with a little red doggie snood. This dog snood crochet pattern works up quickly and comes in 5 stretchy sizes.

This content is protected by copyright. See this Terms of Use / Copyright page for more information.
This post contains sponsored content and/or affiliate links. If you click an affiliate link and make a purchase, I may get a commission.
Christmas in July Make Along
This pattern is my first contribution to this year’s Christmas in July Make Along, hosted by Underground Crafter. Be sure to check out all the great patterns, and enter to win the giveaway too!

Earlier this month, I designed a knitting pattern for this same make-along. Make the Date Night Clutch for your next night out!

Mighty Miss Millie
I adopted Millie from a local rescue in February of 2020. It was just a few weeks before we went into lockdown for the pandemic. She’s sweet, sassy, funny, mischievous, and I can’t remember how I ever lived without her.
You can follow all her antics on her Instagram account, @MightyMissMillie
Materials
- Yarn: 55 [80, 125, 190, 270] yds worsted weight yarn.
- Hook: Size I / 5.5 mm hook or size needed to match gauge
- Notions: Yarn Needle
Project Level
Easy: Single crochet, working in back loop only, increases and decreases, 1 seam.
Sizes
Teeny, [Precious, Cuddly, Fluffly, Sooper Floof]. Instructions are shown for Teeny size, with other sizes listed in [ ]
Measure the vertical head circumference under the chin and around the head, in front of the ears. Choose the size that best matches this measurement.

| Size | To fit head circumference: |
|---|---|
| Teeny | 8-10 inches |
| Precious | 10-13 inches |
| Cuddly | 13-17 inches |
| Fluffy | 17-22 inches |
| Sooper Floof | 22-27 inches |
Gauge
14 sc x 14 rows = 4 inches
Abbreviations used
blo = back loop only
ch = chain
RS = right side
sc = single crochet
sc2tog = single crochet 2 together
st(s) = stich(es)
Instructions
Section 1 (double increases)
Chain 21 [25, 29, 33, 37]
Row 1 (RS): Sc in 2nd ch from hook and in each ch across. (20 [24, 28, 32, 36] sts)
Row 2: Ch 1, turn, sc in blo of first 6 [6, 6, 8, 8] sts, sc in each st across to last 6 [6, 6, 8, 8] sts, sc in blo of last 6 [6, 6, 8, 8] sts.
Row 3: Ch 1, turn, sc in blo of first 6 [6, 6, 8, 8] sts, sc in next 4 [6, 8, 10, 12] sts, 2 sc in each of next 2 sts, sc in each st across to last 6 [6, 6, 8, 8] sts, sc in blo of last 6 [6, 6, 8, 8] sts. (22 [26, 30, 34, 38] sts)
Repeat rows 2-3 3 [5, 7, 9, 11] times more, then repeat row 2 once more. (28 [36, 44, 52, 60] sts)
Section 2 (single increases)
Row 1 (RS): Ch 1, turn, sc in blo of first 6 [6, 6, 8, 8] sts, sc in next 4 [6, 8, 10, 12] sts, 2 sc in next st, sc in each st across to last 6 [6, 6, 8, 8] sts, sc in blo of last 6 [6, 6, 8, 8] sts. (29 [37, 45, 53, 61] sts)
Row 2: Ch 1, turn, sc in blo of first 6 [6, 6, 8, 8] sts, sc in each st across to last 6 [6, 6, 8, 8] sts, sc in blo of last 6 [6, 6, 8, 8] sts.
Repeat rows 1-2 1 [1, 2, 4, 6] times more. (30 [38, 47, 57, 67] sts)

Section 3 (single decreases)
Row 1 (RS): Ch 1, turn, sc in blo of first 6 [6, 6, 8, 8] sts, sc in next 4 [6, 8, 10, 12] sts, sc2tog, sc in each st across to last 6 [6, 6, 8, 8] sts, sc in blo of last 6 [6, 6, 8, 8] sts. (29 [37, 46, 56, 66] sts)
Row 2: Ch 1, turn, sc in blo of first 6 [6, 6, 8, 8] sts, sc in each st across to last 6 [6, 6, 8, 8] sts, sc in blo of last 6 [6, 6, 8, 8] sts.
Repeat rows 1-2 1 [1, 2, 4, 6] times more. (28 [36, 44, 52, 60] sts)
Section 4 (double decreases)
Row 1 (RS): Ch 1, turn, sc in blo of first 6 [6, 6, 8, 8] sts, sc in next 4 [6, 8, 10, 12] sts, sc2tog twice, sc in each st across to last 6 [6, 6, 8, 8] sts, sc in blo of last 6 [6, 6, 8, 8] sts. (26 [34, 42, 50, 58] sts)
Row 2: Ch 1, turn, sc in blo of first 6 [6, 6, 8, 8] sts, sc in each st across to last 6 [6, 6, 8, 8] sts, sc in blo of last 6 [6, 6, 8, 8] sts.
Repeat rows 1-2 3 [5, 7, 9, 11] times more, then repeat row 2 twice more. (20 [24, 28, 32, 36] sts)
Finishing
Fasten off, leaving a long tail for sewing.
Fold work in half, with right sides facing so that last row of section 4 lines up with first row of section 1. Using tail, sew first and last rows together.
Weave in all ends

The shorter side of your snood is meant to be the front. However, if your dog has a longer head, it can be worn the other way too.

I hope you enjoyed this dog snood crochet pattern. A downloadable pdf of this pattern is available on Ravelry for a small fee. The fee for the pdf format is to offset the advertising revenue lost when you print or download the pattern rather than viewing it online.
Do you want the best of Stitches n Scraps delivered right to your inbox? The Stitches n Scraps email newsletter includes highlights from the blog as well as special features not available elsewhere. Don’t miss a stitch – Subscribe now!

Crochet Dog Bed with Fairfield Project Foam
This post contains sponsored content and/or affiliate links. If you click an affiliate link and make a purchase, I may get a commission.
Give your dog a cozy, supportive place to sleep! This crochet dog bed has 5 inches of foam inside and a soft, fur top. It’s the ultimate in comfort for your fur baby. The cover is removable, to make cleaning easier!

This content is protected by copyright. See this Terms of Use / Copyright page for more information.
Fairfield Project Foam
I asked the folks at Fairfield for some of their 5 inch project foam for my pet stairs design. They’re so generous, that they sent me 2 pieces of foam, plus a roll of Poly-Fil Cushion Wrap and a whole bunch of other goodies too!
The project foam is soft enough that I can squish it by pressing hard on it. But it’s also firm enough that it doesn’t compress when my dog, Millie walks on it. I know she thinks it’s comfy because she sometimes just lays on the stairs instead of climbing up into the bed!

For the bed I decided to add a layer of the cushion wrap. This helps to fill out the cover, and adds a luxurious, pillowy feel to the top.

Red Heart Yarns
Red Heart provided the yarn for the removable, crochet cover on this pet bed. The sides and bottom are made with With Love, while the top is made with Hygge Fur. The snuggly fur is warm and can be calming for dogs. The label says it’s machine washable, but I will likely hand wash this cover just to make sure it lasts longer.

Gluing Batting to Foam
Foam is tricky to glue because it’s a porous surface. Most glues tend to sink in rather than stick to the top. Spray glue is generally the best bet. There are several on the market specifically made for furniture foam and upholstery projects. Some of the stronger multi-purpose spray glues will do the job as well.
On the pet stairs, I used some Elmer’s Craft Bond Spray Adhesive that I got in a goodie bag at a conference. That bottle was nearly empty, so I bought some 3M Super 77 to finish the job.
I found the two adhesives pretty comparable, though I didn’t need quite as much of the 3M Super 77. I think they both work well, but would likely choose the 3M glue if I had to pick.
Materials
- Yarn:
- Red Heart With Love Yarn 800 yds #1801 Navy (3 skeins)
- Red Heart Hygge Fur Yarn 1000 yds Soft Taupe (4 skeins)
- Hook: Size K / 6.5 mm crochet hook or size needed to match gauge.
- Notions:
- Fairfield 5″ Project Foam (24 x 36 x 5 inches)
- Fairfield Poly-Fil Cushion Wrap (30 inches x 10 ft)
- Spray Glue for foam
- Yarn Needle
- 5 stitch markers
Project Level
Intermediate: Some post stitches, working with fur yarn, join as you go.
Size
24 inches wide x 36 inches long x 5 inches tall.
Gauge
10 dc x 6.5 rows = 4 inches.
Abbreviations used
(Pattern is written in US terms)
ch = chain
sc = single crochet
dc = double crochet
bpdc = back post double crochet
st(s) = stitch(es)
sl st = slip stitch
sk = skip
rnd = round
Recommended Resources
Instructions
Wrap the Foam
Do this outdoors or in a well ventilated location. Follow any safety guidelines per your glue bottle.
Lay the Cushion Wrap down, and place the Project foam on top of it, so that there’s a 2-3 inch overlap on the front and sides. Wrap the Cushion Wrap up and over the foam as shown. It should now go around the top, bottom, and back side.

Trim the front so there is a 2-3 inch overlap.

Fold back the cushion wrap and spray the top of the foam with adhesive, then slowly replace the wrap, stretching it into place. Turn the cushion over and do the same on the back side and the bottom.

Now fold the side edges down and glue them into place as well. Trim away any overlap, particularly in the corners. It’s ok if there are some gaps here, but do not let the wrap overlap.

Set fully wrapped foam aside to dry while you make the cover. Allow it to dry for at least the full time shown on your glue label before trying to insert it into the cover.

Bottom
Long piece:
With A, Ch 62
Ch 3 at the beginning of a row counts as a dc throughout.
Row 1 (WS): Dc in 4th ch from hook and in each ch across. (60 dc)
Row 2: Ch 3, turn, dc in next st and in each st across. (60 dc)
Place markers at the beginning and end of row 2.
Rows 3-55: Repeat row 2.
Fasten off.
Short Piece:
With A, Ch 62
Rows 1-9: Work as for rows 1-9 of long piece, including placing the markers. Do not fasten off. Secure working loop with a stitch marker or scrap of yarn and remove hook.
Join Bottom:
With right sides up, place short piece on top of long piece so that the bottom edges of each piece line up with the markers on the other piece. They should overlap by 7 rows.

Sew the two pieces together where they overlap, along the side edges only. This creates an open flap across the back, which will be used later to insert the foam.

Sides:
Rnd 1 (RS): Place working loop back onto hook. Continuing from back,
- Ch 1, turn, bpdc around each st across (60 bpdc)
- Working in sides of rows, 90 dc evenly spaced across to corner. (90 dc)
- Working around sts of row 1, bpdc around each st across. (60 bpdc)
- Working in sides of rows, 90 dc evenly spaced across to corner, join with sl st to first st of round. (90 dc)
Rnds 2-8: Ch 3, turn, dc in next st and each st around, join with sl st to first st, changing to 2 strands of B held together. Fasten off A. Do not turn. (300 dc)

Top
Entire top is worked with 2 strands of B held together, for added fullness. Row 1 should be worked across a short edge (60 sts).
Instead of chaining to start each new row, you will work slip stitches into the stitches from the side rounds. These slip stitches act as turning chains, while also joining the top to the sides. These slip stitches are not included in the stitch counts at the ends of the rows.
With 2 strands of B held together,

Row 1 (RS): Sl st in next st, turn, sk sl st, (2 sc in next st, ch 1, sk next st) 30 times, sl st in next 2 sts. (60 sc, 20 ch-1 sps)

Rows 2-89: Turn, (2 sc in next ch-1 sp, ch 1, sk next 2 sc) across, sl st in next 2 unworked sts on side. (60 sc, 20 ch-1 sps)

Row 90: Turn, (2 sc in next ch-1 sp, ch 1, sk next 2 sc) across, sl st in next unworked st on side, changing to A, Fasten off B. (60 sc, 20 ch-1 sps)
There should now be 60 unworked sts left from rnd 8 of side.
Row 91: With A, ch 1, turn, 2 sc in first ch-1 sp, sk next 2 sc, (2 sc in next ch-1 sp, sk next 2 sc) across to last ch-1 sp, sc in last ch-1 sp, sk next st, sc in last st, fasten off leaving a 36 inch tail for sewing. (60 sc)
Joining Top
With tail, sew row 91 of top to remaining unworked sts of side.
Finishing:
- Weave in all ends.
- Insert wrapped foam into cover through back opening. I’ve found this is easiest to do like you would put on a stocking – crumple the cover up so you’re only dealing with the last few inches, insert the bottom of the foam, and then shimmy the cover up over the top. Finally, fold the top flap down over the edge.

The flap should be enough to keep the cover closed on its own, and you don’t want buttons or a zipper rubbing against the floor. If you want to hold it firmly shut, you can sew in an optional tie closure. This rough seam is tied closed with a bow so it can easily be removed when needed.
- Optional tie closure: Cut a 30 inch piece of A. Sew it through both layers across the middle of the opening, in a very large running stitch. Go over at least 3 to 4 stitches at a time so it’s easy to pull out later. Pull this yarn until the ends are roughly even. Then, sew each end back in towards the middle in a similar running stitch. When they meet at the middle, tie a bow.

To remove cover for cleaning, undo tie and slide foam out from opening.

Rate this Crochet Dog Bed Pattern!
I hope you enjoyed this crochet dog bed pattern. A downloadable pdf of this pattern is available on Ravelry for a small fee. The fee for the pdf format is to offset the advertising revenue lost when you print or download the pattern rather than viewing it online.
Do you want the best of Stitches n Scraps delivered right to your inbox? The Stitches n Scraps email newsletter includes highlights from the blog as well as special features not available elsewhere. Don’t miss a stitch – Subscribe now!

How to Crochet Pet Stairs with Fairfield Project Foam
This post contains sponsored content and/or affiliate links. If you click an affiliate link and make a purchase, I may get a commission.
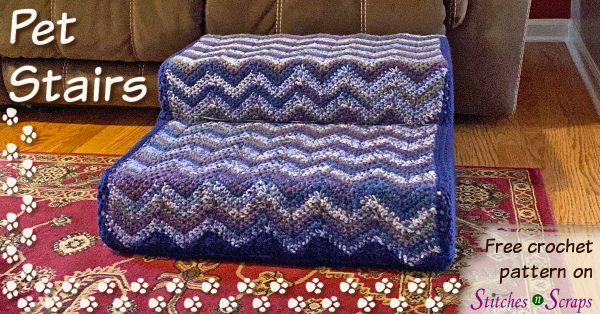
Sometimes our smaller fur babies need a little help to reach high places. Give them a boost with these crochet pet stairs! The sturdy foam insert makes the stairs a comfy place to rest too.

This content is protected by copyright. See this Terms of Use / Copyright page for more information.
Fairfield Project Foam
I asked the folks at Fairfield to provide some of their 5 inch project foam for this stair design. They’re so generous, that they sent me 2 pieces of foam, plus a roll of batting, and a whole bunch of other goodies too!
The project foam is exactly the consistency I had hoped for. It’s soft enough that I can squish it by pressing hard on it. But it’s also firm enough that it doesn’t compress when Millie walks on it.
For Small Pets Only
My Millie is about 23 lbs. (Check her out on Instagram!) So far, these stairs are holding up well to her weight, without a lot of give.

Since the filling is foam and not a rigid material like wood, it may compress more under a heavier animal. Anything above 25 lbs may be a bit too much for these stairs.
Crochet Pet Stairs and Chair Too!
These stairs were intended to help Millie climb up to her favorite perch where she can look out the window. She learned to use them right away and scrambles up and down them with ease. But sometimes, I find her just relaxing on the stairs themselves!

It turns out the stairs double as a firm but comfy chair. She loves to sit on the bottom step and rest her head on the top. Since Fairfield sent me an extra piece of foam, I plan to make a separate dog bed for her as well.
Red Heart With Love Yarn
For the removable, crochet cover on these pet stairs, Red Heart provided some With Love yarn. The yarn is soft enough that Millie enjoys laying on it, but still sturdy enough to hold up to her climbing up and down. It’s also machine washable, which makes it super easy to keep clean!
Clover Rotary Cutter
Clover sent me a free rotary cutter to try out and review, which I will be doing soon. I used it to score the foam for this project prior to cutting it all the way through. I found it really helped me create a smooth, clean cut line. You don’t absolutely need a rotary cutter to do this project. If you have one though, it does help give it a cleaner finish.
Gluing Foam
Foam is tricky to glue together because it’s a porous surface. Most glues tend to sink in rather than stick to the top. Spray glue is generally the best bet. There are several on the market specifically made for furniture foam and upholstery projects. Some of the stronger multi-purpose spray glues will do the job as well.
Elmers Spray Glue
I got a small bottle of Elmer’s Craft Bond Spray Adhesive in a goodie bag at a conference, so I decided to try it. My first attempt failed. The glue seemed to stick at first, and I left it to cure for a full 24 hours. But later, with a little movement, the top piece fell off.
After a bit of research, I tried again with the same glue. This time, I used about 3 times as much. I more or less emptied the rest of the bottle onto the foam. Again I waited 24 hours, and this time the glue held through some moderate tugging!
Millie has been using the stairs pretty frequently for the last few days, and so far everything is still in place.
Trial and Error
Since the cover on these stairs is removable, it’s ok if the glue doesn’t last forever. If it ever starts to come apart, you can just remove the cover and re-apply, or try something else.
My bottle is nearly empty, so I bought a different glue to try on my next foam project. It’s 3M super 77 and is supposed to be a bit stronger. I’m hoping that means I can use a bit less.
Materials
- Yarn: Red Heart With Love Yarn
- 740 yds #1801 Navy (2 skeins)
- 330 yds #1978 Baroque Stripe (about 1.5 skeins)
- Hook: Size K / 6.5 mm crochet hook or size needed to match gauge.
- Notions:
- Fairfield 5″ Project Foam (24 x 36 x 5 inches)
- Marker
- Large knife or cutting tool (a bread knife works well)
- Clover rotary cutter (optional)
- Spray Glue for foam
- 12 stitch markers
- Yarn Needle
Project Level
Intermediate: 3 dimensional project with chevrons and seaming.
Size
24 inches wide x 24 inches deep x 10 inches tall.
Gauge
10 dc x 6.5 rows = 4 inches.
Abbreviations used
(Pattern is written in US terms)
ch = chain
sc = single crochet
hdc = half double crochet
dc = double crochet
tr = treble crochet
sc2tog = single crochet next 2 stitches together (see Special Stitches)
sc3tog = single crochet next 3 stitches together (see Special Stitches)
st(s) = stitch(es)
Recommended Resources
Special Stitches
Single Crochet 2 Together (sc2tog): (Insert hook, yarn over and pull up a loop) in each of next 2 stitches, yarn over and pull through all 3 loops on hook.
Single Crochet 3 Together (sc3tog): (Insert hook, yarn over and pull up a loop) in each of next 3 stitches, yarn over and pull through all 4 loops on hook.
Instructions
Stair Form
Measure
Draw a line 12 inches from one short edge of the project foam, all the way around the top, sides, and bottom of your foam. This line should create a 12 x 24 x 5 inch section, and a 24 x 24 x 5 inch section. Double check your measurements before starting to cut.

Cut
This part will likely make a mess – do it outdoors or where you can easily clean up.
Cut through the foam straight down along the line.

I used a ruler and my rotary cutter from Clover to score a straight line all the way around, and then used a bread knife to finish the cut. Go slowly and be careful to keep your cut straight all the way through. A rotary or band saw may work well for this too, if you have one available.

Glue
Do this outdoors or in a well ventilated location. Follow any safety guidelines per your glue bottle.
Place the smaller section on top of the larger section so that both cut edges are lined up at the back. Make any last minute adjustments to the cut as necessary. Note the surfaces that touch – this is where you will spray the glue.

Using spray glue per the instructions on your bottle, spray the bottom of the smaller piece and place it back on top of the larger piece. Allow to set fully before moving.
Top Back
With A, Ch 62
Row 1: Sc in 2nd ch from hook and in each ch across. (61 sc)
Rows 2-9: Ch 3, turn, dc in next st and in each st across. (61 dc)
Check gauge – work should measure about 24 inches wide x 5.75 inches tall.
Row 10: Ch 1, sc in first st, sc in next st, hdc in next 2 sts, dc in next st, tr in next st, dc in next st, hdc in next 2 sts, sc in next st, (sl st in next st, sc in next st, hdc in next 2 sts, dc in next st, tr in next st, dc in next st, hdc in next 2 sts, sc in next st) across to last st, sc in last st. Change to B, fasten off A. (6 tr points)
Top & Front
In this section, place a marker at each end of rows 11, 37, 48, 74, and 85. These markers fall at the corners of the stairs, for seaming later.

With B,
Row 11: Ch 1, turn, sc2tog, sc in next 3 sts, 3 sc in next st, sc in next 3 sts, (sc3tog, sc in next 3 sts, 3 sc in next st, sc in next 3 sts) across to last 2 sts, sc in last 2 sts. (61 sts)
Rows 12-85 Repeat row 11.
Change to A, fasten off B
Bottom, and Bottom Back
In this section, place a marker at each end of row 123
With A
Row 86: Ch 3 (counts as tr), tr in same st, dc in next st, hdc in next 2 sts, sc3tog, hdc in next 2 sts, dc in next st, (3 tr in next st, dc in next st, hdc in next 2 sts, sc3tog, hdc in next 2 sts, dc in next st) across to last st, 2 tr in last st. (61 sts)
Rows 87-131: Ch 3 (counts as dc), dc in next st and in each st across.
Row 132: Ch 1, sc in each st across. Fasten off.

With A, Ch 62
Row 1: Dc in 4th ch from hook and in each ch across. (60 dc)
Rows 2-8: Ch 3, turn, dc in next st and in each st across. (60 dc)
Row 9: Ch 3, turn, dc in next 29 sts, leaving remaining sts unworked. (30 dc)
Rows 10-16: Ch 3, turn, dc in next st and in each st across. (30 dc). Fasten off.

Assembly:
There is no right or wrong side to the fabric until after it is seamed. I found the seaming easier to do with the fabric in place on the stair form, but it can be done flat as well.
Seaming
- Line up stitch markers with corners of one side piece and pin or clip in place. The back sections should meet at the middle of the back.

- Sew seam all the way around side piece.
- Repeat for other side – do not sew back opening closed.
- Weave in all ends.
- Remove stair form through back opening, and turn cover right side out so that seams are on the inside.

Drawstring and Back Closure
- Insert stair form.
- Cut a piece of B about 80 inches long.
- Starting at one end of the back opening, sew in large running stitches around the side, front and other side, ending at the other end of the back opening.

- Starting from the ends and meeting in the middle, sew opening closed using large whip stitches, like lacing a shoe.
- Pull strings snuggly, tucking in fabric to create a crisp line between the steps.
- Tie ends in a bow at the back and trim if necessary.

To remove cover for cleaning, undo the bow and back seam, then pull out stair form.
Rate this Crochet Pet Stairs Pattern!
I hope you enjoyed this crochet pet stairs pattern. A downloadable pdf of this pattern is available on Ravelry for a small fee. The fee for the pdf format is to offset the advertising revenue lost when you print or download the pattern rather than viewing it online.
Do you want the best of Stitches n Scraps delivered right to your inbox? The Stitches n Scraps email newsletter includes highlights from the blog as well as special features not available elsewhere. Don’t miss a stitch – Subscribe now!


