Find the perfect, free crochet pattern for your next project! Browse them all, or select a category from the dropdown menu. Where will your creativity take you today?
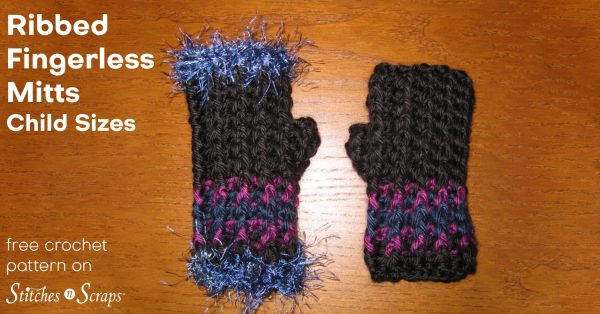
A couple of days ago, I shared with you my Puffy Pinwheel Hat pattern. One Friday evening, I was working on that pattern at my LYS, and my friend Annie said “that looks like a pumpkin!” Well of course she was right (she usually is), and of course I had to make a pumpkin version. How could I not?
Please note this pattern is for the stem, leaves, and vines only. To make the complete hat, you will need the free Puffy Pinwheel Hat pattern as well.
This pattern is protected by copyright. Please do not distribute or share this pattern in any way other than by sharing a link to this page or to the pattern page on Ravelry. Click here for copyright information.
This pattern contains affiliate links (click for more info). If you click one of these links and then make a purchase, I may be compensated. You get the same great prices, and you will be helping to support this site!
Make Puffy Pinwheel Hat pattern, using only orange for all parts except the top button (ignore all color changes).
Make button in brown for the two smaller sizes. For the larger (toddler) size, make the first two rounds of the button in brown, then switch to orange for the third round.
Assemble as normal. For a slightly different look, you can try sewing the sections together with brown instead of with orange. This will create a thin brown line between each section.
Stem:
Rnd 1 [RS]: With brown, work 8 hdc inside a magic circle and pull circle closed. Join with sl st to first st. OR Ch 2, work 8 hdc in 2nd ch from hook, join with sl st to first st. [8 hdc]
Rnd 2: Ch 1, turn, 2 hdc in each st, join with sl st to first st. [16 hdc]
Rnd 3: Ch 1, turn, bphdc in each st around, join with sl st to first st.
Rnd 4: Ch 1, do NOT turn, fphdc in next 2 sts, bphdc in next st, fphdc in next st, bphdc in next st, fphdc in next 2 sts, bphdc in next st, fphdc in next 2 sts, bphdc in next st, fphdc in next 3 sts, bphdc in last st, join with sl st to first st.
Note: The somewhat random front and back post stitches are just there to give the stem texture – it is not important to get them all in the right place. If you were to write an “f” for each front post stitch and a “b” for each back post stitch, rnd 4 would read: f, f, b, f, b, f, f, f, b, f, f, b, f, f, f, b.
Rnd 5: Ch 1, do NOT turn, work a fphdc in each front post stitch and a bphdc in each back post stitch around, join with sl st to first st. Fasten off, leaving a long tail for sewing.
Note: If you want a longer stem, you can repeat Rnd 5 to desired length before fastening off.
Leaves:
Make 3
Row 1 [WS]: With green, work 8 hdc inside a magic circle and pull circle closed. OR Ch 2, work 8 hdc in 2nd ch from hook. Do NOT join. [8 hdc]
Row 2: Ch 1, turn, 3 dc in first st, (dc, sl st, dc) in next st, (2 dc, sl st) in next st, (sc, hdc, dc) in next st, (dc, hdc, sc) in next st, (sl st, 2 dc) in next st, (dc, sl st, dc) in next st, (3 dc, sl st) in last st. Fasten off, leaving a long tail for sewing.
Vines:
Make 2
Row 1: With green, ch 31. Work 2 sc in each stitch across, allowing work to curl as you go. Fasten off, leaving a long tail for sewing.
Finishing:
Stuff stem lightly and sew into place on top of button.
Sew vines and leaves into place as desired.
Sew in any remaining ends.
I hope you enjoy the pattern! Thank you, Annie, for the idea! A downloadable pdf of this pattern is also available in my Craftsy store for a $1 fee. The fee for the pdf format is to offset the advertising revenue lost when you print or download the pattern rather than viewing it online. The pdf includes both the original Puffy Pinwheel Hat, and this pumpkin variation.
If you would like to receive notifications of new posts and patterns as they become available, please follow this blog. You can follow by e-mail (look at the sidebar on the right for the follow by email option), or via RSS feed, or via your WordPress.com reader: Follow Stitches ‘N’ Scraps on WordPress.com
This pattern is protected by copyright. Please do not distribute or share this pattern in any way other than by sharing a link to this page or to the pattern page on Ravelry. Click here for copyright information.
This pattern contains affiliate links (click for more info). If you click one of these links and then make a purchase, I may be compensated. You get the same great prices, and you will be helping to support this site!
Experienced – Made in several pieces with decreases, seaming, working into the back loop only, working in the round, and front post/back post stitches. I’m calling it experienced because of the number of techniques used, but it could be a great learning project for an intermediate level crocheter.
Sizes:
Pattern is written for 0-6 months with changes for 6-12 months and toddler in ( ). Actual hat circumference: 13″ (15″, 17″). Note these are the hat sizes, not the head size – to fit properly, the hat should be 1-2″ smaller around than the head.
Gauge:
15 sc x 18 rows = 4″ square. Each of the 8 hat sections should measure about 4.5 x 1.75″ (5.5″ x 2″, 6.5″ x 2.25″)
Abbreviations used:
ch = chain
sc = single crochet
hdc = half double crochet
fphdc = front post half double crochet
bphdc = back post half double crochet
hdc2tog = half double crochet two stitches together
sl st = slip stitch
st(s) = stitch(es)
sp(s) = space(s)
rnd = round
RS = right side
WS = wrong side
Notes:
If you leave a long tail on each of the blue (color C) hat sections, you can use that tail to sew the sections together.
Progress / tutorial pictures show the toddler size hat. Click any image for a larger view.
Hold 1 section of each color with right sides together as shown below. Line up chain spaces on both pieces.
With C, whipstitch sections together along one side, through wrong side loops only, being sure to whipstitch through the corner ch sp on the bottom of the sections
Join remaining sections in the same manner, alternating colors, until all 8 sections are joined.
Join free edges of first section and last section together in the same manner. Ignore the hole at the top for now.
Ribbing:
Rnd 1 (WS): With WS of hat facing you and working into the bottom edge of the hat, join C with sl st in the 2nd st of any section, *hdc in next 4 (5, 6) sts, hdc2tog in next st and ch sp, hdc2tog in next ch sp and next st, repeat from * 7 times more, join with sl st to first st, changing to B. [48 (56, 64)] sts
Rnd 2: With B, ch 1, turn, hdc in each st around, join with sl st to first st, changing to C.
Rnd 3: With C, ch 1, turn, hdc in front loop only of each st around, join with sl st to first st.
Rnd 4: Ch 1 turn, [fphdc around next st, bphdc around next st] around, join with sl st to first st.
Rnds 5-7 (7, 8): Ch 1, do NOT turn, [fphdc around next st, bphdc around next st] around, join with sl st to first st. Fasten off.
Top “Button”:
Rnd 1 [WS]: With B, work 8 hdc inside a magic circle and pull circle closed. Join with sl st to first st. OR Ch 2, work 8 hdc in 2nd ch from hook, join with sl st to first st. [8 hdc]
Rnd 2: Ch 1, turn, 2 hdc in each st, join with sl st to first st. [16 hdc]
0-6 months & 6-12 months only:
Fasten off leaving a long tail for sewing.
Toddler only:
Rnd 3: Ch 1, turn, (2 hdc in next st, hdc in next st), fasten off leaving a long tail for sewing. [24 hdc]
Finishing:
Sew top “button” in place over the hole at the top of the hat. I like to use a running stitch or back stitch, sewing just under the tops of the crochet stitches along the outer edge of the button, so the seam is not noticeable.
Weave in all ends
I hope you enjoy the pattern! Thank you to Red Heart, for supplying the lovely yarn. A downloadable pdf of this pattern is also available in my Craftsy store for a $1 fee. The fee for the pdf format is to offset the advertising revenue lost when you print or download the pattern rather than viewing it online. The pdf download also includes the pattern for the Li’l Pumpkin variation of this hat!
If you would like to receive notifications of new posts and patterns as they become available, please follow this blog. You can follow by e-mail (look at the sidebar on the right for the follow by email option), or via RSS feed, or via your WordPress.com reader: Follow Stitches ‘N’ Scraps on WordPress.com
Free Pattern – Striped booties
I made these fun, striped booties to match my Dreaming of Pinwheels blanket. They’re made with the same Anne Geddes Baby yarn by Red Heart. I love the colors, and the acrylic / nylon blend means it’s strong and machine washable too. This pattern has instructions for sizes 0-6 months and 6-12 months
This pattern is protected by copyright. Please do not distribute or share this pattern in any way other than by sharing a link to this page or to the pattern page on Ravelry. Click here for copyright information.
This pattern contains affiliate links (click for more info). If you click one of these links and then make a purchase, I may be compensated. You get the same great prices, and you will be helping to support this site!
Rnd 1 (RS): With C, work 7 fsc, 2 sc in base of last st. Working across bottom of row, sc in next 5 sts, 2 sc in last st, join with sl st to first sc. [16 sts]
Rnd 2: Ch 1, turn, 2sc in next 2 sts, sc in next 5 sts, 2sc in next 3 sts, sc in next 5 sts, 2sc in next st, join with sl st to first st. [22 sts]
Rnd 3: Ch 1, turn, 2sc in next st, sc in next 7 sts, 2sc in next 4 sts, sc in next 7 sts, 2sc in next 3 sts, join with sl st to first sc [30 sts]
Rnd 4: Ch 1, turn, (2sc in next 4 sts, sc in next 11 sts) twice, join with sl st to first st [38 sts].
0-6 months only: Mark last st of round 4 for later joining. Fasten off C.
6-12 months only:
Rnd 5: Ch 1, turn, sc in next 12 sts, 2sc in next 6 sts, sc in next 14 sts, 2sc in next 4 sts, sc in next 2 sts, join with sl st to first sc [48 sts]. Mark first st of round for later joining. Fasten off C.
Instep:
Rnd 1 (WS): With WS of sole facing you, join A around post of marked st, as if to work a front post st. Ch 1, fphdc in same st and in each st around, join with sl st to first st. [38 (48) sts]
Rnd 2: Ch 1, turn, hdc in next 32 (39) sts, hdc2tog once (twice), hdc in next 4 (5) sts, join with sl st to first st, changing to C. Fasten off A. [37, (46) sts]
Rnd 3: With C, turn, csdc in first st, dc in next 12 (16) sts, dc2tog 10 (12) times, dc in next 4 (5) sts, join with sl st to first st. [27 (34) sts]
Rnd 4: Turn, csdc in first st, dc in next 3 (4) sts, dc2tog 5 (6) times, dc in next 13 (17) sts, join with sl st to first st. [22 (28) sts]
0-6 months only:
Rnd 5: With C, turn, csdc in first st, dc in next 12 sts, dc2tog, dc in next dc, dc2tog, dc in next 4 sts, join with sl st to first st. [20 sts]
Rnd 6: Turn, csdc in first st, dc in each st around, join with sl st to first st [20 sts]
6-12 months only:
Rnd 5: With C, turn, csdc in first st, dc in next 16 sts, dc2tog 3 times, dc in next 5 sts, join with sl st to first st. [25 sts]
Rnd 6: Turn, csdc in first st, dc in next 4 sts, dc2tog, dc in next 18 sts, join with sl st to first st. [24 sts]
Cuff:
Rnd 7-15 (17): (RS): Do NOT turn, ch 1, (fphdc around next st, bphdc around next st) around, join with sl st to first st, changing to B at the end of last rnd. Fasten off C.
Rnd 16 (18): Ch 1, turn, sc in each st around, join with sl st to first st, fasten off.
Edging:
With RS facing, hold bootie upside down so sole is on top. Insert hook into any heel stitch from the last round of the sole, and draw up a loop with B as shown here:
With B, sl st in next st and in each st around. Fasten off and use yarn needle to form final st as shown:
Weave in any remaining tails and fold cuff down.
I hope you enjoy the pattern! Thank you to Red Heart, for supplying the lovely yarn. A downloadable pdf of this pattern is also available in my Craftsy store for a $1 fee. The fee for the pdf format is to offset the advertising revenue lost when you print or download the pattern rather than viewing it online.
If you would like to receive notifications of new posts and patterns as they become available, please follow this blog. You can follow by e-mail (look at the sidebar on the right for the follow by email option), or via RSS feed, or via your WordPress.com reader: Follow Stitches ‘N’ Scraps on WordPress.com
Free Pattern – Dreaming of Pinwheels
This whimsical blanket combines my Windy Square and Pinwheel Square patterns. It uses a couple of different joining techniques and a simple striped border. It is made with Anne Geddes Baby yarn by Red Heart, and it has come out really soft and squishy. I had to resist the urge to cuddle up in it myself! At the end of the pattern, I have included a couple of suggestions for alternate color combinations.
I have quite a bit of extra yarn left over, so I plan to make another coordinating item – maybe a sweater. I don’t have anything in mind yet so it may be some time before I have a pattern ready, but you can follow this blog so you don’t miss it whenever it’s done! See the “follow this blog” options on the sidebar (desktop) or below (mobile).
Update: Here are the links to the rest of the set!
This pattern is protected by copyright. Please do not distribute or share this pattern in any way other than by sharing a link to this page or to the pattern page on Ravelry. Click here for copyright information.
This pattern contains affiliate links (click for more info). If you click one of these links and then make a purchase, I may be compensated. You get the same great prices, and you will be helping to support this site!
A few other potential color combinations (Click image to enlarge):
Difficulty:
Intermediate – Whipstitch seaming, Jacob’s ladder / braided loops, working into front loop only.
Size:
36″ square.
Gauge:
15 sc x 18 rows = 4″ square.
Abbreviations used:
ch = chain
sc = single crochet
hdc = half double crochet
sl st = slip stitch
st(s) = stitch(es)
sp(s) = space(s)
sk = skip
rnd = round
RS = right side
WS = wrong side
Notes:
I only ended up using 3 skeins of bluebell, but I used every last bit of those 3 skeins – I think I had less than 1 yard left. I recommend getting 4 skeins, just to be on the safe side.
If you leave a long tail at the end of each of your squares, you can use those tails for seaming later.
To join the following sections, hold squares with right sides together. Whipstitch through wrong side loops only. See recommended tutorial here.
Join 4 pinwheel squares together to form one larger square (center of blanket) as shown below. Leave the other 4 pinwheel squares aside (4 corners of blanket).
Join all 8 windy squares into 4 sets of 2 as shown below, making sure that each pair has the wind blowing in the same direction (4 sides of blanket).
You should now have these sections:
Jacob’s ladder joining:
Hold center section and one of the windy square sections together, with wrong sides facing, as shown here. Note the wind should be facing you, and should be blowing to the right.
Working through both pieces, join C with sl st in top right corner.
*Sl st into next st on front (windy) piece only, ch 10, sl st into next st on back (pinwheel piece) only. This creates a loop.
Making a loop (note – this set of pictures actually shows the 2nd loop because it was clearer to photograph)
First loop
Working through both pieces, sl st into next 2 sts. **
Repeat from * 9 more times, sl st into next ch sp on front (windy) piece only, ch 10, sl st into next ch sp on back (pinwheel) piece only, working through both pieces, sl st into next ch sp
Repeat from * to ** 10 more times, pull working loop up (or secure with stitch marker) so that it won’t slip out, and set hook aside (do not fasten off).
You should now have the two pieces joined, with a series of loops across the seam, like this:
Re-position your work in front of you as shown in the above picture. Note that the windy squares should be on the left, and your working yarn should be up at the top. Take the first (bottom) loop, and twist it a half twist. You will only be twisting the first loop – do not twist any of the later loops.
Pull the next loop through the first loop
Continue with each loop, forming the ladder or braid across the seam. You will now be left with one loop at the end.
Pull the working yarn (that you took off the hook earlier) through this last loop, and put it back on your hook. This will secure the ladder / braid in place. Working through both pieces, sl st into the last corner sp. Do not fasten off.
Turn work 90 degrees (to next side of pinwheel section), position next windy section in the same way that you did the first, and repeat from * to join. (wind should always be facing you and blowing to the right). Do the same for each of the remaining windy square sections, until all 4 are joined, then fasten off. Your piece should now look like this:
Joining Corners:
Sew each of the remaining 4 pinwheels into the 4 corners by whipstitching through the wrong side loops only.
Edging:
Rnd 1: Join A with sl st in any corner ch sp, ch 1, *hdc in each st and ch sp across to next corner,** (hdc, ch 2, hdc) in next corner ch sp, repeat from * 3 times, ending at ** on last repeat, (hdc, ch 2) in corner ch sp, join with sl st to first hdc. (128 hdc)
Note: on Rnd 2, when working into front loop only, be careful to work in the actual front loop – not the extra / 3rd loop. See tutorial for correct placement.
Rnd 2: Turn, sl st in next ch sp, changing to B. Working in front loops only, ch 1, sc in same sp, *sc in each st across to next ch sp,** (sc, ch 2, sc) in next ch sp, repeat from * 3 more times, ending at ** on last repeat, (sc, ch 2) in ch sp, join with sl st to first sc. (136 sc)
Rnd 3: Turn, sl st in next ch sp, changing to A. Working in both loops, ch 1, 2 hdc in same sp, *hdc in each st across to next ch sp,** (2 hdc, ch 2, 2 hdc) in next ch sp, repeat from * 3 more times, ending at ** on last repeat, (2 hdc, ch 2) in ch sp, join with sl st to first hdc. (152 hdc)
Rnd 4: Turn, sl st in next ch sp, changing to B, ch 1, sc in same sp, *sc in each st across to next ch sp,** (sc, ch 2, sc) in next ch sp, repeat from * 3 more times, ending at ** on last repeat, (sc, ch 2) in ch sp, join with sl st to first sc. (160 sc)
Rnd 5: Turn, sl st in next ch sp, changing to C, ch 1, 2 hdc in same sp, *hdc in each st across to next ch sp,** (2 hdc, ch 2, 2 hdc) in next ch sp, repeat from * 3 more times, ending at ** on last repeat, (2 hdc, ch 2) in ch sp, join with sl st to first hdc. (176 hdc)
Rnd 6: Turn, sl st in next ch sp, changing to B, ch 1, sc in same sp, *sc in each st across to next ch sp, ** 3 sc in ch sp, repeat from * 3 times more, ending at ** on last repeat, 2 sc in next ch sp, join with sl st to first sc, fasten off. (184 sc)
Sew in any remaining tails
I hope you enjoy the pattern! Thank you to Red Heart too, for supplying the lovely yarn! A downloadable pdf of this pattern is also available in my Craftsy store for a $2 fee. The download includes both the Windy Square and Pinwheel Square patterns as well. The fee for the pdf format is to offset the advertising revenue lost when you print or download the patterns rather than viewing it online.
If you would like to receive notifications of new posts and patterns as they become available, please follow this blog. You can follow by e-mail (look at the sidebar on the right for the follow by email option), via RSS feed, or via your WordPress.com reader: Follow Stitches ‘N’ Scraps on WordPress.com
Free Pattern – Pinwheel square
I love to watch pinwheels spinning in a warm summer breeze. Because of the color selection, Anne Geddes Baby yarn by Red Heart was an obvious choice for this project. It comes in a wide array of colors, including those vibrant, bright shades that can be so hard to find in a baby yarn. It’s also a great weight for a baby blanket, and the acrylic / nylon blend means it’s strong and machine washable too.
This pattern is protected by copyright. Please do not distribute or share this pattern in any way other than by sharing a link to this page or to the pattern page on Ravelry. Click here for copyright information.
This pattern contains affiliate links (click for more info). If you click one of these links and then make a purchase, I may be compensated. You get the same great prices, and you will be helping to support this site!
Intermediate – Mostly worked in the round, working in front or back loops only, working in sides of rows for edging. Because of the front and back loops, I’m calling it intermediate…but this would be a great project for an advanced beginner as well.
Size:
8″ square.
Gauge:
15 sc x 18 rows = 4″ square.
Abbreviations used:
ch = chain
sc = single crochet
hdc = half double crochet
sl st = slip stitch
st(s) = stitch(es)
sp(s) = space(s)
sk = skip
rnd = round
RS = right side
WS = wrong side
Notes:
The magic circle technique is recommended for the first round and for the button, however an alternative is provided.
If you make sure your starting tail is hanging at the back (wrong side) of the work, you can use that as a marker to know which is the wrong side.
In place of the button, you can use any small button or flower pattern you like – just be sure to secure it fully around the edges and be careful not to use anything that can be grabbed / torn off and cause a choking hazard.
When finishing, pay attention to how your stitching will look on the reverse side of the fabric. It’s important the pieces be sewn securely, but try to make it look neat on the back side as well.
Rnd 1 (RS): With A, inside a magic circle, work ch 1, (2 hdc, ch 2) 4 times, pull circle closed, join with sl st to first hdc. (8 hdc, 4 ch sps).
OR
Alternate Rnd 1 (RS): With A, ch 2. In 2nd ch from hook, work ch 1, (2 hdc, ch 2) 4 times, join with sl st to first hdc. (8 hdc, 4 ch 2 sps)
Rnd 2: Turn, sl st in first ch sp, ch 1, hdc in same ch sp, *hdc in each st across to next ch sp, (hdc, ch 2, hdc) in next ch sp, repeat from * twice more, hdc in each st across to next (starting) ch sp, (hdc, ch 2) in ch sp, join with sl st to first hdc. (16 hdc)
Rnds 3-5: Repeat rnd 2. Do not fasten off. (40 hdc in rnd 5)
Blades:
Now each side of the square is worked independently, in rows, to form the blades of the pinwheel.
Row 6: Turn, sl st in first ch sp, working in back loops only for the remainder of the row, sl st in first hdc, *ch 1, 2 hdc in same st, hdc in next 8 sts, 2 hdc in next st. (12 hdc)
Row 7: Working in both loops, ch 1, turn, 2 hdc in first st, hdc in each st across to last st, 2 hdc in last st. (14 hdc)
Rows 8- 9: Repeat Row 7 (18 hdc at end of row 9)
Row 10: Ch 1, turn, 3 hdc in first st, hdc in each st across to last st, 3 hdc in last st, fasten off. (22 hdc)
Other 3 blades: With wrong side facing, join A with sl st in back loop only of the first st on the next side of the square. Working in back loops only for this row, repeat from the * on row 6, all the way through row 10. Do this 2 more times, so all 4 sides of the square are done.
This is a good time to sew in all yellow tails, except for the starting tail.
Edging:
With RS facing, join B with sl st in the base of the first hdc of row 6, on any blade.
Ch 1, work 8 sc evenly spaced along side of blade.
* Working in front loops only, 3 sc in first st at top of blade (corner st), sc in next 9 sts,
Now working in both loops, sc in next 11 sts, 3 sc in next st
Work 8 sc evenly spaced along side of blade, **
Ch 1, work 8 sc evenly spaced along side of next blade.
Repeat from * 3 more times, ending at ** on the last repeat. ch 1, join with sl st to first sc of edging. Do not fasten off.
Background:
Rnd 6 (WS): Turn, sl st in ch sp from row 5 of pinwheel, ch 1, hdc in same sp, * working in front loops only (unused loops from row 6 of blades), hdc in each st across to next ch sp, (hdc, ch 2, hdc) in next sp, repeat from * twice more, hdc in front loop of each st across to next ch sp, hdc in next ch sp, ch 3, join with sl st to back loop only of first hdc of round, changing to C. Fasten off B. (48 hdc)
Rnd 7: Working in front loop only: Turn, sl st in first ch sp, ch 1, hdc in same sp, *hdc in each st across to next sp, (hdc, ch 2, hdc) in next sp, repeat from * twice more, hdc in each st across to next sp, (hdc, ch 2) in next sp, join with sl st to first hdc. (56 hdc)
Rnds 8-9: Working on both loops, repeat rnd 7. (72 hdc at end of rnd 9)
Rnd 10: Turn, sl st in first ch sp, ch 1, 2 hdc in same sp, *hdc in each st across to next sp, (2 hdc, ch 2, 2 hdc) in next sp, repeat from * twice more, hdc in in each st across to next sp, (2 hdc, ch 2) in next sp, join with sl st to first hdc. (88 hdc)
Rnd 11 (joining): Turn, sl st in first ch sp, ch 1, 2 hdc in same sp, *working through unused loop from row 10 of pinwheel blade and both loops from row 10 of background, hdc in next 10 sts, now working only into background, hdc in next 12 sts, ** (2 hdc, ch 2, 2 hdc) in next sp, repeat from * 3 more times, ending at ** on last repeat, (2 hdc, ch 2) in next sp, join with sl st to first hdc. (104 hdc)
Rnd 12 – 13: Turn, sl st in first sp, ch 1, sc in same sp, *sc in each st across to next sp, (sc, ch 2, sc) in next sp, repeat from * twice more, sc in each st across to next sp, (sc, ch 2) in next sp, join with sl st to first sc. Fasten off at end of Rnd 13. (120 sts at end of Rnd 13).
Button:
With B, make a magic circle, ch 3, 11 dc inside the magic loop, join with sl st to top of starting ch, fasten off and close magic circle.
OR ch 4, work 11 dc in 4th ch, join with sl st to form a circle, fasten off.
Finishing:
Fold loose corners of pinwheel in to the center and sew them in place using the starting tail. If they don’t quite reach the very middle it’s ok. The blades should not overlap each other.
Sew button into the center of the square so that it covers the folded in corners. Be sure to sew all around the edge of the button so it can’t be grabbed and torn off by little hands or mouths. If you make sure the blades are very secure, you can then sew the button to just the blades, not all the way through – that way the green (B) stitches won’t show on the back of the square.
Sew in any remaining tails
I hope you enjoy this Pinwheel Square pattern. A downloadable pdf of this pattern is available on Ravelry for a small fee. The fee for the pdf format offsets the advertising revenue lost when you print or download the pattern rather than viewing it online.
Do you want the best of Stitches n Scraps delivered right to your inbox? Don’t miss a stitch – Subscribe now!
Free Pattern – Windy Square
This “windy” blanket square makes me think of a gentle, warm breeze on a bright spring day. I wanted the design to be solid, but still feel light and airy. The yarn that immediately came to mind is Anne Geddes Baby yarn by Red Heart. It’s soft and squishy like a billowy cloud, with a subtle hint of sheen. It’s a great weight for a baby blanket, and the acrylic / nylon blend means it’s strong and machine washable too.
I’m working on another square that will coordinate with this one, and should have that for you soon – be sure to follow this blog so you don’t miss it! See the “follow this blog” options on the sidebar (desktop) or below (mobile).
This pattern is protected by copyright. Please do not distribute or share this pattern in any way other than by sharing a link to this page or to the pattern page on Ravelry. Click here for copyright information.
This pattern contains affiliate links (click for more info). If you click one of these links and then make a purchase, I may be compensated. You get the same great prices, and you will be helping to support this site!
Intermediate – puff stitches, front post stitches (cables), and working in the sides of rows for edging.
Size:
8″ square.
Gauge:
15 sc x 18 rows = 4″ square.
Abbreviations used:
ch = chain
fsc = foundation single crochet
sc = single crochet
sc2tog = single crochet 2 stitches together
fpdc = front post double crochet
fptr = front post treble crochet
puff = puff stitch (see special stitches)
yo = yarn over
sl st = slip stitch
st(s) = stitch(es)
sp(s) = space(s)
sk = skip
rnd = round
RS = right side
Special Stitch:
Puff stitch (puff):
Yo, insert hook from front to back around post of the stitch BELOW the next st, as though to work a front post stitch,
draw up a loop to the height of the current row. Repeat 2 more times, so there are a total of 7 loops on hook.
Make sure all loops are even and at the height of the current row, yo and pull through 6 loops (leaving 2 loops on the hook), then yo and pull through the last 2 loops.
Skip the stitch directly behind the puff.
Notes:
Foundation stitches are recommended for the first row, however an alternate first row is provided for those who prefer a starting chain.
The cables (front post stitches) are done in such a way that they lay on top of the fabric, so the back comes out smooth. Generally speaking, the fp stitches are worked as extra stitches on the right side, (added between two other stitches, without skipping any stitches behind them) and are skipped on the wrong side (except once at the top of each curve). Please pay close attention in the pattern to when stitches should be skipped and when they should not be.
The written instructions may seem complicated in some spots, but it’s really all about where to place those post stitches, so referring to the cable diagram should help. The cable diagram provided is NOT a crochet pattern chart. It is just a diagram to help with placement of the puff and post stitches and should be used as a visual aid WITH the written instructions, not instead of them.
Row 1 (RS): 28 fsc OR ch 29, sc in 2nd ch from hook and each ch across. (28 sts)
Row 2: Ch 1, turn, sc in each st across.
Row 3: Ch 1, turn, sc in first 3 sts, (puff, sc in next st) 12 times, sc in last st.
Row 4: Ch 1, turn, sc in each sc and in top of each puff across (28 sc)
Row 5: Ch 1, turn, sc in first 2 sts, (puff, sc in next st) 13 times.
Row 6: Repeat row 4.
Rows 7-8: Repeat rows 3 – 4.
Row 9: Ch 1, turn, sc in first 6 sts, (puff, sc in next st) 9 times, sc in last 4 sts.
Row 10: Repeat Row 4.
Row 11: Ch 1, turn, sc in first 5 sts, (puff, sc in next st) 4 times, sc in next 2 sts, (puff, sc in next st) 3 times, sc in next 7 sts.
Row 12: repeat Row 4
Reminder – When working the front post stitches (right side rows), do NOT skip a stitch behind the post stitch unless specifically told to do so.
Row 13: Ch 1, turn, sc in first 6 sts, (puff, sc in next st) 3 times, sc in next 2 sts, fpdc around post of stitch 2 rows below the stitch you just made (this should be the sc that’s right in the middle between the two sets of puff stitches on row 11 – see cable diagram), sc in next 14 sts.
Row 14: Ch 1, turn, sc in first 14 sts, sk next st (this is the fpdc from the previous row), sc in each sc and each puff across. (28 sc)
Row 15: Ch 1, turn, sc in first 14 sts, fpdc around fpdc from row 13, sc in next 3 sts, fpdc around post of stitch 2 rows below the stitch you just made, sc in next 11 sts.
Row 16: Ch 1, turn, sc in first 11 sts, sk next st, sc in next 3 sts, sk next st, sc in last 14 sts. (28 sc)
Row 17: Ch 1, turn, sc in first 12 sts, fpdc around post of stitch 2 rows below the stitch you just made, sc in next 2 sts, fpdc around first fpdc from row 15, sc in next 3 sts, fpdc around next fpdc from row 15, sc in last 11 sts.
Row 18: Ch 1, turn, sc in next 11 sts, sk next st, sc in next 3 sts, sk next st, sc in next 2 sts, sk next st, sc in last 12 sts. (28 sc)
Row 19: Ch 1, turn, sc in next 11 sts, fpdc around first post st from row 17, sc in next 3 sts, fpdc around next post st from row 17, sc in next 4 sts, fpdc around next post st from row 17, sc in next 3 sts, fptr around the stitch that is 2 rows below and 2 stitches to the left (ahead) of the stitch you just worked, sc in next 4 sts, fptr around the same st that you used for the last fptr, sc in last 3 sts.
Row 20: Ch 1, turn, sc in next 3 sts, sk next st, sc in next 4 sts, sk next st, sc in next 3 sts, sk next st, sc in next 4 sts, sk next st, sc in next 3 sts, sk next st, sc in next 11 sts. (28 sc)
Row 21: Ch 1, turn, sc in next 3 sts, fptr around the stitch that is 2 rows below and 2 stitches to the left (ahead) of the stitch you just worked, sc in next 4 sts, fptr around the same st that you used for the last fptr, sc in next 3 sts, fpdc around first post st from row 19, sc in next 4 sts, fpdc around next post st from row 19, sc in next 6 sts, fptr around next post st from row 19, sc in next 5 sts, ignore next post st from row 17 and fpdc around the last post st from row 17, sc in last 3 sts.
Row 22: Ch 1, turn, sc in next 3 sts, sk next st, sc in next 5 sts, sk next st, sc in next 6 sts, sk next st, sc in next 4 sts, sk next st, sc in next 3 sts, sk next st, sc in next 4 sts, sk next st, sc in last 3 sts. (28 sc)
Row 23: Ch 1, turn, sc in first 3 sts, fpdc around first post st from row 21, sc in next 6 sts, fpdc around 3rd post st from row 21 (ignoring 2nd post st – see cable diagram), sc in next 5 sts, fpdc around next post st from row 21, sc in next 9 sts, work fptr around next post st from row 21 only up to the last step, where there are 2 loops remaining on the hook, then do the same around the next post st from row 21, so there should now be 3 loops left on the hook, yo and draw through all three loops, sc in last 5 sts.
Row 24: Ch 1, turn, sc in first 4 sts, sc2tog, sc in next 9 sts, sk next st, sc in next 5 sts, sk next st, sc in next 6 sts, sk next st, sc in last 3 sts. (28 sts)
Row 25: Ch 1, turn, sc in first 6 sts, work fptr around first post st from row 23 only up to the last step, where there are 2 loops remaining on the hook, then do the same around the next post st from row 23, so there should now be 3 loops left on the hook, yo and draw through all three loops, sc in next 8 sts, fpdc around next post st from row 23, sc in next 14 sts.
Row 26: Ch 1, turn, sc in first 14 sts, sk next st, sc in next 7 sts, sc2tog, sc in next 6 sts. (28 sts)
Row 27: Ch 1, turn, sc in first 14 sts, fpdc around last post st from row 25, sc in next 14 sts.
Row 28: Ch 1, turn, sc in first 14 sts, sk next st, sc in next 14 sts. (28 sc)
Row 29: Ch 1, turn, sc in first 11 sts, fpdc around post of stitch 2 rows below the stitch you just made, sc in next 4 sts, fpdc around post st from row 27, sc in next 3 sts, fptr around the stitch that is 2 rows below and 2 stitches to the left (ahead) of the stitch you just worked, sc in next 5 sts, fptr around the same st that you used for the last fptr, sc in next 5 sts.
Row 30: Ch 1, turn, sc in first 5 sts, sk next st, sc in next 5 sts, sk next st, sc in next 3 sts, sk next st, sc in next 4 sts, sk next st, sc in next 11 sts. (28 sc)
Row 31: Ch 1, turn, sc in next 5 sts, fptr around the stitch that is 2 rows below and 2 stitches to the left (ahead) of the stitch you just worked, sc in next 3 sts, fpdc around the same st that you used for the last fptr, sc in next 2 sts, fpdc around first post st from row 29, sc in next 7 sts, fptr around next post st from Row 29, sc in next 6 sts, fpdc around last post st from row 29, sc in last 5 sts.
Row 32: Ch 1, turn, sc in first 5 sts, sk next st, sc in next 6 sts, sk next st, sc in next 7 sts, sk next st, sc in next 2 sts, sk next st, sc in next 3 sts, sk next st, sc in last 5 sts. (28 sc)
Row 33: Ch 1, turn, sc in first 7 sts, work fptr around first post st from row 31 only up to the last step, where there are 2 loops remaining on the hook, then do the same around the third post st from row 31, so there should now be 3 loops left on the hook, yo and draw through all three loops, sc in next 13 sts, work fptr around next post st from row 31 only up to the last step, where there are 2 loops remaining on the hook, then do the same around the last post st from row 31, so there should now be 3 loops left on the hook, yo and draw through all three loops, sc in next 8 sts.
Row 34: Ch 1, turn, sc in first 7 sts, sc2tog, sc in next 12 sts, sc2tog, sc in next 7 sts. Do not fasten off. (28 sts)
Edging:
Ch 1, turn, 2 sc in first sc, sc in next 26 sc, (2 sc, ch 2, 2 sc) in last sc,
Working along side of rows, work 26 sc evenly spaced across to next corner,
Working along bottom of row 1, (2 sc, ch 2, 2 sc) in first st, sc in next 26 sts, (2sc, ch 2, 2sc) in last st
Working along side of rows, work 26 sc evenly spaced across to next corner. In corner st, work 2 sc, ch 2, join with sl st to first st of edging. Fasten off and weave in ends.
I hope you enjoy the pattern! Thank you to my friend Annie for getting me on the right track. Thanks to Red Heart too, for supplying the lovely yarn! A downloadable pdf of this pattern is also available in my Craftsy store for a $1 fee. The fee for the pdf format is to offset the advertising revenue lost when you print or download the pattern rather than viewing it online.
If you would like to receive notifications of new posts and patterns as they become available, please follow this blog. You can follow by e-mail (look at the sidebar on the right for the follow by email option), or via RSS feed, or via your WordPress.com reader: Follow Stitches ‘N’ Scraps on WordPress.com
Free Pattern – Accidental Beanie
This pattern came about entirely by accident. I was working on a Jacob’s square for the Jake’s blankie CAL by Jessie at Home, but I wasn’t really paying attention. Without realizing it, I had worked the whole first 5 rows without doing any of the increases. When I went to make the Jacob’s ladders, the “square” started curling in, and I found I had accidentally made something that looked remarkably like a hat. A little ribbing on the bottom and it became a fun, chunky beanie! It was a little small, but was easily sized up. The pattern has instructions for premie to adult sizes!
This pattern is protected by copyright. Please do not distribute or share this pattern in any way other than by sharing a link to this page or to the pattern page on Ravelry. Click here for copyright information.
This pattern contains affiliate links (click for more info). If you click one of these links and then make a purchase, I may be compensated. You get the same great prices, and you will be helping to support this site!
Intermediate – Working in the round, Jacob’s ladder technique, front and back post stitches.
Size:
Premie [baby, toddler, child, teen / small, adult / large]. Hat circumference (should be 1 inch smaller than head) 11 [13, 15, 17, 19, 21] inches, height of hat 4.5 [5, 5.25, 5.75, 6.5, 7.5] inches.
Gauge:
12 dc x 7 rows = approximately 4″ square.
Abbreviations used:
ch = chain
dc = double crochet
fpdc = front post double crochet
bpdc = back post double crochet
sl st = slip stitch
st(s) = stitch(es)
sp(s) = space(s)
sk = skip
Notes:
The magic circle technique is recommended for the beginning because it does not leave a hole at the top, but it can be a little fiddly with all the large chain spaces. If you’re having trouble, an alternative method is provided and you can sew the hole shut when weaving in the tail.
Do not turn at end of rounds.
As you get further into the pattern, you may find it helpful to mark the beginning chain of each round.
Get creative with color! These pictures show examples of alternating colors each row and of changing color at the ribbing section:
One of the hats pictured has a little flower on it. That was made by working round 1 of the pattern (it’s the same for all sizes), with 3 fewer chains in each ch loop. So ch 8 instead of ch 11, and ch 5 instead of ch 8.
Sizing tips:
Choose the size based on circumference – the circumference of the hat should be about 1″ smaller than that of the head, to allow for stretching (of the hat, not the head).
If you need to adjust the height, you can do it by adding or subtracting rounds at the top or ribbing sections as desired. Every round in the top section adds about a half inch, and every round in the ribbing section adds about a quarter inch. If you’re adding or subtracting rounds in the top section, be sure to do so at the end, after all the increases are done.
If you prefer tighter ribbing, for a snugger fit, try using a hook 2 sizes smaller than your other hook (instead of only 1 size smaller).
Make magic circle OR ch 3, join with sl st to make a circle
Rnd 1: Ch 11 (counts as first dc and ch 8, now and throughout), (2 dc, ch 8) in circle 5 times, dc in circle, join with sl st to 3rd ch of starting ch 11 (top of first dc), If magic circle was used, pull it closed. (12 dc, 6 ch loops)
Rnd 2: Ch 11, (sk next ch sp, dc in each of next 2 sts, ch 8) 5 times, sk last ch sp, dc in last st, join with sl st to 3rd ch of starting ch 11. (12 dc, 6 ch loops)
Rnd 3: Ch 11, (sk next ch sp, 2 dc in each of next 2 sts, ch 8) 5 times, sk last ch sp, 2 dc in last st, dc in same st as start of round, join with sl st to 3rd ch of starting ch 12. (24 dc, 6 ch loops)
Baby size only:
Rnd 4: Ch 11, (sk next ch sp, dc in next 2 sts, 2 dc in next st, dc in next st, ch 8) 5 times, sk last ch sp, dc in next 2 dc, 2 dc in next st, join with sl st to 3rd ch of starting ch. (30 dc, 6 ch loops)
Both sizes:
Next 3 Rnds: Ch 11, (sk next ch sp, dc in each dc across to next ch sp, ch 9) 5 times, sk last ch sp, dc in each dc across, join with sl st to 3rd ch of starting ch. (24 [30] dc, 6 ch loops)
Top (Toddler through Adult sizes):
Make magic circle OR ch 3, join with sl st to make a circle
Rnd 1: Ch 11 (counts as first dc and ch 8, now and throughout), (2 dc, ch 8) in circle 5 times, dc in circle, join with sl st to 3rd ch of starting ch 12 (top of first dc), If magic circle was used, pull it closed. (12 dc, 6 ch loops)
Rnd 2: Ch 11, (sk next ch sp, dc in next st, ch 8, dc in next st, ch 8) 5 times, sk last ch sp, dc in last st, ch 8, join with sl st to 3rd ch of starting ch 12. (12 dc, 12 ch loops)
Rnd 3: Ch 11, (sk next ch sp, dc in next st, ch 8) 11 times, sk last ch sp, join with sl st to 3rd ch of starting ch 12. (12 dc, 12 ch loops)
Rnd 4: Ch 11, (sk next ch sp, 2 dc in next st, ch 8) 11 times, sk last ch sp, dc in same st as starting, join with sl st to 3rd ch of starting ch 12. (24 dc, 12 ch loops)
Child size only:
Rnd 5: Ch 11, *(sk next ch sp, 2 dc in next st, dc in next st, ch 8, sk next ch sp), dc in each of next 2 sts, repeat from * 5 times, then repeat between ( ) once more, dc in last st, join with sl st to 3rd ch of starting ch. (30 dc, 12 ch loops)
Teen size only:
Rnd 5: Ch 11, (sk next ch sp, 2 dc in next st, dc in next st, ch 8) 11 times, sk last ch sp, 2 dc in next st, join with sl st to 3rd ch of starting ch. (36 dc, 12 ch loops)
Adult size only:
Rnd 5: Ch 11, (sk next ch sp, 2 dc in next st, dc in next st, ch 8) 11 times, sk last ch sp, 2 dc in next st, join with sl st to 3rd ch of starting ch. (36 dc, 12 ch loops)
Rnd 6: Ch 11, *(sk next ch sp, dc in next st, 2 dc in next st, dc in next st, ch 8, sk next ch sp), dc in next 3 sts, repeat from * 5 times, then repeat between ( ) once more dc in last 2 sts, join with sl st to 3rd ch of starting ch 12. (42 dc, 12 ch loops)
All four sizes:
Next 3 [3, 4, 5] Rnds: Ch 11, (sk next ch sp, dc in each dc across to next ch sp, ch 9) 11 times, sk last ch sp, dc in each dc across, join with sl st to 3rd ch of starting ch. (24 [30, 36, 42] dc, 12 ch loops)
Top of adult / large hat before forming ladders
Ladders (All sizes):
Secure working loop with stitch marker, or pull it up really tall so your stitches don’t get pulled out while making the ladders.
Take any loop from row 1 and twist it once. Take the loop directly above it from row 2, and pull it through the loop from row 1. Continue to pull each loop through the one below it. Note that only the first loop should be twisted. The final loop in each ladder will be secured in the next round. If desired, you can secure them temporarily with stitch markers or safety pins. Repeat for each set of loops around hat.
Next Rnd: Ch 3 (counts as first dc) (sl st in next loop, dc in each dc across to next loop) 5 [5, 11, 11, 11, 11] times, sl st in next loop, dc in each remaining dc, join with sl st to top of starting ch. (24 [30, 24, 30, 36, 42] dc)
Next Rnd: Ch 3, (2 dc in next loop, dc in each dc across to next loop) 5[5, 11, 11, 11, 11] times, 2 dc in next loop, dc in each remaining dc, join with sl st to top of starting ch. (36 [42, 48, 54, 60, 66] dc)
Ribbing (All sizes):
Switch to smaller hook.
Rnd 1: Ch 2 (counts as first bpdc, now and throughout), (fpdc around next st, bpdc around next st) around to last st, fpdc around last st, join with sl st to top of starting ch.
If you used a chain loop at the top of the hat, remember to sew the end around the hole and pull it tight to close it.
I hope you enjoy the pattern! An ad-free, downloadable pdf of this pattern is also available in my Craftsy store for a $1 fee. The fee for the pdf format is to offset the advertising revenue lost when you print or download the pattern rather than viewing it online.
If you would like to receive notifications of new posts and patterns as they become available, please follow this blog. You can follow by e-mail (look at the sidebar on the right for the follow by email option), or via RSS feed, or via your WordPress.com reader: Follow Stitches ‘N’ Scraps on WordPress.com
NOTE: Your feedback matters! Feedback from several users has indicated that the sizing on this pattern was coming out too small. The pattern has now been updated (11/6/15) to increase the sizing for all three sizes, and also to increase the difference in sizing between the 3 sizes. If you purchased a pdf download of this pattern, you should soon receive an updated version.
I had originally posted this just over a year ago, but it was buried in another post celebrating my 100th post. This has since become one of my more popular patterns, and I thought it deserved it’s own post. I hope you enjoy it!
This pattern is protected by copyright. Please do not distribute or share this pattern in any way other than by sharing a link to this page or to the pattern page on Ravelry. Click here for copyright information.
This pattern contains affiliate links (click for more info). If you click one of these links and then make a purchase, I may be compensated. You get the same great prices, and you will be helping to support this site!
Intermediate – crocodile stitches, and front/back post double crochet stitches.
Size:
0-6mo, [6-12mo,12-24mo]. Pattern is written for smallest size with changes for larger sizes in parentheses.
Gauge Swatch:
4″ square = 30 sts x 16 rows in pattern as follows:
Row 1: Ch 32, hdc in 2nd ch from hook and each ch across. (31 hdc).
Rows 2-16: Ch 2 (counts as bphdc), turn, (fphdc around next st, bphdc around next st) across.
When measuring, ignore one of the edge stitches (30 stitches should measure 4″, but ribbing pattern requires odd # of stitches)
Abbreviations used:
RS = right side
ch = chain
sc = single crochet
hdc = half double crochet
sl st = slip stitch
st(s) = stitch(es)
sk = skip
sc2tog = single crochet 2 stitches together
fphdc = front post half double crochet bphdc = back post half double crochet V = V stitch – see special stitches
Special Stitches:
V stitch (V): (hdc, ch1, hdc) in next st.
Scale: Work 4 hdc around first post of V stitch, ch 1, turn work 90 degrees counterclockwise, work 4 hdc around 2nd post of V stitch. (See Fig 1 below or view Crocodile Stitch Tutorial)
Fig. 1
Notes:
The hat pictured was made with Patons Kroy Socks 4 Ply in the Green Striped Ragg colorway.
Ch 2 at beginning of ribbing rows counts as bphdc throughout.
When working in ch space of skipped V stitches (odd rows from 3-9 of crocodile stitch, row 4 of edging), insert hook through both the ch space of the V and the space between the scales in front of the V. (See Crocodile Stitch Tutorial)
Based on pattern feedback, some crocheters are having a hard time achieving the row gauge and are ending up with a hat that is too shallow. If your row gauge isn’t coming out right, feel free to add or remove rows in the ribbing section as needed, being sure to end with a wrong side row.
Row 1 (WS, RS, WS): Hdc in 2nd ch from hook and in each ch across (92 [104, 116] hdc).
Row 2-19 [22, 25]: Ch 2 (counts as bphdc), turn, fphdc around 2nd st, (bphdc around next st, fphdc around next st) across.
Work should now measure 4.75 [5.5, 6.25] inches tall. If you need to, you can add more repeats, being sure to end with a wrong side row.
Next Row: Ch 1, turn, sc in next 9 [7, 9] sts, (sc2tog, sc in next 7 [9, 10] sts) 8 times, sc2tog, sc in last 9 [8, 9] st. Do NOT fasten off. (83 [95, 107] sts)
Crocodile Stitch:
Row 1: Ch 1, turn, hdc in first st, sk next st, (V, sk next 2 sts) repeat across to last 3 sts, V in next st, sk next st, hdc in last st. (27 [31, 35] V stitches, 2 hdc)
Row 2: Turn, sl st in first hdc, (work scale around next V, skip next V) 13 [15, 17] times, work scale around last V, sl st in last st. (14 [16, 18] scales)
Row 3: Ch 1, turn, hdc in first st, (V in center of next scale, V in skipped V) 13 [15, 17] times, V in center of last scale, hdc in last st. (27 [31, 35] V stitches, 2 hdc)
Row 4: Turn, sl st in first 2 hdc and in ch space of first V, (work scale around next V, skip next V) 12 [14, 15] times, work scale in next V, sl st in ch space of last V and in last 2 hdc. (13 [15, 17] scales)
Row 5: Ch 2, turn, (V in skipped V, V in center of next scale) 13 [15, 17] times, V in last skipped V, hdc in last st. (27 [31, 35] V stitches, 2 hdc)
Row 6-10: Repeat Rows 2 – 5, then repeat row 2 once more.
Do NOT fasten off – secure loop with stitch marker or safety pin as you will need to pick it up again for the next section.
Fold work in half, with right sides together, so that Row 10 forms the front of the hat. Sew back seam. Turn hat right-side-out again.
Bottom Edging:
Pick up loop from last stitch of previous section, and turn work so you are now working in the sides of the rows along the bottom:
Row 1 (WS): Ch 1, work 83 [95, 107] sc evenly spaced along sides of rows.
Row 2: Ch 1, turn, hdc in each st across.
Row 3: Ch1, turn, sc in each st across. Do NOT finish off.
Front Edging:
Turn work so you are now working in the sides of the rows of bottom edging, and across row 10 of the Crocodile stitch section.
Row 4: Ch 1, 2 sc in side of row 3, sc in side of row 2, sc in side of row 1, sc in next st, (3 sc in center of next scale, 3 sc in next skipped V stitch) 13 [15, 17] times, 3 sc in center of last scale, sc in next st, sc in side of row 1, sc in side of row 2, 2 sc side of row 3, join with sl st to 1st st of row 3, turn, do NOT fasten off. (91 [103, 115] sc).
Ties:
This is for basic ties, see notes below for variations. The hat pictured is made with option 3.
First tie: Sl st in next 2 st, ch 45, sc in each ch, sl st in same st last sl st, fasten off.
Second tie: Join with sl st in 3rd st of row 4, ch 45, sc in each ch, sl st in same st as last sl st, fasten off.
Variations for Ties:
Option 1: basic tie with tassel
First tie: Sl st in next 2 st, ch 50, sc in 6th ch from hook and in each ch across, sl st in same st last sl st, finish off.
Second tie: Join with sl st in 3rd st of row 4, ch 50, sc in 6th ch from hook and in each ch across, sl st in same st as last sl st, fasten off.
Tassels: Cut 10, 4 inch pieces of yarn. Using 5 pieces for each tassel make a tassel in the chain loop at the end of each tie. [Fig 2]
Fig. 2
Note: the following options require knowledge of foundation sc. If you are not familiar with this technique, check out the tutorial in the Recommended Resources section above.
Option 2: Foundation sc [fsc]
First tie: Sl st in next 2 st, work 45 fsc, fasten off.
Second tie: Join with sl st in 3rd st of row 4, work 45 fsc, fasten off.
Option 3: Foundation sc [fsc] with tassels
First tie: Sl st in next 2 st, work 45 fsc, ch5, sl st in base of last fsc, fasten off.
Second tie: Join with sl st in 3rd st of row 4, work 45 fsc, ch5, sl st in base of last fsc, fasten off.
Tassels: Cut 10, 4 inch long pieces of yarn. Using 5 pieces each, attach a tassel to the chain loop at the end of each tie. [Fig 2]
I hope you enjoy the pattern!
Do you want the best of Stitches n Scraps delivered right to your inbox? Don’t miss a stitch – Subscribe now!
Children’s Fingerless Mitts Crochet Pattern
These stretchy, children’s fingerless mitts are super warm and squishy! The pattern includes 2 sizes, with dense, all-over ribbing that stretches for a perfect fit. Mix and match colors for fun striped designs and/or add an optional, fuzzy trim.
These fingerless mitts make great gifts for everyone on your list! This pattern comes in toddler size for approximately ages 1-3, and child size for older children.
Mix up your colors for fun striping patterns! The mitts in the main picture are the toddler size. For the striping detail, they have 1 row of purple, followed by 2 rows of dark blue, and another 1 row of purple. One mitt shows the optional eyelash yarn edging.
The green adult-size mitts have 2 rows of silver at the bottom and 2 rows at the top. For the orange mitts, I used one row of greenish-brown at the bottom and 4 rows near the top, ending with one orange row. I call the color combo “peas and carrots.”
Work 2 rows in the same color for a solid stripe, or change colors with every row for a more variegated effect. The options are endless!
Size F / 5 (3.75 mm) hook or size needed to match gauge
Size G / 6 (4 mm) hook or 1 size bigger than the smaller hook.
Notions: Yarn needle
Project Level
Intermediate: Front and back post stitches, worked in the round, increases. Foundation half double crochet stitches are optional.
Size:
Toddler [Child]
Mitts are stretchy and fit a wide range of sizes. Toddler size fits (approx. ages 1-3), Child fits older children. For teens, use adult size pattern. Picture shows Toddler size.
Gauge:
19 sts x 11 rows = 4 inches in ribbing pattern, with smaller hook.
Use pattern as gauge swatch: Cuff should measure 2 x 2 [2.5 x 2.5] inches. Exact gauge is not critical, as the mitts are designed to be stretchy.
Join rnds where indicated with a sl st in the first st of the rnd. Change colors as desired throughout.
Cuff
With smaller hook and worsted weight yarn
Rnd 1 (RS): Work 20 [26] fhdc, join with sl st to first st to form a ring. (20 [26] fhdc)
OR
Alternate Rnd 1 (RS): Ch 21 [27] loosely, hdc in 2nd ch from hook, and in each ch around, join. (20 [26] hdc)
This will leave a small gap at the bottom of the row, which should be sewn closed when weaving in the tail.
Rnd 2: Ch 2 (counts as bpdc throughout), fpdc around next st, [bpdc around next st, fpdc around next st] around, join. (10 [13] bpdc, 10 [13] fpdc)
Rnds 3-6 [7]: Repeat Rnd 2 four [five] times more. Do not fasten off.
Hand:
With larger hook and worsted weight yarn:
Thumb Gusset
Toddler size only:
Rnd 7: Ch 2, fpdc around next st, [bpdc around next st, fpdc around next st] 4 times, ch1, [bpdc around next st, fpdc around next st] 5 times, join. (10 bpdc, 10 fpdc, 1 ch-1 sp)
Rnd 8: Ch 2, fpdc around next st, [bpdc around next st, fpdc around next st] across to ch-1 sp, (hdc, ch1, hdc) in ch-1 sp, [bpdc around next st, fpdc around next st] around, join. (10 bpdc, 10 fpdc, 2 hdc, 1 ch-1 sp)
Rnd 9: Ch 2, [fpdc around next st, bpdc around next st] across to ch-1 sp, 2 hdc in ch-1 sp, [fpdc around next st, bpdc around next st] around, join. (11 bpdc, 11 fpdc, 2 hdc)
Child size only:
Rnd 8: Ch 2, [fpdc around next st, bpdc around next st] 6 times, ch1, [fpdc around next st, bpdc around next st] 6 times, fpdc around last st, join. (13 bpdc, 13 fpdc, 1 ch-1 sp)
Rnd 9: Ch 2, [fpdc around next st, bpdc around next st,] across to ch-1 sp, (hdc, ch1, hdc) in ch-1 sp, [fpdc around next st, bpdc around next st] across to last st, fpdc around next st, join. (13 bpdc, 13 fpdc, 2 hdc, 1 ch-1 sp)
Rnd 10: Ch 2, fpdc around next st, [bpdc around next st, fpdc around next st] across to ch-1 sp, (hdc, ch1, hdc) in ch-1 sp, [bpdc around next st, fpdc around next st] around, join. (14 bpdc, 14 fpdc, 2 hdc, 1 ch-1 sp)
Rnd 11: Ch 2, [fpdc around next st, bpdc around next st,] across to ch-1 sp, 2 hdc in ch-1 sp, fpdc around next st, [bpdc around next st, fpdc around next st] around, join. (15 bpdc, 15 fpdc, 2 hdc)
Rnd 11 [13]: Ch 2, fpdc around next st, [bpdc around next st, fpdc around next st] 4 [5] times, ch 1, sk next 5 [7] sts, [fpdc around next st, bpdc around next st] 4 [6] times, fpdc around last st, join. (9 [12] bpdc, 10 [13] fpdc, 1 ch-1 sp)
Rnd 12 [14]: Ch 2, fpdc around next st, [bpdc around next st, fpdc around next st] across to ch-1 sp, hdc in ch-1 sp, fpdc around next st, [bpdc around next st, fpdc around next st] around, join. (9 [12] bpdc, 10 [13] fpdc, 1 hdc)
Fingers
Rnds 13-14 [15-17]: Repeat Rnd 2.
If not working optional edgings, fasten off. If working optional edging, change to eyelash yarn.
Optional Edgings
Finger Edging: With larger hook and eyelash yarn, repeat Rnd 2, fasten off.
Cuff edging: Turn work upside down to work into bottom edge of cuff. Join eyelash yarn with sl st in the bottom of any bpdc from rnd 1. Working around sts from rnd 1, repeat Rnd 2, fasten off.
Finishing
Weave in all ends.
Repeat instructions for 2nd mitt.
Share this Children’s Fingerless Mitts Crochet Pattern on Pinterest!
Here’s an image perfect for pinning.
Rate this Children’s Fingerless Mitts Crochet Pattern!
I hope you enjoy this children’s fingerless mitts pattern. A downloadable pdf of this pattern is available on Ravelry, for a small fee. The fee for the pdf format offsets the advertising revenue lost when you print or download the pattern rather than viewing it online.
Do you want the best of Stitches n Scraps delivered right to your inbox? Don’t miss a stitch – Subscribe now!