Free Crochet Patterns – Amigurumi and Softies

Find the perfect, free crochet pattern for your next project! Browse them all, or select a category from the dropdown menu. Where will your creativity take you today?


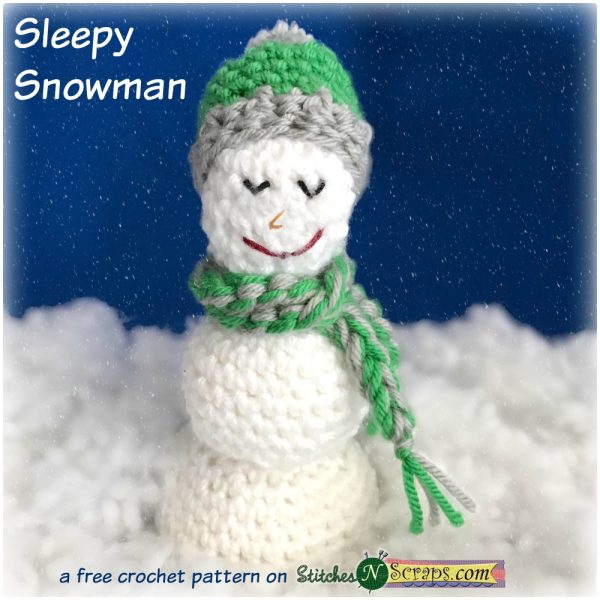
Shhhh! This sweet little snowman is sleepy. He's had a busy day playing in the freshly fallen snow, and now ...More
Seahorse Teether - a free pattern on StitchesNScraps.com
This sweet seahorse crochet teether is a cuddly new friend for your baby, with a teething ring wrapped up in ...More
Hugging Tree - a free crochet pattern on StitchesNScraps.com
 Celebrate the "tree huggers" in your life today, by making them this cute little tree to hug! The pattern is ...More

Free Pattern – Sleepy Snowman

Shhhh! This sweet little snowman is sleepy. He’s had a busy day playing in the freshly fallen snow, and now he’s resting, all cozy in his cap and scarf. Add a Sleepy Snowman to your holiday decor, or make one as a gift! He works up quickly, and is great for using up scraps.

Sleepy Snowman pattern on StitchesNScraps.com

This pattern was designed for the Holiday Stashdown CAL 2017 on CAL Central. With this CAL, you can clean out your stash and end up with some beautiful items for holiday gifting, plus there are tons of great giveaway prizes to be won!

Holiday Stashdown CAL 2017


This pattern is protected by copyright. Please do not distribute or share this pattern in any way other than by sharing a link to this page or to the pattern page on Ravelry. Click here for copyright information.

This pattern contains sponsored content and affiliate links (click for more info). If you click one of these links and then make a purchase, I may be compensated. You get the same great prices, and you will be helping to support this site!

Sleepy Snowman

4-medium 
Add this to your Ravelry Queue

Materials:

  • Worsted weight yarn
    • 50 yds white
    • 10 yds each of green and silver
  • Small amounts of black, red, and orange embroidery floss or crochet thread (to embroider face)
  • Size H / 5 mm hook or size needed to obtain gauge
  • Yarn needle
  • Fiberfill / stuffing material (a couple of handfuls)
  • Stitch marker (optional)
  • Small pom-pom maker (optional)


Difficulty:

Intermediate – Simple stitches worked in continuous rounds, with some assembly and embroidery.

Size:

About 6″ tall (not counting hat).

Gauge:

14 sc x 17 rows = 4 inches. Exact gauge is not critical for this project, but stitches should be tight enough to hold stuffing in.

Abbreviations used:

  • ch = chain
  • sc = single crochet
  • sc2tog = single crochet 2 together
  • fphdc = front post half double crochet
  • bphdc = back post half double crochet
  • sl st = slip stitch
  • st(s) = stitch(es)
  • sp(s) = space(s)
  • rnd = round
  • RS = right side

Recommended Resources:

Instructions:

Notes: 

  • Do not join rounds or turn, unless specifically instructed.
  • You may find it helpful to mark the first stitch of each round with a stitch marker or piece of scrap yarn

Snowman 

Head

Rnd 1 (RS): With white, work 6 sc in a magic loop OR ch 2, 6 sc in 2nd ch from hook.  (6 sc)

Rnd 2: 2 sc in each st around. (12 sc)

Rnd 3: (2 sc in next st, sc in next st) 6 times. (18 sc)

Rnds 4-7: Sc in each st around (18 sc)

Rnd 8: (Sc2tog, sc in next st) 6 times. (12 sc)

Start stuffing head. Continue to stuff snowman as you go. Stuff firmly, but do not overstuff (stuffing should not show through stitches). 

Rnd 9: Sc2tog around (6 sts)

Middle

Rnds 10-11: Repeat rnds 2-3.

Rnd 12: (2 sc in next st, sc in next 2 sts) 6 times. (24 sc)

Rnds 13-17: Sc in each st around (24 sc)

Rnd 18: (Sc2tog, sc in next 2 sts) 6 times. (18 sts)

Rnd 19: Repeat rnd 8.

Bottom

Rnd 20: Repeat rnd 3.

Rnd 21: Repeat rnd 12.

Rnd 22: (2 sc in next st, sc in next 3 sts) 6 times. (30 sc)

Rnds 23-28: Sc in each st around. (30 sc)

Rnd 29: (Sc2tog, sc in next 3 sts) 6 times. (24 sts)

Rnd 30: Repeat rnd 18.

Rnds 31-32: Repeat rnds 8-9.

Fasten off, leaving a 12 inch tail.

Finishing 

Finish stuffing.

With tail and yarn needle, sew through each of last 6 stitches, using a running stitch. Pull tight to close bottom.

Flatten bottom (optional – helps snowman to stand freely): Sew tail up through center of bottom, and bring needle out somewhere on the neckline. Pull gently until bottom flattens. Insert needle 1 stitch over (in any direction), back down through the snowman, and out at the center bottom again.

up through bottom - Sleepy Snowman pattern on StitchesNScraps.compull to flatten bottom - Sleepy Snowman pattern on StitchesNScraps.comdown through neck - Sleepy Snowman pattern on StitchesNScraps.comSnowman body - Sleepy Snowman pattern on StitchesNScraps.com

Eyes & Mouth: Using images as a guide, embroider eyes and mouth. They are both made the same way. Come up at 1 side (A). Go down the other side (B), and come up below and in the middle of those two points (C). Make sure the thread goes under your needle, so it is pulled down slightly in the middle. Go back down as close as possible to the same spot (C), making sure you are catching that thread in your stitch as you do, to lock it in place.

eyes and nose - Sleepy Snowman pattern on StitchesNScraps.com finished face - Sleepy Snowman pattern on StitchesNScraps.com

Nose: I didn’t originally have a nose on my snowman, until one of the testers (Heather – Libbadiah on Ravelry), added a little carrot nose on hers. I liked it so much, I had to add one to mine too! It’s made the same way as the other features, except that the stitch is worked vertically instead of horizontally, and then tacked down off to the side. Thanks Heather!

nose - Sleepy Snowman pattern on StitchesNScraps.com

Weave in all tails. Weave the starting and ending tails of the embroidery floss / threads into sections where they will be hidden – so under where the hat will be, or where the scarf will be.

Hat 

With silver, ch 20, leaving a 16 inch starting tail. Being careful not to twist, join with sl st to form a circle.

Rnd 1 (RS): Ch 1, hdc in back bump of 2nd ch from hook and each ch across, join with sl st to first st. (20 sts)

Rnd 2: Ch 1, bphdc in first st, (fphdc in next st, bphdc in next st) around to last st, fphdc in next st, join with sl st, changing to green. (20 sts)

Rnds 3-6: With green, sc in each st around. Do not join. (20 sc)

Rnd 6: (Sc2tog, sc in next st) 6 times, sc2tog. Do not join. (13 sc)

Rnd 7:  Sc in next st, sc2tog 6 times. Fasten off. (7 sts)

Use green tail to sew top of hat shut, then weave in the end.

Make a pom pom with silver yarn, and trim to about 1 inch. Use tails from pom pom to sew or tie it onto the hat, then weave in the ends.

Use starting (silver) tail from hat to sew hat to snowman’s head, then weave in the end.

Snowman's Hat - Sleepy Snowman pattern on StitchesNScraps.com hat placement - Sleepy Snowman pattern on StitchesNScraps.com

Scarf

With silver and green yarns together, ch 36.  Tie a knot at each end of the chain and trim tails to form “fringe”. Wrap around snowman’s neck as desired.

scarf - Sleepy Snowman pattern on StitchesNScraps.com

Important! If you are making this for children, be sure to sew all pieces (including the scarf) securely into place so they can’t be removed or get wrapped around little fingers. 


I hope you enjoy making this pattern! Thanks to pandastamper, tawnierose, libbadiah, and JStockert for testing it!

A downloadable pdf of this pattern is also available in my Craftsy store or on Ravelry, for a small fee. The fee for the pdf format is to offset the advertising revenue lost when you print or download the pattern rather than viewing it online.

Do you want the best of Stitches ‘N’ Scraps delivered right to your inbox? The Stitches ‘N’ Scraps email newsletter includes highlights from the blog as well as special features not available elsewhere. Don’t miss a stitch – Subscribe now!

Seahorse Teether - a free pattern on StitchesNScraps.com

Seahorse Crochet Teether

This sweet seahorse crochet teether is a cuddly new friend for your baby, with a teething ring wrapped up in its tail.

Seahorse Teether - a free pattern on StitchesNScraps.com

This content is protected by copyright. See this Terms of Use / Copyright page for more information.

This post contains sponsored content and/or affiliate links. If you click an affiliate link and make a purchase, I may get a commission.


Red Heart Baby Hugs Yarn

This adorable seahorse teether is made in Red Heart Baby Hugs yarn, which I received free from Red Heart for this design. The pattern uses both worsted weight (medium) and dk weight (light) versions of Baby Hugs Yarn.

Re Heart Baby Hugs Giveaway on StitchesNScraps.com

Just like the name suggests, this yarn has the soft texture and bright colors that babies love. Moms love that Baby Hugs is OEKO-TEX® Standard 100 Class I certified, which means it has been tested to be free from harmful levels of over 300 substances!

Make the matching blanket

If you like this pattern, be sure to check out the matching Anemone security blanket – you can make both patterns with just one skein of medium and one skein of light!

Anemone Security Blanket - a free pattern on StitchesNScraps.com

Continuous Rounds and Running Stitch Markers

Use a stitch marker to keep track of the beginning of the round. You can use a regular stitch marker, but my favorite technique is to use a piece of scrap yarn as a running stitch marker instead. Learn how in this Running Stitch Markers tutorial.

Running stitch marker spiraling around tail - Seahorse Teether - a free pattern on StitchesNScraps.com

The marker spirals around the work because of the way continuous rounds gradually shift by one stitch every 2 rounds. In the instructions, the shaping also shifts to account for this. Read more about how this works in this post about Why Continuous Rounds Shift.

Materials

  • Yarn:
    • 55-60 yds Red Heart Baby Hugs Medium – Aloe
    • 10-15 yds Red Heart Baby Hugs Light – Peachy
    • Small amount of black thread or yarn for eyes.
    • 55-60 yds Red Heart Baby Hugs Medium – Aloe
    • 10-15 yds Red Heart Baby Hugs Light – Peachy
    • Small amount of black thread or yarn for eyes.
  • Hook: Size H / 8 (5 mm) hook or size needed to obtain gauge
  • Notions:
    • Maple teething ring
    • Fiberfill / stuffing material
    • Yarn or Tapestry needle
    • Stitch marker or scrap yarn

Project Level

Intermediate: The stitches are easy but the shaping is more complicated. Most important thing is to keep track of the first stitch of each round.

Size

About 8 inches long when complete, not counting teething ring. Size will vary depending on your gauge and finishing (how tightly you curl the tail, etc).

Gauge

16 sc x 18 rows = 4 inches. Exact gauge is not critical. It’s best to use the smallest hook you are comfortable with for the medium yarn. Your stitches should be a bit tight, so the stuffing doesn’t come out.

Abbreviations used

This pattern uses US terms.

  • ch = chain
  • sc = single crochet
  • hdc = half double crochet
  • sc2tog = single crochet next 2 stitches together
  • hdc-dec = half double crochet decrease (see special stitches)
  • dc = double crochet
  • sl st = slip stitch
  • st(s) = stitch(es)
  • sp(s) = space(s)
  • rnd = round
  • yo = yarn over
  • WS = wrong side
  • RS = right side

Special Stitches:

Half Double Crochet Decrease (hdc-dec): Yo, insert hook into next st, yo and draw up a loop (3 loops on hook). Insert hook into next st, yo and draw up a loop (4 loops on hook). Yo and pull through all 4 loops.

Picot: Ch 3, sl st in 3rd ch from hook.

Instructions

The entire body of the seahorse is worked in continuous rounds. Do NOT turn or join rounds unless specifically indicated.

Tail

Rnd 1 (RS): With Aloe, make a magic circle leaving an 8-inch tail for sewing. Ch 1, 4 sc in circle (4 sts)

OR Alternate Rnd 1: With Aloe, ch 2, 4 sc in 2nd ch from hook. (4 sts)

Rnd 2: (2 sc in next st, sc in next st) twice. (6 sts)

Rnds 3-4: Sc in next 3 sts, hdc in next 3 sts.

Rnd 5-6: Hdc in next st, sc in next 3 sts, hdc in next 2 sts.

Rnds 7-8: Hdc in next 2 sts, sc in next 3 sts, hdc in next st.

Rnds 9-10: Hdc in next 3 sts, sc in next 3 sts.

Rnds 11-12: Sc in next st, hdc in next 3 sts, sc in next 2 sts.

Rnds 13-14: Sc in next 2 sts, hdc in next 3 sts, sc in next st.

Rnd 15: Sc in next 2 sts, 2 sc in next st, hdc in next 3 sts. (7 sts)

Rnd 16: Sc in next 4 sts, hdc in next 2 sts, 2 hdc in next st. (8 sts)

Begin stuffing your seahorse and continue stuffing as you go. It should be plump, but not so stuffed that you can see the stuffing through the stitches. 

Rnds 17-18: Hdc in next st, sc in next 4 sts, hdc in next 3 sts.

Rnds 19-20: Hdc in next 2 sts, sc in next 4 sts, hdc in next 2 sts.

Rnds 21-22: Hdc in next 3 sts, sc in next 4 sts, hdc in next st.

Rnds 23-24: Hdc in next 4 sts, sc in next 4 sts.

Rnds 25-26: Sc in next st, hdc in next 4 sts, sc in next 3 sts

Rnds 27-28: Sc in next 2 sts, hdc in next 4 sts, sc in next 2 sts

Rnds 29-30: Sc in next 3 sts, hdc in next 4 sts, sc in next st.

Body

Rnd 31: [2 sc in next st, sc in next st] twice, sc in next 4 sts. (10 sts)

Rnd 32: [Sc in next st, 2 sc in next st] twice, sc in next 6 sts. (12 sts)

Rnd 33: Sc in next 2 sts, 2 sc in next st, sc in next 3 sts, 2 sc in next st, sc in next 5 sts. (14 sc)

Rnd 34: [Sc in next 3 sts, 2 sc in next st] twice, sc in next 6 sts. (16 sts)

Rnd 35: Sc in next 4 sts, [2 sc in next st, sc in next 5 sts] twice. (18 sts)

Rnd 36: [Sc in next 5 sts, 2 sc in next st] twice, sc in next 6 sts. (20 sts)

Rnds 37-38: Sc in next 6 sts, hdc in next 9 sts, sc in next 5 sts.

Rnds 39-40: Sc in each st around

Rnd 41: sc in next 8 sts, sc2tog, sc in next 5 sts, sc2tog, sc in next 3 sts. (18 sts)

Rnd 42: Sc in each st around

Rnd 43: Sc in next 8 sts, sc2tog, sc in next 5 sts, sc2tog, sc in next st. (16 sts)

Rnd 44: Sc in each st around

Rnd 45: Sc in next 9 sts, sc2tog, sc in next 3 sts, sc2tog. (14 sts)

Rnd 46: Sc in each st around

Neck

Rnd 47: Sc2tog, hdc in next 9 sts, sc2tog, sc in next st. (12 sts)

Rnd 48: Sc in next st, hdc in next 9 sts, sc in next 2 sts.

Rnd 49: Sc in next st, sc2tog, hdc in next 7 sts, sc2tog. (10 sts)

Rnd 50: Sc in next 2 sts, hdc in next 7 sts, sc in next st.

Rnds 51-52: Sc in next 4 sts, hdc in next 5 sts, sc in next st.

Rnds 53-54: Sc in next 5 sts, hdc in next 5 sts.

Head

Rnd 55: Hdc in next st, [sc in next st, 2 sc in next st] twice, sc in next st, hdc in next 4 sts. (12 sts).

Rnd 56: Hdc in next st, sc in next 2 sts, 2 sc in next st, sc in next st, 2 sc in next st, sc in next 2 sts, hdc in next 4 sts. (14 sts)

Rnd 57: Hdc in next 2 sts, sc in next 2 sts, 2sc in next st, sc in next 3 sts, 2 sc in next st, sc in next 2 sts, hdc in next 3 sts. (16 sts)

Rnd 58: Hdc in next 3 sts, sc in next 9 sts, hdc in next 4 sts.

Rnds 59-60: Hdc in next 5 sts, sc in next 7 sts, hdc in next 4 sts.

Rnd 61: Hdc in next st, hdc-dec, hdc in next 2 sts, sc in next 7 sts, hdc in next 2 sts, hdc-dec (14 sts).

Rnd 62: Hdc in next st, hdc-dec, hdc in next st, sc in next 7 sts, hdc in next st, hdc-dec. (12 sts).

Remember to continue stuffing as you go – head gets very small at the end and will be harder to stuff.

Rnd 63: Hdc in next st, hdc-dec, sc in next 7 sts, hdc-dec. (10 sts)

Rnd 64: Hdc in next st, hdc-dec, sc in next 5 sts, hdc-dec. (8 sts)

Rnd 65: Hdc in next 3 sts, sc in next 5 sts.

Rnd 66: Sc in each st around.

Rnd 67: Sc2tog, sc in next 4 sts, sc2tog. (6 sts)

Rnd 68: Sc in each st around.

Rnd 69: [Sc in next st, sc2tog] twice. (4 sts)

Rnd 70: Sc in each st around.

Rnd 71: [2 sc in next st, sc in next st] twice. (6 sts)

Rnd 72: Sc in each st around.

Rnd 73: Sc2tog 3 times, fasten off.

Finish stuffing and weave in any ends except for the long starting tail.

Eye and neck pictures show fin already attached – please ignore that, it will be done later.

Make eye: With black yarn or thread, sew through both sides of head at the same time where you want the eye to be. Pull snuggly so the eye sinks in a little. When you’re happy with it, sew in the ends.

Eye - Seahorse Teether - a free crochet pattern on StitchesNScraps.com

Secure neck: If you leave the neck as-is, the head will be able to move up and down a bit more. If you prefer a more secure / sharper crease in the neck as shown, use a scrap of Aloe to sew it in place. Fold the head down against the neck, and sew them together at the crease.

Securing neck - Seahorse Teether - a free crochet pattern on StitchesNScraps.com

Fin

Foundation chain: With Peachy, ch 46

Row 1: Turn, sl st in 2nd ch from hook, sc in next ch, (picot, sc in next 3 chs) 10 times, sc in next 4 chs, leaving remaining chains unworked.

Row 2: Turn, sk first 2 sc, [ch 1, dc] 5 times in next sc, ch 1, sk next 2 sc, sl st in next sc.

Row 3: Turn, sk sl st, sc in first ch-1 sp, [picot, sc in next dc, sc in next ch-1 sp] 5 times; continuing in unworked chs from foundation chain, sc in next ch, picot, [sc in next 3 chs, picot] twice, sc in next ch, sl st in last ch.

Fasten off, leaving an 18-inch tail for sewing.

Attach Fin

You may find it helpful to pin or baste fin in place before sewing. Using long tail, Sew through the base of the fin from front to back, then through the seahorse underneath, from back to front. Continued in this manner to attach entire length of the fin. If desired, repeat seam in opposite direction to make it extra secure. Weave in fin ends.

Sewing on fin - Seahorse Teether - a free crochet pattern on StitchesNScraps.com

Attach Teething Ring

Slide the teething ring onto the tail, curl the tail up, and sew it securely in place using the end.

Tail - Seahorse Teether - a free crochet pattern on StitchesNScraps.com

Weave in any remaining ends.


I hope you enjoy this Seahorse Crochet Teether pattern. Special thanks to Red Heart for providing the beautiful yarn, and to MixedKreations, dollyBambasDalColloLungo, wilmaelee, and asdlane for testing the pattern!

A downloadable pdf of this pattern is available on Ravelry for a small fee. The fee for the pdf format offsets the advertising revenue lost when you print or download the pattern rather than viewing it online.

Do you want the best of Stitches n Scraps delivered right to your inbox? Don’t miss a stitch – Subscribe now!

Hugging Tree - a free crochet pattern on StitchesNScraps.com

Free Pattern – Hugging Tree

Happy Earth Day! Celebrate the “tree huggers” in your life today, by making them this cute little tree to hug! The pattern is designed in Lion Brand Vanna’s Choice yarns, which I received free from Lion Brand for this project. It’s squishably soft and durable, and the tonal Taupe Mist colorway adds a great textured look to the trunk. If you prefer to use natural fibers, Lion Brand’s 24/7 Cotton is a great choice as well!

Hugging Tree - a free crochet pattern on StitchesNScraps.com


This pattern is protected by copyright. Please do not distribute or share this pattern in any way other than by sharing a link to this page or to the pattern page on Ravelry. Click here for copyright information.

This pattern contains sponsored content and affiliate advertisements (click for more info). If you click one of these advertisements and then make a purchase, I may be compensated. You get the same great prices, and you will be helping to support this site!

Hugging Tree

4-medium  

Add this to your Ravelry Queue

Materials:

  • Lion Brand Vanna’s Choice worsted weight yarn:
    • 125 yds each of Fern (green) and Taupe Mist (brown)
    • 10-20 yds each of White, Black and Scarlet (red)
  • OR Lion Brand 24/7 Cotton worsted weight yarn:
    • 125 yds each of Grass (green) and Cafe Au Lait (brown)
    • 10-20 yds each of White, Black, and Red.
  • Size I / 9 (5.5 mm) hook
  • Yarn or tapestry needle
  • Stuffing / fiber fill

Difficulty:

Easy – Basic stitches with some shaping.

Size:

About 12-13 inches tall.

Gauge:

14 sc x 16 rows = 4 inches. Gauge is not critical for this project, as long as it is tight enough so that stuffing doesn’t fall out.

Abbreviations used:

  • ch = chain
  • sc = single crochet
  • sc2tog = single crochet 2 stitches together
  • dc2tog = double crochet 2 stitches together
  • dc3tog = double crochet 3 stitches together
  • st(s) = stitch(es)
  • sl st = slip stitch
  • sk = skip
  • sp(s) = space(s)
  • RS = Right Side
  • WS = Wrong Side

Recommended Resources:

Notes:

  • The tree tops and trunk are purposely not symmetrical. Make sure the tree tops are both facing the same direction when you sew them together. What is the right side on one will be the wrong side on the other.
  • If you leave long tails, you can use them for sewing pieces together.

Instructions:

Tree tops (make 2):

Chain 28 loosely.

Row 1: Sc in second ch and in next ch, sc2tog, sc in next 3 chs, 3 sc in next ch, sc in next 3 chs, sc2tog, sc in next 3 chs, 3 sc in next ch, sc in next 4 chs, sc2tog, sc in last 4 chs. (28 sts)

On first tree top, mark row 1 as RS. On 2nd tree top, mark row 2 as RS. 

Row 2: Ch 1, turn, 2 sc in first st, sc in next 3 sts, sc2tog, sc in next 4 sts, 3 sc in next st, sc in next 3 sts, sc2tog, sc in next 4 sts, 3 sc in next st, sc in next 3 sts, sc2tog, sc in next st, 2 sc in last st. (31 sts)

Row 3: Ch 1, turn, 2 hdc in first st, hdc in next st, dc3tog, hdc in next st, sc in next 5 sts, hdc in next 2 sts, dc3tog, hdc in next st, sc in next 4 sts, hdc in next 3 sts, dc3tog, hdc in next 3 sts, 2 hdc in last st (27 sts)

Row 4: Ch 1, turn, 2 sc in first st, sc in next st, hdc in next 2 sts, dc2tog, hdc in next 2 sts, sc in next 2 sts, 2 sc in next st, sc in next st, hdc in next st, dc2tog, hdc in next 2 sts, sc in next 2 sts, 2 sc in next st, sc in next st, hdc in next st, dc2tog, hdc in next 2 sts, 2 hdc in last st. (28 sts)

Row 5: Ch 1, turn, 2 sc in first st, sc in each st across to last st, 2 sc in last st. (30 sts)

Rows 6-8: Ch 1, turn, sc in each st across.

Row 9: Ch 1, turn, sc2tog, sc in each st across, sc2tog. (28 sts)

Row 10: Ch 1, turn, sc2tog, sc in each st across to last 2 sts, sc2tog. (26 sts)

Row 11: Ch 1, turn, 2 sc in first st, sc in each st across. (27 sts)

Row 12: Ch 1, turn, sc in each st across to last st, 2 sc in last st. (28 sts)

Row 13: Ch 1, turn, 2 sc in first st, sc in each st across to last st, 2 sc in last st. (30 sts)

Row 14: Ch 1, turn, 2 sc in first st, sc in each st across. (31 sts)

Row 15: Ch 1, turn, sc in each st across to last st, 2 sc in last st. (32 sts)

Row 16: Ch 1, turn, sc in each st across.

Row 17: Ch 1, turn, sc in each st across to last 2 sts, sc2tog. (31 sts)

Row 18: Ch 1, turn, sc2tog, sc in each st across. (30 sts)

Rows 19 – 21: Ch 1, turn, sc2tog, sc in each st across to last 2 sts, sc2tog. (24 sts)

Row 22: Ch 1, turn, sc2tog, sc in next st, hdc in next 3 sts, sc in next st, hdc in next 8 sts, sc in next st, hdc in next 5 sts, sc in next st, sc2tog. (22 sts)

Row 23: Ch 1, turn, sc in first 2 sts, hdc in next 4 sts, sc in next 3 sts, hdc in next 6 sts, sc in next 2 sts, hdc in next 2 sts, sc in next st, sc2tog. (21 sts)

Row 24: Ch 1, turn, sc2tog, hdc in next st, sc in next st, sl st in next 3 sts, sc in next st, hdc in next 3 sts, sc in next st, sl st in next 3 sts, sc in next st, hdc in next 2 sts, sc in next st, sc2tog. (13 sts, 6 sl sts)

Edging: Ch 1, do not turn, work 23 sc evenly spaced in sides of rows across to the foundation chain. Ch 1, sc in bottom of each ch across foundation chain. Ch 1, work 25 sc evenly spaced in sides of rows up to the top. Ch 1, join with sl st to first st of row 24, fasten off.

Tree Top pieces - Hugging Tree - A free crochet pattern on StitchesNScraps.com

Trunk:

Chain 10.

Rnd 1: 2 sc in 2nd ch from hook, sc in next 7 chs, 3 sc in last ch, working on opposite side of chain, sc in next 8 chs, join. (20 sts)

Rnd 2: Ch 1, turn, 2 sc in first st, sc in next 7 sts, 2 sc in each of next 3 sts, sc in next 7 sts, 2 sc in each of next 2 sts, join. (26 sts)

Rnd 3 (RS): Ch 1, turn, working in back loops only, sc in each st around, join.

Rnd 4: Ch 1, turn, sc in each st around, join.

Rnd 5: Ch 1, turn, (sc2tog, sc in next 11 sts) twice, join. (24 sts)

Rnd 6: Ch 1, turn, sc in next 2 sts, sc2tog, sc in next 16 sts, sc2tog, sc in last 2 sts, join. (22 sts)

Rnd 7: Ch 1, turn, sc in first st, sc2tog, sc in next 16 sts, sc2tog in next 2 sts, sc in last st, join (20 sts)

Rnd 8: Ch 1, turn, sc in next 7 sts, sc2tog twice, sc in next 9 sts, join. (18 sts)

Rnds 9-12: Ch 1, turn, sc in each st around, join.

Rnd 13: Ch 1, turn, (sc2tog, sc in next 7 sts,) twice, join. (16 sts)

Rnds 14-18: Ch 1, turn, sc in each st around, join.

Rnd 19: Ch 1, turn, sc in first st, 3 sc in next st, sc in next 7 sts, 3 sc in next st, sc in last 6 sts, join. (20 sts)

Rnd 20: Ch 1, turn, sc in first 6 sts, 2 sc in next st, 3 sc in next st, 2 sc in next st, sc in next 8 sts, 3 sc in next st, sc in last 2 sts, join. (26 sts)

Rnd 21: Ch 1, turn, sc in first 3 sts, 3 sc in next st, sc in next 12 sts, 3 sc in next st, sc in next 10 sts, join. (30 sts)

Rnds 22 – 23: Ch 1, turn, sc in each st around, join, fasten off.

Now we need to divide the trunk into 2 flaps, to make it easier to attach it to the tree top later.  

Row 24a: Turn, sk first 10 sts from end of last rnd, join Taupe with sl st in next st (this should be at one of the side edges), ch 1, sc in same st and in next 14 sts, leaving remaining 15 sts unworked.

Row 25a – 27a: Ch 1, turn, sc in each st across. Fasten off at end of row 27a.

Row 24b: Do not turn, join taupe in first unworked st from row 23, ch 1, sc in same st and in next 14 sts.

Rows 25b – 27b: Repeat rows 25a – 27a.  Fasten off.

Weave in ends

Trunk - Hugging Tree - A free crochet pattern on StitchesNScraps.com

Face:

Pupils (make 2): Make a magic circle, work 6 sc inside the circle, pull circle closed, fasten off, use seamless join. (see Recommended Resources)

Whites of eyes (make 2):

Rnd 1 (WS): Make a magic circle, work 6 sc inside the circle, pull circle closed and join with a sl st to first st.

Rnd 2: Ch 1, turn, 2 sc in first st, 2 hdc in next st, 3 dc in next st, 2 hdc in next st, 2 sc in each of next 2 sts, use seamless join. (13 sts)

Sew pupils to whites of eyes, weave in black ends.

Mouth: With red, ch 15, fasten off.

Face pieces - Hugging Tree - A free crochet pattern on StitchesNScraps.com

Assembly / Finishing:

(use main image as a guide)

  • Sew eyes and mouth to RS of first tree top securely (so little fingers can’t rip them off!). You may find it helpful to pin them in place first.

Finished face - Hugging Tree - A free crochet pattern on StitchesNScraps.com

  • With green yarn, sew top flaps of trunk to wrong side of each tree top as shown below. Be sure the edges of the tree tops line up with each other. The separate trunk flaps will allow for a little movement, but it’s important to get it lined up as closely as possible. To do this, sew one flap onto one tree top piece, then line up the other piece and pin or baste the other flap into place before sewing. I sewed 2 seams on each flap, just to be sure they were secure.

Hugging Tree - A free crochet pattern on StitchesNScraps.com

  • Weave in all ends and stuff trunk
  • Hold tree tops together so that the front (face side) is facing you, and edging stitches line up. Working through both pieces, join yarn with sl st in the stitch closes to the right edge of the trunk, (ch 1, sl st) in each st around, stuffing as you go.

Joining tree tops - Hugging Tree - A free crochet pattern on StitchesNScraps.com

  • Make dimples: Secure a length of yarn near where the first dimple should be, by weaving in one end. Insert your needle through the stuffing, across to the other side of the face where the 2nd needle should be. Pull GENTLY – the harder you pull, the deeper the dimple will be. Now insert your needle in the next stitch over, and go back through to the starting point. Weave in the end, cut it with a little bit of a tail, and tuck the tail into the stuffing (I like to sew it through to the other side, pull gently, and cut the yarn so it gets sucked back inside when it is cut.)

  Making Dimples - Hugging Tree - A free crochet pattern on StitchesNScraps.com  Making Dimples - Hugging Tree - A free crochet pattern on StitchesNScraps.com

  • Weave in remaining ends the same way, using them to sew up any gaps.
  • HUG your tree! (No really, it helps to distribute the stuffing more evenly).

I hope you enjoy the pattern! Special thanks to Gaelle from La laine de l’ogre for testing it!

A downloadable pdf of this pattern is also available in my Craftsy store or on Ravelry, for a small fee. The fee for the pdf format is to offset the advertising revenue lost when you print or download the pattern rather than viewing it online.

Do you want the best of Stitches ‘N’ Scraps delivered right to your inbox? The Stitches ‘N’ Scraps email newsletter includes highlights from the blog as well as special features not available elsewhere. Don’t miss a stitch – Subscribe now!

A basic felted ball

Free Pattern – Simple crochet balls

A basic felted ballI ran out of dryer sheets the other day, so I decided to try making felted dryer balls instead. I only made it through one ball before other projects (and life in general) got in the way. One day I’ll make more, and then I’ll let you know how they work!  Meanwhile, I thought I would share with you a general recipe for making crocheted balls.

This is a great starting point for buttons, dolls heads, ornaments, toys, and more! Depending on the yarn you use and your gauge, you can make lots of different sizes. Really large balls may look a little misshapen (more like a capsule than a ball). I wouldn’t recommend making anything more than about 6-8 inches in diameter using these instructions.  I made my ball about 4 inches in diameter, and stuffed it with leftover yarn scraps. I also felted my ball by hand and then ran it through the dryer a couple of times, which makes it soft and fuzzy.


This pattern is protected by copyright. Please do not distribute or share this pattern in any way other than by sharing a link to this page or to the pattern page on Ravelry. Click here for copyright information.

This pattern contains affiliate links (click for more info). If you click one of these links and then make a purchase, I may be compensated. You get the same great prices, and you will be helping to support this site!

Simple Crocheted Balls

Add this to your Ravelry Queue

Materials:

  • Any yarn or thread desired. If you want to felt it, be sure to use a felting wool (NOT superwash!). Yardage will vary depending on gauge – I used about 75 yds of a bulky yarn for a 4″ ball.
  • Appropriate size crochet hook for your yarn. I used size I/9 (5.5 mm)
  • A locking stitch marker (or safety pins, or scrap yarn) to mark beginning of rounds
  • Yarn or tapestry needle

Difficulty:

Beginner – just single crochet (with increases and decreases), worked in the round.

Size:

Size will vary based on materials used. Mine came out to about 3 inches diameter after felting. I do not recommend using this pattern for balls larger than 8 or 9 inches.

Gauge:

Gauge is not important, but pay careful attention to the notes for each section.

Abbreviations used:

  • ch = chain
  • sc = single crochet

Notes:

  • This pattern is worked in continuous rounds. Do not join or turn unless specifically indicated.
  • Use a stitch marker, safety pin, or loop of yarn to mark the first stitch of each round.

Recommended Resources:

Bottom:

NOTE: These instructions include extra rounds for lighter weight yarns or larger balls. Measure your piece periodically, and stop when you reach your desired diameter at the end of a round. If felting, remember it will shrink a bit. Make a note of the last round you completed, and then skip ahead to the “Middle” section. 

Rnd 1: In magic loop, work 6sc.
OR
Ch 6, join with sl st to form a ring. Ch 1, 6 sc in ring.

Rnd 2: 2 sc in each st around (12 sc)

Rnd 3: (2 sc in next st, sc in next st) 6 times. (18 sc)

Rnd 4: (2 sc in next st, sc in next 2 sts) 6 times. (24 sts)

Rnd 5: (2 sc in next st, sc in next 3 sts) 6 times. (30 sts)

Rnd 6: (2 sc in next st, sc in next 4 sts) 6 times. (36 sts)

Rnd 7: (2 sc in next st, sc in next 5 sts) 6 times. (42 sts)

Rnd 8: (2 sc in next st, sc in next 6 sts) 6 times. (48 sts)

Rnd 9: (2 sc in next st, sc in next 7 sts) 6 times. (54 sts)

Rnd 10: (2 sc in next st, sc in next 8 sts) 6 times. (60 sts)

Rnd 11: (2 sc in next st, sc in next 9 sts) 6 times. (66 sts)

Rnd 12: (2 sc in next st, sc in next 10 sts) 6 times. (72 sts)

Rnd 13: (2 sc in next st, sc in next 11 sts) 6 times. (78 sts)

Rnd 14: (2 sc in next st, sc in next 12 sts) 6 times. (84 sts)

Rnd 15: (2 sc in next st, sc in next 13 sts) 6 times. (90 sts)

Middle:

NOTE: On the table below, look up the number of rows you completed in the beginning section to see how many rounds to work in this section. For example, I worked through Rnd 6 in the beginning section, so for the middle section I worked the middle rnd a total of 9 times.

Middle rnd: Sc in each st around.

If you stopped after: Work middle rnd a total of: Then start bottom at:
Rnd 2 3 times Rnd 14
Rnd 3 5 times Rnd 13
Rnd 4 6 times Rnd 12
Rnd 5 8 times Rnd 11
Rnd 6 9 times Rnd 10
Rnd 7 11 times Rnd 9
Rnd 8 12 times Rnd 8
Rnd 9 14 times Rnd 7
Rnd 10 15 times Rnd 6
Rnd 11 17 times Rnd 5
Rnd 12 18 times Rnd 4
Rnd 13 20 times Rnd 3
Rnd 14 21 times Rnd 2
Rnd 15 23 times Rnd 1

Bottom:

NOTES:

  • On the table above, look up the number of rows you completed in the beginning section to see what round to start on this section. For example, I worked through Rnd 6 in the beginning section, so for this section I would start on rnd 10.
  • Start stuffing your ball as you go, before it gets too tight. 

Rnd 1: (Sc in next 13 sts, sc2tog over next 2 sts) 6 times (84 sts)

Rnd 2: (Sc in next 12 sts, sc2tog over next 2 sts) 6 times (78 sts)

Rnd 3: (Sc in next 11 sts, sc2tog over next 2 sts) 6 times (72 sts)

Rnd 4: (Sc in next 10 sts, sc2tog over next 2 sts) 6 times (66 sts)

Rnd 5: (Sc in next 9 sts, sc2tog over next 2 sts) 6 times (60 sts)

Rnd 6: (Sc in next 8 sts, sc2tog over next 2 sts) 6 times (54 sts)

Rnd 7: (Sc in next 7 sts, sc2tog over next 2 sts) 6 times (48 sts)

Rnd 8: (Sc in next 6 sts, sc2tog over next 2 sts) 6 times (42 sts)

Rnd 9: (Sc in next 5 sts, sc2tog over next 2 sts) 6 times (36 sts)

Rnd 10: (Sc in next 4 sts, sc2tog over next 2 sts) 6 times (30 sts)

Rnd 11: (Sc in next 3 sts, sc2tog over next 2 sts) 6 times (24 sts)

Rnd 12: (Sc in next 2 sts, sc2tog over next 2 sts) 6 times (18 sts)

Rnd 13: (Sc in next st, sc2tog over next 2 sts) 6 times (12 sts)

Rnd 14: (sc2tog over next 2 sts) 6 times (6 sts), sl st in first st. Fasten off.

Finish stuffing if necessary, then sew top and bottom closed with tails. Weave tails in a little and then tuck the ends right into the ball.

Felting (optional):

NOTE: If you’re not sure about the colorfastness of your materials, felt by hand first and make sure no color bleeds out.  

To felt by hand: Place ball(s) in hot water with a little bit of soap. Rub vigorously until desired texture is achieved (depending on your yarn, this may take a while).

To felt by machine: First place ball(s) inside something to keep fuzz from getting out. If felting multiple balls at once, try using a stocking and tying the stocking shut above and below each ball (use a non-felting yarn to tie stocking shut). Once secure, run through a hot cycle, preferably with other clothes, and then run through the dryer. May take a couple of cycles to felt completely.


I hope you enjoy the pattern!

If you would like to receive notifications of new posts and patterns as they become available, please follow this blog. You can follow by e-mail (look at the sidebar on the right for the follow by email option), or via RSS feed, or via your WordPress.com reader: Follow Stitches ‘N’ Scraps on WordPress.com