Find the perfect, free crochet pattern for your next project! Browse them all, or select a category from the dropdown menu. Where will your creativity take you today?
Feisty the Baby Fox is full of mischief and fun! They love to play chase and hunting games with their other baby animal friends. This fox amigurumi crochet pattern is quick and easy, and makes a great first amigurumi project.
This crochet amigurumi watering can is my second design for the 2025 Toybox Crochet Along (CAL) at CAL Central. The CAL is separated into 4 themes, and our current theme is Woodland Creatures.
My previous pattern, this Mini Watering Can, was for the Garden theme.
Join in the fun on the Facebook Group. See the main post for the full schedule, other patterns, and giveaway information too!
Red Foxes
I live in the Fox River Valley area of Illinois. As the name would suggest, foxes, particularly red foxes, are everywhere in these parts! They’re most active at night, but you can sometimes catch them resting in a sunny spot in a backyard.
Here’s an Instagram reel of a beautiful fox my dog and I saw finishing up some breakfast while out for a walk. We’ve seen this same fox a few times, along with a partner.
One autumn, my mom had a fox who would paw at her back door wanting to come inside! Foxes are beautiful to look at and help keep the area free of rodents and other pests, but they’re definitely wild creatures and best enjoyed from a distance.
Baby Buddies
Fiesty loves to play with his baby friends. All are made with the same basic body design. Make them all for a playtime set!
Fairfield World generously sent me lots of Poly-Fil Premium Polyester Fiber Filling for these softie designs. This is my go-to stuffing material for all my crochet amigurumi patterns because it’s so soft and squishy and easy to use.
They also send me some of their Poly Pellets, which are great for adding a bit of weight and stability to your amigurumi. For this Fox amigurumi pattern, I put a few pellets (about 20 or 30) into a small plastic bag, and nestled that bag into the stuffing, near the bottom. Because the pellets can be a choking hazard if they get loose, avoid using them if the project is for small children.
Increase (inc): Sc in back loop only of next st, then sc in both loops of same st. See full tutorial here.
Decrease (dec): Insert hook into front loop only of both indicated sts, yo and draw up a loop, yo and draw through both loops on hook.
This is an alternative to a single crochet 2-together (sc2tog) stitch. If you prefer, you can use the standard sc2tog instead.
Instructions
Body
Body, head, and muzzle are worked in continuous rounds. Do not join or turn unless indicated. Mark first stitch of each round.
With orange, ch 2
Rnd 1 (RS): 6 sc in 2nd ch from hook. (6 sts)
Rnd 2: Inc in each st around. (12 sts)
Rnd 3: [Inc in next st, sc in next st] around. (18 sts)
Rnd 4: [Inc in next st, sc in each of next 2 sts] around. (24 sts)
Rnd 5: Sc in each st around.
Rnd 6: [Inc in next st, sc in each of next 3 sts] around. (30 sts)
Rnds 7-10: Sc in each st around.
Rnd 11: [Dec, sc in each of next 3 sts] around. (24 sts)
Rnds 12-15: Sc in each st around.
Rnd 16: [Dec, sc in each of next 2 sts] around. (18 sts)
Rnds 17-18: Sc in each st around.
Rnd 19: [Dec, sc in next st] around. (12 sts)
Stuff Body most of the way full and continue stuffing as you go.
Head
Rnds 20-22: Repeat Rnds 3-5 of Body
Rnd 23: Sc in next 6 sts, ch 6, sk next 6 sts, sc in last 12 sts. (18 sts, 1 ch-6 sp for muzzle opening)
Rnd 24: Sc in each st and each ch around. (24 sts)
Rnd 25: Sc in each st around.
Rnd 26: [Dec, sc in next 2 sts] around. (18 sts)
Rnd 27: [Dec, sc in next st] around. (12 sts)
Rnd 28: Dec around. (6 sts)
Fasten off.
Using tails, sew top of Head and bottom of Body closed, then weave in all ends.
Finish stuffing Head through muzzle opening.
Front Patch
With white, ch 7.
Row 1 (RS): Sc in 2nd ch from hook and each ch across. (6 sts)
Row 2: Ch 1, turn, sc in first st, inc in next st, sc in next 2 sts, inc in next st, sc in last st. (8 sts)
Row 3: Ch 1, turn, sc in each st across.
Row 4: Ch 1, turn, sc in first st, inc in next st, sc in next 4 sts, inc in next st, sc in last st. (10 sts)
Rows 5-8: Ch 1, turn, sc in each st across.
Row 9: Ch 1, turn, sc in first st, dec, sc in next 4 sts, dec, sc in last st. (8 sts)
Rows 10-13: Ch 1, turn, sc in each st across.
Row 14: Ch 1, turn, sc in first st, dec, sc in next 2 sts, dec, sc in last st. (6 sts)
Rows 15-17: Ch 1, turn, sc in each st across.
Row 18: Rep Row 2.
Row 19: Rep Row 4.
Row 20: Ch 1, turn, sc in each st across. (10 sts)
Edging: Ch 1, turn, sl st in each st and each row around entire outer edge. (56 sl sts)
Fasten off leaving a 60″ tail for sewing. Weave in starting tail.
With RS up, line up center of Row 20 of Front Patch with 6 skipped sts from Rnd 23 of Head, at bottom of muzzle opening. 6 sts of Front Patch should line up with muzzle opening sts, with 2 extra sts on each side. Bottom of Front Patch should rest along bottom of Rnd 3 of Body.
Sew front patch in place around entire edge using long tail.
Muzzle
With RS facing, join white with sl st in any st or ch around muzzle opening.
Rnd 1: Work 14 sc evenly spaced around muzzle opening.
This works out to 1 sc in each st, 1 sc in the bottom of each ch, and 1 extra sc in each side, where the stitches and chains meet.
Rnd 2: [Dec, sc in next 5 sts] twice. (12 sts)
Rnd 3: [Dec, sc in next 2 sts] around. (9 sts)
Rnd 4: [Dec, sc in next st] around. (6 sts)
Fasten off.
Stuff muzzle. If needed, you can use the back of your hook, a knitting needle, a chopstick, or other similar tool to push the stuffing into the muzzle.
Using tail, sew muzzle closed and weave in all ends.
Ear (Make 2)
With orange, ch 2, leaving an 8-inch tail for sewing.
Row 1: 4 sc in 2nd ch from hook. (4 sts)
Row 2: Ch 1, turn, sc in first st, 2 sc in each of next 2 sts, sc in last st. (6 sts)
Change to black, cut orange, leaving a tail to weave in.
Row 3: With black, Ch 1, turn, sc in each st across. (6 sts)
Row 4: Ch 1, turn, sc in first st, dec twice, sc in last st. (4 sts)
Row 5: Ch 1, turn, dec twice. (2 sts)
Row 6: Ch 1, turn, dec. (1 st)
Fasten off. Weave in ending tail.
Pinch ends of Row 1 together and sew in place with starting tail. Then sew Ear to top of Head.
Finishing
Weave in all ends.
With black, embroider nose and eyes.
Share this Crochet Fox Amigurumi Pattern on Pinterest!
Here’s an image perfect for pinning:
Rate this Crochet Fox Amigurumi Pattern!
I hope you enjoyed this crochet fox amigurumi pattern. A downloadable pdf of this pattern is available on Ravelry for a small fee. The fee for the pdf format is to offset the advertising revenue lost when you print or download the pattern rather than viewing it online.
Do you want the best of Stitches n Scraps delivered right to your inbox? The Stitches n Scraps email newsletter includes highlights from the blog as well as special features not available elsewhere. Don’t miss a stitch – Subscribe now!
Crochet Amigurumi Watering Can
Every little gardener needs a little watering can! This crochet amigurumi watering can is an adorable essential for a garden play set. Embellish it with flowers and add embroidery for a personal touch. With 2 strands of yarn held together, it’s quick and fun to make!
Join in the fun on the Facebook Group. See the main post for the full schedule, other patterns, and giveaway information too!
King Cole Comfort Aran Yarn
I love King Cole Comfort Aran yarn for crochet amigurumi. It’s an acrylic and nylon blend yarn that creates a wonderfully soft, strong, smooth, and slightly glossy fabric. For this watering can, I used some skeins from my stash.
I chose #3328 Grey for the main color and #337 Denim to make the water, spout top, and flower embellishments. The watering can works in almost any main color. For the water, if you prefer a brighter blue, try #3590 Cornflower.
Yarn Under (yu): Bring yarn under hook from back to front.
Yarn Under Single Crochet (yusc): Insert hook where indicated, yu and pull up a loop, yo and pull through both loops on hook.
Increase (inc): Yusc in back loop only of indicated st, yusc in both loops of same st. Inc counts as 2 yusc in stitch counts at end of rows/rnds. See this Almost Invisible Increase tutorial for a closer look.
Invisible Join: Remove working loop from hook. Insert hook from back to front through first st of rnd, place working loop back on hook and pull through from front to back. See this Joining Rounds tutorial for a closer look.
Decrease (dec): Insert hook in front loop only of next 2 sts together, yu and pull up a loop through both sts, yo and draw through both loops on hook.
This decrease is an alternative to a sc2tog. If preferred, you can work a normal sc2tog, replacing the first 2 yo with yu.
Back Post Yarn Under Single Crochet (bpyusc): Insert hook from back to front and to back again around post of indicated st, yu and draw up a loop, yo and draw through both loops on hook.
Notes
Use 2 strands of yarn held together for all sections of pattern except Flowers.
After weaving in tails, pull ends through stuffing and out again, pull taught and cut close to work so that end recedes after being cut and is hidden inside of work.
Instructions
Flowers (make 3)
With 1 strand of B, ch 2.
Rnd 1: [Sc, 3 dc] 5 times in 2nd ch from hook. Fasten off, leaving a 12″ / 30 cm tail for sewing. Pull tail through first sc to join. (5 sc, 15 dc)
Set Flowers aside.
Wind 25-30 yds of B into a separate ball so that you can use 2 strands together for remainder of pattern.
Water
Water is worked in turned rounds to keep it from twisting or skewing. Scroll down for chart.
With 2 strands of B held together and leaving an 18″ / 45 cm tail for sewing, ch 4.
Rnd 1 (RS): 2 yusc in 2nd ch from hook, yusc in next ch, 3 yusc in next ch, working on opposite side of ch, yusc in next ch, yusc in same ch as beg of rnd, invisible join in first st. (8 sts)
Rnd 2: Ch 1, turn, inc in first st, yusc in next st, inc in next 3 sts, yusc in next st, inc in last 2 sts, invisible join in first st. (14 sts)
Rnd 3: Ch 1, turn, inc in first st, yusc in next st, inc in next st, yusc in next 2 sts, [inc in next st, yusc in next st] 3 times, yusc in next st, inc in next st, yusc in last st, invisible join in first st. (20 sts)
Rnd 4: Ch 1, turn, inc in first st, yusc in next 3 sts, [inc in next st, yusc in next 2 sts] 3 times, yusc in next st, [inc in next st, yusc in next 2 sts] twice, invisible join in first st. (26 sts)
Rnd 5: Ch 1, turn, yusc in first st, [inc in next st, yusc in next 3 sts] twice, yusc in next st, [inc in next st, yusc in next 3 sts] 3 times, yusc in next st, inc in next st, yusc in last 2 sts, invisible join in first st. (32 sts)
Rnd 6: Ch 1, turn, yusc in first st, inc in next st, yusc in next 5 sts, [inc in next st, yusc in next 4 sts] 3 times, yusc in next st, inc in next st, yusc in next 4 sts, inc in next st, yusc in last 3 sts, invisible join in first st. (38 sts)
Rnd 7: Ch 1, turn, yusc in first 2 sts, inc in next st, yusc in next 5 sts, inc in next st, yusc in next 4 sts, place marker in yusc just made, yusc in next 2 sts, [inc in next st, yusc in next 5 sts] 3 times, yusc in next st, inc in next st, yusc in last 3 sts, invisible join in first st. (44 sts)
In image, red star shows marker placement.
Fasten off. Weave in ending tail. Pull long tail to RS of work. Set Water aside.
Water Chart
Click image to expand
Spout
Spout, Handle, and Body are worked in continuous rounds. Do not turn or join unless instructed. Use a stitch marker or running stitch marker to mark the first stitch of each rnd.
With 2 strands of B held together and leaving a 12″ / 30 cm tail for sewing, ch 2.
Rnd 1 (RS): 6 yusc in 2nd ch from hook. (6 sts)
Rnd 2: Inc in each st to end of rnd. (12 sts)
Rnd 3: [Inc in next st, yusc in next st] to end of rnd. (18 sts)
Rnd 4: Yusc in next st, inc in next st, [yusc in next 2 sts, inc in next st] to last st, yusc in last st. (24 sts)
Rnd 5: [Inc in next st, yusc in next 2 sts] to end of rnd, invisible join to first st. (32 sts)
Rnd 6: Ch 1, bpyusc around each st to end of rnd.
Rnd 7: [Dec, yusc in next 2 sts] to end of rnd. (24 sts)
Rnd 8: [Dec, yusc in next st] to end of rnd. (16 sts)
Begin stuffing Spout and continue stuffing firmly as work progresses.
Rnd 9: Dec to end of rnd, change to 2 strands of A held together in last st. (8 sts)
Rnds 10-25: Yusc in each st to end of rnd.
Rnd 26: Yusc in next 2 sts, [inc in next st, yusc in next 2 sts] twice. (10 sts)
Rnd 27: Yusc in next 3 sts, [inc in next st, yusc in next 2 sts] twice, yusc in last st. (12 sts)
Rnd 28: Yusc in next 5 sts, inc in next st, yusc in next st, inc in next st, yusc in last 4 sts. (14 sts)
Rnd 29: Sl st in next 2 sts, yusc in next 2 sts, inc in next st, yusc in next st, inc in next st, place marker in 2nd yusc of inc just made, yusc in next st, inc in next st, yusc in next 3 sts, sl st in next 2 sts. Fasten off, leaving an 18″ / 45 cm tail for sewing. (13 yusc)
Marked st is center front of Spout.
With tapestry needle, bring beginning (color B) tail down through center of top of Spout and out at color change (rnd 9) directly in line with marked center front. Pull gently until top of Spout indents slightly and angles towards center front.
Insert needle close to where it came out, then bring it back out through center of top of Spout. Adjust position and tightness as desired, then weave in tail to secure.
Weave in all other ends except for long tail for sewing. Set Spout aside.
Spout Support
With 2 strands of A held together and leaving a 12″ / 30 cm tail for sewing, ch 9.
Row 1: 3 yusc in 2nd ch from hook, yusc in next 6 chs, 3 yusc in next ch, working in opposite side of chain, yusc in next 6 chs, invisible join to first st. Fasten off leaving a 12″ / 30 cm tail for sewing. (18 sts)
Set Spout Support aside.
Handle
With 2 strands of A held together and leaving a 12″ / 30 cm tail for sewing, ch 6, being careful not to twist, sl st in first ch to form a circle.
Rnd 1: Yusc in 2nd ch from hook and each ch to end of rnd. (6 sts)
Rnds 2-25: Yusc in each st around. Stuff Handle as work progresses, leaving 1″ / 2.5 cm unstuffed at top and bottom.
Rnd 26: Yusc in each st around, join with sl st in first st. Fasten off leaving a 12″ / 30 cm tail for sewing.
Set Handle aside.
Top
With 2 strands of A held together, ch 2.
Row 1: 3 yusc in 2nd ch from hook. (3 sts)
Row 2: Ch 1, turn, inc in each st across. (6 sts)
Row 3: Ch 1, turn, inc in first st, yusc in next st, [inc in next st, yusc in next st] across. (9 sts)
Row 4: Ch 1, turn, inc in first st, yusc in next 2 sts, [inc in next st, yusc in next 2 sts] across. (12 sts)
Row 5: Ch 1, turn, yusc in first st, inc in next st, [yusc in next 3 sts, inc in next st] twice, yusc in last 2 sts. (15 sts)
Row 6: Ch 1, turn, yusc in first st, inc in next st, [yusc in next 4 sts, inc in next st] twice, yusc in last 3 sts. (18 sts)
Rnd 7: Ch 1, turn, yusc in first 2 sts, inc in next st, [yusc in next 5 sts, inc in next st] twice, yusc in last 3 sts, ch 1, working in sides of rows, yusc in each row across, join with sl st in turning ch-1. (35 sts)
Fasten off, leaving an 18″ / 45 cm tail for sewing. Set Top aside.
Base
With 2 strands of A held together, ch 4.
Rnds 1-6: Rep Rnds 1-6 of Water.
Rnd 7: Ch 1, turn, yusc in first 2 sts, [inc in next st, yusc in next 5 sts] twice, yusc in next st, [inc in next st, yusc in next 5 sts] 3 times, yusc in next st, inc in next st, yusc in last 3 sts, join with sl st in first st. (44 sts)
Do not fasten off.
Body
Rnd 1 (RS): Ch 1, bpyusc around each st to end of rnd. (44 sts)
Rnds 2-19: Yusc in each st to end of rnd. Do not fasten off.
Weave in starting tail.
Assembly
Attach Water
Place Water RS up on top of last rnd of Body, lining up marked st on Water with next st on Body. This should line up the oval-shaped Water with the oval-shaped Base. If it does not, adjust as necessary so they line up.
Joining Rnd: Working through Water and Body together, yusc in each st to last 10 sts, stuff Body firmly, yusc in each remaining st to end of rnd. Fasten off (44 sts)
Indent Water and Base
Place long tail of water on tapestry needle. Insert needle down through center of Water and out at center of Base, compressing Body as needed to get needle through.
Pull gently to indent Water and Base. Insert needle close to where it came out and bring it back up through center of Water. Adjust tension as desired, then weave in end to secure.
Attach Top
With RS up, line up curved edge of Top with either curved edge of Water. This will become the front edge. Sew Top to Joining Rnd around curved edge, using a whipstitch seam and long tail. This will be a visible seam that resembles a welded metal join.
Attach Flowers
Sew flowers to side of Body as desired. Optionally, add additional embroidery or embellishments such as leaves or stems.
Attach Spout and Spout Support
Line up marked center front of bottom of Spout with center front bottom of Body, at Base. Using long tail, whipstitch bottom of Spout in place, pausing before completing the seam to finish stuffing Spout firmly.
Using long tails, sew one short end of Spout Support to center front top edge of Body. Sew opposite short end to top of Spout at color change (Row 9). Flatten Support along Spout as needed to adjust length of support, and sew in place.
Attach Handle
Flatten 1″ / 2.5 cm of each end of Handle. Fold flattened ends towards inside and sew to top and bottom of Body, on opposite side from Spout.
Top fold line should be at top edge of Body, with end of Handle pointing down and bottom fold line should be at bottom edge of Body, with end of Handle pointing up. This helps Handle to curve outwards.
Weave in any remaining ends and remove markers.
Share this crochet amigurumi watering can pattern on Pinterest!
Here’s an image perfect for pinning.
Rate this crochet amigurumi watering can pattern!
I hope you enjoyed this crochet amigurumi watering can pattern! A downloadable pdf of this pattern is available on Ravelry for a small fee.
Do you want the best of Stitches n Scraps delivered right to your inbox? Don’t miss a stitch – Subscribe now!
Buddy the Beaver
Buddy the Beaver is always busy! Whether building, burrowing, or barking, his days are certainly never boring. Make your own beaver buddy with this easy, amigurumi crochet beaver pattern!
I designed this crochet cocoa coaster set for the 2024 Softies CAL, hosted by CAL Central Crochet. This is our 7th annual Softies CAL, and is definitely our cutest CAL of the year!
See the full schedule in the main CAL post. While you’re there, be sure to enter the giveaway for a chance at some fabulous prizes! Then crochet along and join in the fun on the CAL Central Facebook group.
King Cole Comfort Aran Yarn
When I closed my yarn store, I had some of this lovely, King Cole Comfort Aran yarn left over. It’s a super soft, acrylic yarn and nylon blend that creates a wonderfully soft, smooth, and slightly glossy fabric. It’s available in lovely pastel colors that are perfect for baby items, as well as a few more vibrant options.
I used #3329 Truffle for the main color and #1970 Surf for the accent color. These colors are not currently available, but #3591 Slate and #3590 Cornflower would make great substitutions. King Cole Big Value Aran has some great color options as well.
2 Strands Together
This amigurumi crochet beaver pattern uses 2 strands of yarn held together for most of the pattern. You can split your skein into 2 separate balls, or you can work with both ends (inside and outside) of the same skein held together!
Busy Beavers
I live near the Fox River, with miles of winding, riverfront trails. There is a magnificent beaver lodge in the section where I tend to walk. (Don’t worry, Millie was quite far away from the actual lodge in this picture and didn’t disturb anything)
For the longest time, I thought this was a beaver dam, but I learned there is a difference between dams and lodges. Beavers build dams only when necessary to slow the flow of the water. In quiet waterways like this one, they don’t need a dam.
The lodge is their home, and where they spend most of the winter months. It’s rare to catch a glimpse of the beavers themselves, but they leave signs of their work on the trees along the path.
Fun Beaver Fact
Did you know American Beavers are known for their orange, iron-enriched teeth? I learned this while designing this pattern. The National Park Service page about Acadia’s North American Beavers has lots of great info on beaver anatomy!
Increase (inc): Sc in back loop only of indicated st, sc in both loops (like normal) of same st. (See increase tutorial here)
Decrease (dec): Insert hook into front loop only of both indicated sts, yo and draw up a loop, yo and draw through both loops on hook.
This is an alternative to a single crochet 2-together (sc2tog) stitch. If you prefer, you can use the standard sc2tog instead.
Instructions
Most of the pattern is worked in continuous rounds. Do not join or turn unless indicated. Mark first st of each rnd.
Body
Holding 2 strands of MC together, ch 2.
Rnd 1: 6 sc in 2nd ch from hook. (6 sts)
Rnd 2: Inc in each st around. (12 sts)
Rnd 3: [Inc in next st, sc in next st] around. (18 sts)
Rnd 4: Sc in next st, inc in next st, [sc in each of next 2 sts, inc in next st] around to last st, sc in last st. (24 sts)
Rnd 5: [Inc in next st, sc in each of next 3 sts] around. (30 sts)
Work should now measure 3.75 inches in diameter.
Rnd 6: Sc in each of next 3 sts, inc in next st, [sc in each of next 5 sts, inc in next st] around to last 2 sts, sc in each of last 2 sts. (35 sts)
Rnd 7: [Inc in next st, sc in each of next 6 sts] around. (40 sts)
Rnds 8-10: Sc in each st around.
Rnd 11: Sc in each of next 4 sts, dec in next 2 sts, [sc in each of next 8 sts, dec in next 2 sts] 3 times, sc in last 4 sts. (36 sts)
Rnds 12-13: Sc in each st around.
Rnd 14: [Dec in next 2 sts, sc in each of next 4] around. (30 sts)
Rnds 15-16: Sc in each st around.
Rnd 17: Sc in each of next 2 sts, dec in next 2 sts, [sc in each of next 3 sts, dec in next 2 sts] around to last st, sc in last st. (24 sts)
Rnd 18: Sc in each st around.
Rnd 19: [Dec in next 2 sts, sc in each of next 2 sts] around. (18 sts)
Rnd 20: [Sc in next st, dec in next 2 sts] around. (12 sts)
Stuff Body.
Head
Rnds 21-23: Rep rnds 3-5. (30 sts)
Rnds 24-26: Sc in each st around.
Rnd 27: Rep rnd 17. (24 sts)
Rnds 28-31: Sc in each st around.
Rnd 32-33: Rep rnds 19-20. (12 sts)
Stuff Head.
Rnd 34: [Dec in next 2 sts] around, join with sl st in first st. (6 sts)
Fasten off. Use tails to sew top of Head and bottom of Body closed. Weave in all ends.
Ear (Make 2)
With 1 strand of MC, ch 2.
Rnd 1 (WS): 8 sc in 2nd ch from hook. (8 sts)
Rnd 2: Inc in each st around.
Fold ear in half with WS together and working loop at right edge (left edge if you are crocheting left-handed). The 16 sts of rnd 2 should form 8 pairs of sts in 2 layers.
Rnd 3: Sl st in each pair of sts around, join with sl st to first sl st.
The join will pull the corners together to form the rounded ear.
Fasten off, leaving an 8-inch tail for sewing.
Arm (Make 2)
Holding 2 strands of MC together and leaving a 10-inch tail for sewing, ch 8, join in first ch to form a ring.
Rnd 1: 8 sc in ring. (8 sts)
Rnd 2: Sc in each st around.
Rnd 3: Sc in each of next 3 sts, dec in next 2 sts, sc in each of last 3 sts. (7 sts)
Rnd 4: Sc in each st around.
Rnd 5: Dec in next 2 sts, sc in each of next 5 sts. (6 sts)
Rnd 6: Sc in each st around.
Fasten off.
Flatten rnd 6 so that the 6 sts form 3 pairs of sts in 2 layers.
Hand: Working through both layers, join 1 strand of CC with sl st in first pair of sts, 5 dc in next pair of sts, sl st in last pair of sts. (5 dc)
Fasten off. Stuff arms lightly about halfway if desired. Sample shows a very small amount of stuffing.
Leg & Foot (Make 1 Left and 1 Right)
Holding 2 strands of MC together and leaving a 12-inch tail for sewing, ch 3.
Thigh (worked in rows)
Row 1 (RS): 2 sc in 2nd ch from hook, 2 sc in last ch. (4 sts)
Rows 2-3: Ch 1, turn, inc in first st, sc in each st across to last st, inc in last st. (8 sts)
Rows 4-5: Ch 1, turn, sc in each st across.
Calf (worked in rnds)
Rnd 6: Sc in each st around, join with sl st in first st. (10 sts)
Rnd 7: Ch 1, sc in first st, [dec in next 2 sts, sc in next st] around to last st, sc in last st. (7 sts)
Rnd 8: Dec in first 2 sts, sc in each remaining st around. (6 sts)
Rnd 9: Rep Rnd 6, fasten off.
Foot
Flatten Rnd 9 so the 6 sts form 3 pairs of sts in 2 layers with open edge of thigh on left edge for left leg and on right edge for right leg.
This may feel backwards, but that is because the foot starts on a WS row. All that really matters at this point is that the two thighs face in opposite directions.
Working in rows:
Row 1: Holding 2 strands of CC together, join with sl st in first st, ch 1, 2 hdc in first pair of sts, hdc in next pair of sts, 2 hdc in last pair of sts. (5 hdc)
Row 2 (RS): Ch 1 turn, sc in first st, fpdc around same st, [sc in next st, fpdc around same st] twice, sc in same st as last sc made (center), [fpdc around next st, sc in same st] twice. (5 fpdc, 6 sc)
Row 3: Ch 1, turn, [sl st in next sc, bpdc in next fpdc] 5 times, sl st in last sc.
Fasten off. Stuff thigh.
Tail:
Holding 2 strands of CC together, ch 3.
Rnd 1: 4 sc in 2nd ch from hook, 4 sc in next ch. (8 sts)
Rnd 2: Sc in each of next 2 sts, inc in next st, sc in each of next 3 sts, inc in next st, sc in last st (10 sts)
Rnd 3: Sc in each of next 2 sts, inc in next st, sc in each of next 4 sts, inc in next st, sc in each of last 2 sts (12 sts)
Rnd 4: Sc in each st around.
Rnd 5: Sc in each of next 3 sts, inc in next st, sc in each of next 5 sts, inc in next st, sc in each of last 2 sts (14 sts)
Rnd 6: Sc in each st around.
Rnd 7: Sc in each of next 4 sts, inc in next st, sc in each of next 6 sts, inc in next st, sc in each of last 2 sts (16 sts)
Rnd 8: Sc in each st around.
Rnd 9: Sc in each of next 5 sts, inc in next st, sc in each of next 7 sts, inc in next st, sc in each of last 2 sts (18 sts)
Rnds 10-18: Sc in each st around.
Rnd 19: [Dec in next 2 sts, sc in each of next 7 sts] twice, join with sl st in first st. (16 sts)
Fasten off, leaving a 12-inch tail for sewing. Do not stuff tail.
Muzzle:
Holding 2 strands of CC together, ch 3.
Rnd 1: 3 sc in 2nd ch from hook, 6 sc in next ch, 3 sc in bottom of beginning ch. (12 sts)
Rnd 2: Inc in each of next 2 st, sc in each of next 2 sts, inc in each of next 4 sts, sc in each of next 2 sts, inc in each of last 2 sts. (20 sts)
Rnd 3: Inc in each of next 2 sts, *sc in next st, sl st in each of next 4 sts, sc in next st**, inc in each of next 4 sts, rep from * to **, inc in each of last 2 sts (28 sts)
Fasten off, leaving a 12-inch tail for sewing.
Wrap one of the starting tails around center of muzzle, pull tightly to draw it in, and weave in end to secure.
Teeth:
Holding 2 strands of orange together, ch 3.
Sample shows 1 strand of super bulky yarn instead.
Row 1: Sc in 2nd ch from hook and in next ch. (2 sc)
Row 2: Ch 1, turn, sc in each st across. (2 sc)
Fasten off, leaving an 8-inch tail for sewing.
Assembly
Use long tails for sewing wherever possible throughout assembly.
Legs: Place legs on either side of body, with open end of thigh against bottom of body. Angle leg downward so that foot rests flat at bottom.
Sew to body around edge of thigh.
Tail: Holding work upside down, sew tail to center back, along the same rnd as bottom of thighs.
Sew another line one rnd above.
This second line makes the tail curve slightly at the body and keeps the seam from showing.
Arms: Flatten open end so that hand points in desired direction. Sew arms on either side of body at neckline, in line with top of thighs. Sample shows this sewn upside down like the tail. Doing so makes the arms stick out a little bit more. You can also sew it flat (right side up) if you prefer.
Muzzle & Tooth:
Sew teeth, WS up, to WS of muzzle at bottom center, so that teeth sticks out below muzzle.
Sew muzzle and teeth horizontally, centered between arms and legs, and positioned just below center of head. Tooth should be pointing downwards. Stuff each side of muzzle separately before closing, keeping stuffing away from center line.
Ears: Sew ears to top of head, evenly spaced above center of muzzle and positioned slightly closer to the front than the back.
Embroidery
Nose: With black, make several horizontal stitches at top center of muzzle for nose. Overlap edge of muzzle slightly, working a stitch or two on muzzle and several stitches just above muzzle.
Embroider a vertical line down center off muzzle all the way to bottom of tooth. Bring the vertical line around bottom edge of tooth and back up to bottom of muzzle. Weave in end on head, behind tooth.
Sample shows 4-5 backstitches total for this line.
Eyes: With a new piece of black, embroider eyes evenly spaced above center of muzzle. If desired, make a stitch from one eye to the other through the stuffing and pull gently. This will indent the eyes slightly. Repeat in the opposite direction and weave in end.
Weave in all remaining ends.
Share this Amigurumi Crochet Beaver Pattern on Pinterest!
Here’s an image perfect for pinning.
Rate this Amigurumi Crochet Beaver Pattern!
I hope you enjoyed this amigurumi crochet beaver pattern. A downloadable pdf of this pattern is available on Ravelry for a small fee. The fee for the pdf format offsets the advertising revenue lost when you print or download the pattern rather than viewing it online.
Do you want the best of Stitches n Scraps delivered right to your inbox? Don’t miss a stitch – Subscribe now!
Halloween Cauldron Crochet Pattern
Stir up some Halloween fun with this cauldron crochet pattern! Get creative with overflowing stuffing, or crochet the optional cover. What’s brewing in your cauldron?
This crochet cauldron pattern is the first pattern in the 2023 Halloween Crochet Along at CAL Central. Join in the fun on the Facebook Group. See the main post for the full schedule, other patterns, and giveaway information too!
Beyond Halloween
This charming cauldron isn’t just for Halloween. It makes a lovely addition to an equinox or Samhain altar. Instead of stuffing, line the inside with a bit of paper or foil, then fill it with herbs, dried berries or pot pourri. For Samhain, use it to hold small mementos of those you are remembering.
You can also fill your cauldron with small candies, jewelry, or trinkets. For St. Patrick’s Day, try gold beads to turn your cauldron into a pot of gold. With the optional cover, it’s a fun pincushion too!
Watch the Video Tutorial!
Need a little help with the pattern? Follow along step by step with the full video tutorial!
Hook: Size H (5mm) crochet hook or size needed to match gauge
Notions:
Scissors
Tapestry Needle
Fiberfill, wool roving, or other material to fill the cauldron
12-inch pipe cleaner
Project Level
Intermediate: Single crochet worked in the round with increases, decreases, and bobbles. Some tricky construction for the handles, but an easier option is also included.
Size
3.25 inches tall x 3.25 inches wide, not including handles.
Bobble (bo): [Yo, insert hook in indicated st, yo and pull up a loop, yo and pull through 2 loops on hook] 7 times, yo and pull through all 8 loops on hook. Push bobble to right side of fabric. (See bobble tutorial here)
Decrease (dec): Insert hook into front loop only of both of next 2 stitches, yarn over and draw up a loop, yarn over and draw through both loops on hook. This is an alternative to a single crochet 2-together (sc2tog) stitch. If you prefer, you can use the standard sc2tog instead.
Rnd 1 (RS): Ch 2, 6 sc in 2nd ch from hook. (6 sc)
Rnd 2: Inc in each st around. (12 sc)
Rnd 3: [Sc in next st, inc in next st] around. (18 sc)
Rnd 4: [Inc in next st, sc in next st, bo in next st, sc in next st, inc in next st, sc in next st] 3 times. (21 sc, 3 bo)
Rnd 5: [Inc in next st, sc in each of next 3 sts] around. (30 sc)
Rnd 6: Sc in each of next 2 sts, inc in next st, [sc in each of next 4 sts, inc in next st] around to last 2 sts, sc in each of last 2 sts. (36 sc)
Rnds 7-9: Sc in each st around. (36 sc)
Rnd 10: [Dec, sc in each of next 4 sts] around. (30 sts)
Rnd 11: Sc in each st around (30 sts)
For an easier version with separate (sewn on) handles, or for no side handles, scroll down for aternative Rnd 12
Rnd 12: Sc in each of next 4 sts, [ch 4, turn, sl st in 2nd ch from hook, sc in next ch, sl st in next ch, (handle made) sl st in last sc worked before handle.
Turn, keeping the handle on the RS of the work, sc in each of next 2 sts, remove working loop from hook, insert hook from bottom to top through free end of handle, put working loop back on hook and pull through handle].
Sc in each of next 13 sts, repeat between [ ], sc in each of last 9 sts. (30 sc, 2 handles)
Alternative Rnd 12: Sc in each st around. (30 sc)
In rnd 13, skip the handles only. Be sure to work into the 2 sc behind each handle.
Rnd 13: Skipping handles, sc in each st around. (30 sc)
Rnd 14: [Dec, sc in each of next 3 sts] around. (24 sts)
Rnd 15: [Inc, sc in each of next 3 sts] around, join with sl st or invisible join in first st. (30 sts)
Weave in ends.
Separate handles (Optional)
Use this option if you used Alternative Rnd 12 and want to make handles separately and sew them on.
Handle (make 2): Ch 4, sl st in 2nd ch from hook, sc in next ch, sl st in last ch, fasten off, leaving an 8-inch tail for sewing. (1 sc, 2 sl sts)
Use tails to sew handles to opposite sides of cauldron, along rnd 12. Weave in ends.
Cover (Optional)
Use this option if you prefer to have a solid cover over the stuffing.
Rnds 1-3: Repeat rnds 1-3 of Cauldron.
Rnd 4: Sc in next st, [Inc in next st, sc in each of next 2 sts] around to last 2 sts, inc in next st, sc in last st, join with sl st or invisible join in first st. (24 sc)
Fasten off.
Cut a length of yarn the same color as the cauldron for seaming. Attach this yarn to the cauldron by weaving in the end, close to any stitch on rnd 14 (the narrowest rnd at the top).
Stuff cauldron about 2/3 full.
Place cover inside cauldron, on top of stuffing, so that it lines up with rnd 14
Sew cover in place along rnd 14 of cauldron as follows, or using your preferred seaming technique.
For each stitch, sew from top to bottom through the stitch on the cover, bringing the needle back out through the same hole on the cauldron that it came in from.
Then sew a horizontal stitch on the outside of the cauldron, bringing the needle back in through the next stitch on the cauldron without sewing through the cover.
Continue in this manner for all remaining stitches, adding additional stuffing before finishing the seam if needed.
Weave in any remaining ends.
Finishing
Stuffing: If you did not work the optional cover, stuff cauldron generously with stuffing material of your choice. Add beads, sequins, glitter, or other decorations to the stuffing as desired.
Top handle: Stick one end of the pipe cleaner through the side of the cauldron (either from inside to outside or outside to inside, just be consistent) at approximately rnd 14.
Fold about an inch up at the end and twist the end around the remaining pipe cleaner to secure. Repeat with the other end on the opposite side of the cauldron, trimming away any excess pipe cleaner if necessary.
Share this Halloween Cauldron Crochet Pattern on Pinterest!
Here’s an image perfect for pinning.
Rate this Halloween Cauldron Crochet Pattern!
I hope you enjoyed this Halloween cauldron crochet pattern. A downloadable pdf of this pattern is available on Ravelry for a small fee. The fee for the pdf format offsets the advertising revenue lost when you print or download the pattern rather than viewing it online.
Do you want the best of Stitches n Scraps delivered right to your inbox? The Stitches n Scraps email newsletter includes highlights from the blog as well as special features not available elsewhere. Don’t miss a stitch – Subscribe now!
Crochet Cocoa Coaster Set Pattern
Winter means steaming mugs of rich hot chocolate, full of floating mini marshmallows. Cradle your cocoa and protect your tables with this crochet cocoa coaster set! It makes a great gift too.
4 coasters nestle inside the oversized mug, with squishy marshmallows in every layer. Even when all the coasters are in use, the mug is still half full!
I designed this crochet cocoa coaster set for the 2022 Holiday Stashdown CAL, hosted by CAL Central Crochet. This is our 8th annual holiday stashdown, and it’s always our most popular CAL of the year.
See the full schedule in the main CAL post. While you’re there, be sure to enter the giveaway for a chance at some fabulous prizes! Then crochet along and join in the fun on the CAL Central Facebook group.
Cocoa Colors
Except for the marshmallows, this entire pattern is made holding 2 strands of yarn together as one. Using 2 similar shades of brown, with 1 strand of each shade, can add a bit of depth and dimension to your cocoa.
It’s a great way to use up small amounts of mismatched yarns or different dye lots. If you don’t have 2 similar browns though, it’s absolutely fine to use 2 strands of the same shade.
1 of the 5 coasters will be fixed inside the mug later, leaving you with 4 removable coasters.
Do not join rnds unless indicated, mark first st of each rnd.
With 1 strand each of the 2 shades of brown yarn together and using larger hook, ch 2, leaving a slightly longer tail than usual.
Rnd 1 (RS): 6 sc in 2nd ch from hook. (6 sc)
Rnd 2: 2 sc in each st around. (12 sc)
Rnd 3: [2 sc in next st, sc in next st] around. (18 sc)
Rnd 4: Sc in next st, 2 sc in next st, [sc in each of next 2 sts, 2 sc in next st] around to last st, sc in last st. (24 sc)
Rnd 5: [2 sc in next st, sc in each of next 3 sts] around. (30 sc)
Fasten off leaving a slightly longer tail than usual. Do not weave in ends.
Marshmallows (Make 15)
Pattern shows 3 marshmallows per coaster, but you can make as many or as few as you like.
With one strand of white and using smaller hook, ch 2.
Row 1: 3 sc in 2nd ch from hook. (3 sc)
Row 2: Ch 1, turn, sk first st, sc2tog in next 2 sts. (1 st)
Fasten off, leaving a long tail for sewing.
Sew marshmallows to coasters as desired, using long tail. Weave in white ends
Weave in brown ends, working over any white yarn that shows on the back to hide it.
Mug
Do not join rnds unless indicated, mark first st of each rnd.
Base
If your plastic mesh circle is larger than your coasters, trim plastic mesh circle to the same size as one of the coasters and set it aside.
If the mesh doesn’t work out exactly, err on the side of slightly smaller rather than larger.
With 2 strands of blue held together and using larger hook, ch 2.
Rnds 1-4: Repeat rnds 1-4 of coaster.
Rnd 5: (Hdc, sc) in next st, sc in each of next 3 sts, [2 sc in next st, sc in each of next 3 sts] around, join with sl st in first st. (1 hdc, 29 sc)
Rnd 6: Ch 1, bpsc around each st around, join with sl st in first st. (30 bpsc)
Rnds 7-10 Do not ch, sc in each st around. (30 sc)
Rnd 11: Hold 1 coaster against the sts of rnd 10, with WS together. Working through both layers, sc in each of first 20 sc.
Insert plastic mesh circle so that it lays flat along the bottom of mug.
Stuff base lightly with fiber fill – it should be firm enough to hold its shape, but not so stuffed that it bulges out. The coaster top should be flat.
Sc in each of remaining 10 sts around. (30 sc)
Sides
Rnd 12: [2 sc in next st, sc in each of next 14 sts] twice. (32 sc)
Rnds 13-16: Sc in each st around.
Rnd 17: Sc in each st around, join with a sl st to first st, fasten off.
Fasten off. Weave in ends
Handle
With 2 strands of blue held together and using larger hook, ch 16, leaving a long tail for sewing.
Rnd 1: Working in back bumps of ch, sc in 2nd ch from hook and each ch across, ch 1, working in opposite side of ch, sc in each ch across, do not join. (30 sc)
Fasten off, leaving a long tail for sewing.
Place either end of handle against mug with RS together. Line up end of handle with bottom of rnd 14 of sides (i.e about 4 rnds down from top), so that remainder of handle extends up above the top of the mug. This may look backwards, but you’ll be folding the handle back down after sewing it.
Separate the two strands of the tail at this end of the handle. Using each strand separately, sew handle to mug across rnds 14-15 only. Do not sew into top 2 rnds. Weave in ends separately.
Fold handle down, and align the other edge with top of rnd 7 (i.e. 2 rnds above the ridge on the bottom created by the fpsc stitches).
Separate the two strands of the tail at bottom of handle. Using each strand separately, sew handle to mug across bottom edge only.
Finishing
Weave in any remaining ends.
Remove any remaining stitch markers.
Place remaining 4 coasters inside mug.
Share this pattern on Pinterest! Here’s an image perfect for pinning:
Rate this crochet cocoa coaster set!
I hope you enjoyed this crochet cocoa coaster set pattern. A downloadable pdf of this pattern is available on Ravelry for a small fee.
Do you want the best of Stitches n Scraps delivered right to your inbox? Don’t miss a stitch – Subscribe now!
Crochet Rat Amigurumi Pattern
Cute or creepy, this crochet rat amigurumi pattern can go either way! Add an ink black rat with glowing red eyes to your Halloween decor, or change up the colors for a fuzzy new friend.
Use the hashtag #CALCentralCrochet when sharing pictures of your rat on social media.
Make a Mischief
A group of rats is known as a mischief. If you’ve ever had a pet rat, you know just how accurate that term is! Rats are social creatures, so make yourself a whole mischief of them!
My amigurumi rat got up to some mischief right away. She waited patiently on this ledge for my husband to come in the door and see her. He was not necessarily amused (but I was!)
Wild Vs. Fancy Rats
Wild rats and domesticated rats (also called fancy rats) are very different. Wild rats can carry diseases and cause all sorts of damage in their search for food. Pet rats, cared for by humans, tend to be very clean and…well ok they still like to eat a lot and tear stuff up.
I kept pet rats many years ago. They can be very loving, are fairly easy to train, and are fun to play with. This little albino troublemaker was named Angel. The picture is from 2005, so is a bit fuzzy.
My sweetest rat ever was a fawn-colored cutie named Chester, who mostly just loved to snuggle and eat yogurt-covered blueberries.
Fairfield Poly-Fil and Poly Pellets
Fairfield provided the Poly-Fil stuffing that I used in this project. I chose Ultra Plush Poly-Fil for a super squishy and smooth finish.
I’ve also included Fairfield Poly Pellets as an optional add-in. I did not use these in the sample I made, but it is a great option if you want to add more weight for stability. They are small though, so I would avoid using them in anything made for young children.
Decrease (dec): Insert hook into front loop only of both of next 2 stitches, yarn over and draw up a loop, yarn over and draw through both loops on hook. This is an alternative to a single crochet 2 together (sc2tog) stitch. If you prefer, you can use the standard sc2tog instead.
Increase (inc): Sc in back loop only of indicated st, then sc in both loops of same st. This counts as two stitches in the end of round stitch counts.
Most of the pattern is worked in continuous rounds. Do not join or turn your work unless specifically indicated.
Head
With black, ch 2.
Rnd 1: 4 sc in 2nd ch from hook. (4 sts)
Rnd 2: Inc in each st around. (8 sts)
Rnd 3: Sc in each st around.
Rnd 4: [Inc in next st, sc in next st] around. (12 sts)
Rnd 5: Sc in each st around.
Rnd 6: Sc in next st, [Inc in next st, sc in each of next 2 sts] 3 times, inc in next st, sc in last st. (16 sts)
Rnd 7: Sc in each st around.
Rnd 8: [Inc in next st, sc in each of next 7 sts] twice. (18 sts)
Rnd 9: Sc in each st around.
Rnd 10: Sc in each of next 4 sts, Inc in next st, sc in each of next 8 sts, inc in next st, sc in each of last 4 sts. (20 sc)
Rnd 11: Sc in each st around.
Neck:
Rnd 12: [Dec, sc in each of next 3 sts] twice, [inc, sc in each of next 4 sts] twice.
Rnd 13: Dec, sc in next st, dec, sc in each of next 4 sts, inc, sc in each of next 5 sts, inc, sc in each of next 4 sts.
Rnd 14: Sc in each of next 3 sts, dec, sc in each of next 4 sts, inc, sc in each of next 3 sts, inc, sc in each of next 4 sts, dec.
Rnd 15: Sc in each of next 9 sts, [inc, sc in each of next 2 sts] 3 times, inc, sc in last st. (24 sts)
Rnds 16-19: Sc in each st around.
Body:
Rnd 20: Inc in next st, sc in each of next 6 sts, inc in next st, sc in each of last 16 sts. (26 sts)
Rnd 21: Sc in each st around.
Rnd 22: Sc in each of next 2 sts, inc in next st, sc in each of next 6 sts, inc in next st, sc in each of last 16 sts. (28 sts)
Rnd 23: Sc in each of next 3 sts, inc in next st, sc in each of next 6 sts, inc in next st, sc in each of last 17 sts. (30 sts)
Rnds 24-29: Sc in each st around
Rnd 30: Sc in next st, dec, [sc in each of next 3 sts, dec] 3 times, sc in each of last 12 sts. (26 sts)
Rnd 31: [Dec, sc in each of net 2 sts] 3 times, dec, sc in each of last 12 sts. (22 sts)
Rnd 32: [Sc in each of next 3 sts, dec] 3 times, sc in each of next 5 sts, dec. (18 sts)
Rnd 33: Sc in each st around
Rnd 34: [Dec, sc in next st] around. (12 sts)
Stuff head and body firmly.
If you would like more stability, you can add extra weight to the body with Poly Pellets. Put some pellets into the toe of a nylon stocking and tie it closed. Trim off the excess stocking, and put the remaining bundle near the bottom of the body. Pack all around the beads with stuffing so they don’t show. Poly pellets can be a choking hazard, so don’t use them if you are making this for a small child.
Tail
Rnd 35: Dec around. (6 sts)
Rnds 36-45: Sc in each st around.
Rnd 46: Dec, sc in each of last 4 sts. (5 sts)
Rnds 47-51: Sc in each st around.
Rnd 52: Dec, sc in each of last 3 sts. (4 sts)
Rnds 53-56: Sc in each st around.
Use stuffing tool to stuff tail lightly
Rnd 57: Dec, sc in each of last 2 sts. (3 sts)
Fasten off.
Sew tail through each of the 3 sts and pull to close.
Weave in ends.
Thigh (make 2)
With black, ch 2.
Rnd 1: 6 sc in 2nd ch from hook. (6 sts)
Rnd 2: Inc in each st around. (12 sts)
Rnd 3: [Inc in next st, sc in next st] 3 times, inc in next st, sc in each of last 6 sts. (16 sts)
Rnd 4: [Inc in next st, sc in each of next 2 sts] 3 times, inc in next st, sc in each of last 6 sts. (20 sts)
Fasten off, leaving a long tail for sewing.
Weave in starting tail.
Ear (make 2)
With black, ch 2.
Rnd 1 (RS): 4 sc in 2nd ch from hook, change to pink, 2 sc in same ch, join with sl st to first st. (4 black sc, 2 pink sc)
Rnd 2: Ch 1, turn, inc in each of first 2 sts, change to black, inc in each of last 4 sts, join with sl st to first st. (8 black sc, 2 pink sc)
Row 3: Ch 1, turn, sl st in each of first 2 sts, sc in each of next 4 sts, sl st in each of next 2 sts, leaving pink sts unworked. (4 black sc, 4 black sl sts)
Fasten off leaving a long tail for sewing.
Fold ear in half with RS together, so that pink portion rests inside of black portion.
Weave in pink ends.
With shorter black tail, sew the two bottom corners of ear together so that it curls into a teardrop shape, then weave in the end. You should now only have one long tail remaining on each ear.
Front leg and foot (make 2)
Leg:
With black, ch 2.
Rnd 1: 4 sc in 2nd ch from hook. (4 sts)
Rnds 2-3: Sc in each st around.
Fasten off, leaving a long tail for sewing.
Use stuffing tool to stuff lightly.
Weave ending tail through all 4 sts and pull tight to close.
Foot:
Insert hook into the end of the leg, right under where you closed it. Your hook should basically be going through two of the four stitches from the last round. Pull up a loop of pink.
Row 1: [Ch 3, sl st in same place where you pulled up the loop] 3 times. (3 toes)
Fasten off.
Weave in pink ends and starting black end, leaving the longer black tail for sewing.
Back leg and foot (make 2)
Leg:
With black, ch 2.
Rnd 1: 6 sc in 2nd ch from hook. (6 sts)
Rnds 2-3: Sc in each st around.
Rnd 4: [Dec, sc in next st] twice. (4 sts)
Rnd 5: Sc in each st around.
Fasten off, leaving a long tail for sewing.
Use stuffing tool to stuff lightly.
Weave ending tail through all 4 sts and pull tight to close.
Foot:
Work as for front foot.
Assembly
Use the long tails to sew pieces together as indicated.
Feet and legs:
Using the image as a guide, sew legs to the bottom of the body. Sew only the back half of each leg so that the foot can move freely.
The back legs should be just set slightly further apart than the front legs, with the outside edge of the leg sticking out slightly past the body.
Thighs:
The flatter portion of the thigh is the bottom. Align thigh on side of body, just above back leg. The bottom edge of the thigh should rest on top of the back leg.
Sew thigh to body almost all the way around, attaching it to the back end of the leg where they meet.
When you have just a few stitches left, stuff thigh lightly, then finish sewing all the way around.
Ears and Face
Sew ears to top of head.
With pink yarn, embroider a nose by making 2 or 3 stitches at the starting tip of the head.
With red yarn, embroider eyes with either French knots, or 2 or 3 small stitches.
Remove any remaining stitch markers and weave in all ends.
Share this pattern on Pinterest! Here’s an image perfect for pinning:
Rate this crochet rat amigurumi pattern!
I hope you enjoyed this crochet rat amigurumi pattern. A downloadable pdf of this pattern is available on Ravelry for a small fee.
Do you want the best of Stitches n Scraps delivered right to your inbox? Don’t miss a stitch – Subscribe now!
Lemon Amigurumi Crochet Pattern
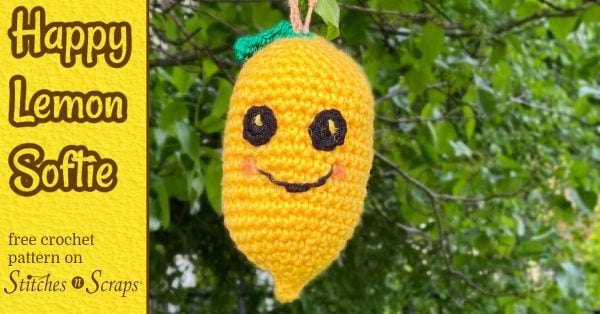
Nothing says summer like a bright, sunny lemon! Bring a smile to your summer with this quick and easy, happy lemon amigurumi pattern. Toss it in a fruit bowl or hang it in a tree. What will you do with your squishy new friend?
Join in the fun on the Facebook group, and be sure to use the hashtag #CALCentralCrochet when you share your projects!
Fairfield PolyFil Ultra Plush
Fairfield provided all the stuffing materials for this CAL. They’re so generous that I actually have lots left over from previous events!
For this lemon amigurumi pattern, I used some of their Ultra Plush Poly Fil. It’s very soft, but also has a really smooth finish.
Fairfield Poly Pellets
I also used just a tiny bit (about a tablespoon) of Poly Pellets. This is a totally optional addition, but I had some on hand and I love what they do for amigurumi projects.
Tying the pellets up in the toe of a nylon stocking creates a small weighted bundle. You can use this bundle to add weight wherever you want it! In my happy lemon, the weight is right at the bottom, which helps it to hang beautifully straight and still.
Decrease (dec): Insert hook into front loop only of next st, and then into the front loop only of the following stitch, yarn over and pull up a loop, yarn over and pull through both loops on hook.
This counts as 1 sc in the end of round stitch counts.
Increase (inc): Sc in back loop only of indicated st, then sc in both loops of same st. This counts as two sc in the end of round stitch counts.
Lemon is worked in continuous rounds, do not join or turn. Mark the first stitch of each round.
Bottom
With yellow, ch 2.
Rnd 1: 4 sc in 2nd ch from hook. (4 sc)
Rnd 2: Sc in each st around.
Rnd 3: Inc in each st around. (8 sc)
Rnd 4: [Sc in next st, inc in next st] around. (12 sc)
Rnd 5: [Inc in next st, sc in each of next 2 sts] around. (16 sc)
Rnd 6: [Sc in each of next 3 sts, inc in next st] around. (20 sc)
Rnd 7: [Inc in next st, sc in each of next 4 sts] around. (24 sc)
Rnd 8: [Sc in each of next 7 sts, inc in next st] around. (27 sc)
Rnd 9: [Inc in next st, sc in each of next 8 sts] around. (30 sc).
Middle
Rnds 10-19: Sc in each st around.
Weave in beginning tail.
Poly Pellets (optional): Pour about a tablespoon of Poly Pellets into the toe of a nylon stocking. Tie a knot in the stocking above pellets. Trim off top of stocking about 1-2 inches above knot.
Fold trimmed ends over so they wrap around the beads. Place the bundle of beads in the very bottom point of the lemon.
Top
Begin stuffing lemon with Poly-Fil.
Rnd 20: [Sc in each of next 8 sts, dec] around. (27 sc)
Rnd 21: [Sc in each of next 7 sts, dec] around. (24 sc)
Rnd 22: [Sc in each of next 4 sts, dec] around. (20 sc)
Rnd 23: [Sc in each of next 3 sts, dec] around. (16 sc)
Rnd 24: [Sc in each of next 2 sts, dec] around. (12 sc)
Finish stuffing lemon firmly.
Rnd 25: Dec around, change to green. (6 sc)
Rnd 26: With green, sc in each st around.
Fasten off, leaving a long tail.
Use tail to sew top of lemon closed. Weave in ends. Remove stitch marker.
Leaf
With green, ch 6, leaving a long tail.
Row 1: Sl st in 2nd ch from hook, hdc in next ch, 2 dc in next ch, hdc in next ch, 3 sc in next ch, working across opposite side of ch, hdc in next ch, 2 dc in next ch, sl st in next ch, ch 2, sl st in same ch. (2 hdc, 4 dc, 3 sc, 1 ch-2 sp)
Fasten off. Use starting tail to sew leaf to top of lemon. weave in ends.
Eyes (make 2)
With black, ch 2.
Rnd 1: 6 sc in 2nd ch from hook. (6 sc)
Fasten off. On one eye only, leave a 36-inch tail for sewing and embroidery. Weave in all tails except the long one.
Face
Using the images as a guide, position eyes just slightly less than halfway down the lemon. Use the long tail to sew in place.
Continuing with tail, embroider a smiling mouth. Weave in end.
With yellow, make a small highlight stitch on each eye. Weave in all ends.
Apply a small amount of blush to the cheeks, using a cotton swab.
Stem
With brown, ch 15, leaving a long tail.
Fasten off leaving a long tail. Weave both tails securely into top of lemon so that the chains form a hanging loop / stem.
Share this pattern on Pinterest! Here’s an image perfect for pinning:
Rate this Happy Lemon Amigurumi crochet pattern!
I hope you enjoyed this happy lemon amigurumi crochet pattern. A downloadable pdf of this pattern is available on Ravelry for a small fee.
Do you want the best of Stitches n Scraps delivered right to your inbox? Don’t miss a stitch – Subscribe now!
Cute Crochet Monster Pattern – Wittle Wubble
Meet my new friend, Wittle Wubble! This cute crochet monster has long arms for hugging, hanging, and getting into all sorts of mischief. Make a Wittle Wubble friend of your very own, or give one as a gift. They have a little pocket that’s perfect for hiding treasures (and gift cards too)!
What do you do when you a monster needs a name, but you can’t think of one? Ask some of the coolest kids you know to name it for you! I asked my friend Jessie of Jessie at Home to check with her kids. Vero came up with the name Wubble, and Kyla agreed. I think it’s perfect!
Wittle Wubble is a monster after all, and can’t help but get into lots of twouble!
Made With Love
Yarnspirations has sent me Red Heart With Love Yarn for several projects over the last couple of years, and I have a lot leftover. These colors seemed just perfect for a cute crochet monster!
The main color is #1907 Boysenberry, and the pocket is #1803 Blue Hawaii. I’m not actually sure what brand the white yarn is as I only had a little ball, but there is #1001 White available in With Love as well.
Fairfield PolyFil
I also have bags of PolyFil stuffing that Fairfield has sent me for various projects. To make this cute crochet monster even more cuddly, I used Ultra Plush PolyFil. It’s so squishably soft!
Intermediate: Worked in rows and rounds, front post stitches, increases and decreases, sewing multiple pieces together.
Size
Approximately 13 inches tall, not counting ears.
Gauge
13 sc x 14 rows = 4 inches.
Use pattern as gauge swatch – Pocket should measure 3 x 2.5 inches.
Abbreviations used
(Pattern is written in US terms) ch = chain dc = double crochet dec = decrease (see Special Stitches) fpsc = front post single crochet inc = increase (see Special Stitches) rnd = round RS = right side sc = single crochet sk = skip sl st = slip stitch st(s) = stitch(es) WS = wrong side
Decrease (dec): Insert hook into front loop only of next st, and then into the front loop only of the following stitch, yarn over and pull up a loop, yarn over and pull through both loops on hook.
Increase (inc): Sc in back loop only of indicated st, then sc in both loops of same st. This counts as two stitches in the end of round stitch counts.
Row 1: Sc in 2nd ch from hook and in each ch across. (10 sc)
Rows 2-9: Ch 1, turn, sc in each st across. (10 sc)
Fasten off leaving an 18 inch tail for sewing.
Weave in starting tail.
Pocket should measure about 3 inches wide by 2.25 inches tall.
Bottom
With A, ch 12.
Join rounds where indicated with a sl st in the first st of the round. Do not turn unless indicated.
Rnd 1 (RS): 3 sc in 2nd ch from hook, sc in each of next 9 chs, 3 sc in last ch, working into the bottom of the chain sc in each of next 9 chs, join. (24 sc)
Rnd 2: Ch 1, 2 sc in each of first 3 sts, sc in each of next 9 sts, 2 sc in each of next 3 sts, sc in each of last 9 sts, join. (30 sc)
Rnd 3: Ch 1, 2 sc in first st, [sc in next st, 2 sc in next st] twice, sc in each of next 10 sts, [2 sc in next st, sc in next st] 3 times, sc in each of last 9 sts, join. (36 sc)
Rnd 4: Ch 1, 2 sc in first st, [sc in each of next 2 sts, 2 sc in next st] twice, sc in each of next 11 sts, [2 sc in next st, sc in each of next 2 sts] 3 times, sc in each of last 9 sts, join. (42 sc)
Rnd 5: Ch 1, 2 sc in first st, [sc in each of next 3 sts, 2 sc in next st] twice, sc in each of next 12 sts, [2 sc in next st, sc in each of next 3 sts] 3 times, sc in each of last 9 sts, join. (48 sc)
Do not fasten off.
Edging
Rnd 6: Ch 1, fpdc around each st around, join. (48 fpdc)
Notice that since we worked post stitches, the tops of the stitches from rnd 5 are unused. Those tops are where we will join later to work the body.
The RS of the bottom will be turned upside down so that it’s visible on the bottom of the monster. The edging then hangs, upside down, below the body. This turning over is what makes Rnd 6 a wrong side rnd.
The picture above shows the RS of the bottom, with Rnd 1 of the edging. In the picture below, the bottom has been turned over so that you see the RS of the edging and the unused loops from Rnd 5.
Rnd 7 (RS): Turn, sk first st, [sc in next st, (dc, ch 1, dc) in next st, sc in next st, sl st in next st] around, placing the last sl st in the skipped st at the beginning of the rnd. (12 shells)
Fasten off and weave in all ends on bottom.
Most of the rest of the pattern is worked in continuous rounds – do not join or turn unless specified. Mark the first stitch of each round with a stitch marker.
Legs and Feet (Make 2)
Heel:
With A, ch 2 or make a magic circle
Rnd 1 (RS): 6 sc in 2nd ch from hook or in magic circle, join, close magic circle if applicable. (6 sc)
Rnd 2: Ch 1, sc in first st, 2 sc in next st, (sc in next st, 2 sc in next st) around, join. (9 sc)
Rnd 3: Ch 1, sc in each of first 2 sts, 2 sc in next st, (sc in each of next 2 sts, 2 sc in next st) around, join. (12 sc)
Do not fasten off.
Toe:
Continuing from heel:
Rnd 1: Sc in each of first 6 sc, ch 3, skip remaining 6 sc, join. (6 sc)
Rnd 2: Ch 1, sc in each st and ch around. (9 sc)
Rnd 3: Ch 1, sc in first st, dec, [sc in next st, dec] around. (6 sc)
Fasten off. Use tail to sew toe closed, and then weave in ends on toe and heel.
Leg:
With RS facing, join A with sl st in first skipped st on rnd 3 of heel
Rnd 1: Sc in each of first 6 sc, sc in corner where heel meets toe, sc in bottom of each of the 3 chs from the toe, sc in corner. (11 sc)
Rnd 2: Sc in each of next 6 sts, dec, sc in next st, dec. (9 sc)
Rnd 3: Sc in each st around. (9 sc)
Weave in starting tail for leg.
Rnds 4-17: Repeat rnd 3.
Fasten off, leaving a 12 inch tail for sewing.
Stuff leg and foot lightly, leaving the last 1 inch unstuffed at the top.
Attach Legs
Pinch top of leg flat, perpendicular to the foot. When the pinched edge is laying flat, foot should be sticking up.
Position flattened edge of leg against RS of bottom, so that it lines up along one end of rnd 1. Fix it in place with stitch markers.
Once you are satisfied with the positioning, sew legs into place using a whipstitch: In a circular motion, bring the needle through the stitches of the bottom, then back up and through both layers of the leg.
Remove stitch markers once leg is attached. Attach 2nd leg in the same way, on the opposite side of rnd 1 of bottom. Be sure that both toes are pointing in the same direction.
Weave in any remaining tails.
Body:
With RS facing, join A with a sl st in the top of any stitch from rnd 5 of bottom.
Rnds 1-20: Sc in each st around. (48 sts)
Weave in starting tail.
Head:
Rnd 21: (Sc in next 6 sts, dec) around. (42 sts)
Rnd 22: Sc in each st around. (42 sts)
Rnd 23: (Sc in next 5 sts, dec) around. (36 sts)
Rnd 24: Sc in each st around. (36 sts)
Rnd 25: (Sc in next 4 sts, dec) around. (30 sts)
Rnd 26: (Sc in next 3 sts, dec) around. (24 sts)
Rnd 27: (Sc in next 2 sts, dec) around. (18 sts)
Stuff body and head moderately, but do not overstuff. You should not be able to see the stuffing through the stitches.
Rnd 28: (Sc in next st, dec) around. (12 sts)
Rnd 27: Dec around. (6 sts)
Fasten off, use tail to sew top of head closed and then weave in ends.
Arms (make 2):
With A, ch 2 or make a magic circle
Rnd 1 (RS): 6 sc in 2nd ch from hook or in magic circle, close magic circle if applicable. (6 sc)
Rnd 2: [Sc in next st, 2 sc in next st] around. (9 sc)
Rnds 3-5: Sc in each st around.
Weave in starting tail.
Rnds 6-25: Sc in each st around.
Fasten off, leaving a 12 inch tail for sewing.
Stuff arms lightly, leaving the top 1 inch unstuffed.
Ears (make 2):
With A, ch 2 or make a magic circle
Rnd 1 (RS): 3 sc in 2nd ch from hook or in magic circle, close magic circle if applicable. (3 sc)
Rnd 2: 2 sc in each st around. (6 sc)
Rnd 3: Sc in each st around.
Rnd 4: [2 sc in next st, sc in next st] around. (9 sc)
Rnd 5: Repeat rnd 3
Rnd 6: [2 sc in next st, sc in each of next 2 sts] around. (12 sc)
Rnd 7: Repeat rnd 3
Rnd 8: Sc in each st around, join.
Row 9:Turn, sc in each of first 6 sts, sl st in next st, leave remaining sts unworked. (6 sc)
Row 10:Turn, sk sl st, sc in each of next 5 sts, sl st in last st. (5 sc)
Row 11:Turn, sk sl st, sc in each of next 4 sts, sl st in last st. (4 sc)
Fasten off, leaving a 12 inch tail for sewing.
Weave in starting tail.
Eyes (make 2):
With A, ch 2 or make a magic circle
Rnd 1 (RS): 6 sc in 2nd ch from hook or in magic circle, join, close magic circle if applicable. (6 sc)
Fasten off, leaving a 12 inch tail for sewing.
Weave in starting tails.
Assembly
Pin pieces in place as indicated using stitch markers or pins. Remove the pins or markers once the piece has been sewn on.
Sew all seams securely so that little hands can’t pull them apart. I recommend going back over each seam a second time, in the opposite direction.
Pocket
Lay body flat so that feet are pointing up. Place the pocket RS up on the body, so that it is centered between the legs. The last row of the pocket should be on top, and the bottom edge of the pocket should rest just above the bottom edging. Pin pocket into place.
Sew pocket to body using a whipstitch around the side and bottom edges. Leave the top edge open.
Weave in end from pocket.
Ears
Flatten ears so that row 11 is folded in half, creating a single curved edge along the bottom.
Pin ears in place on head so that the curve follows the curve of the head. When you are happy with the placement, sew ears in place with a whipstitch.
Weave in ends from ears.
Arms
Flatten top of arms and pin into place, centered below the ears. Sew to body using a whipstitch.
Weave in ends from arms.
Face
Place eyes on head using the picture as a guide. Sew eyes in place with a back stitch or running stitch, just under the tops of the crochet stitches.
With B, make a small stitch at the center of each eye.
With C, embroider the mouth. I used stem stitch, but backstitch is also a good option.
Weave in all remaining ends.
Give your cute crochet monster a big hug to even out all the stuffing (and because hugs are awesome).
Rate this cute crochet monster pattern!
I hope you enjoyed this cute crochet monster pattern.
A downloadable pdf of this pattern is available on Ravelry for a small fee. The fee for the pdf format is to offset the advertising revenue lost when you print or download the pattern rather than viewing it online.
Do you want the best of Stitches n Scraps delivered right to your inbox? Don’t miss a stitch – Subscribe now!
Crochet Sloth Amigurumi – Smiley the Baby Sloth
Smiley the baby sloth likes to keep things low key. Most days you can find them lounging around or hanging out with their other baby buddies. This crochet sloth amigurumi pattern is fast and fun to make, so you can crochet the whole crew!
Fairfield World generously offered all the designers free Poly-Fil fiber fill for their designs. It’s my go-to filler for all my amigurumi, but I already had a lot from previous events. So this time they sent me some of their Poly Pellets instead!
This was my first time using any sort of weighted fill, and I was thrilled with the results. It gave Smiley a nice firm base to help them stand still for pictures, even in the wind. I might hesitate to use it for baby gifts though, in case any of the beads works loose and gets swallowed. I’ve made this an optional step in the pattern.
Nylon sock/stocking to hold poly pellets (ankle or knee length – optional)
Project Level
Intermediate: Mostly single crochet in the round, with some increases and decreases, working in back and front loops separately.
Size
7 inches tall
Gauge
14 sc x 14 rows = 4 inches. Use pattern as gauge swatch – Rounds 1 – 4 should measure 2.25 inches in diameter. Exact gauge is not critical.
Abbreviations used
(Pattern is written in US terms) ch = chain sc = single crochet inc = increase (see Special Stitches) dec = decrease (see Special Stitches) sk = skip st(s) = stitch(es) sl st = slip stitch sp = space ch-sp = chain space rnd = round RS = right side
Increase (inc): Sc in back loop only of next st, then sc in both loops of the same st. See full tutorial here.
Decrease (dec): Insert hook into front loop only of both of next 2 stitches, yarn over and draw up a loop, yarn over and draw through both loops on hook. This is an alternative to a single crochet 2 together (sc2tog) stitch. If you prefer, you can use the standard sc2tog instead.
Instructions
Weighted Base (optional)
Pour about 1/4 cup of Poly Pellets into the toe of the stocking. A funnel is helpful for this. Tie a knot in the stocking, above the pellets.
Fold the top of the stocking around to the other side, so that the pellets are in 2 layers of stocking.
If desired, you can repeat the last 2 steps, so that the pellets are now in 3 layers.
When stuffing the body, place a thin layer of stuffing at the bottom, then place your weighted base inside. As you finish stuffing, be sure to surround your weighted base entirely with stuffing material all around it so that the nylon does not show through and you can’t feel the knots.
Body
The Body, Head, and Muzzle are worked in continuous rounds. Do not join or turn unless indicated. Mark first stitch of each round.
With A, ch 2
Rnd 1 (RS): 6 sc in 2nd ch from hook. (6 sc)
Rnd 2: Inc around. (12 sc)
Rnd 3: (Inc in next st, sc in next st) around. (18 sc)
Rnd 4: (Inc in next st, sc in each of next 2 sts) around. (24 sc)
Rnd 5: Sc in each st around.
Rnd 6: (Inc in next st, sc in each of next 3 sts) around. (30 sc)
Rnds 7-10: Sc in each st around.
Rnd 11: (Dec, sc in each of next 3 sts) around. (24 sts)
Rnds 12-15: Sc in each st around.
Rnd 16: (Dec, sc in each of next 2 sts) around. (18 sts)
Rnds 17-18: Sc in each st around.
Rnd 19: (Dec, sc in next st) around, join with sl st to flo of first st. Do not fasten off (12 sts)
Stuff body most of the way full and continue stuffing as you go. (If you made a weighted base, this is where you insert it.)
Hood
Continuing from body
Row 1: Ch 1, sc in flo of same st and flo of each of next 8 sts, leaving 3 sts unworked. (9 sts)
Row 2: Ch 1, turn, sc in first st, (inc, sc in next st) across. (13 sts)
Row 3: Ch 1, turn, sc in first st, (inc, sc in next 2 sts) across. (17 sts)
Rows 4-7: Ch 1, turn, sc in each st across. (17 sts)
Row 8: Ch 1, turn, sc in first st, (dec, sc in next 2 sts) across. (13 sts)
Row 9: Ch 1, turn, sc in first st, (dec, sc in next st) across. (9 sts)
Rows 10-11: Ch 1, turn, sc in first st, dec, sc across to last 3 sts, dec, sc in last st (5 sts).
Row 12: Ch 1, turn, sk first st, sc in next 2 sts, dec. (3 sts)
Row 13: Ch 1, turn, sk first st, dec. (1 st)
Fasten off, leaving a 12 inch tail for sewing.
Head
Fold hood back and out of the way. With RS facing, Join B with sl st in blo of first unworked st on body.
Rnd 1: Inc in same st, sc in next st, inc in next st. working in unworked back loops in front of hood, (sc in blo of next st, 2 sc in blo of next st) 4 times, sc in blo of last st. (18 sts)
Rnd 2-3: Repeat rnds 4-5 of body
Rnd 4: Sc in next 2 sts, ch 4, sk next 4 sts, sc in last 15 sts. (21 sc and ch-4 sp for muzzle)
Muzzle opening should be centered directly opposite the hood, so that when the hood is folded up, the point at the top lines up with the center of the muzzle opening.
Rnd 5: Sc in each st and each ch around. (24 sc)
Rnd 6: Sc in each st around.
Rnd 7: (Dec, sc in next 2 sts) around. (18 sc)
Rnd 8: (Dec, sc in next st) around. (12 sc)
Rnd 9: Dec around, fasten off. (6 sc)
Using tails, sew top of head and bottom of body closed, then weave in all ends except for long tail on hood.
Finish stuffing head through muzzle opening.
Muzzle
Rnd 1: Join B with sc in any st around muzzle opening, sc in each remaining st around. (8 sc)
Rnd 2: Sc in each st around. Fasten off, leaving a long tail for sewing. (8 sc)
Stuff the muzzle.
Line the stitches up so that there are 4 on top and 4 on the bottom. Sew the opening closed with the tail, using a mattress stitch.
Weave in ends from the muzzle.
Eye Patches (Make 2)
With A, ch 2
Rnd 1 (RS): 6 sc in 2nd ch from hook, join with sl st to first st. (6 sc)
Row 2: Ch 1, sc in first 3 sts, leaving remaining sts unworked. (3 sc)
Row 3: Ch 1, sk first st, sc in next 2 sts. (2 sc)
Row 4: Ch 1, sk first st, sc in last st. (1 sc)
Fasten off, leaving an 8 inch tail for sewing.
Assembly
Using tails, sew eye patches on to head. The circle part of the eye patch should rest just above the muzzle, with the pointed end turned down slightly. The pointed end should end up under the edge of the hood, once the hood is in place.
Weave in ends from eye patches.
Fold hood up so that the point is centered between and slightly above the eye patches. The edges of the hood should cover the pointy end of the eye patch. With the long tail, sew hood in place around the edge, all around the face.
Weave in all ends.
With Black, embroider the eyes, nose, and mouth.
Weave in any remaining ends.
Rate this Crochet Sloth Amigurumi Pattern!
I hope you enjoyed this crochet sloth amigurumi pattern. A downloadable pdf of this pattern is available on Ravelry for a small fee. The fee for the pdf format is to offset the advertising revenue lost when you print or download the pattern rather than viewing it online.
Do you want the best of Stitches n Scraps delivered right to your inbox? The Stitches n Scraps email newsletter includes highlights from the blog as well as special features not available elsewhere. Don’t miss a stitch – Subscribe now!
Crochet Penguin Amigurumi – Playful the Baby Penguin
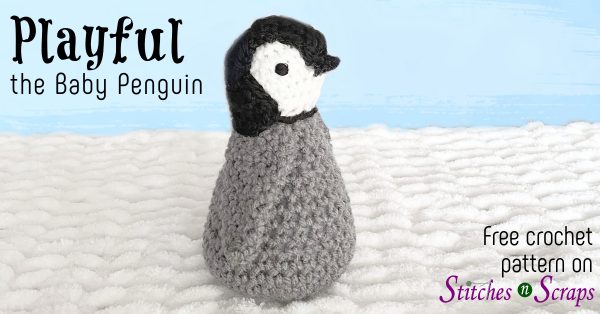
Playful the Baby Penguin has arrived just in time for the holidays! She’s an emperor penguin chick, so she loves the cold weather and playing in the snow with her friends. This crochet penguin amigurumi pattern is fast to make, so you can make the whole set.
I designed this crochet amigurumi penguin pattern for the 80 Days of PolyFil celebration. This event is sponsored by Fairfield, in celebration of their 80th anniversary!
Fairfield World generously sent me lots of Poly-Fil Premium Polyester Fiber Filling for these softie designs. This is my go to stuffing material for all my crochet amigurumi patterns because it’s so soft and squishy and easy to use. It also makes great fake snow for pictures!
My favorite stuffing tip is to tear the stuffing into small bits and stuff just a little at a time, rather than trying to put a whole handful in all at once. This creates a smoother finish and avoids clumps and lumps.
Intermediate: Mostly single crochet in the round, with some increases and decreases.
Size
7 inches tall
Gauge
14 sc x 14 rows = 4 inches. Use pattern as gauge swatch – Rounds 1 – 4 should measure 2.25 inches in diameter. Exact gauge is not critical.
Abbreviations used
(Pattern is written in US terms) ch = chain sc = single crochet inc = increase (see Special Stitches) dec = decrease (see Special Stitches) sk = skip st(s) = stitch(es) sl st = slip stitch sp = space ch-sp = chain space rnd = round RS = right side
Increase (inc): Sc in back loop only of next st, then sc in both loops of the same st. See full tutorial here.
Decrease (dec): Insert hook into front loop only of both of next 2 stitches, yarn over and draw up a loop, yarn over and draw through both loops on hook. This is an alternative to a single crochet 2 together (sc2tog) stitch. If you prefer, you can use the standard sc2tog instead.
Instructions
Body
Everything except the hood is worked in continuous rounds. Do not join or turn unless indicated. Mark first stitch of each round.
With A, ch 2
Rnd 1 (RS): 6 sc in 2nd ch from hook. (6 sc)
Rnd 2: Inc around. (12 sc)
Rnd 3: (Inc in next st, sc in next st) around. (18 sc)
Rnd 4: (Inc in next st, sc in each of next 2 sts) around. (24 sc)
Rnd 5: Sc in each st around.
Rnd 6: (Inc in next st, sc in each of next 3 sts) around. (30 sc)
Rnds 7-10: Sc in each st around.
Rnd 11: (Dec, sc in each of next 3 sts) around. (24 sts)
Rnds 12-15: Sc in each st around.
Rnd 16: (Dec, sc in each of next 2 sts) around. (18 sts)
Rnds 17-18: Sc in each st around.
Rnd 19: (Dec, sc in next st) around, changing to B at the end of the rnd. (12 sts)
Stuff body most of the way full and continue stuffing as you go.
Head
Rnds 20-22: Repeat rnds 3-5
Rnd 23: Sc in next 9 sts, ch 3, sk next 3 sts, sc in last 12 sts. (21 sc and ch-3 sp for beak)
Rnd 24: Sc in each st and each ch around. (24 sc)
Rnd 25: Sc in each st around.
Rnd 26: (Dec, sc in next 2 sts) around. (18 sc)
Rnd 27: (Dec, sc in next st) around. (12 sc)
Rnd 28: Dec around, fasten off. (6 sc)
Using tails, sew top of head and bottom of body closed, then weave in all ends.
Finish stuffing head through beak opening.
Hood
With C, Ch 13, leaving a 30 inch tail for sewing.
Row 1: Sc in 2nd ch from hook and in each ch across. (12 sts)
Row 2: Ch 1, turn, sc in each st across.
Rows 3-4: Ch 1, turn, sc in first st, dec, sc across to last 3 sts, dec, sc in last st. (8 sts)
Rows 5-7: Repeat row 2.
Row 8: Repeat row 3. (6 sts)
Rows 9-10: Repeat row 2.
Row 11: Ch 1, turn, sc in first st, dec twice, sc in last st. (4 sts)
Rows 12-13: Repeat row 2.
Row 14: Ch 1, turn, dec, sc in last st. (3 sts)
Row 15: Repeat row 2.
Beak
The beak starts by joining the hood to the beak opening.
Rnd 1: Ch 1, turn, with body and head upside down, hold the 3 stitches of the last row of the hood against the 3 stitches at the top of the beak opening.
Working through both layers, sc in next 3 sts. Continuing around the beak opening only, sc in the next 3 stitches at the bottom of the beak opening.
Rnd 2: (Dec, sc in next st) twice. Fasten off. (4 sts)
Wings (Make 2)
With A, ch 7, leaving a 12 inch tail for joining.
Rnd 1: Sc in 2nd ch from hook and in each ch across, working in bottom of chains, sc in each ch across. (12 sts)
Rnds 2-4: Sc in each st around.
Rnd 5: (Dec, sc in next 4 sts) twice. (10 sts)
Rnds 6-7: Sc in each st around.
Rnd 8: (Dec, sc in next 3 sts) twice. (8 sts)
Rnd 9: Sc in each st around
Rnd 10: (Dec, sc in next 2 sts) twice. (6 sts)
Rnd 11: (Dec, sc in next st) twice. Fasten off. (4 sts)
Assembly
Using tails, sew wings in place at the neckline, where head meets body.
Fold hood down so that the bottom of it wraps around the back of the neck.
With the long tail, sew hood in place around the edge – all around the face and across the back of the neck.
Embroider the eyes.
Backstitch across front of neck, to hide color change.
Weave in all ends.
Rate this Crochet Penguin Amigurumi Pattern!
I hope you enjoyed this crochet penguin amigurumi pattern. A downloadable pdf of this pattern is available on Ravelry for a small fee. The fee for the pdf format is to offset the advertising revenue lost when you print or download the pattern rather than viewing it online.
Do you want the best of Stitches n Scraps delivered right to your inbox? The Stitches n Scraps email newsletter includes highlights from the blog as well as special features not available elsewhere. Don’t miss a stitch – Subscribe now!