Week 7 – Jake’s Blankie Crochet Along
Have you been crocheting along with the Jake’s Blankie CAL on Jessie at Home? Here’s my Week 7 Jake’s Blankie CAL update, and some tips on joining.

This content is protected by copyright. See this Terms of Use / Copyright page for more information.
This post contains sponsored content and/or affiliate links. If you click an affiliate link and make a purchase, I may get a commission.
My Week 7 Progress
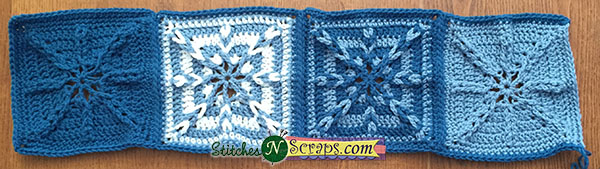
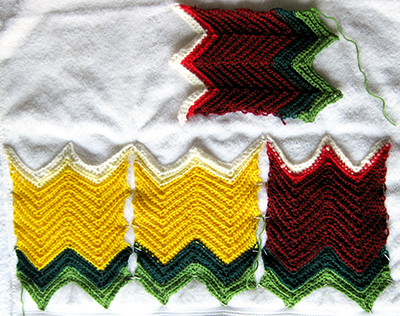
My squares are done for both week 7 and week 8. I’ll wait to show you the week 8 square until next week.
Stash Troubles
As always happens near the end of a scrap project, one of my colors was running out. I didn’t have enough light blue, so I got a bit creative with the color changes. With the changes, there was just enough left for both of these last 2 squares to have a little in them.
Unfortunately, both other colors are nearly used up too! I don’t have enough for joining or edging. That means I need to go shopping for more dark blue to finish the project.
Joining the Squares
Speaking of joining, I have started joining the squares. Here’s what I have done so far.

I am using Jessie’s recommended, single crochet, join-as-you-go technique, but with a couple of modifications.
Instead of doing this in the last round of the square pattern, I’m adding one additional round. Also, I’m doing it in one, continuous, zig-zagging round.
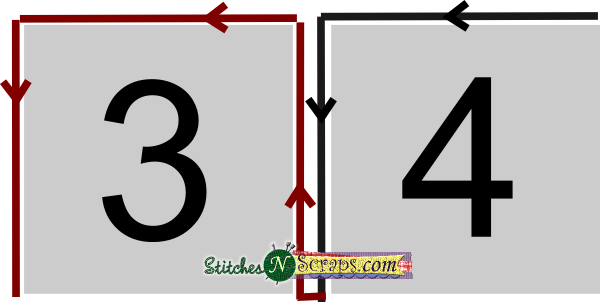
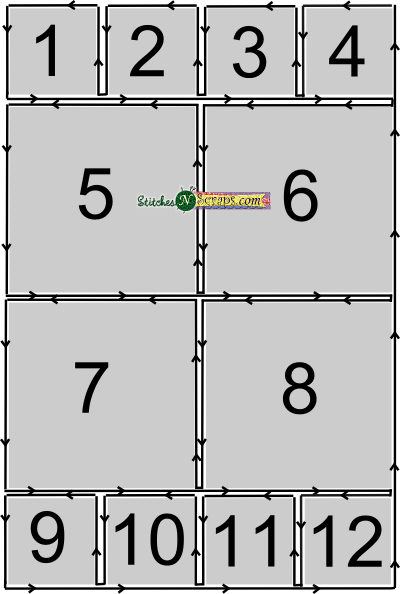
Joining the First Row
Start by joining the yarn in one corner space of square 4. Work along 2 sides as follows: Sc in the corner sp, sc in each stitch across to next corner, (sc, ch 1, sc) in the next corner sp, sc across to next corner, sc in corner sp.

Next, connect it to square 3: Ch 1, sl st in the matching corner sp on square 3, joining sc (see Jessie’s instructions) in same sp, joining sc in each st across to the corner, joining sc in the corner sp.
Continue around 2 more sides of square 3: Ch 1, sc in same corner sp, sc across to next corner, (sc, ch 1, sc) in that corner sp, sc across to next corner, sc in corner sp.
Repeat the square 3 instructions for both square 2 and square 1. Then, work across the whole bottom of the first row: Ch 1, sc in same corner sp, (sc in each st across to corner of current square, sc in corner ch sp on current square, sl st in ch sp from joining, sc in corner ch sp on next square) 3 times, sc across each st to last corner, sc in last corner.
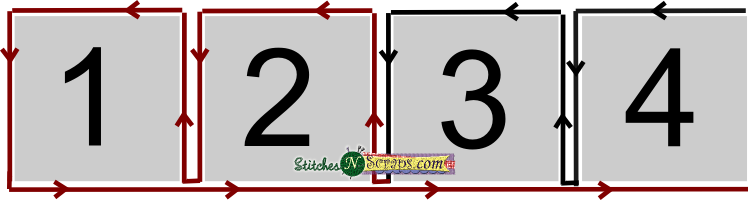
Your first row should now look like this:
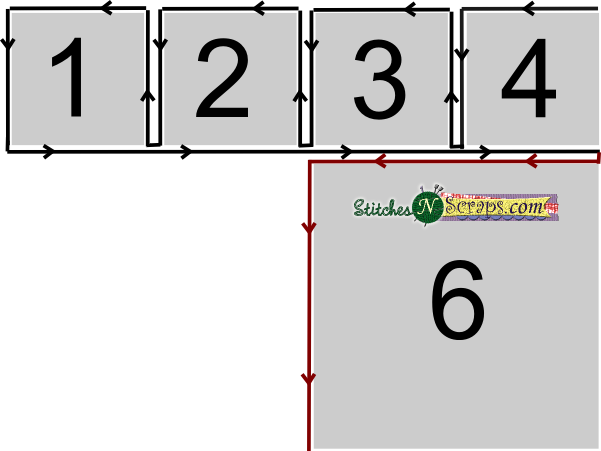
Joining Square 6
The 2nd row is a bit tricky because of the larger squares. Because the squares are double the size, they don’t have the same corner increases as the first row.
Join square 6 as follows: ch 1, sl in matching corner sp on square 6, 2 joining sc in same corner (worked into first 2 sc on square 4), joining sc in each st across to the next corner, 2 joining sc in corner.
Then work down the next side of square 6: ch 1, 2 sc in same corner sp, sc in each st across to corner, 2 sc in corner sp.
Joining Square 5
Join square 5 to square 6: Ch 1, sl st in matching corner sp, 2 joining sc in same corner sp, joining sc in each st across, 2 joining sc in next corner sp, ch 1.
Then join square 5 to squares 2 and 1: 2 joining sc in same corner sp, joining sc in each st across to next corner sp, 2 joining sc in corner sp.
Next, work down the third side of square 5: Ch 1, 2 sc in same corner sp, sc in each st across, 2 sc in corner sp,
Finishing the 2nd Row
Finally, work across the bottom: Ch 1, 2 sc in same corner sp, sc in each st across to corner sp, 2 sc in corner sp on square 5, sl st in ch sp from joining, 2 sc in corner sp on square 6, sc in each st across to corner, 2 sc in next corner sp.

This is what I have finished so far.
Remaining Rows
Join the 3rd row the same way as the 2nd. Then join the last row the same way as the first. Finally, work around the 2 unworked sides of the blanket with 1 sc and 1 ch in the corner of each small square, and 2 sc and 1 chain in the corner of each large square, joining at the end with a sl st in the first stitch.
It sounds more complicated than it is. If you work through it step by step, it will start to make sense. The main benefit of this method is you can join the whole blanket in one long round, with fewer ends to weave in!
Are you Crocheting Along?
Visit the main Jakes Blankie CAL post on Jessie at Home for all the details. Then join in the fun, and crochet along with me!

Do you want the best of Stitches n Scraps delivered right to your inbox? Don’t miss a stitch – Subscribe now!


You May Also Like
Tea Cozy Tuesday – April – Week #4

How to Crochet Pet Stairs with Fairfield Project Foam