Crochet Tutorials
Ready for a new crochet stitch, technique, or pattern? You’re in the right place! Browse all the crochet tutorials, or select a category from the dropdown menu. What will you learn today?

3 Ways to Weave in Ends in Crochet
Tutorial, product review and giveaway!
I’ve extended the giveaway to run through June 10th (it was originally the 7th), so you have a little extra time to get your entries in. Don’t miss it!
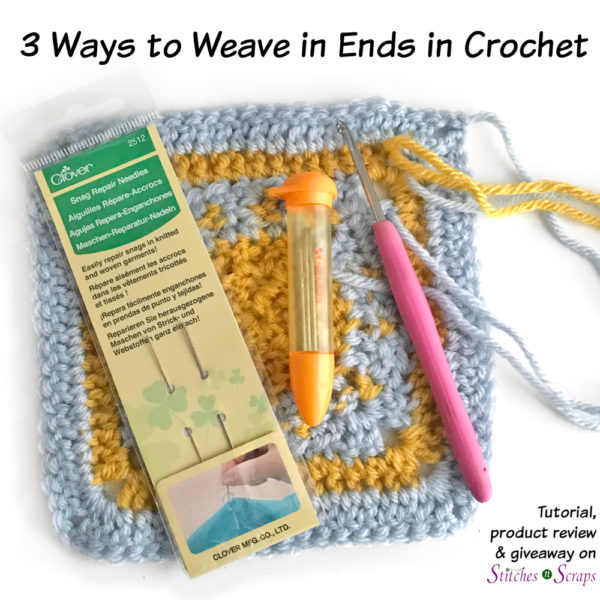
How do you secure your yarn ends when you are done crocheting? Knots can leave unsightly bumps, so weaving in your ends is usually the best option. I typically weave in ends using a bent tip needle, but there are other options as well!

This post contains affiliate advertisements (click for more info). If you click one of these advertisements and then make a purchase, I may be compensated. You get the same great prices, and you will be helping to support this site!
The Clover snag repair needle
Clover recently gave me a free package of two snag repair needles to try out and review for you. While it’s meant for repairing snags, it’s also great for weaving in short ends. Keep reading to see how it works and how you can enter to win a set of Clover snag repair needles for yourself. There’s a video tutorial below as well!

Why not knot?
I know many crocheters who like to knot their ends, and don’t feel their work is secure unless there’s a knot. But knots make hard bumps in an otherwise soft material. Over time, even the best knot can loosen and come out. Some people apply glue to their knots, which makes them even harder and can also wear out over time. Still others make a knot and then weave in the remaining ends.
In almost every case, weaving in the ends without a knot is a better option. It creates a much smoother and softer finish, and if ends are woven in properly and securely, they should not come out over time. There are a few exceptions, such as some jewelry pieces where there aren’t enough stitches to weave into, or if you want a visible knot as a decorative element. Otherwise, I’m so against knots that I don’t even use a slip knot when I start my work (see how in this tutorial!).
How to weave in ends securely
Regardless of which tool you use, the basics of weaving in ends are the same. Ends should be hidden inside the stitches, preferably of the same color, so that they do not show. To make sure they do not pull out, weave them back and forth in multiple directions. Go vertically through the rows when you can, rather than horizontally through the stitches.

Weaving in vertically in this way is less likely to make the stitches bunch together than going horizontally. With some yarns you might be ok just making 2 runs – going down once and back up again once (or up and then down as the case may be). I get paranoid about it, so I often go down, then up, then down again. If your yarn is really slippery, you can do even more than that. Remember to go in a slightly different spot each time and be careful with your tension so you don’t create any lumpy areas.
3 Tools for weaving in ends
I typically use a yarn needle to weave in my ends, but it can also be done with a crochet hook or the Clover snag repair needle.
1. Weave in ends with a crochet hook
Insert your hook through the stitches, working towards the end that you would like to weave in. When you get to it, grab the end with the hook, and pull it back through the stitches.

This is not my favorite technique because a thicker hook can distort the stitches, while a thinner hook can split the end that you’re trying to weave in. It works more easily on looser stitches than on tight ones. It’s useful to know how to do it though, in case I ever find myself stuck without a needle. It also works well for short ends that are difficult to thread onto a needle.
2. Weave in ends with a tapestry needle
These can be called yarn needles, tapestry needles, or darning needles. Choose a needle that has a large enough eye to hold your yarn, but is small enough to go through your stitches easily. My favorite for most yarns is this Clover bent tip darning needle set. It comes with one small (#15) and two larger (#12) needles.

I have about 5 or 6 (or maybe more) of these little yellow tubes all over my house, so I can always find one when I need it. The bright container is easy to find, and keeps the needles safe. Before I found these, I was forever losing my needles in couch cushions or (worse) carpeting.
To weave in ends using a needle, thread the needle and sew the end through the stitches. Be sure your needle does not go all the way through the right side of you work.

The bent tip is a matter of personal preference. I find it makes it easier to get into the stitches and more comfortable to hold. Clover has containers like this with straight needles too, and I recommend trying both before deciding which you like better.
You can also find plastic needles but I find those harder to work with and much easier to break. The only time I use a plastic needle is if I need one that’s really big for super bulky yarns.
3. Weave in ends with a Clover snag repair needle
This is a brand new tool from Clover, and they sent me a set for free to try out. Instead of an eye, this needle has a screw top. As you pull it through your stitches, it grabs onto any loose threads nearby and pulls them through with the needle. This is particularly useful for ends that are too short to sew in with a regular needle.

Using the Clover snag repair needle this way was not as easy as using a tapestry needle. So I still plan to use my tapestry needles for most ends. However, for shorter ends, the snag repair needle is a great option!
This needle is also great for it’s intended purpose – fixing snags in fabrics. As you pull the needle through the fabric, it grabs the snag and pulls it to the wrong side so it doesn’t show. At the end of the video below, I show how it works for that.
Video Tutorial
Enter the giveaway!
Clover is generously providing a set of 2 snag repair needles (2 needles in 1 package) to one lucky winner!

To be eligible, you must be 18 years of age or older, with a valid, US shipping address. The winner will be contacted by email, and must reply to that email and provide their selections and shipping address within 1 week in order to receive the prizes. If the winner does not reply within 1 week, a new winner will be selected. The giveaway ends on June 7th 10th, 2019 (at 11:59pm, central time). Hurry and enter below!
Update: I’ve extended the giveaway to run through June 10th (at 11:59 pm, central time), so you have a little extra time to get your entries in. Don’t miss it!
This giveaway is powered by Rafflecopter, and they may ask for some log-in information if you are not already logged in. See the Rafflecopter privacy policy for more information.
a Rafflecopter giveawayAll About Gauge
Featuring the Clover Swatch Ruler and Needle Gauge
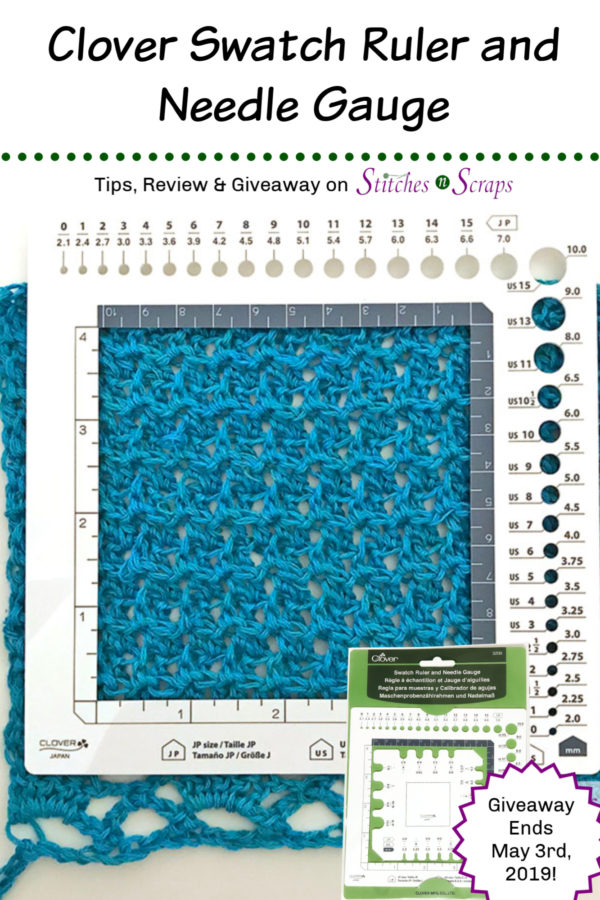
I know a lot of knitters and crocheters cringe at the words “gauge” and “swatching”. But working up a gauge swatch before starting a project can be important, and it doesn’t have to be difficult! Clover recently gave me a free swatch ruler and needle gauge tool to try out and review for you. It seemed like the perfect opportunity to share some information with you about gauge and swatching.

This post contains affiliate advertisements (click for more info). If you click one of these advertisements and then make a purchase, I may be compensated. You get the same great prices, and you will be helping to support this site!
Keep reading for more information on why and how to swatch, and how to adjust if needed. Plus, enter the giveaway below for a chance to win a Clover swatch ruler and needle gauge!
What is a gauge swatch?
A gauge swatch is a small sample of knitting or crochet, from which you can measure the size of your stitches. It can also be a chance to practice the stitches used in the pattern, and can give you an idea of how the finished piece will look and feel.
Why does it matter?
You don’t always have to match the gauge listed in your pattern or on the yarn label, but it’s important to understand how differences in gauge can affect your finished piece.
- Size: Matching the gauge used in a pattern will result in the same size finished piece as the pattern. If you’re making a hat, and you want to make sure it fits you and not an elephant, this is important!
- Texture: If your gauge is tighter, your fabric will be stiffer and firmer. A looser gauge results in a more open and drapey fabric. This difference can be important if you want your garments to drape nicely, or your stuffed dolls to keep their stuffing in.
- Yarn usage: You may not care if your blanket square turns out to be 13 inches instead of 12, but if it does it will use more yarn. Over an entire blanket, that can mean several extra skeins. Accurate gauge measurements can help to predict yarn usage.
Practice makes perfect
Learning a new stitch pattern can take a little practice, and your first few tries may have some mistakes. Working up a gauge swatch gives you an opportunity to practice the pattern before you start the project. Just be sure you are measuring your gauge over a section of your swatch that is correct and even.
When working without a pattern, a gauge swatch can give you a chance to try out different stitches and ideas. I wrote about exactly that in this post about swatching for a new design.

Making a swatch
If you are working from a pattern, it should have a recommended gauge. 4 inches is a common size for measurements, which is why the Clover Gauge Swatch Ruler has a convenient 4 inch window.
Your pattern may say something like “12 sc x 15 rows = 4 inches”. This means that if you measure across a 4 inch square of single crochet stitches, you should find 12 stitches and 15 rows. This does not mean you should work up a swatch that is exactly 12 sc by 15 rows.
Make it bigger
The stitches along the edges of your work are often slightly different than those in the middle. Cast on and bind off edges, selvedges, and foundation chains can all affect your measurements.
To avoid measuring over these areas, your swatch should be larger than the area you need to measure. If you’re measuring a 4 inch square, make a swatch that’s at least 6 inches square. The exception to this rule is if the instructions include a specific gauge swatch pattern.
Swatching in pattern:
Gauge measurements should ideally be done in the stitch used in the pattern. In the above example, the measurements were given as a number of single crochet stitches, but it could easily have been a different stitch or stitch pattern. It also doesn’t have to be a 4 inch square.
The gauge instructions may say something like “5 shells and 12 rows = 3 inches in pattern”. In this case, you would still need to work up a larger square, but follow the stitch pattern used in the project to do so.
Sometimes, the pattern will specify separate instructions for a gauge swatch, or may use part of the pattern itself as a swatch. For example, in my Modular Mitered Pillow pattern, each small square should be about 3.5 inches. In this case, you do not need to make a larger swatch as the measurements take into account the edge stitches.

Blocking your swatch
It’s usually a good idea to wash and block your swatch before measuring it, because different fibers react differently to blocking. Unblocked squares that are identical except that one is made with bamboo yarn and the other with acrylic yarn will become very different from each other after blocking.
Unless otherwise stated, the gauges listed in most patterns are based on a blocked swatch or on the final project after blocking. If you match the gauge with an unblocked swatch, you may be in for a surprise once you wash your finished piece.
Block your swatch the same way you would block the finished project. For garments, it’s a good idea to hang your swatch with a little weight on it (binder clips or chip clips work well). This can help to simulate any sagging from the weight of the garment.
Here are three swatches of the same yarn, one unblocked, one blocked flat, and one blocked with some weight. As you can see, the finished measurements are very different.

Not blocked, the 4 inch area is 20 sts x 8.5 rows. Dried flat, it’s 19 sts x 8 rows. When hung with a little weight, it becomes 18 sts x 7.25 rows. These may not seem like big differences over 4 inches, but it becomes a bigger difference in a larger piece. In this example, if I went by the unblocked gauge and made a sweater with a 36 inch bust, after washing it, that bust would become 40 inches!
Measuring gauge
Here’s where the Clover Swatch Ruler comes in very handy. The window isolates a square area, making it easier to count your stitches.

There are ruler markings on all sides of the window, in case you need to measure a smaller area. 2 sides have markings in inches, and the other 2 in centimeters.
Adjusting to meet the pattern gauge
If you find that you have too few stitches in your measured area, that means your gauge is too loose and your stitches are too big. To fix this, try dropping down to a smaller needle or hook size. Alternately, if your gauge is too tight and you have too many stitches, try going up a needle or hook size. It may take a little trial and error to find the right size.
Adjusting the pattern to meet your gauge
If the pattern is simple enough, and you are happy with the texture of your swatch, you may be able to adjust the pattern to meet your gauge. This requires a bit of math.
First, figure out how many stitches and rows you have per inch. Then look in the pattern to see how many inches you need. Multiply the two numbers together and you will see how many stitches you will need to make.
For example, if a scarf pattern is 8 inches wide, and my gauge is 12 stitches in 4 inches, I will need to make 24 stitches to get the same 8 inch width. If you make these kinds of adjustments, remember to take into account any stitch multiples needed for pattern stitches, and remember to adjust the number of rows as well.
The Clover Swatch Ruler and Needle Gauge
This multi-functional tool is great for measuring swatches, but it also has needle and hook gauges! It comes in 2 pieces that nest together. Both are sturdy, but thin and flat so they store easily.
The big piece, with the swatch ruler, also has the needle gauge. This handy tool helps you identify the size of any needle, even if the markings have rubbed off. This is particularly useful for double pointed needles that have no markings. You simply find the smallest hole that your needle fits into, and that’s the size.

The smaller piece has a similar gauge, but for crochet hooks. On this one, instead of holes to put needles through, there are grooves to slide hooks into. Both the hook and needle gauges have US, metric, and Japanese sizes listed.

Enter the giveaway!
Clover is generously providing a swatch ruler and needle gauge tool to one lucky winner!

To be eligible, you must be 18 years of age or older, with a valid, US shipping address. The winner will be contacted by email, and must reply to that email and provide their selections and shipping address within 1 week in order to receive the prizes. If the winner does not reply within 1 week, a new winner will be selected. The giveaway ends on May 3rd, 2019 (at 11:59pm, central time). Hurry and enter below!
This giveaway is powered by Rafflecopter, and they may ask for some log-in information if you are not already logged in. See the Rafflecopter privacy policy for more information.
a Rafflecopter giveaway
Tutorial – How to crochet a Romanian Cord
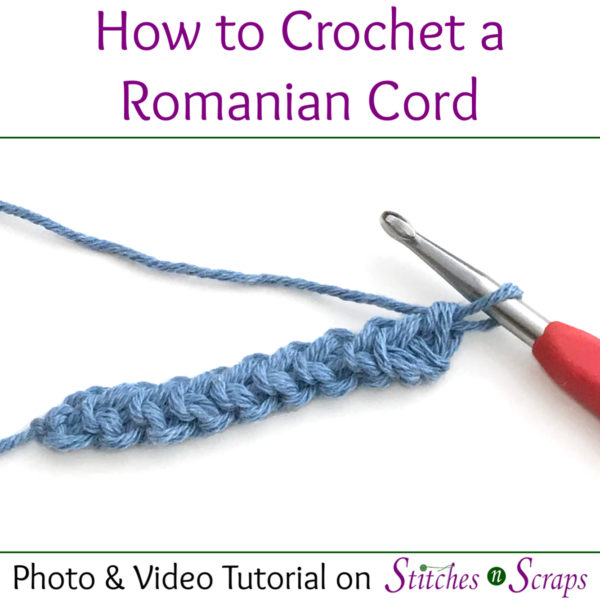
The Romanian cord is a flat cord with a striking texture that is the same on both sides. It’s a perfect option for things like drawstrings, ties, bag handles, straps, or even belts! The easy technique starts with 2 setup stitches, and then is just one simple stitch repeated for the desired length of your cord.

Romanian Cord – Photo Tutorial:
(Scroll down for video tutorial)
Note: It is very important to work all stitches loosely for this technique. You may want to use a larger hook than you would normally use for your yarn.
Set up stitches:
First, chain 2 and work a single crochet into the 2nd chain from your hook. As you do this, pay attention to your turning chain (the one you did not work into). It will fold up alongside your stitch, and create a small loop on the side.

Turn, and single crochet into this side loop.

Notice as you do this that each single crochet (including the previous one you made), forms 2 little loops just under your hook. You will find the 2 loops from the previous stitch along the side edge.

Repeating Stitch:
Turn, and single crochet into the 2 side loops. These two loops were created by your very first stitch.

Repeat this last step until you reach your desired length. After a few more stitches, you should see a flat, textured cord start to form. Since we are turning with every stitch, it will look the same on both sides.

What will you do with your Romanian cords? Try using them in place of any drawstring or tie on your favorite patterns, tie one around a gift for that extra special touch, or sew the ends together to make a quick bracelet!
Romanian Cord – Video Tutorial:

Tutorial – Working into the 3rd Loop of Half Double Crochet
All the basic stitches in crochet have a front loop and back loop, which form a V shape at the top of the stitch. Half double crochet (hdc) is unique because it has an extra, 3rd loop. Learn how to find this 3rd loop, whether working in rows or in rounds, and see what happens when you work into it.

Working into the 3rd Loop of Hdc – Photo Tutorial:
(Scroll down for video tutorial)
What makes the 3rd Loop:
The yarn over in a half double crochet forms a diagonal line at the front, and a horizontal line at the back of the stitch. That horizontal line at the back is the 3rd loop.

Finding the 3rd Loop:
When you work in rows, you turn your work so the back side of the previous row is facing you. This is also true if you are working in rounds but turning your work after joining each round. In these situations, the third loop will be facing you.

When working in rounds without turning, the front of the the previous round is facing you. In this case, the third loop is at the back. You can find it by tilting the work towards you slightly and looking behind the front and back loops.

Why work into the 3rd Loop?
When you work into the third loop, the top and bottom loops of the stitch are pushed forward. This creates a pretty braid-like row of v shapes. Doing this on every row or round can produce a faux knit effect.

Working into the 3rd Loop of Hdc – Video Tutorial:
Ready to try it out? I used this technique on the Mod Stripes Towel!

Almost Invisible Single Crochet Increase
A traditional crochet increase is done by simply working 2 stitches into the same stitch. Sometimes though, this can be too visible, or can open up that stitch too much. For those situations, this (almost) invisible single crochet increase may be a better option.

When to choose a traditional single crochet increase
As a design element
Traditional increases make visible bumps and holes. This isn’t always a bad thing! Sometimes the extra stitches can form a pretty pattern and work as a design element. One example of this is spiraling increases at the top of a hat.
In chains and chain spaces
While you CAN technically do the invisible increase technique into a chain, you can’t do it in a chain space. In either case, it would be fiddly and there’s just no reason to. There’s already a hole, and the increase won’t really look any different.
Check out this Lunchtime Live episode for the difference between working into chains and working into chain spaces.
Alternative placements
Sometimes your pattern will call for working into the front loop only, or around a post, or something else other than the traditional placement in the top of the stitch. In these cases you should work the increase the way the pattern specifies, because there is usually a reason for it.
When to choose an invisible single crochet increase
Less visible
Traditional increases can sometimes be too noticeable when you don’t want them to be. For example, you may not want visible lines for the bust shaping on a sweater.
Smaller hole
Sometimes the wider holes from traditional increases can be the issue. Putting 2 stitches into the same spot can “open up” that stitch, creating a small hole. This can be a problem when you need a more solid fabric, like for amigurumi projects. These holes can be enough to make the stuffing visible or even allow some of it to fall out.

Right side and wrong side
An invisible increase can be used any time you are putting 2 sc in the same stitch. The difference is more noticeable from the front, so it works best on right side rows or rounds. Here’s what it looks like from the right side.

And here’s what it looks like from the back. If you work an invisible increase on a wrong side row, this is what you will see on the right side.

How to crochet the almost invisible increase
(scroll down for video tutorial)
First work a single crochet into the back loop of the indicated stitch.

Then work another single crochet into both loops of the same stitch.

This pushes your first single crochet slightly to the back. In this way, the two stitches rest on top of one another rather than side by side, making them look more like 1 stitch. Since they are worked into 2 different places, they also don’t create any more of a hole than a normal single crochet would.
That’s all there is to it! Now you can use this increase in place of a traditional one any time you like. When you see “2 sc in next stitch,” try using this increase method instead.
(Almost) Invisible, Single Crochet Increase – Video Tutorial:
Ready to try it out? I use this increase in most of my amigurumi patterns, as well as in all the magnets in the 2021 Fridgies CAL!


Tutorial – Intermeshing Crochet Basics
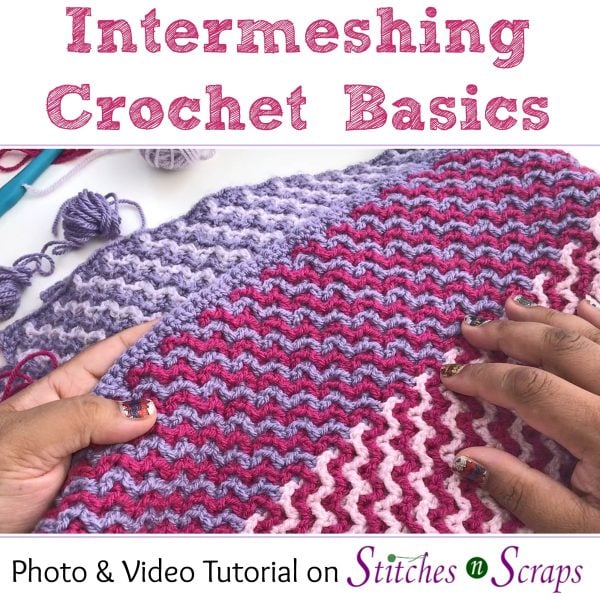
Intermeshing crochet is a technique of working 2 layers of crocheted mesh together. It creates a thick, squishy fabric with fun, geometric designs. Learn the basics in this photo and video tutorial.

Make the blanket shown in this tutorial, and enter to win one of 3 great prizes! The Jazzberry Baby Blanket Crochet-Along will be starting on 8/22/18.
Intermeshing Crochet Basics – Photo Tutorial:
(scroll down for video tutorial)
Abbreviations
I’ve used the following abbreviations in this tutorial:
- sc = single crochet
- dc = double crochet
- ch = chain
- sp = space
- st = stitch
Getting Started – Common Method:
The method I’ve most commonly seen for starting a piece of intermeshing crochet is to first make two separate sections of (dc, ch 1) mesh.

Place one piece on top of the other, so that the stitches from one line up in the open spaces on the other, and so that the front piece is lower by half a row.

Then work the intermeshing crochet pattern of your choice over these two layers, to join them together.

I don’t particularly like this technique of starting. It leaves a floppy, open section at the bottom, where the two pieces of mesh aren’t connected. To seal it, you have to go back later and do an edging.

Getting Started – Alternate Method:
Starting Edge:
I prefer to start with a row of single crochet in one color – we’ll call this the outside color. (The other color will become the inside color.) This gives us a nice edge to join everything together from the beginning. For this tutorial, make a starting row of 21 sc (multiple of 4 + 1).
Row 1: Ch 22, sc in 2nd ch from hook and in each ch across.

Creating the Mesh:
Each row will now be worked twice, once in each color.
Remember from the previous method, our layers of mesh need to be offset by half a row, which is about the height of an sc stitch. To achieve that, for row 2 only, we will work one color in sc, and the other in dc. First, let’s create an sc mesh with our outside color:
Row 2.1: Ch 1, turn, sc in first st, (ch 1, skip next st, sc in next st) across.

Pull your working loop up big so it won’t pull out, and remove your hook. Now we need to join the next color.
Adding the 2nd Color:
Go back to the beginning of the row and find the skipped stitch under your first ch-1 sp. We’re going to join the inside color into this stitch.

For this particular design, we want our first inside stitch to be behind this ch-1 space. So insert your hook from the back, underneath the chain space and into that skipped stitch.


Join the inside color yarn with a slip stitch. Chain 4, which counts as your first dc and ch-1 sp. Notice that this stitch is now seated behind the ch-1 sp of the other color.

Now we are going to continue working into those skipped stitches, alternating between working in front of and behind the chain spaces. You will need to know 2 special double crochet terms – dcf, and dcb. Let’s work a dcf into the next skipped stitch.
Double Crochet in front of the ch-1 sp (dcf):
Yarn over and insert your hook into the indicated stitch as normal, being careful not to go under the chain space at all, and draw up a loop. Your working yarn, loops, and hook should all be in front of the chain space.

Finish your double crochet as normal.

This completes your dcf. Note that this stitch is in front of the chain space. Chain 1 to create a space, and then dcb in the next skipped stitch.
Double Crochet behind the ch-1 sp (dcb):
Yarn over, insert your hook from the back, under the chain space above the indicated stitch, then insert your hook into the stitch, bringing it out to the back of your work. This is exactly like when we joined the new color at the start of the row.

Pull up a loop in that stitch. Your working yarn, hook, and all your loops should be behind the chain space.

Finish your double crochet as normal.

This completes your dcb. Note that this stitch is behind the chain space. Continue across the row working (ch 1, dcf, ch 1, dcb) into the skipped stitches, until you get to the end of the row. You will end with a dcf.
Row 2.2: Do not turn. Go back to the start of the row to begin working in the skipped sts below the ch-1 sps from 2.1. Working behind the first ch-1 sp, join inside color with a sl st in first skipped st, ch 4 (counts as dc and ch-1), sk next st, dcf, (ch 1, sk next st, dcb, ch 1, sk next st, dcf) across to last st, skip last st, drop working loop at back of work.

Now we have established an interlocking mesh pattern that is joined together nicely at the starting edge.
Dropping the yarn:
Notice the last instruction in row 2.2 says to drop the working loop at the back of your work. When working on the inside color, it is important to drop the yarn (working loop and working yarn) to the correct side of the work as indicated by your pattern.

When you start the next row, you will be “trapping” that yarn in place on whichever side it’s on, making it impossible to work from the other side if you have to. If you go to pick up your yarn again and find you have dropped it on the incorrect side, you will need to either cut the yarn or undo the whole row to fix it.

Continuing the pattern:
From this point forward, you will always be working into the same color as the yarn you are working with. This means if you are working with the outside yarn, you will work only into outside color stitches. If you are working with the inside yarn, you’ll only be working into inside color stitches.
I prefer to start my rows with a chainless starting double crochet (csdc), but if you do not like or know this technique, you can use a ch 3 (counts as dc) instead. Be sure to still add another chain after that, for the ch-1 sp.
Row 3.1: Turn, pick up outside color, csdc in first st, ch 1, dcf, ch 1, (dcb, ch 1, dcf, ch 1) across to last st, dc in last st, drop working loop.

Row 3.2: Do not turn. Pick up inside color, working in front of the ch-1 sp, csdc in first st, ch 1, dcb, (ch 1, dcf, ch 1, dcb) across, drop working loop at front of work.

This creates a very basic, stair-step or zig-zag pattern. You can create all sorts of patterns with interlocking crochet, just by changing when you work in front of the chain space, and when you work behind it.
Finishing:
When we are done with our intermeshing pattern, we need to create an even, finished top edge that combines both layers again. Our rows are offset by half a row. To correct that, we will be working a dc (keeping our front and back pattern) into each of the lower, outside color stitches, while working an sc into each of the higher, inside color stitches.

Row 4: Turn, pick up outside color, csdc in first st, (sc in next inside st, dcf in next outside st, sc in next inside st, dcb in next outside st) across.

Now we have a nicely joined edge! To make the top edge match the bottom, work one more row of sc in your outside color.
Intermeshing Crochet Basics – Video Tutorial:
Ready to try it out? Take your skills a step further with the Jazzberry Baby Blanket Crochet Along. The CAL starts on 8/22/18 and we will be making the blanket shown in this video. Join in the fun and enter to win a prize!

Tutorial – Crochet Star Stitch
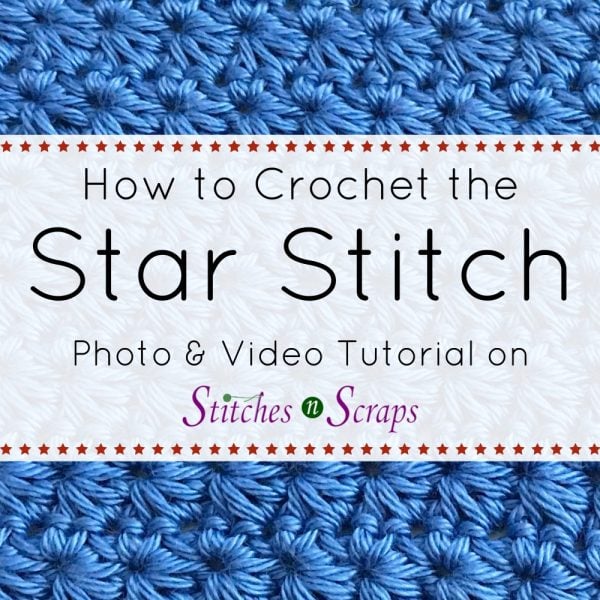
Add a bit of sparkle to your crochet with star stitch! The big, bold stitch looks great in stripes, and is much easier to make than it looks. Each crochet star stitch is basically a cluster stitch, building off of the previous star stitch. Learn how in this tutorial.

Crochet Star Stitch Photo Tutorial:
(scroll down for video tutorial)
Try this stitch in the Stars & Stripes Washcloth pattern!
Row 1:
Start by chaining any even number of stitches, 6 or greater. The first star uses 6 chains, and the remaining stars each use 2. For this example, I’ve chained 16.
Now we can start making stars. For each star, you will need to have 6 loops on your hook.
First star:
Skip the first chain, and pull up a loop in each of the next 5 chains. You should now have 6 loops on your hook.

Yarn over, and pull through all 6 loops, then chain 1. This completes your first star.
The chain 1 at the end forms the eye of the star. Each of the 6 loops that were on your hook form a leg or post of the star, and the last chain you worked into is the base of the star.

Remaining stars:
Pull up a loop in the eye of the previous star, pull up another loop in the last leg of the previous star (or between the last 2 legs, either way is fine), pull up another loop in the base of the previous star. You now have 4 loops on your hook, so you need 2 more.

Pull up a loop in each of the next 2 chains. You now have 6 loops on your hook.

Complete the star as before – yarn over, pull through all 6 loops, and chain 1.
Continue working stars in this manner until you reach the end of the row. The base of the last star should be in the very last chain. To make a nice, even edge, work 1 hdc in that same last chain.

Row 2:
Each star took up 2 chains, so on this row, we’re going to work 2 sc for each star.
Chain 1, turn, sc in the first hdc, sc in the eye of the first star. There’s only 1 sc in the first star because we put the other one in that extra hdc at the edge. Now 2 sc in the eye of each star across to the end of the row. To make a nice straight edge, sc in the top corner of the previous row.

Row 3:
First Star:
Turn and chain 2. Working into the 2nd chain from your hook, pull up one loop in the front loop only of the chain, then pull up another loop in the back loop only of the same chain. You should now have 3 loops on your hook.

Pull up a loop in each of the next 3 chains, yarn over and pull through all 6 loops on your hook, chain 1.

Remaining Stars:
Work the rest of the row exactly as you did for row 1, except instead of working into chains you’re working into stitches.
Pull up 3 loops from the previous star – one in the eye, one in the last leg, and one in the base. Pull up a loop in each of the next 2 stitches. Yarn over and pull through all 6 loops on your hook, then chain 1.
Continue making stars to the end of the row, then hdc in the last stitch (the same stitch as the base of the last star).

Repeat rows 2-3 for the star stitch pattern. For a clean, even, finished edge, end your work after a repeat of row 2.
Crochet Star Stitch Video Tutorial:
Ready to try it out? My Stars & Stripes Washcloth pattern is made in star stitch. Give it a try!

Tutorial – Picot Two Ways
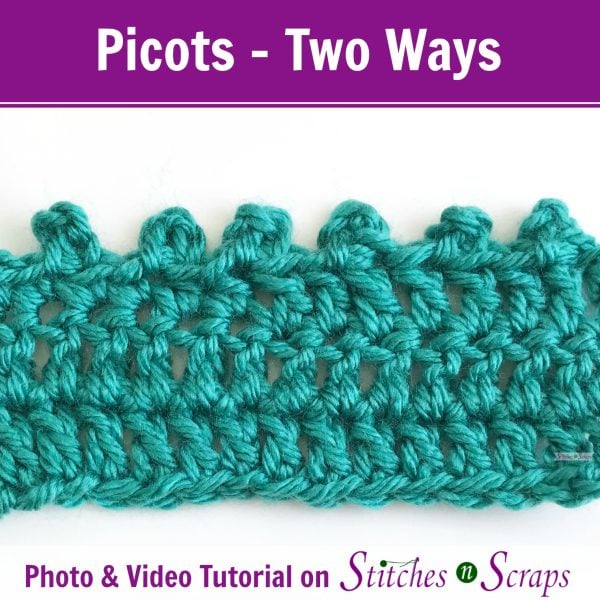
A picot is a small loop of chain stitches, usually used as a decorative element for edgings and lace. There are a few different ways commonly used to close picots. In this tutorial, we’ll explore two of them.

For one example of using picots in an edging, see my Shell & Picot edging tutorial!
Picot Two Ways Photo Tutorial:
(scroll down for video tutorial)
Start by making a chain. Usually this is a chain 3, but could be more or even fewer, depending on the pattern. The more chains you make, the larger your picot will be.

To close your picot, slip stitch into the last stitch you made. Where exactly that slip stitch is placed is what makes the difference in these two methods.
Method 1:
The most common way to close a picot is to place the slip stitch where you would any other stitch. Insert your hook under the top “V” of the stitch (from front to back), and slip stitch as normal.

This is a perfectly good way to make picots, but is not my favorite way. I don’t like how it deforms the top of the stitch and can sometimes leave a small gap.

Method 2 – dc:
This method works slightly differently, depending on what stitch you are working into. If you are working into a double crochet or taller stitch, insert your hook through the front loop (shown below in purple) and the left leg (red) of the top part of the stitch. Then finish your slip stitch as normal.

Here are the two methods side by side. The difference is subtle, but you can see how the loop looks a little straighter and the top of the stitch is not pulled open in the same way.

Method 2 – hdc:
If you’re working your picot into an hdc, work your slip stitch into the front loop and the diagonal bar that was created from the yarn over.
Method 2 – sc:
Working a picot into an sc is just like for the taller stitches. Insert your hook through the front loop and the left leg of the stitch.

Here is how the picots look side by side. The difference in the two methods is subtle, and a matter of personal preference. As long as you’re consistent throughout your project, it doesn’t matter which method you choose.

Video Tutorial:
Want to try it out? Here are a few of my patterns that use picots:

Tutorial – Bavarian Stitch in Rows
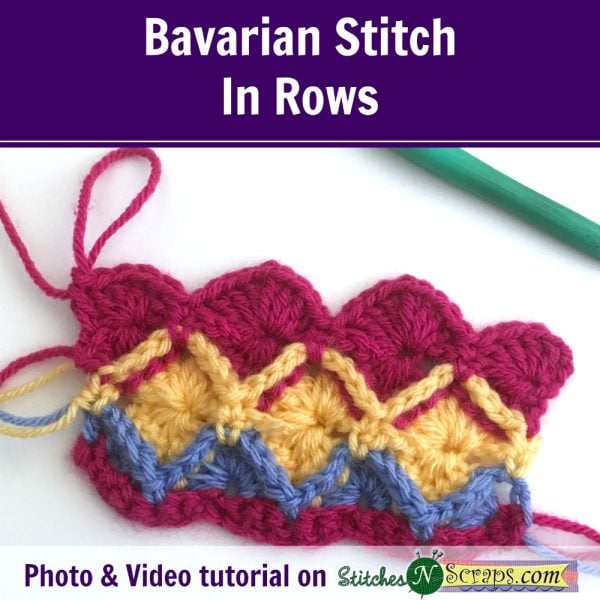
Bavarian Stitch is a crochet technique that creates a beautiful, textured, diamond shaped design. It is typically worked in the round, making a square from the center out, but with a few adjustments, the same technique can easily be applied in rows!
Photo Tutorial:
(scroll down for video tutorial)
Repeats:
The Bavarian Stitch pattern is a repeat of 6 stitches, and to work it in rows, we will need to add an extra 3. The pattern stitch repeats over 4 rows to make the characteristic diamond shapes.
Fans & Clusters:
The diamond shapes are made up of clusters and fans, that spread the stitches out and draw them back in together again. To make the rest of the instructions easier, let’s define the fan and cluster stitches used:
Fan: (4 dc, ch 1, 4 dc) in indicated stitch.
Front Post Cluster (cluster): This is worked around the posts from the fan stitches, as though for front post stitches.
*(Yarn over, insert hook around post of next dc, yarn over and pull up a loop, yarn over and draw through 2 loops on hook) 4 times** – you should now have 5 loops on your hook.
Skip the next sc, then repeat from * to ** again. Now you should have 9 loops on your hook.
Yarn over and draw through all 9 loops, ch 1 to close.
Half Cluster: This is used at the edges and is worked around the posts just like the cluster stitch. *(yarn over, insert hook around post of next dc as though for a front post stitch, yarn over and pull up a loop, yarn over and draw through 2 loops on hook)** 4 times, yo and draw through all 5 loops on hook, ch 1 to close.
With those techniques, you’re ready to start the Bavarian stitch pattern.
[the_ad_group id=”1362″]
Foundation:
For this tutorial, I’ve started with a foundation row of 21 single crochet (multiple of 6 plus 3). Because we’re starting from a flat edge, Row 1 is going to be a set up row that is just the top half of the diamonds.
Row 1 (Set up):
Ch 3 (counts as a dc), work 4 dc in next st, skip next 2 stitches, sc in next st, *skip next 2 stitches, fan in next st, skip next 2 stitches, sc in next stitch. Repeat from * once more, skip next 2 stitches, 4 dc in next st, dc in last st. You should have 2 fan stitches in the middle, with 4 dc forming half a fan at each edge.
Row 2 – Clusters
On Row 2, we start the 4 row repeat. We’re going to be starting a new row of diamonds, so let’s join a new color to start this row. With the new color, ch 1, turn, sc in first stitch, (ch 3, cluster, ch 3, sc in next ch-1 sp) twice, ch 3, cluster, ch 3, sc in last st. We’ve now pulled the sides of the fans together to form the bottom of a new row of diamonds. You should have 3 cluster stitches.
Row 3 – Fans
Let’s make the top of these diamonds. Ch 1, turn, sc in the first st, (skip the next ch-3 sp, fan in the top of the next cluster, skip the next ch-3 sp, sc in next sc) 3 times. Now we have 3 completed diamonds.
Row 4 – Clusters
We’re starting a new set of diamonds, so let’s change colors again. Row 4 is similar to row 2, but we’re now offset by half a fan. Here’s where we use the half cluster stitches to even out the edges. With the new color, ch 3, turn, half cluster, (ch 3, sc in next ch-1 sp, ch 3, cluster) twice, ch 3, sc in next ch-1 sp, ch 3, half cluster, dc in last stitch.
Row 5 – Fans
This row is similar to Row 1, but we’re working into clusters instead of into the foundation row. Ch 3, turn, 4 dc in the top of the half cluster, (skip the next ch-3 sp, fan in the top of the next cluster, skip the next ch-3 sp, sc in next sc) twice, skip the next ch-3 sp, 4 dc in the top of the half cluster, dc in the last stitch.
Repeat rows 2 – 5 to continue the pattern.
[the_ad_group id=”1380″]
Video Tutorial:

Learn to Crochet – Lesson 8 – Granny Square
This post contains affiliate advertisements (click for more info). If you click one of these ads and then make a purchase, I may be compensated. You get the same great prices, and you will be helping to support this site!
This is the final lesson in the Learn to Crochet series. In the previous lessons we learned how to start and finish a project, and the basic crochet stitches. Now let’s put those techniques together in a different way to make a granny square! Learn how to work in the round instead of in rows, and how to work into chain spaces.
After this lesson, you will have all the tools you need to try some easy patterns. Scroll down to the bottom of this post for a list of suggested patterns to try.
[the_ad_group id=”1380″]
Most of my regular readers are already accomplished crocheters. If any of you know someone who might want to learn, please pass this along!
The Learn to Crochet Series
If you’ve never picked up a hook before, and don’t quite know where to start, the Learn to Crochet Series is designed just for you. You can find the entire Learn to Crochet series here. This series of tutorials goes through how to get started, and some of the most basic stitches and techniques. Now that we’ve reached the end of the series, you should be ready to test your skills with some beginner patterns!
Some Easy Patterns to Try:
- Granny Square Gift Card Envelope
- 5 Minute Wine Glass Charms
- Impetuous
- Seed Stitch Bow
- Rainbow Cake
- Mesh Tube Scarf
- Streeterville Cowl


