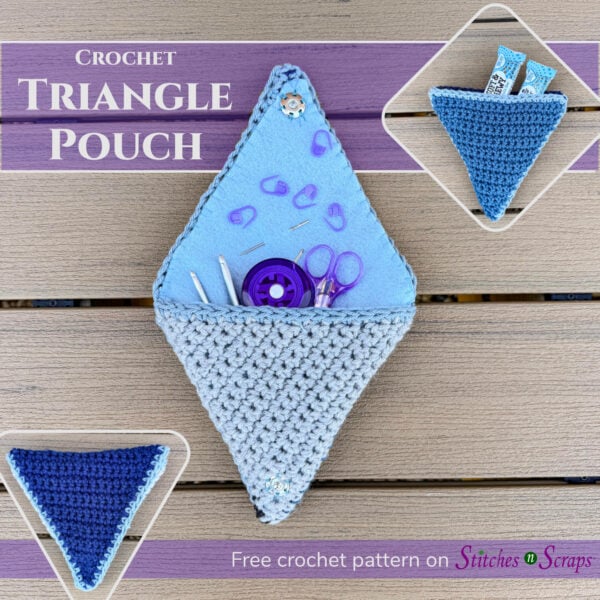
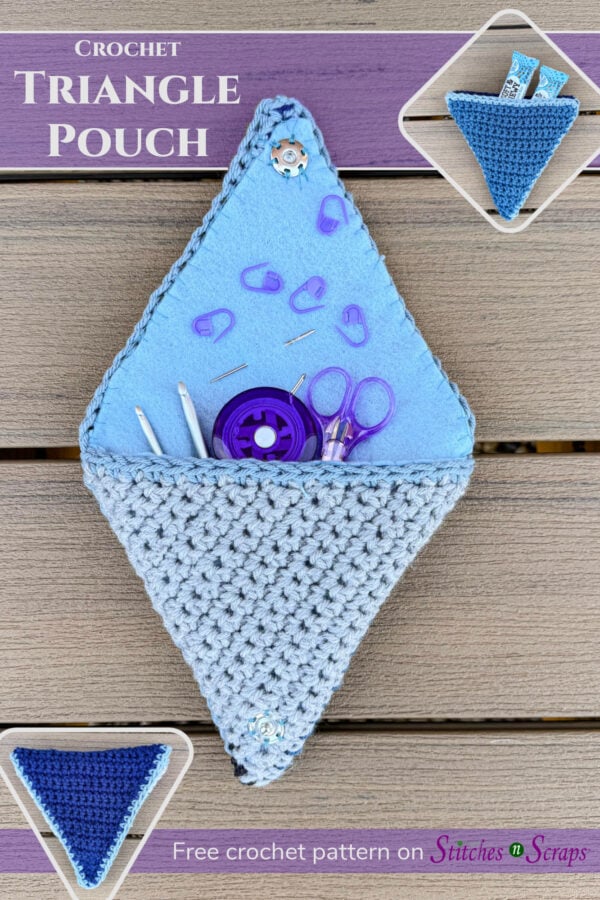
Crochet Triangle Pouch Pattern
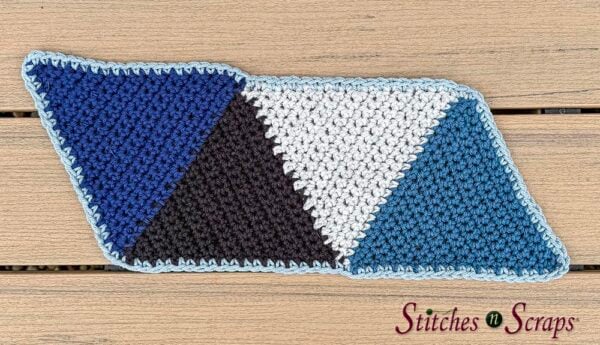
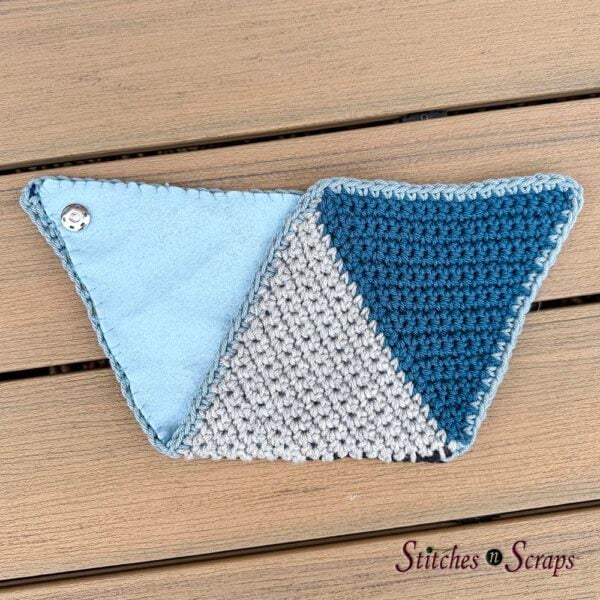
Four connected triangles fold up like magic into this clever, origami-inspired Crochet Triangle Pouch. It’s perfect for holding crochet and knitting notions, keys, or other everyday essentials. This fun and easy pattern is a fantastic way to use up scraps, and makes a great gift too. Make it all one color, or mix and match to create your own unique design.
This content is protected by copyright. See this Terms of Use / Copyright page for more information.
This post contains sponsored content and/or affiliate links. If you click an affiliate link and make a purchase, I may get a commission.
Inspired By a Gift
My friend Stacy is a fabulous leatherworker and teacher. She teaches bag-making masterclasses live on Zoom. Just choose a bag and sign up for a zoom through her site at Bougiebagsv.com. You can even host a bag-making party for your group! No previous experience is necessary, so it’s a great way to learn a new craft.
At a recent knitting event, Stacy gave us all a gift of a small leather notions pouch. I was so taken with the folding triangle construction, I just had to try it in crochet!
One Snap Instead of Two
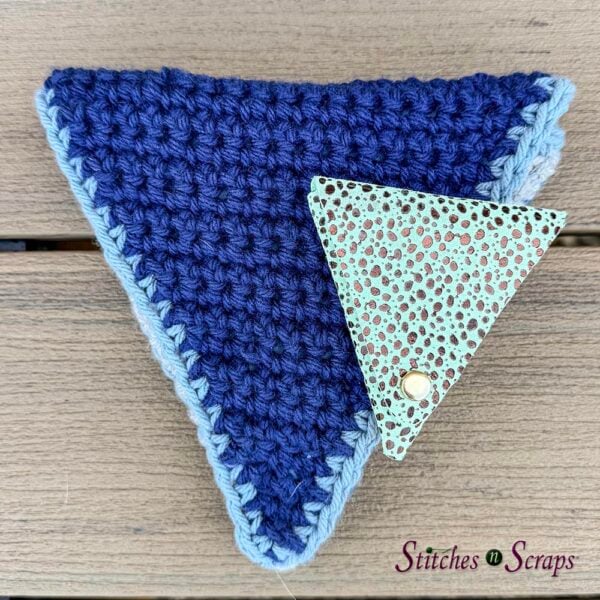
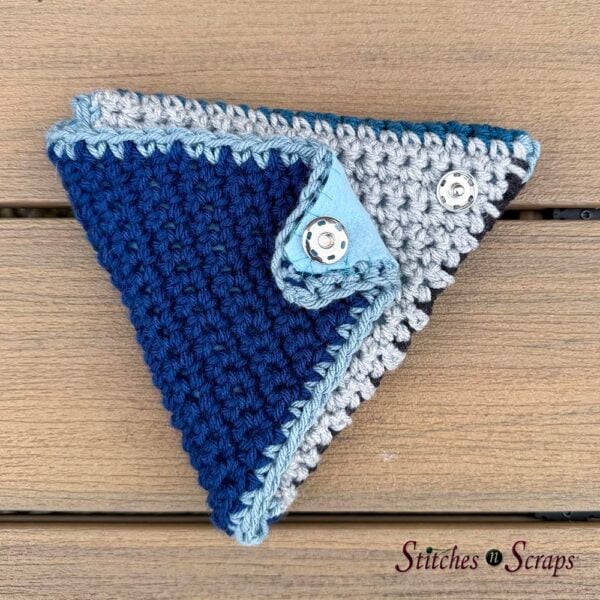
The leather pouch has 2 flaps that open, with a snap on each side. By opening both flaps, the pouch unfolds completely flat. This construction leaves a tiny hole at the bottom, which is not a problem because of the small size of the pouch. The hole is small enough that stitch markers are not likely to fall out. However, the crochet pouch is larger and more flexible, so this hole does cause a problem.
Instead of 2 flaps that open, sewing one of the flaps in place eliminates the hole and creates an open back pocket instead.
Yarn and Color Choices
This crochet triangle pouch is a great way to use up scraps of yarn, so long as they are all pretty close in thickness. The pattern was designed for worsted-weight yarn, but you can make it in different sizes by changing the yarn weight. Choose a hook that gives you a fairly tight gauge with your chosen yarn.
Mix and match colors as you like throughout the pattern for your own unique look. In the sample, each triangle section is a different color to highlight the construction. The pattern indicates color changes to match this sample.
Felt Lining
The felt lining helps keep smaller items secure in the crochet triangle pouch by closing up the gaps between stitches. It will also help the pouch keep its shape, and keeps the snap secure. I chose felt because there’s no need to finish the edges. You can use a different fabric if you like, but will need to cut a seam allowance and fold the unfinished edges in when sewing.
Snap or Button
Because of the felt lining, this pattern works better with a snap than a button. If you prefer a traditional button, you will need to cut a buttonhole in the felt. Attach the button where the male end of the snap goes (on Triangle 2 or 3), and cut a buttonhole in the felt of the flap, directly opposite the button. To close, simply push the button through the gap between stitches.


Materials
- Yarn: 125 yds worsted-weight yarn in any combination of colors.
- Sample shown in Caron One Pound – 100% acrylic, worsted weight yarn (812 yds / 16 oz / 454 g per skein)
- 29 yds each 10611 Ocean (A), 10616 Soft Gray Mix (B), 10503 Black (C), 10546 Midnight Blue (D)
- 9 yds 10523 Azure (E)
- Sample shown in Caron One Pound – 100% acrylic, worsted weight yarn (812 yds / 16 oz / 454 g per skein)
- Hook: Size I / 5.5 mm crochet hook or size needed to match gauge
- Notions:
- Scissors
- Stitch marker
- Tapestry needle
- Felt – 2 sheets of 9″ x 12″ / 22.8 cm x 30.4 cm or enough to cover 6.5″ x 20.75″ / 16.25 cm x 52 cm area.
- 1 snap fastener, between 1/2 – 1 inch (12 – 25mm). Sample shows a 19mm (approx 3/4″) snap.
- Needle and thread for attaching felt and snap
- Sewing pins
- Optional additions:
- Buttons, snaps, or zipper for back pocket closure
- Metal rings and purse strap to convert to a shoulder bag
- Tassel
Project Level
Easy: Single crochet, increases and decreases, working into sides of rows, sewing felt lining and snap.
Size
Approximately 8″ wide x 6.5″ tall when closed
Gauge
12 sc = 4″ / 10 cm; 13 rows = 4.25″ / 10.5 cm
Abbreviations used
This pattern uses US terms.
| ch | chain |
| rep | repeat |
| rnd | round |
| RS | right side(s) |
| sc | single crochet |
| sk | skip |
| sl st | slip stitch |
| st(s) | stitch(es) |
| WS | wrong side(s) |
Recommended Resources
Instructions
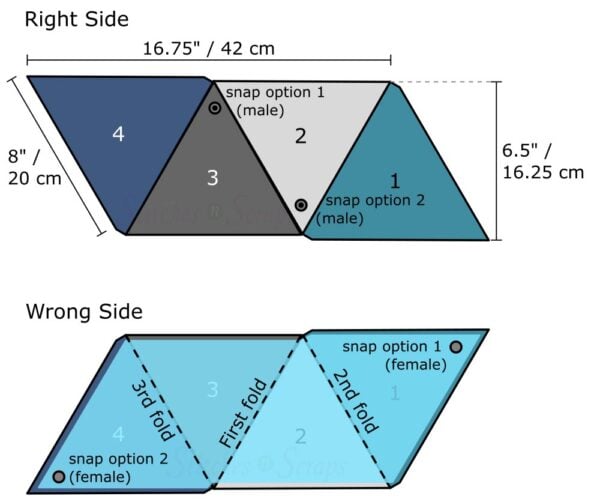
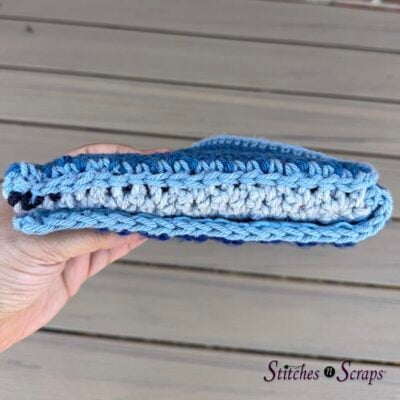
Triangles 1 and 4 will become the flap and back pocket, and Triangles 2 and 3 will become the body of the pouch. To help them fold neatly over the body of the pouch, Triangles 1 and 4 each have an extra row of 20 sts.
Triangle 1
With A, ch 21.
Row 1 (WS): Sc in 2nd ch from hook and in each ch across. (20 sts)
Row 2: Ch 1, turn, sk first st, sc in each st across. Mark any st on this row as RS. (19 sts)
Rows 3-20: Rep Row 2. (1 st)
Change colors where indicated (or where desired) by using new color to complete last pull-through step of last stitch of previous color.
Row 21: Ch 1, turn, working into ends of rows, 20 sc evenly spaced across side edge of Triangle 1 to next corner, change to B. (20 sts)
Triangle 2
Row 1 (RS): Ch 1, turn, sc in each st across. (20 sts)
Rows 2-20: Rep Rows 2-20 of Triangle 1, change to C at end of last row. (1 st)
Triangle 3
Row 1 (RS): Ch 1, turn, working into ends of rows, 20 sc evenly spaced across side edge of Triangle 2 to corner where it meets Triangle 1. (20 sts)
Rows 2-20: Rep Rows 2-20 of Triangle 1, change to D at end of last row. (1 st)
Triangle 4
Row 1 (WS): Ch 1, do not turn, working into ends of rows, 20 sc evenly spaced across side edge of Triangle 3 to corner where it meets Triangle 2. (20 sts)
Row 2 (RS): Ch 1, turn, sc in each st across (20 sts)
Rows 3-21: Rep Rows 2-20 of Triangle 1. If desired, change color in the st on Row 21, change to E at end of last row. (1 st)
Edging
Edging Rnd: Turn, working around outside edge of piece, [ch 1, sc in each st or row to next corner] around, join with sl st to starting ch 1, fasten off. (42 sts on each long edge, 20 sts on each short edge)
Finishing
Weave in all ends.
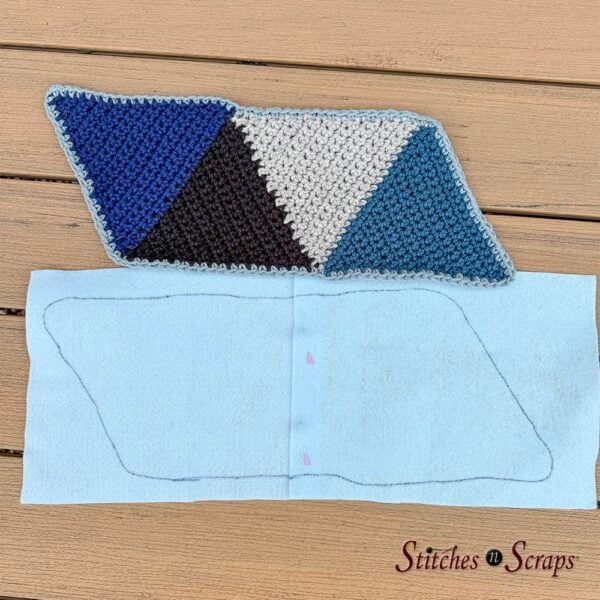
Wash and block to shape as shown in Assembly Diagram. Size is less important than symmetry – opposite edges should match in length.
Assembly Diagram
Felt Lining
Place crochet piece on felt and trace around it. If using felt sheets, you will need 2 sheets. Overlap the sheets slightly and pin in place while tracing.
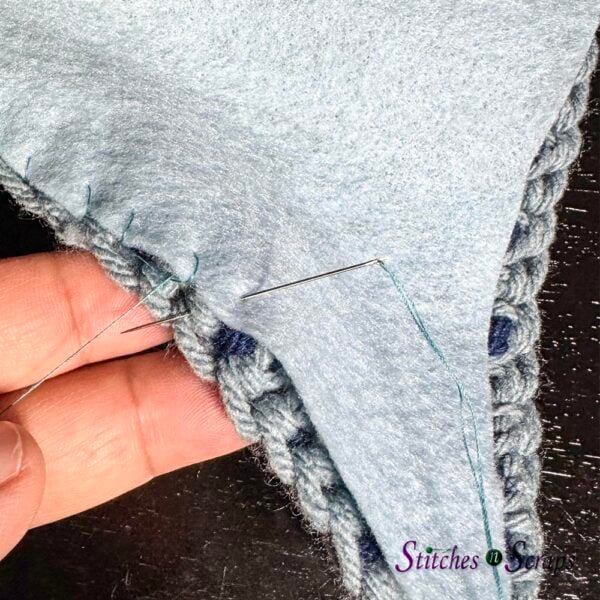
Cut felt just inside traced line and place it on WS of crochet piece. Trim felt as needed so it rests nicely under top of edging rnd.
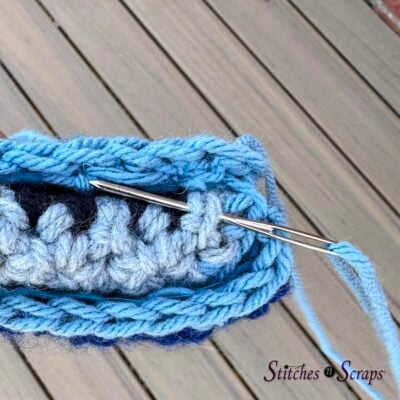
Sew felt to crochet piece with needle and thread, using your choice of whipstitch or blanket stitch (photo shows blanket stitch). For best results, sew only into WS loops of the crochet, so that stitches do not show through to the RS.
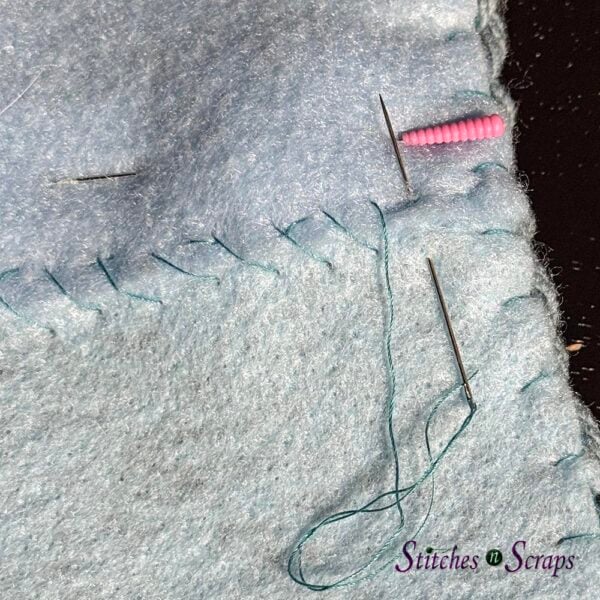
If using overlapping pieces of felt, sew felt pieces together using backstitch and/or whipstitch. This photo shows a loose backstitch to hold the pieces in place, followed by whipstitch to smooth the join line. Again, be sure stitches do not go through to RS of crochet.
Assembly and Snap
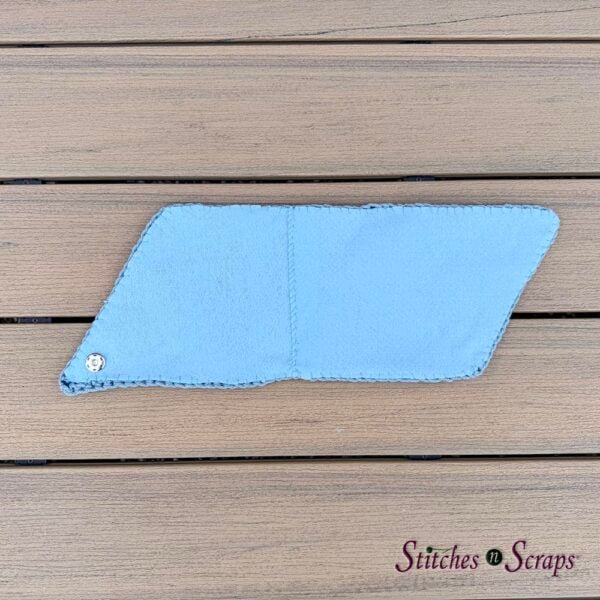
Choose whether you want Triangle 1 or Triangle 4 to be the flap. Attach female end of snap to WS (felt) at outside point of chosen Triangle (shown on Triangle 4). The other outside Triangle will become the pocket.
Fold work along center line between Triangles 2 and 3 with WS together.
Fold Triangle 1 down over opening so it overlaps Triangle 3. Fold Triangle 4 down over opening so it overlaps Triangle 2. Mark where snap touch Triangles (either Triangle 2 or 3), and attach male ends of snap to that position.
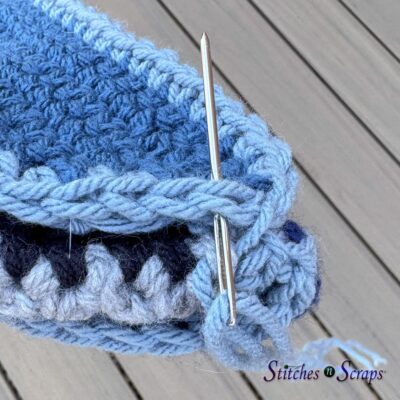
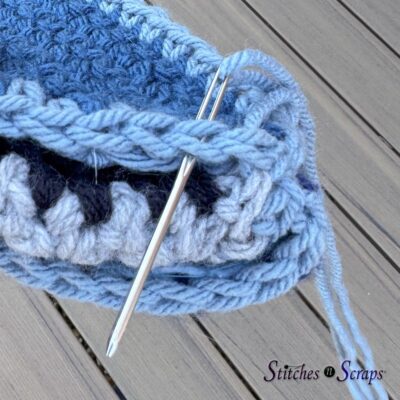
Pocket Side Seam
Hold pouch with snap at the bottom, so that pocket opening is at the top. Using tapestry needle and E, Sew side edge of pocket closed as described below, paying particular attention to closing the gap at the bottom corner.
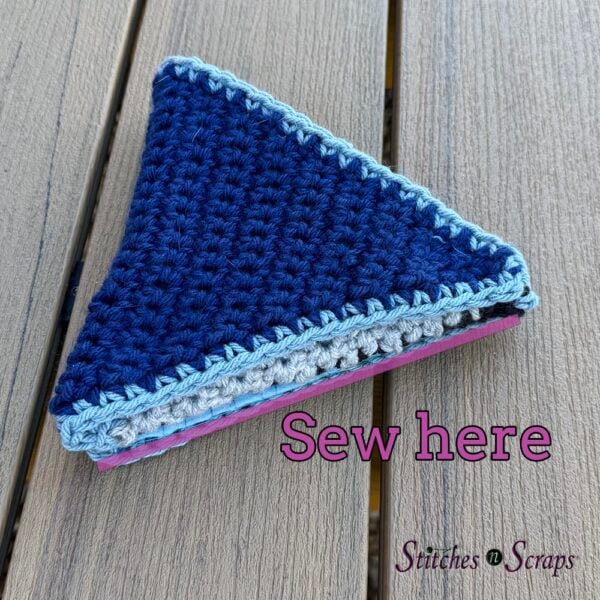
For a nearly invisible seam, start by bringing needle out at top corner of flap. *Insert needle horizontally from right to left through legs of adjacent stitch on body and pull through, insert needle from bottom to top through same stitch on flap that it just came out of, then from top to bottom through next stitch on flap. Repeat from * to bottom corner.
Optional Additions
Your crochet triangle pouch is ready to use as-is. For an extra personal touch, try any of these optional additions:
- Add a button, snap, or zipper closure to the back pocket.
- Sew metal rings to the top corners to attach a purse strap.
- Add a tassel to the bottom point.
Share this Crochet Triangle Pouch Pattern on Pinterest!
Here’s an image perfect for pinning:
Rate this Crochet Triangle Pouch Pattern!
I hope you enjoy this crochet triangle pouch pattern. A downloadable pdf of this pattern is available on Ravelry for a fee.
Interested in using this pattern for a class or workshop? Check out my Terms of Use for usage details.
Do you want the best of Stitches n Scraps delivered right to your inbox? The Stitches n Scraps email newsletter includes highlights from the blog as well as special features not available elsewhere. Don’t miss a stitch – Subscribe now!


You May Also Like

Autumn Air Cowl Crochet Along

Scrappy Stitchers Link Party #11