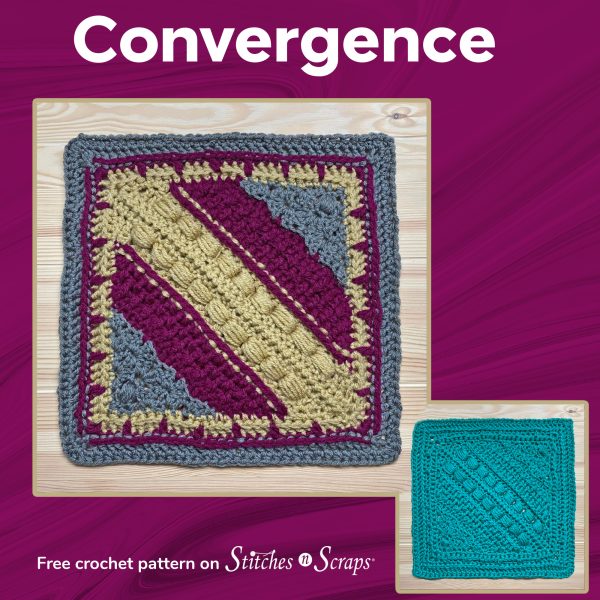
Convergence 12-inch crochet square
Layers of texture converge in the center of this 12-inch crochet square. The shifting stitch patterns and unique construction are as fun to make as they are to look at. Make it all in one color for a more subtle effect, or go bold with multiple colors!
This content is protected by copyright. See this Terms of Use / Copyright page for more information.
This post contains sponsored content and/or affiliate links. If you click an affiliate link and make a purchase, I may get a commission.
Moogly Afghan Crochet Along
This 12-inch crochet square is my design for the 2022 Moogly Afghan Crochet Along. Crochet along with Tamara through 24 fantastic afghan squares. Check out the main post for the full schedule, ideas for projects to make with your squares, and giveaway details too!
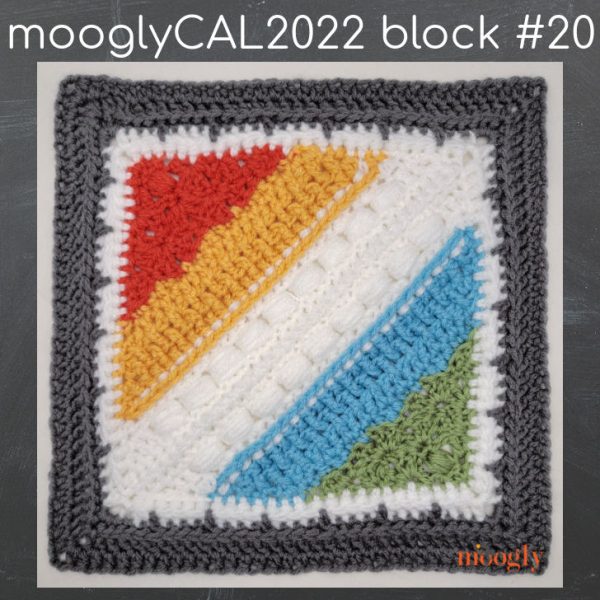
Tamara used 6 different colors to make this square. See her version, along with her notes and tips.
Red Heart With Love Yarn
Yarnspirations provided the Red Heart With Love yarn for this design. I’ve participated in this CAL for several years, and never use up all the yarn they send. So this year, I used some of the leftovers!

I love how soft this yarn is, and it’s available in a wide variety of colors. My color choices this year were Pewter, Boysenberry, and Tan. Which ones will you choose for your square?
Video Tutorial
Need a little help? Check out the full video tutorial for this 12-inch crochet square pattern!

Previous 12-inch Crochet Squares
It’s hard to believe, but this is my 8th year designing for this crochet along! Here are all of my previous 7 squares.
Horizontal Puff Stitches
This pattern uses horizontal puff stitches, which can be made in many different ways. The ones in this square are essentially traditional puff stitches worked around the posts of 3 double crochets. Check out this Lunchtime Live Episode for a deeper dive into the topic of horizontal puff stitches, including several other variations.


Materials
- Yarn: Red Heart With Love worsted weight, 100% acrylic yarn – 50 yds each of
- #1401 Pewter (A)
- #1907 Boysenberry (B)
- #1308 Tan (C)
- Hook: US size J (6 mm) crochet hook or size needed to match gauge
- Notions: Yarn needle
Project Level
Intermediate – unique construction, front and back post stitches, working in back loop only, shells, puffs, and horizontal puffs.
Size
12 inches square
Gauge
13 sc x 15 rows = 4 inches
Abbreviations used
blo = back loop only
bpdc = back post double crochet
ch = chain
dc = double crochet
fpdc = front post double crochet
hdc = half double crochet
h-puff = horizontal puff (see Special Stitches)
puff = puff stitch (see Special Stitches)
rnd = round
RS = right side
sc = single crochet
sl st = slip stitch
sp = space
st(s) = stitch(es)
WS = wrong side(s)
yo = yarn over
Recommended Resources
Special Stitches
Puff Stitch (puff): (Yo, insert hook in indicated st, pull up a loop) 5 times, yo and pull through all 11 loops on hook, ch 1.

Horizontal Puff (h-puff): This is essentially a puff stitch worked around a group of 3 dc stitches. You may find it helpful to rotate your work 90 degrees while making the puff portion of the stitch.
Dc in each of next 3 sts, (yo, insert hook from front to back and out the front again (like for a front post stitch) around all 3 dc just made, pull up a loop to the height of your hook) 5 times, yo and pull through all 11 loops on hook, ch 1.

Notice at the top of the h-puff stitch, you will see 5 “v” shapes. 3 of these come from the dc stitches, 1 is the top of the actual puff stitch, and 1 is from the closing chain.
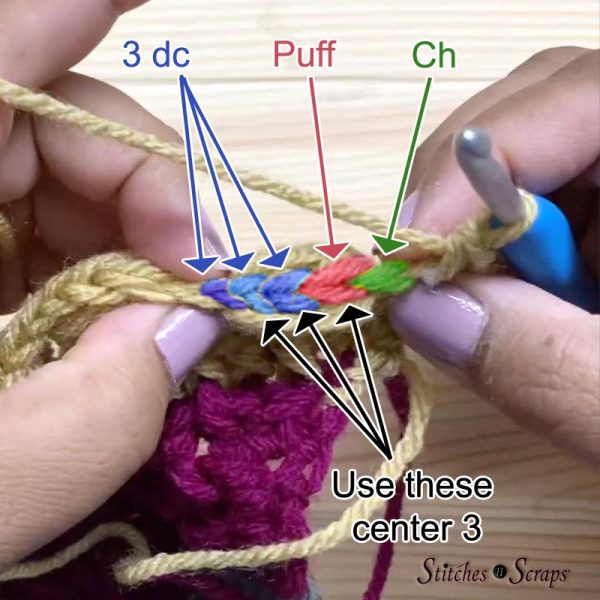
On the next row, you will be making 3 stitches into the puff. Work these into the center 3 of the 5 vs. I.e., into the top of the puff, and the first 2 dcs.
Instructions
The main portion of the square is made with 2 triangles, joined together along the center diagonal line. Starting ch-3 counts as a dc throughout – feel free to replace this with a chainless starting double crochet (csdc) or any other method you prefer for starting dc rows.
Triangle (make 2)
Scroll down for charted version of this section.
Shells
With A, ch 4.
Row 1: 2 dc in 4th ch from hook (skipped chs count as additional dc). (3 dc)
Row 2: Ch 3 (counts as dc throughout), turn, dc in first st, ch 1, puff in next st, ch 1, 2 dc in last st. (4 dc, 1 puff, 2 ch-1 sps)
Row 3: Ch 3, turn, (dc, ch 1, 2 dc) in first st, sk next st, sk next ch-1 sp, sc in next st, sk next ch 1 sp, sk next st, (2 dc, ch 1, 2 dc) in last st. (1 sc, 8 dc, 2 ch-1 sps)
Row 4: Ch 4 (counts as dc and ch 1), turn, 2 dc in first st, sk next st, sc in next ch-1 sp, sk next 2 sts, (2 dc, ch 1, 2 dc) in next st, sk next 2 sts, sc in next ch-1 sp, sk next st, (2 dc, ch 1, dc) in last st. (2 sc, 10 dc, 3 ch-1 sps
Row 5: Ch 3, turn, 2 dc in first st, sc in next ch-1 sp, [sk next 2 sts, (2 dc, ch 1, 2 dc) in next st, sk next 2 sts, sc in next ch-1 sp] twice, 3 dc in last st, change to B.
Row 6: With B, ch 1 (does not count as a st throughout), turn, working in blo of all sts and working as normal into ch sps, 2 sc first st, [sc in next st, hdc in next st, dc in next st, hdc in next st, sc in next st, sc in next ch-1 sp] twice, sc in next st, hdc in next st, dc in next st, hdc in next st, sc in next st, 2 sc in last st. (12 sc, 6 hdc, 3 dc)

Rice Stitch
Row 7: Ch 1, turn, 2 hdc in first st, hdc in each st across to last st, 2 hdc in last st. (23 hdc)
Row 8: Ch 1, turn, 2 hdc in first st, (fpdc around next st, bpdc around next st) across to last 2 sts, fpdc around next st, 2 hdc in last st. (4 hdc, 11 fpdc, 10 bpdc)
Row 9: Ch 1, turn, 2 hdc in first st, (bpdc around next st, fpdc around next st) across to last 2 sts, bpdc around next st, 2 hdc in last st. (4 hdc, 11 fpdc, 12 bpdc)
Row 10: Repeat row 8, change to C. (4 hdc, 13 fpdc, 12 bpdc)

Horizontal Puffs
Row 11: With C, ch 1, turn, 2 hdc in first st, fpdc around each st across to last st, 2 hdc in last st. (4 hdc, 27 fpdc)
Row 12: Ch 3, turn, dc in first st, dc in next st, h-puff 9 times, dc in next st, 2 dc in last st. (9 h-puffs, 6 dc)
Row 13: Ch 1, turn, 2 sc in first st, sc in each of next 2 sts, 3 sc in each h-puff across to last 3 sts, sc in each of next 2 sts, 2 sc in last st. (35 sc)
For 1st triangle, fasten off.
For 2nd triangle, do not fasten off.

Triangle Chart

Joining Triangles
Hold both triangles with WS together and the last row on top.
With C, and working through both layers, (sl st, ch 1) in each st across to last st, sl st in last st. (35 sl sts, 34 chs)
You should now have a square with your working yarn at 1 corner, and RS facing. Do not fasten off.

Border
Scroll down for charted version of this section.
Border is worked in rounds. Do not turn your work unless indicated.
Color changes in this section are made by fastening off one color and joining the next color in any ch-1 sp. If you are working in only one color, do not fasten off. Instead, just sl st across to the next ch-1 sp.
With C and with RS facing, continue from the corner where you ended the joining.
Rnd 1: Ch 2 (counts as ch-1 sp), [work 25 hdc evenly spaced across to next corner, ch 1] 3 times, work 25 hdc evenly spaced to starting corner, join with sl st in starting ch-1 sp. (100 hdc, 4 corner ch-1 sps)
Rnd 2: Ch 1, [(hdc, ch 1, hdc) in ch-1 sp, bpdc around each st across to next ch-1 sp] 4 times, join with sl st to first hdc. (8 hdc, 100 bpdc, 4 corner ch-1 sps)
Fasten off C, join B with sl st in any corner ch-1 sp.
Working around the posts from rnd 1 has left the tops of those sts unused. When working “below” the indicated st on rnd 3, work into those unused tops of the sts.
Rnd 3: With B, (2 sc, ch 1, 2 sc) in ch-1 sp, *sc in each of next 3 sts, [dc in hdc below next st, sc in each of next 3 sts] across to next ch-1 sp, (2 sc, ch 1, 2 sc) in next ch-1 sp, rep from * twice more, sc in each of next sts, [dc in hdc below next st, sc in each of next 3 sts] across, join with sl st to first sc. (100 sc, 24 dc, 4 corner ch-1 sps)
Fasten off B, join A with sl st in any corner ch-1 sp.
Rnd 4: With A, Repeat rnd 2. (8 hdc, 124 bpdc, 4 corner ch-1 sps)
Rnd 5: Ch 1, [(hdc, ch 1, hdc) in ch-1 sp, hdc in each st across to next ch-1 sp] 4 times, join with sl st to first hdc, fasten off. (140 hdc, 4 corner ch-1 sps)
If needed, you can repeat rnd 5 until your square reaches 12 inches.
Border Chart

Finishing
Fasten off
Weave in ends
Wash and block.
Share this pattern on Pinterest! Here’s an image perfect for pinning:

Rate this 12-inch crochet square!
I hope you enjoyed this 12-inch crochet square pattern. A downloadable pdf of this pattern is available on Ravelry for a small fee.
Do you want the best of Stitches n Scraps delivered right to your inbox? Don’t miss a stitch – Subscribe now!


4 Comments
NeedleArtista
Your link to the Convergence Square on Ravelry is broken. Also, I couldn’t find it by searching.
Pia Thadani
Sorry about that! I’ve fixed it, it should be showing as available now if you would like to check again.
Alexandra
Such a neat corner to corner pattern!
Pia Thadani
Thanks!