How a Pattern Happens – Math
Have you ever wondered what goes into designing a crochet pattern? It’s different for everyone, but I thought it would be fun to share my process with all of you. This is part 3 of a series of behind-the-scenes posts, where you can join me as I work through a new design.
This post contains affiliate links (click for more info). If you click one of these links and then make a purchase, I may be compensated. You get the same great prices, and you will be helping to support this site!
We’ve talked about choosing yarn and swatching, so now it’s time to plan out the pattern and start working it up. I need one size for the gift I’m making, but if I were to publish a pattern in only one size, people wouldn’t be happy. I will eventually need to figure out how to make it in multiple sizes, and if I keep that in mind from the start, it will be easier later. This means math. To give you a better idea of timing, I did these calculations on 11/19 – right after my swatch was dry and ready to go.
There’s only one formula
Don’t get scared off by the idea of doing math! While it may look complicated, it all really boils down to just one formula, which many of you are already familiar with. First I decide how many inches wide or tall I want something, then I multiply that by the gauge to come up with the number of stitches or rows needed. That’s really as complicated as it gets!
Measurement in inches * stitches or rows per inch = number of stitches or rows needed.
What measurements do I need?
So the math isn’t difficult, but deciding what measurements to use can be. I always start with the size charts from the Craft Yarn Council (CYC). I’ve drawn a more detailed diagram showing some shaping, so I can compare this to the measurements available on the CYC women’s size charts. This gives me a starting point for the calculations.

Typically for a project like this, I already have an idea of what dimensions I need, so I wouldn’t actually draw this diagram – this is mostly just an illustration for the purposes of this post.
Setting up the spreadsheet
Calculating the measurements for multiple sizes is called “grading”. An Excel spreadsheet is a great way to manage these calculations. I learned this technique from Kim Guzman, and it’s been invaluable! First, I put in some basic info, and then in the first column I list the measurements I’m going to need. Next, I make 3 columns for each size – in this case, small through xl.
The 3 columns are for a desired measurement, a calculated number of stitches and rows, and an actual number of stitches and rows. Using formulas, I can set this up so that as I play with the measurements, the calculated numbers change automatically. This takes a little time to start out with, but is well worth it later. I list the gauge in each column, even though it’s the same for all of them, only because it makes the formulas easier to work with.

Adding in ease
These are actual body measurements, and I don’t want the vest to be skin tight, so I need to add in some ease. Ease is simply how much extra room you add to the measurements. For fitted garments, you may sometimes even have negative ease, where you make the garment smaller in some places than the actual measurement.
The CYC not only provides great size charts, but also some tips on using them. They show how each measurement is taken, and recommendations for the amount of ease needed to achieve the desired fit. They also have some recommendations regarding length.
[the_ad id=”7845″]
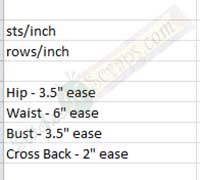
I start with the width measurements. In this case, I want to keep the shaping sort of subtle, and roomy in the waist. To achieve this, I add more ease in the waist than at the bust and hips. So I’m thinking something like 3.5 inches of ease at the bust and hips, and 6 inches at the waist. The cross back measurement is only across half the garment, not all the way around, so for that I need half as much ease, which is 1.75 inches. Let’s just say 2, to give us a little extra shoulder room.
Then I move on to the length measurements. Hip length is about 6 inches below the waist, so I’m going to go about 7. I also want some room in the armhole, but don’t want it droopy, so I’m going with 1.5″ of ease. Here I’ve plugged in all the numbers from the CYC size chart, added the ease, and calculated the number of stitches / rows to use.

Adjusting
I have enough information in this chart now to make the vest. BUT if I were to stick to these exact numbers, the pattern will be overly complicated, with different instructions for each size. It’s much easier to write if I can do things the same on all sizes. For example, if I decrease 2 stitches every 3 rows between the hip and waist on one size, it would be great to be able to do the same on the other sizes. This is not always possible, but is something to keep in mind as I go forward.
Another consideration is even and odd stitch counts. I can only decrease in whole numbers; I can’t decrease 1.5 stitches on each side! If I’m decreasing on both sides evenly, this means I need an even number of decreases. If I’m decreasing the same on the front and back and also want to keep those increases even on both sides, I’ll need to decrease in multiples of 4. So a lot of these numbers may change slightly as we go, but for now it’s enough to start with.
Yay! I’m finally ready to start crocheting the vest!


2 Comments
Sheila
Loved the info. Thank You!
Pia Thadani
Glad you liked it! 🙂