Free Pattern – Granny Square Gift Card Envelope
Giving a gift card? Personalize it with this fast and easy gift card envelope! Made from a simple granny square, it works up quickly and is a great project for beginners.

This pattern is protected by copyright. Please do not distribute or share this pattern in any way other than by sharing a link to this page or to the pattern page on Ravelry. Click here for copyright information.
This pattern contains affiliate links (click for more info). If you click one of these links and then make a purchase, I may be compensated. You get the same great prices, and you will be helping to support this site!
Granny Square Gift Card Envelope

![]()
Add this to your Ravelry Queue
Materials:
- 30 yds sport weight yarn
- 8 inches contrasting yarn or ribbon for tie
- Size G / 4 mm hook or size needed to obtain gauge
- Yarn needle
- 2 Locking stitch markers or safety pins
Difficulty:
Easy- Basic granny square with a slight modification and some seaming.
Size:
About 4″ wide by 3″ tall.
Gauge:
26 dc x 11 rows = 4″. Use project for gauge – Finished granny square should measure approximately 5″ before seaming. Exact gauge is not critical.
Abbreviations used:
- ch = chain
- sc = single crochet
- sl st = slip stitch
- st(s) = stitch(es)
- sp(s) = space(s)
- rnd = round
- RS = right side
- WS = wrong side
Recommended Resources:
Instructions:
Granny Square
Note: Ch 3 at at the beginning of a round counts as a dc throughout. The ch 4 at the beginning of rnd 1 is a foundation chain plus a dc.
Rnd 1 (WS): Ch 4, 2 dc in 4th ch from hook, (ch 2, 3 dc) three times in same ch, ch 2 [corner sp], join with sl st to first st. (12 dc, 4 corner sps)
Note: From this point forward you will only be working in ch sps. Skip all stitches unless otherwise specified.
Rnd 2: Turn, sl st in first corner sp, ch 3, 2 dc in same sp, ch 1, (3 dc, ch 2, 3 dc, ch 1) in each of next 3 corner sps, (3 dc, ch 2) in same corner sp as start of round, join with sl st to first st. (24 dc, 4 ch-1 sps, 4 corner sps)
Rnd 3: Turn, sl st in first corner sp, ch 3, 2 dc in same sp, ch 1, {(3 dc, ch 1) in next ch-1 sp, (3 dc, ch 2, 3 dc, ch 1) in next corner sp] 3 times, (3 dc, ch 1) in next ch-1 sp, 3 dc in beginning corner sp, ch 2, join with sl st to first st. (36 dc, 8 ch-1 sps, 4 corner sps)
Rnd 4: Turn, sl st in first corner sp, ch 3, 2 dc in same sp, ch 1, {(3 dc, ch 1) in each ch-1 sp across to next corner, (3 dc, ch 2, 3 dc, ch 1) in next corner sp] 3 times, (3 dc, ch 1) in each ch-1 sp across to beginning corner, 3 dc in beginning corner sp, ch 2, join with sl st to first st. (48 dc, 12 ch-1 sps, 4 corner sps)
Rnd 5: Repeat Rnd 4. (60 dc, 16 ch-1 sps, 4 corner sps)
Rnd 6: Turn, sl st in first corner sp, ch 3, 2 dc in same sp, ch 1, {(3 dc, ch 1) in each ch-1 sp across to next corner, (3 dc, ch 2, 3 dc, ch 1) in next corner sp] 2 times, (3 dc, ch 1) in each ch-1 sp across to last corner, (hdc, sc, sl st, sc, hdc) in last corner [flat corner], (3 dc, ch 1) in each ch-1 sp across to beginning corner, 3 dc in beginning corner sp, ch 2, join with sl st to first st. (70 sts, 20 ch-1 sps, 3 corner sps)
Fasten off.
Seaming:
Click on any images to view larger
Place piece in front of you with right side facing and the flat corner at the bottom. Each edge should be about 5 inches.

Fold up the bottom corner so it approximately rests at the middle of the square. The folded edge at the bottom should be about 4 inches.
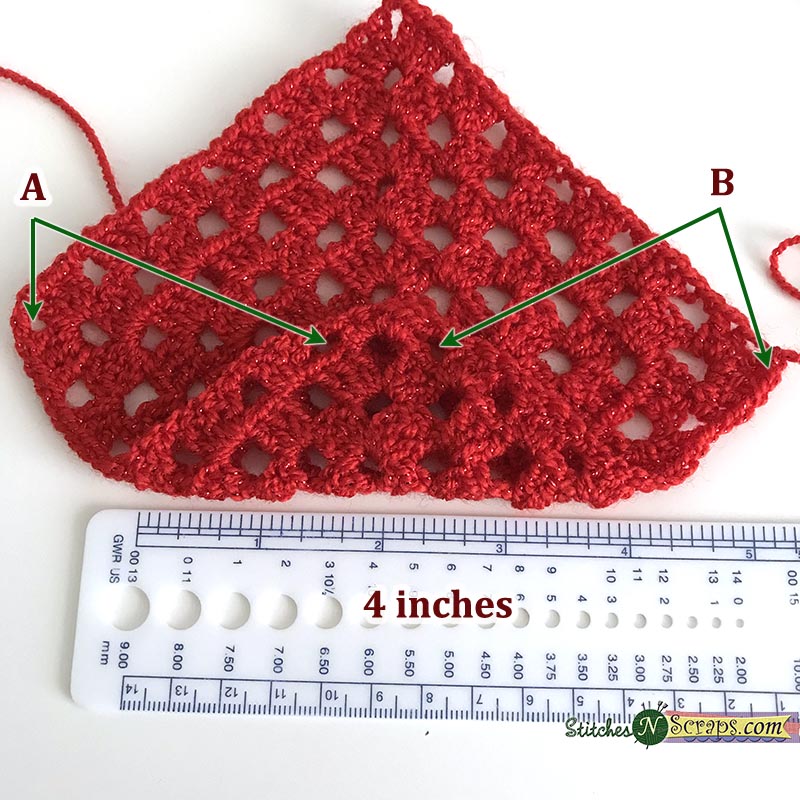
Fold sides in so that the spaces marked A and B in the previous picture match up. The corner spaces at the sides should match up with the ch-1 sps on either side of the flat corner. Use stitch markers or safety pins to hold corners in place. Place gift card into pouch and make sure it fits. If it doesn’t, adjust folds until it does.
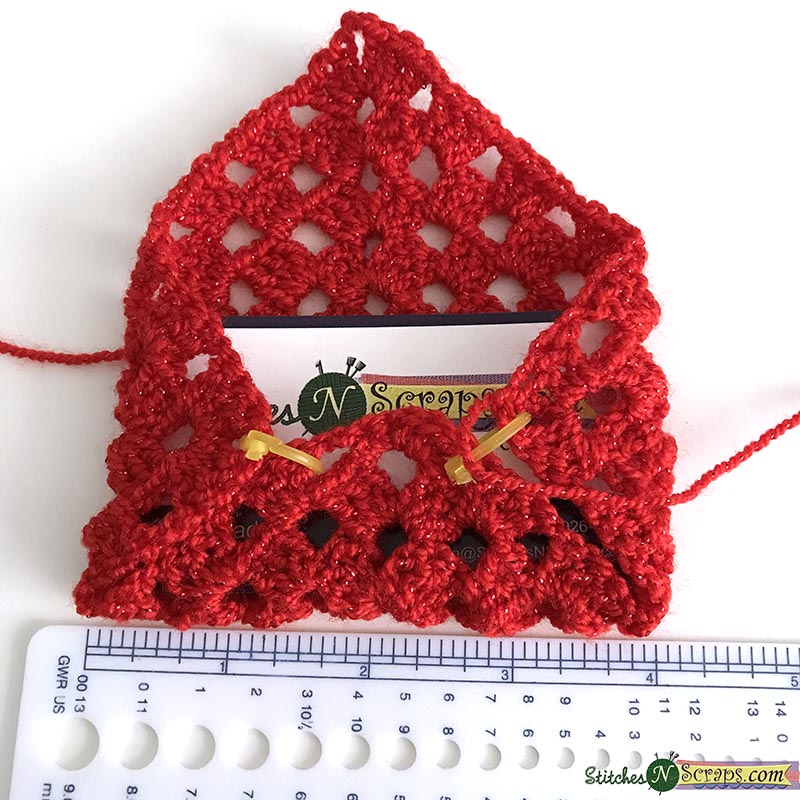
Sew sides to bottom using a whip stitch seam, and remove markers once secure.

Weave in all ends and turn envelope right side out.
Fastening:
Thread 6-8 inch section of contrasting ribbon or yarn through the spaces on either side of the flat corner.

Fold top over, and thread tie through the same holes on top corner.
 Tie a bow, and trim ends as desired. Tip – if you turn the piece upside down before tying your bow, your bow will come out right side up!
 Alternately, you could fasten your envelope with a button, clip, hook and loop closure, or by just tucking the top into the bottom.
I hope you enjoy making this pattern!
A downloadable pdf of this pattern is also available in my Craftsy store or on Ravelry, for a small fee. The fee for the pdf format is to offset the advertising revenue lost when you print or download the pattern rather than viewing it online.
Do you want the best of Stitches ‘N’ Scraps delivered right to your inbox? The Stitches ‘N’ Scraps email newsletter includes highlights from the blog as well as special features not available elsewhere. Don’t miss a stitch – Subscribe now!


One Comment
Elisabeth
That is a cute idea