Free Crochet Patterns
Find the perfect, free crochet pattern for your next project! Browse them all, or select a category from the dropdown menu. Where will your creativity take you today?
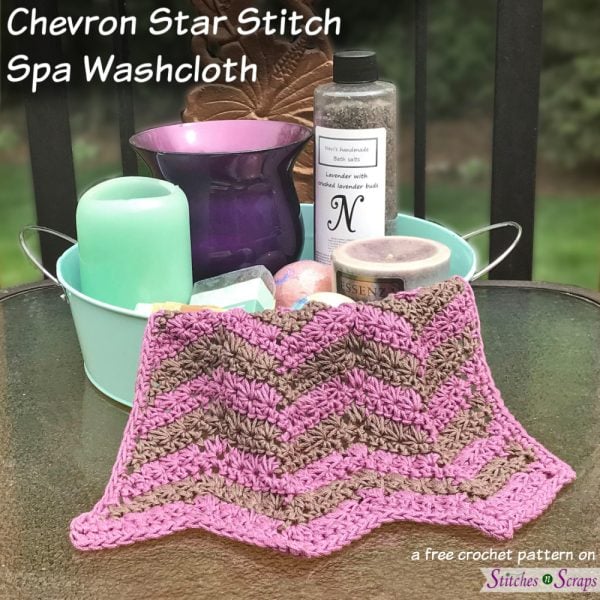
Free Pattern – Tulip the Bunny Rabbit
Tulip the bunny rabbit has come for a visit, just in time for Easter! With a sweet smile and big floppy ears, this fuzzy bunny is sure to delight. Best of all, she works up quickly with relatively few seams.

Tulip’s name comes from her nose, though the tulip shape was entirely unintentional! I posted a picture of her on the Scrappy Stitchers Facebook group and asked for name suggestions. Elaine W. noticed the shape of the nose and mouth, and suggested the perfect name.
This post contains affiliate advertisements (click for more info). If you click one of these advertisements and then make a purchase, I may be compensated. You get the same great prices, and you will be helping to support this site!
2019 Softie CAL
Tulip has come to visit for the 2019 Softie CAL at CAL Central. This is our second year for this popular crochet along. There are lots of great patterns already, and more to come through May!

There are some great giveaway prizes too, from Fairfield World, Clover USA, Search Press North America, LeitherCo, and Morgan’s Mane. See all the details, including the giveaway entry information and links to the other patterns, in the main Softie CAL post on Underground Crafter.
Fairfield Poly Fil
Fairfield once again offered all the designers of the Softie CAL with free stuffing for their projects. They’re very generous, and I actually still have loads left of the Poly Fil they sent me for last year’s CAL!
For Tulip, I used some Original Poly Fil brand fiber fill. This is the same bag of stuffing I had used for my Serrana the Mermaid pattern, as well as my Valentine pillow, and I still have enough left for a few more projects.
Red Heart Hygge Yarn
Earlier this year, Red Heart had sent me some of their Hygge yarn for free to make my Hygge Neck Roll Bolster Pillow for the Hygge Home CAL. I used some of the leftovers to make Tulip. I still have more left, so there may be another project down the road!
It’s a chunky, fuzzy yarn that’s a joy to work with. Over 2 projects now, I haven’t noticed any of the splitting or snagging issues that I normally expect with a textured yarn.
This pattern is protected by copyright. Please do not distribute or share this pattern in any way other than by sharing a link to this page or to the pattern page on Ravelry. Click here for copyright information.
Tulip the Bunny Rabbit


Add this to your Ravelry Queue
Materials
I received the Hygge yarn for this pattern for free from Red Heart, and the Poly Fil fiberfill free from Fairfield.
- Red Heart Hygge yarn
- 125 yds #8579 Lavender
- 30 yds #8406 Pearl
- Size H / 5mm crochet hook or size needed to obtain gauge.
- Poly Fil Fiberfill
- Tapestry Needle
- Small amounts of worsted weight black yarn and pink crochet thread or embroidery floss (for face).
Project Level
Intermediate: Working in the round with shaping, some seaming, and some back post stitches.
Size
About 13 inches tall.
Gauge
13 sc x 13 rows = 4 inches.
Exact gauge isn’t critical. Stitches should be tight enough so that stuffing doesn’t show through.
Use pattern as gauge swatch – first leg should measure approximately 1.5 x 3 (before stuffing).
Abbreviations used
(Pattern is written in US terms)
ch = chain
sc = single crochet
bpsc = back post single crochet
inc = increase (see special stitches)
dec = decrease (see special stitches)
st(s) = stitch(es)
sl st = slip stitch
bp sl st = back post slip stitch
rnd = round
Recommended Resources
- Continuous rounds and running stitch markers
- Why Continuous Rounds Shift
- Front and Back Post Slip Stitches
- Front and Back Post Single Crochet (fpsc & bpsc)
- Invisible Single Crochet Decrease on Nicki’s Homemade Crafts
Special Stitches:
Invisible increase (inc): Sc in back loop only of indicated st, then sc in both loops of same stitch.
Invisible decrease (dec): Insert hook into front loop only of both of next 2 stitches, yarn over and draw up a loop, yarn over and draw through both loops on hook.
This is an alternative to a single crochet 2 together (sc2tog) stitch. If you prefer, you can use the standard sc2tog instead.
Instructions
Most of the pattern is worked in continuous rounds. Do not join or turn unless specifically indicated. Mark first stitch of each round.
Leg
Rnd 1 (bottom): With pearl, ch 2, 6 sc in 2nd ch from hook, join with sl st in first st. (6 sc)
Rnd 2: Ch 1, inc in each st around, join with sl st in first st, fasten off. (12 sc)
Rnd 3: Join lavender with bp sl st around post of any st from rnd 2. Bpsc in same st and each st around, do not join. (12 sc)

Rnd 4: (Inc, sc in next 3 sts) 3 times. (15 sc)
Rnds 5-6: Sc in each st around. (15 sc)
Rnd 7: (Dec, sc in next 3 sts) 3 times. (12 sc)
Rnds 8-11: Sc in each st around. (12 sc)
Fasten off, leaving a 10 inch tail for sewing. Weave in all ends except for this long tail.
Repeat rnds 1-11 for 2nd leg, but do not fasten off.
Body:
Rnd 12 – joining legs together: (24 sts total)
- Continuing on 2nd leg, sc in each of first 6 sts. (6 sts)
- Working into first leg, sc in each st around. (12 sts)
- Continuing on 2nd leg, sc in each of 6 remaining sts. (6 sts)
Rnd 13: (Inc in next st, sc in next 3 sts) 6 times (30 sts)
Rnds 14-22: Sc in each st around (30 sts)
Use long tail from first leg to sew crotch area shut. Weave in all ends (not working yarn). Stuff legs and bottom part of body.
Rnd 23: (Dec, sc in next 3 sts) 6 times (24 sts)
Rnds 24-27: Sc in each st around (24 sts)
Rnd 28: (Dec, sc in next 2 sts) 6 times (18 sts)
Rnds 29-30: Sc in each st around (18 sts)
Rnd 31: (Dec, sc in next st) 6 times, do not fasten off. (12 sts)
Stuff body
Head
Rnd 32: (Inc, sc in next st) 6 times (18 sts)
Rnd 33: (Inc, sc in next 2 sts) 6 times (24 sts)
Rnds 34-42: Sc in each st around (24 sts)
Rnd 43: (Dec, sc in next 2 sts) 6 times (18 sts)
Rnd 45: (Dec, sc in next st) 6 times (12 sts)
Stuff head and neck
Rnd 47: Dec 6 times, fasten off. (6 sts).
Weave in all ends.

Arm (Make 2):
Rnds 1-3: Repeat rounds 1-3 of leg (12 sts)
Rnds 4-15: Sc in each st around (12 sts)
Rnd 16: (Dec, sc in next st) 4 times, fasten off leaving a long tail for sewing. (8 sts)
Stuff arm about halfway.

Ear (Make 2)
Inside:
Row 1: With cream, ch 4, sc in 2nd ch from hook and each ch across. (3 sc)
Rows 2-3: Ch 1, turn, inc, sc in each st across (5 sc)
Row 4-18: Ch 1, sc in each st across (5 sc)
Row 19: Ch 1, dec, sc in next st, dec (3 sc)
Rows 20-22: Ch 1, sc in each st across (3 sc)
Row 23: Ch 1, dec, sc in next st (2 sts)
Row 24: Ch 1, dec, fasten off.
Outside:
With lavender, repeat rows 1-24 of inside, but do not fasten off.
Edging round (52 sts total):
Hold inside and outside pieces together. Working through both layers,
- Work 22 sc across side edge to base of ear. (22 sc)
- Working across bottom of row 1, 3 sc in first st, sc in next st, 3 sc in next st (7 sc)
- Work 22 sc across side edge to tip of ear. (22 sc)
- Ch 1, sc in tip of ear, ch 1, join with sl st to beginning of rnd (1 sc)

Assembly:
If you are making this for a child, please skip the last assembly step (the bow around the neck). Loose ties and ribbons can easily wind around little fingers and toes or become a choking hazard.
- Flatten open end of arms and sew to body at neckline
- Sew ears into place on head, with flat side (row 1) at top.
- Make a small pom pom with pearl and sew into place for tail.
- Weave in any remaining ends.
- Using the picture as a guide, embroider face.
- For decorative use only: Wrap a strand of pearl yarn or a piece of ribbon around the neck and tie in a bow. Trim ends as needed.
I hope you enjoy making this pattern. A downloadable pdf of this pattern is also available on Ravelry, for a small fee. The fee for the pdf format is to offset the advertising revenue lost when you print or download the pattern rather than viewing it online.
Do you want the best of Stitches n Scraps delivered right to your inbox? The Stitches n Scraps email newsletter includes highlights from the blog as well as special features not available elsewhere. Don’t miss a stitch – Subscribe now!

Free Pattern – Star Applique
Shine your brightest with a star applique. These crochet stars are fast and easy to make, and so versatile.

This post contains affiliate advertisements (click for more info). If you click one of these advertisements and then make a purchase, I may be compensated. You get the same great prices, and you will be helping to support this site!
The layered look
The size of the star depends on the yarn and hook you use. Creating 2 stars of different sizes and sewing them together makes a pretty, layered effect.

Perfect for holidays, or any day
I made these for an Independence Day display that I’ve been working on, but they would be great for Christmas or other holidays as well.
The versatile design can be used for so many things. Sew them onto clothing or bags, string them together into a garland, or glue them onto cards, frames, or anywhere else you need a star.
Great for scraps
Turn all those smaller balls of scrap yarn into a basket full of stars. That way you’ll always have stars on hand for any occasion!
This pattern is protected by copyright. Please do not distribute or share this pattern in any way other than by sharing a link to this page or to the pattern page on Ravelry. Click here for copyright information.
Star Applique

Add this to your Ravelry Queue
Materials
- Any yarn or thread (yardage will vary based on yarn used)
- Appropriate size hook for your yarn
- Tapestry Needle
Project Level
Easy: Simple stitches, working in the round, shaping at star points.
Size / Gauge
Can be made with any yarn or thread and an appropriate sized hook. The stars shown are as follows:
Purple star: 4.25 inches, worsted weight yarn, H / 5mm hook.
White stars: 3 inches, worsted weight yarn, G / 4 mm hook.
Red stars: 2 inches, DK weight yarn, F / 3.5mm hook.
Abbreviations used
(Pattern is written in US terms)
ch = chain
sc = single crochet
hdc = half double crochet
dc = double crochet
st(s) = stitch(es)
sl st = slip stitch
sk = skip
rnd = round
Recommended Resources
Instructions
Entire pattern is worked on the right side. Depending on your yarn and gauge, points may curl.
Rnd 1 (center circle): Ch 6, sl st in 6th ch from hook, (ch 5, sl st in same ch) 3 times, ch-2, dc in same ch. (5 loops)

Rnd 2 (points): (Ch 5, sl st in 2nd ch from hook, sc in next ch, hdc in next ch, dc in last ch, sl st in next loop from rnd 1) 5 times, working the last sl st into the same loop as the beginning of the round. (5 points)

Rnd 3 (edging): [(Ch 1, sl st in next st) 4 times along edge of star point, ch 3, working down opposite edge of star point towards center circle, sl st in next st, (ch 1, sl st in next st) 3 times, sk next sl st] 5 times, join with sl st to first ch.

Fasten off, leaving long tails for sewing if needed.
For a layered star, make 2 stars of different sizes and sew them together.
When done sewing pieces together, weave in any remaining ends.
I hope you enjoy making this pattern. A downloadable pdf of this pattern is also available on Ravelry, for a small fee. The fee for the pdf format is to offset the advertising revenue lost when you print or download the pattern rather than viewing it online.
Do you want the best of Stitches n Scraps delivered right to your inbox? The Stitches n Scraps email newsletter includes highlights from the blog as well as special features not available elsewhere. Don’t miss a stitch – Subscribe now!

Free Pattern – Sweet & Simple Flower Headband
Designed for the 2019 International Crochet Month Designer Showcase
Tame those tresses with a touch of spring! This Sweet and Simple Flower Headband adds a pop of color, with a stretchy ribbed section for a snug fit.

This post contains affiliate advertisements (click for more info). If you click one of these advertisements and then make a purchase, I may be compensated. You get the same great prices, and you will be helping to support this site!
Make it in Any Size
The beginner-friendly pattern can be made to any size from infant to adult, and everything in between. The pictures show the 6 month size, but instructions are included for changing both the length and the width as needed.
Make Matching Booties
I received the yarn for this pattern for free from KPC yarn, some time ago at a conference. It’s a soft, DK weight, cotton yarn. I originally used it for my Little Cutie Booties pattern, and had just enough left over for this matching headband. The headband and booties together make a great set for gifting!

Laurel Hill Hooks
The folks at Laurel Hill sent me a lovely, ebony crochet hook for free, to try out for this project. Unfortunately, I changed my mind mid-stream about what I would be making, and needed a much smaller hook. I did still try out the Laurel Hill hook though. Read my review for all the details!

2019 International Crochet Month Designer Showcase
March is International Crochet Month. To celebrate, Marie Segares of Underground Crafter has put together a Designer Showcase. This blog hop event features a different designer every day. Today is my day to be featured and share this free pattern! See all the details at Underground Crafter.

If you crochet, think CGOA!
All the designers participating in this event are members of the Crochet Guild of America. Through local chapter events, online discussions, and of course the annual conference I’ve met so many wonderful people and learned so much. It’s also shown me just how wonderfully diverse the world of crochet can be!
As a professional, the connections I’ve made at CGOA have been invaluable, but it’s the friends I’ve made that I treasure most. CGOA is a great resource for crocheters of all skill levels and interests. Whether you’re new to crochet, or are into amigurumi, freeform, lace, colorwork, or something else, CGOA has something for you. If you crochet, think CGOA!
This pattern is protected by copyright. Please do not distribute or share this pattern in any way other than by sharing a link to this page or to the pattern page on Ravelry. Click here for copyright information.
Sweet & Simple Flower Headband


Add this to your Ravelry Queue
Materials
- KPC Glencoul DK yarn (yardage indicated is for 6 month size)
- 2-5 yds Lucky Heather (purple)
- 2-5 yds Parakeet (green)
- 15 yds Forest Fruit (pink)
- Size G / 4 mm hook, or size needed to obtain gauge
- Tapestry Needle
Project Level
Basic: Simple stitches, sc2tog decrease, working in rows and rounds, working in back loop only.
Size:
Can be made to any size. Sample shown in 0-6 month size.
Gauge
Use pattern as gauge swatch – ribbing section should measure about 3/4 inches x 3 inches, without stretching. Exact gauge is not critical and size can be easily adjusted as needed.
Abbreviations used
(Pattern is written in US terms)
ch = chain
sc = single crochet
sc2tog = single crochet 2 together
hdc = half double crochet
dc = double crochet
ch-1 sp = chain 1 space
st(s) = stitch(es)
sl st = slip stitch
sk = skip
rnd = round
RS = right side
WS = wrong side
Recommended Resources
- Learn to Crochet Series
- Working into the back bump
- Front Loop Only (flo) & Back Loop Only (blo) on Moogly
- How to Single Crochet 2 Together on Fiber Flux (sc2tog)
- Invisible Single Crochet Decrease on Nicki’s Homemade Crafts (alternative to sc2tog)
Instructions
To make the headband wider, start with more chains. Just make sure you start with an even number.
Ribbing
With green, Ch 6 (multiple of 2)
Row 1 (WS): Sc in back bump of 2nd ch from hook and each ch across (5 sc)
Rows 2 – 19: Ch 1, turn, sc back loop only of each st across. (5 sc)
Change to pink, fasten off green.

Main section
This section is written so that it will still work if you added more stitches. If you started with just the 6 chains, you’ll sometimes only need to work the parts in ( ) once.
Row 20 (RS): With pink, ch 1, turn, sc in back loop only of first st, (sc, ch-1) across to last 2 sts, sc in back loop only of last 2 sts. (4 sc, 1 ch-1 sp).
Row 21: Ch 3 (counts as dc), turn, dc in same st, (sk next st, 2 dc in next ch-1 sp) across to last 2 sts, sk next st, 2 dc in last st. (6 dc, 2 ch-1 sps)
Row 22: Ch 4 (counts as dc and ch-1), (sk next st, 2 dc in next ch-1 sp) across to last 2 sts, sk next st, dc in last st. (6 dc, 3 ch-1 sps).
Repeat rows 21-22 until work reaches desired length. It should stretch to fit snuggly but not tightly around head.
Suggested lengths without stretching:
0-6 months: 14 inches
6-12 months: 15 inches
12-24 months: 16 inches
Child: 18 inches
Adult small: 20 inches
Adult large: 22 inches
Next row: Ch 1, turn, sc in first st, sk next ch-1 sp, sc2tog, (sc in next ch-1 sp, sc2tog) across to last ch-1 sp, sk last ch-1 sp, sc in last st. (5 sc)
Fasten off, leaving a long tail for sewing.
Using tail, sew ends of headband together.
Flower:
For larger sizes, consider making 3 flowers and sewing them onto the headband near each other to make a cluster of flowers.
Ch 2,
Rnd 1: 6 sc in 2nd ch from hook, join with sl st to first st. (6 sc)
Rnd 2: Ch 1, (sc, hdc, dc, hdc, sc) in back loop of each st around, join with sl st to first st. (6 petals)
Fasten off, leaving a long tail for sewing.
Using tail, sew flower to headband.
Weave in any remaining ends.
I hope you enjoy making this pattern. A downloadable pdf of this pattern is also available on Ravelry, for a small fee. The fee for the pdf format is to offset the advertising revenue lost when you print or download the pattern rather than viewing it online.
Do you want the best of Stitches n Scraps delivered right to your inbox? The Stitches n Scraps email newsletter includes highlights from the blog as well as special features not available elsewhere. Don’t miss a stitch – Subscribe now!

Free Pattern – Sapling Sweater Vest
Add a stylish finishing touch to your little one’s outfit with the Sapling Sweater Vest. The lightweight fabric is perfect for warmer weather, and the gentle ribbing stretches to grow and move with active babies. The beginner friendly pattern works up quickly and includes 4 sizes from 6 – 24 months.

This post contains affiliate advertisements (click for more info). If you click one of these advertisements and then make a purchase, I may be compensated. You get the same great prices, and you will be helping to support this site!
The perfect baby gift!
I designed the Sapling Sweater Vest as a gift for a friend who just had a baby. (He’s absolutely adorable!) The unisex design and simple, relaxed fit work well for a baby gift. Lighter weight yarn makes it ideal for spring weather, and it would be great for autumn too.
Fractal spinning
I’m a member of a local spinning guild called Illinois Prairie Spinners. At one of our meetings late last year, we learned about fractal spinning. The teacher had samples of fiber for us to use, and I chose a woodsy, pastel roving.

By definition, fractals can be divided over and over again and just become infinitely smaller versions of the original. For fractal spinning, you divide the fiber into sections in a particular way so that the colors change at different rates in the different plies. If done right, you will have solid sections where the colors match up between the plies, and “barber pole” sections where the colors do not.
The key is, for it to work properly, your measuring and your spinning both have to be perfectly even. Mine is not, so I didn’t get a true fractal. But I did get a very lovely, very soft, fingering weight, merino yarn!

Blocking your swatch
You can of course use any fingering weight yarn for this project, it does not have to be something you spun yourself. I would suggest trying it with your favorite, fingering weight sock yarn.
Whatever fiber you choose, it may behave differently after washing than mine did. Even different wool fibers can have different characteristics. That’s why it’s so important to wash and block your swatch before measuring it. This way, if the fiber is going to shrink or grow, you can adjust your gauge accordingly.
This pattern is protected by copyright. Please do not distribute or share this pattern in any way other than by sharing a link to this page or to the pattern page on Ravelry. Click here for copyright information.
Sapling Sweater Vest


Add this to your Ravelry Queue
Materials
- 250 [280, 315, 350] yds, fingering weight yarn (see Sizes)
- Size G / 4 mm crochet hook or size needed to match gauge
- Tapestry Needle
Project Level
Basic: Mostly dc stitches, worked in back loop only. Some decreases and increases. Worked sideways and seamed.
Sizes
Instructions are given for 6 months, with changes for 12 months, 18 months, and 24 months in [ ]

Gauge
Working in back loops only, 22 dc x 12 rows = 4 inches.
Abbreviations used
(Pattern is written in US terms)
ch = chain
sc = single crochet
dc = double crochet
dc2tog = double crochet 2 stitches together
blo = back loop(s) only
st(s) = stitch(es)
sl st = slip stitch
sk = skip
RS = right side
WS = wrong side
Recommended Resources
Instructions
Both back and front are worked sideways, starting at an underarm. Ch 3 at the beginning of a row counts as a dc throughout.
Back
Armhole
Ch 32 [34, 36, 38]
Sizes 6 mo and 12 mo only:
Row 1 (WS): Dc in 4th ch from hook and each ch across. (30 [32] dc)
Row 2: Ch 3, turn, dc in blo of next st and each st across to last st, 2 dc in blo of last st. (31 [33] dc)
Sizes 18 mo and 24 mo only:
Row 1 (RS): Dc in 4th ch from hook and each ch across. ([34, 36] dc)
Row 2: Ch 3, turn, dc in blo of same st and each st across. ([35, 37] dc)
Row 3: Ch 3, turn, dc in blo of next st and each st across to last st, 2 dc in blo of last st. [36, 38] dc)
Shoulder
Row 3 [3, 4, 4]: Ch 28 [29, 29, 30], turn, dc in 4th ch from hook and each remaining ch, dc in blo of each st across. (57 [60, 63, 66] dc)
Rows 4-7 [4-7, 5-8, 5-8]: Ch 3, turn, dc in blo of next st and each st across. (57 [60, 63, 66] dc)

Neckline
Row 8 [8, 9, 9] (RS): Ch 3, turn, dc in blo of next st and each st across to last 6 sts, dc2tog in blo of next 2 sts, leave remaining 4 sts unworked. (52 [55, 58, 61] dc)
Rows 9-24 [9-26, 10-27, 10-29]: Ch 3, turn, dc in blo of next st and each st across. (52 [55, 58, 61] dc)
Shoulder
Row 25 [27, 28, 30]: Ch 7, turn, dc in 4th ch from hook and each remaining ch, dc in blo of each st across (57 [60, 63, 66] dc)
Rows 26-29 [28-31, 29-32, 30-34]: Ch 3, turn, dc in blo of next st and each st across. (57 [60, 63, 66] dc)
Armhole
Sizes 6 mo and 12 mo only:
Row 30 [32] (RS): Ch 3, turn, dc in blo of next 29 [31] sts, dc2tog in blo of next 2 sts, leave remaining sts unworked. (31 [33] dc)
Row 31 [33]: Ch 2 (does not count as a st), turn, sk first st, dc in blo of each remaining st across. (30 [32] dc)
Fasten off, leaving an 18 inch tail to use for sewing side seam.
Sizes 18 mo and 24 mo only:
Row 33 [35] (RS): Ch 3, turn, dc in blo of next 34 [36] sts, dc2tog in blo of next 2 sts, leave remaining sts unworked. (36, 38 dc)
Row 34 [36]: Ch 2 (does not count as a st), turn, sk first st, dc in blo of each remaining st across. (35 [37] dc)
Row 35 [37]: Ch 3, turn, dc in blo of next st and each st across to last 2 sts, dc2tog in blo of last 2 sts. (34 [36] dc)
Fasten off, leaving an 18 inch tail to use for sewing side seam.
Front
Arm & Shoulder
Rows 1-7 [7, 8, 8]: Repeat rows 1-7 [7, 8, 8] of Back. (57 [60, 63, 66] dc)
Neckline
Row 8 [8, 9,9] (RS): Ch 3, turn, dc in blo of next st and each st across to last 6 [7, 7, 8] sts, dc2tog in blo of next 2 sts, leave remaining 4 sts unworked. (52 [54, 57, 59 ] dc)
Row 9 [9, 10, 11]: Ch 2 (does not count as a dc), turn, sk first st, dc in blo of each remaining st across. (51 [53, 56, 58] dc)
Row 10 [10, 11, 11]: Ch 3, turn, dc in blo of next st and each st across to last 2 sts, dc2tog in blo of last 2 sts. (50 [52, 55, 57] dc)
Row 11 [11, 12, 12]: Ch 3, turn, dc in blo of next st and each st across. (50 [52, 55, 57] dc)
Rows 12-13 [12-13, 13-16, 13-16]: Repeat last 2 rows once [once, twice, twice] more. (49 [51, 53, 55] dc)
Rows 14-20 [14-22, 17-21, 17-23]: Ch 3, dc in blo of next st and each st across. (49 [51, 53, 55] dc)
Row 21 [23, 22, 24]: Ch 3, turn, dc in same st and in each st across. (50 [52, 55, 56] dc)
Rows 22-23 [24-25, 23-26, 25-28]: Repeat last 2 rows once [once, twice, twice] more. (51 [53, 56, 58] dc)
Row 24 [26, 27, 29]: Ch 3, turn, dc in blo of next st and each st across to last st, 2 dc in blo of last st. (52 [54, 57, 59] dc)
Shoulder & Armhole
Row 25 [27, 28, 30]: Ch 7 [8, 8, 9], turn, dc in 4th ch from hook and each remaining ch, dc in blo of each st across (57 [60, 63, 66] dc)
Rows 26-31 [28-33, 29-35, 30-37]: Repeat rows 26-31 [28-33, 29-35, 30-37] of Back. (34 [36] dc)
Fasten off, leaving an 18 inch tail to use for sewing side seam.

Assembly
With right sides together, sew back to front at side seams and shoulders.
Armhole Edging
Rnd 1: With RS facing, join yarn with a sl st in side seam at underarm, ch 1, work 4 [4, 5, 5] sc evenly spaced across sides of underarm rows, sk next st, sc in each st around to last st, sk last st,
work 4 [4, 5, 5] sc across sides of remaining underarm rows, join with sl st to first st. (60 [62, 66, 68] sc)
Repeat for other armhole.
Collar
Rnd 1: With RS facing, join yarn with a sl st in shoulder seam at neckline, ch 3, work 67 [73, 77, 83] dc evenly spaced around neckline, join with sl st to first st. (68 [74, 78, 84] dc)
Rnd 2: Do not turn. Ch 3, dc in next st and each st around, join with sl st to first st, fasten off. (68 [74, 78, 84] dc)
24 mo size only: Repeat Rnd 2 once more.
Weave in all ends, wash and block.
I hope you enjoy making this pattern. A downloadable pdf of this pattern is also available on Ravelry, for a small fee. The fee for the pdf format is to offset the advertising revenue lost when you print or download the pattern rather than viewing it online.
Do you want the best of Stitches n Scraps delivered right to your inbox? The Stitches n Scraps email newsletter includes highlights from the blog as well as special features not available elsewhere. Don’t miss a stitch – Subscribe now!

Free Pattern – Hygge Neck Roll Bolster Pillow
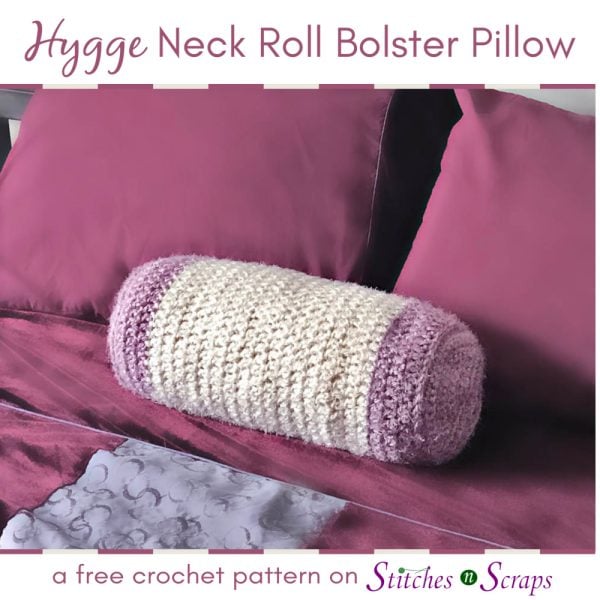
Fluffy, cozy, and oh so comfy! Give your neck the support it needs with the Hygge Neck Roll Bolster Pillow. With 2 options for the end cap, you can either make a solid pillow, or a pillow cover that can be slipped on and off.

This post contains affiliate advertisements (click for more info). If you click one of these advertisements and then make a purchase, I may be compensated. You get the same great prices, and you will be helping to support this site!
What is Hygge?
Hygge is a danish word that has become a lifestyle trend. Roughly translated, it means cozy and content. Read more about the concept here.
Hygge Home CAL
I designed this pattern for the Hygge Home CAL. Through mid-March, we’ll be sharing comfy, cozy, home decor projects like this one. Red Heart and Darn Good Yarn have both provided giveaway prizes to make the event even more fun! See all the details, including the giveaway entry information and links to the other patterns, in the main CAL post on Underground Crafter.
Red Heart Hygge Yarn
Red Heart also sent me some of their Hygge yarn for free, to make this design. This chunky yarn is fuzzy and unbelievably soft, exactly what you would expect from the name. I love the soft, muted shades, but if that’s not for you, Red Heart has recently widened the color range to include some richer colors too.

At the time, I didn’t yet know what I was going to make, so I got more than I needed. I have quite a bit left over, so you can expect another pattern in this yarn later in the year.
The pillow form
To stuff the pillow, I used a Poly Fil Premier Neckroll from Fairfield. This neckroll pillow form has an overlapping, envelope style opening at one end. I love this because it means you can add and remove stuffing to change the pillow firmness. This opening is where I got the idea for the optional opening on the pillow too.
This pattern is protected by copyright. Please do not distribute or share this pattern in any way other than by sharing a link to this page or to the pattern page on Ravelry. Click here for copyright information.
Hygge Neck Roll Bolster Pillow


Add this to your Ravelry Queue
Materials
- Red Heart Hygge yarn
- 110 yds #8579 Lavender
- 110 yds #8406 Pearl
- Poly-Fill Neck Roll pillow form
- Size K / 6.5 mm crochet hook, or size needed to match gauge
- Tapestry Needle
Skill Level
Intermediate: Worked in the round with simple color changes, some back post single crochets. Optional, alternate closure is somewhat more advanced.
Size
Fits a 5 x 14 inch neck roll pillow form.
Gauge
Use pattern as gauge swatch – Starting circle (either version) should measure approximately 6 inches in diameter.
Abbreviations used
(Pattern is written in US terms)
ch = chain
sc = single crochet
bpsc = back post single crochet
dc = double crochet
ch-sp = chain space
st(s) = stitch(es)
sl st = slip stitch
rnd = round
Recommended Resources
Instructions
(Scroll down for video tutorial)
Starting circle (Easier / solid version)
The easy version creates a solid end piece that will match the other end of the pillow. This is less bulky, but will not open and the pillow form will not be removable. Choose either this version or the optional advanced version.

Rnd 1 (RS): With lavender, ch 2, 6 sc in 2nd ch from hook, join with sl st to first st. (6 sc)
Rnd 2: Ch 1, 2 sc in each st around, join with sl st to first st. (12 sc)
Rnd 3: Ch 1, (2 sc in next st, sc in next st) around, join with sl st to first st. (18 sc)
Rnd 4: Ch 1, (2 sc in next st, sc in next 2 sts) around, join with sl st to first st. (24 sc)
Rnd 5: Ch 1, (2 sc in next st, sc in next 3 sts) around, join with sl st to first st. (30 sc)
Rnd 6: Ch 1, (2 sc in next st, sc in next 4 sts) around, join with sl st to first st. (36 sc)
Rnd 7: Ch 1, (2 sc in next st, sc in next 5 sts) around, join with sl st to first st. (42 sc)
Rnd 8: Ch 1, (2 sc in next st, sc in next 6 sts) around, join with sl st to first st. (48 sc)
Rnd 9: Ch 1, sc in each st around, join with sl st to first st. (48 sc)
Do not fasten off. Skip ahead to Body.
Starting circle (Advanced / open version)
The advanced version creates an end piece with overlapping halves. This is bulkier, but opens so that the pillow form can be removed. Scroll down for a video tutorial of the joining in this section.

Partial Circle (make 2)
Row 1: With lavender, ch 2, 3 sc in 2nd ch from hook. (3 sc)
Row 2 (RS): Ch 1, turn, 2 sc in each st across. (6 sc)
Row 3: Ch 1, turn, 2 sc in first st, sc in next st, (2 sc in next st, sc in next st) across. (9 sc)
Row 4: Ch 1, turn, 2 sc in first st, sc in next 2 sts, (2 sc in next st, sc in next 2 sts) across. (12 sc)
Row 5: Ch 1, turn, 2 sc in first st, sc in next 3 sts, (2 sc in next st, sc in next 3 sts) across. (15 sc)
Row 6: Ch 1, turn, 2 sc in first st, sc in next 4 sts, (2 sc in next st, sc in next 4 sts) across. (18 sc)
Row 7: Ch 1, turn, 2 sc in first st, sc in next 5 sts, (2 sc in next st, sc in next 5 sts) across. (21 sc)
Row 8: Ch 1, turn, 2 sc in first st, sc in next 6 sts, (2 sc in next st, sc in next 6 sts) across. Place marker in 21st st (4th st from end). (24 sts)
Ch 3 at the beginning of a row counts as a dc in the first st throughout. For a less visible seam, try using a chainless starting double crochets instead!
Row 9: Ch 3 turn, working in sides of rows, work 15 dc evenly spaced across straight edge. (16 dc)
Row 10: Ch 3, turn, dc in next 3 sts, (dc2tog, dc in next 4 sts) twice (14 dc)
Fasten off first partial circle, do not fasten off 2nd partial circle.
Assembly
Line up the two partial circles, with right sides up, so that the two pieces overlap to form a circle. Partial circle #2, with the working yarn still attached, should be on top. The straight edges of the circles should line up with the markers.

Rnd 11 (RS): Do not turn. Ch 1.
The sides of rows 9 & 10 on the top piece line up with the last 4 sts of row 8 on the bottom piece. Working through both layers, sc in each of those 4 sts. (4 sc)
The next 4 sts on the top piece line up with the sides of rows 9 & 10 on the bottom piece. Working through both layers, sc in each of those 4 sts. (4 sc).
Now your piece is joined at one side where it overlaps.

Working into the top layer only, sc in each st around to next marker (16 sc)
The next 4 sts on the top piece line up with the sides of rows 9 & 10 on the bottom piece. Working through both layers, sc in each of those 4 sts. (4 sc).
The sides of rows 9 & 10 on the top piece line up with the next 4 sts on the bottom piece. Working through both layers, sc in each of those 4 sts. (4 sc)
Now both overlapping edges are joined.
Sc in each remaining st on bottom layer. (16 sc)
Join with sl st to first st of round. (Total of 48 sts in round)
You should now have a full circle, with an opening in the middle where the two layers overlap. Continue with Body.

Body
Ch 3 at the beginning of a row counts as a dc in the first st throughout. For a less visible seam, try using a chainless starting double crochets instead!
Rnd 1: Ch 1, bpsc in each st around, join with sl st to first st. (48 sc)
Rnds 2-4: Ch 3, dc in next st and in each st around, join with sl st to first st, changing to pearl at the end of Rnd 6. (48 dc)
Rnds 5-21: With pearl, ch 3, dc in next st and in each st around, join with sl st to first st, changing to lavender at the end of rnd 20. (48 dc)
Insert pillow form to check length. The remaining uncovered length of the pillow form should be the same as the length of rounds 1-4. If it is not, add or remove pearl colored rows as needed.

Rnds 22-24: With lavender, ch 3, dc in next st and in each st around, join with sl st to first st. (48 dc)
Ending Circle
Rnd 1: Ch 1, bpsc in each st around, join with sl st to first st. (48 sc)
Rnd 2: Ch 1, sc in each st around, join with sl st to first st. (48 sc)
If you used the solid starting circle, insert pillow form and weave in all tails before continuing.
Rnd 3: Ch 1, (sc in next 6 sts, sc2tog) around, join with sl st to first st. (42 sts)
Rnd 4: Ch 1, (sc in next 5 sts, sc2tog) around, join with sl st to first st. (36 sts)
Rnd 5: Ch 1, (sc in next 4 sts, sc2tog) around, join with sl st to first st. (30 sts)
Rnd 6: Ch 1, (sc in next 3 sts, sc2tog) around, join with sl st to first st. (24 sts)
Rnd 7: Ch 1, (sc in next 2 sts, sc2tog) around, join with sl st to first st. (18 sts)
Rnd 8: Ch 1, (sc in next st, sc2tog) around, join with sl st to first st. (12 sts)
Rnd 9: Ch 1, sc2tog in each st around, join with sl st to first st. (6 sts)
Fasten off leaving a 6 inch tail.
Use tail to sew hole closed.
Weave in ends.
If you use the open starting circle, pull the overlapping ends apart and insert pillow form.
Hygge Neck Roll Optional Closure – Video Tutorial:
I hope you enjoy making this pattern. A downloadable pdf of this pattern is also available on Ravelry, for a small fee. The fee for the pdf format is to offset the advertising revenue lost when you print or download the pattern rather than viewing it online.
Do you want the best of Stitches n Scraps delivered right to your inbox? The Stitches n Scraps email newsletter includes highlights from the blog as well as special features not available elsewhere. Don’t miss a stitch – Subscribe now!

Free Pattern – Mandala Earrings
Add a floral accent to your Spring wardrobe with these crochet Mandala Earrings. They’re fast to make, and a great scrap project too. You’ll want some in every color!

This post contains affiliate advertisements (click for more info). If you click one of these advertisements and then make a purchase, I may be compensated. You get the same great prices, and you will be helping to support this site!
Earlier this year, at a trade show, I met with the folks at Plaid. They showed me their brand new spray-on version of Mod Podge Ultra, and gave me a sample to try.
The earrings need to be stiffened to hold their shape, and this seemed like the perfect opportunity to try out the new Mod Podge! Scroll down to the video to see it in action.
It comes in both matte and gloss finishes. I chose gloss, but I don’t think it made much of a difference on the thread. If I was working with paper, the difference would likely have been more noticeable.
As of the time I am writing this (early February 2019), the spray-on version of Mod Podge isn’t available yet. From the product page on Amazon, it looks like it will be available in early March. In the meantime, the original liquid Mod Podge will work just as well.
This pattern is protected by copyright. Please do not distribute or share this pattern in any way other than by sharing a link to this page or to the pattern page on Ravelry. Click here for copyright information.
Mandala Earrings


Add this to your Ravelry Queue
Materials
- Size 10 crochet thread, 5-10 yds each of
- Green
- White
- Purple
- Size C / 2.75 mm crochet hook, or size needed to match gauge
- Tapestry Needle
- Mod Podge Ultra
- 2 earring hooks
- 4 jump rings (5mm)

Skill Level
Intermediate – Worked in the round, with 2 colors at once.
Size
2 inches in diameter. Size can be adjusted by using a different size hook or weight of thread/yarn.
Gauge
Use pattern as gauge swatch. Each earring should measure 2 inches in diameter. Exact gauge is not critical.
Abbreviations used
(Pattern is written in US terms)
ch = chain
sc = single crochet
dc = double crochet
ch-sp = chain space
st(s) = stitch(es)
sl st = slip stitch
Rnd = round
Instructions
(Scroll down for video tutorial)
Mandala (make 2)
With green, ch 4, join with sl st in first ch to form a ring.
Rnd 1: Ch 5 (counts as dc and ch-2), [dc, ch 2] 5 times in ring, join to 3rd ch of starting ch 5 (top of first dc). (6 dc, 6 ch-2 sps).
Rnd 2: Sl st in first ch-2 sp, ch 1, (sc, ch 2, sc) in same ch-2 sp, [ch 1, sk next dc, (sc, ch 2, sc) in next ch-2 sp] around to last dc, ch-1, sk last dc, join with sl st in first sc.
Fasten off and weave in ends.

For round 3, you will be working with both white and purple at the same time. All white stitches will be worked into ch-2 sps, and all purple stitches will be worked into ch-1 sps. Skip all stitches between the ch-sps.
When dropping the working loop, pull it up really big first, or secure it with a stitch marker, so that it won’t unravel.
Rnd 3:
Join white with sl st in any ch-2 sp, ch 7, sk next ch-1 sp, sc in next ch-2 sp (ch-7 loop made). Drop working loop to the back of your work.

Working behind the ch-7 loop, join purple with sc in the skipped ch-1 sp, ch 7, making sure the white working loop and thread are at the back, sc in next ch-1 sp. Drop working loop and thread to the back of your work.

*Pick up white loop from back of work, ch 7, making sure the purple working loop and thread are at the back, sc in next ch-2 sp. Drop working loop and thread to the back of your work.

Pick up purple loop from back of work, ch 7, making sure the white working loop and thread are at the back, sc in next ch-1 sp. Drop working loop and thread to the back of your work.

Repeat from * 3 times more.
Pick up white loop from back of work, ch 7, sl st in first white sc. Fasten off white. (6 white ch-7 loops)
Pick up purple loop from back of work, ch 7, working in front of white ch-7 loop, sl st in first purple sc. Fasten off purple. (6 purple ch-7 loops)
Weave in all ends.

Stiffening
Lay both mandalas on a protective surface that they won’t stick to, such as wax paper or a silicone sheet. I used a scrap of bubble wrap (smooth side up).
Adjust shape as desired.
Spray with Mod Podge until thoroughly wet, then flip over and spray from the other side.
Allow to dry completely, adding another coat of Mod Podge if desired.
Attaching Earring Hook
Open two jump rings by twisting gently with pliers.
Attach one jump ring to the mandala and close it. Then attach another jump ring to the first one but do not close it.
Slip the earring hook onto the same jump ring, positioning it so that the end of the hook points to the back of your work. This way when you wear the earring, the front of your work will show. Close jump ring.
Repeat for second earring.

Mandala Earrings – Video Tutorial:
I hope you enjoy making this pattern. A downloadable pdf of this pattern is also available on Ravelry, for a small fee. The fee for the pdf format is to offset the advertising revenue lost when you print or download the pattern rather than viewing it online.
Do you want the best of Stitches n Scraps delivered right to your inbox? The Stitches n Scraps email newsletter includes highlights from the blog as well as special features not available elsewhere. Don’t miss a stitch – Subscribe now!

Free Pattern – Persephone’s Meadow Keyhole Scarf
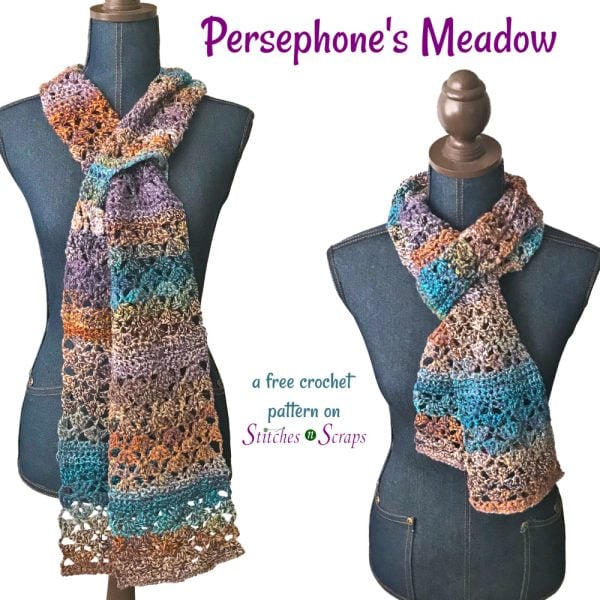
Persephone’s Meadow is the pattern that special yarn has been waiting for. You know the one, it’s been sitting at the back of your stash shelf for years because you haven’t found the right pattern to show it off yet. Now you have! Whether your favorite yarn is solid or striped, smooth or textured, this keyhole scarf design will help it to shine.

This post contains affiliate advertisements (click for more info). If you click one of these advertisements and then make a purchase, I may be compensated. You get the same great prices, and you will be helping to support this site!
The lacy stitch pattern brings out the texture of the yarn and helps a smaller amount to go further. Solid bands add structure, and draw out more concentrated areas of color. The size can easily be adjusted as well, both in length and width. This means you can modify it for a different weight of yarn if you prefer.
This pattern was designed for the 2019 Make it for Me CAL, hosted by ELK Studio. It’s a special project for me because the yarn I used is one I spun myself. Check out the other patterns, and share in the fun on Facebook!
If you’re interested in seeing the details of the spinning project, you can find it in my Ravelry notebook. It started from souvenir fiber I picked up on a trip, and is mostly merino wool with a bit of silk and tencel to make it shiny and strong. The spiral/homespun texture was actually a happy accident, from uneven tension when I was plying. I love how it turned out though!
This pattern is protected by copyright. Please do not distribute or share this pattern in any way other than by sharing a link to this page or to the pattern page on Ravelry. Click here for copyright information.
Persephone’s Meadow Keyhole Scarf


Add this to your Ravelry Queue
Materials
- 275 yds worsted weight yarn
- Size J / 6 mm crochet hook, or size needed to match gauge
- Yarn needle
Skill Level
Easy – Basic stitches in a repeating pattern.
Size
7 x 56 inches
Gauge
14 sc x 15 rows = 4 inches. Exact gauge is not critical.
Abbreviations used
(Pattern is written in US terms)
ch = chain
sc = single crochet
dc = double crochet
ch-sp = chain space
st(s) = stitch(es)
sl st = slip stitch
Instructions
Short end
Ch 23 (Multiple of 6 + 5)
Row 1: Sc in 2nd ch from hook and in each ch across. (22 sc)
Row 2: Ch 1, turn, sc in each st across. (22 sc)
Ch 3 at the beginning of a row counts as a dc in the first st.
Row 3: Ch 3, turn, [sk next 2 sts, (2 dc, ch 1, 2 dc) in next st, sk next 2 sts, dc in next st] across to last 3 sts, sk next 2 sts, 3 dc in last st. (19 dc, 3 ch-1 sps)
Rows 4-10: Ch 3, turn, [sk next 2 sts, (2 dc, ch 1, 2 dc) in next st, sk next 2 sts, dc in next ch-1 sp] across to last 3 sts, sk next 2 sts, 3 dc in last st. (19 dc, 3 ch-1 sps)
Row 11: Ch 1, turn, sc in each st and each sp across. (22 sc)
Row 12-15: Ch 1, turn, sc in each st across. (22 sc)
Rows 16-28: Repeat rows 3-15.
To make the scarf longer, add more repeats in this section, then add an equal number of extra repeats to the long end.
Keyhole
Rows 29-38: Repeat rows 3-12.
Row 39: Ch 1, turn, sc in first 5 sts, ch 12, sk next 12 sts, sc in last 5 sts. (10 sc, 12 chs)
Row 40: Ch 1, turn, sc in each st and ch across. (22 sc)
Row 41: Ch 1, turn, sc in each st across. (22 sc)

Long end
If you added repeats in the short end for extra length, add the same number of extra repeats in this section.
Rows 42-119: Repeat rows 3-15 6 times
Rows 120-129: Repeat rows 3-12.
Fasten off, weave in all ends.
I hope you enjoy making this pattern. A downloadable pdf of this pattern is also available on Ravelry, for a small fee. The fee for the pdf format is to offset the advertising revenue lost when you print or download the pattern rather than viewing it online.
Do you want the best of Stitches n Scraps delivered right to your inbox? The Stitches n Scraps email newsletter includes highlights from the blog as well as special features not available elsewhere. Don’t miss a stitch – Subscribe now!

Heart-Shaped Crochet Hot Pad – 10 Minute Make!
Add this heart-shaped hot pad to your Valentine’s Day decor. Super bulky yarn combined with a super easy pattern means it only takes 10 minutes to make!

This content is protected by copyright. See this Terms of Use / Copyright page for more information.
This post contains sponsored content and/or affiliate links. If you click an affiliate link and make a purchase, I may get a commission.
Hooked Zpagetti Yarn
I received the Zpagetti t-shirt yarn free from Hoooked at the Creativation conference in 2019. The color I used for my crochet hot pad is called Taffy Pink, but they have a whole range of pretty pinks and corals to choose from.

I learned at Creativation that Hoooked Zpagetti yarn is environmentally friendly. Textile manufacturing creates an incredible amount of waste from selvages and cuttings. Hoooked recycles this textile waste into fabulous yarn!
If you’ve never worked with t-shirt yarn before, you’re missing out. It’s soft, surprisingly stretchy, and creates a dense, squishy fabric. Because it’s so thick, it works best with simple stitches and makes large projects really fast. I haven’t tried knitting with it yet, but I think I may need to sometime soon.
Global Backyard Industries Crochet Hook
Of course, an extra-large yarn needs an extra-large hook! I got this hook from Global Backyard Industries long ago, when I did a pattern for their t-shirt yarn kits, and it worked perfectly for this crochet hot pad!
Materials
- Yarn: 100 yds Hooked Zpagetti – 95% cotton, 5% other, super bulky weight yarn (131 yds / 24.7 oz / 700 g per cone)
- Hook: Size P / 12 mm crochet hook or size needed to match gauge
- Notions:
- Scissors
- Large yarn needle
Project Level
Easy – Basic stitches, worked in the round.
Size
9 inches / 22.5 cm wide x 8.5 inches / 21.5 cm tall.
Gauge
Rnd 1 should measure approximately 4.25 inches / 10.5 cm in diameter. Exact gauge is not critical.
Abbreviations used
This pattern uses US terms.
| ch | chain |
| dc | double crochet |
| rnd | round |
| sc | single crochet |
| sl st | slip stitch |
| sp | space |
| st(s) | stitch(es) |
| tr | treble crochet |
Recommended Resources
Instructions
Ch 4, join with sl st to form a ring.
Rnd 1: Ch 1 (does not count as a st throughout), (11 dc, ch 1, sc) in ring, do not join or turn. (12 sts, 1 ch-1 sp)
Rnd 2: Ch 1, 6 dc in first dc, [2 dc in next dc, dc in next 2 dc, 2 dc in next dc], (dc, ch-1, tr, ch-1, dc) in next dc, repeat between [ ], 6 dc in next dc, skip next ch-1 sp, sl st in last sc. (26 dc, 1 tr, 2 ch-1 sps)
Rnd 3: (Ch 1, sl st) in each st and each ch-1 sp around, fasten off. (29 sl sts, 29 ch-1 sps)
Weave in ends. If you started your work with a slip knot, undo the slip knot before weaving in the end.
Share this Heart-Shaped Hot Pad on Pinterest!
Here’s an image perfect for pinning.

Rate this crochet hot-pad pattern!
I hope you enjoy this crochet hot-pad pattern. A downloadable pdf of this pattern is available on Ravelry for a small fee. The fee for the pdf format offsets the advertising revenue lost when you print or download the pattern rather than viewing it online.
Interested in using this pattern for a class or workshop? Check out my Terms of Use for usage details.
Do you want the best of Stitches n Scraps delivered right to your inbox? Don’t miss a stitch – Subscribe now!

Free Pattern – Valentine Pillow
Show your love to someone special with this soft and squishy heart. The simple heart shapes are seamed with a decorative edging, to make a Valentine pillow you’ll love to squeeze. Remember to make one for yourself too!

This post contains affiliate advertisements (click for more info). If you click one of these advertisements and then make a purchase, I may be compensated. You get the same great prices, and you will be helping to support this site!
I’m working on using up some of my stash yarn this year, so I’m delighted that this first project of the year is a stashbuster. Both the yarn and the fiber came from my stash.
I used a skein of Patons Classic Wool Merino that I’ve had for ages. The yarn was actually renamed to just Patons Classic Wool at some point, but the Rosewood colorway I used has been discontinued. They have a really pretty color now called Plum Heather which I think would be just gorgeous for this pattern!
For the stuffing, I used some Poly Fil brand fiber fill. I had originally received this fiber fill for free from Fairfield, to use for my Serrana the Mermaid design. The generous folks at Fairfield sent me so much that I have a ton left over! I may be designing quite a few more stuffed items this year to use it all up.
This pattern is protected by copyright. Please do not distribute or share this pattern in any way other than by sharing a link to this page or to the pattern page on Ravelry. Click here for copyright information.
Valentine Pillow

Add this to your Ravelry Queue
Materials
- 200 yds worsted weight yarn
- Size H / 5 mm crochet hook, or size needed to match gauge
- Yarn needle
- 2 -3 oz Original Poly-Fil fiber fill
Skill Level
Intermediate – All single crochet with some increases and decreases for shaping. Worked flat and seamed with reverse single crochet (crab stitch).
Size
12 inches x 12 inches
Gauge
14 sc x 17 rows = 4 inches. Exact gauge is not critical, but fabric should be tight enough so stuffing doesn’t show through.
Abbreviations used
(Pattern is written in US terms)
ch = chain
sc = single crochet
dec = invisible decrease (see Special Stitches)
st(s) = stitch(es)
sl st = slip stitch
Recommended Resources
- Invisible Single Crochet Decrease on Nicki’s Homemade Crafts
- Edging – Crab Stitch and Twisted SC
- Felting / Fulling
Special Stitch:
Invisible Decrease (dec): Insert hook into front loop only of both of next 2 stitches, yarn over and draw up a loop, yarn over and draw through both loops on hook.

Insert hook into front loop only of both of next 2 stitches

Yarn over and draw up a loop

Yarn over and draw through both loops on hook
This is an alternative to a single crochet 2 together (sc2tog) stitch. If you prefer, you can use the standard sc2tog instead.
Instructions
Heart (make 2)
The heart shapes are reversible, so your work has no right or wrong side until it is joined.
Bottom:
Row 1: Ch 2, sc in 2nd ch from hook (1 sc).
Row 2: Ch 1, turn, 3 sc in first st. (3 sc)
Rows 3-9: Ch 1, turn, 2 sc in first st, sc across to last st, 2 sc in last st. (17 sts)
Row 10: Ch 1, turn, sc in each st across. (17 sts)
Row 11: Ch 1, turn, 2 sc in first st, sc across to last st, 2 sc in last st. (19 sts)
Row 12-23: Repeat rows 10-11 six times more. (31 sts)
Rows 24-25: Ch 1, turn, sc in each st across (31 sts)
Row 26: Ch 1, turn, 2 sc in first st, sc across to last st, 2 sc in last st. (33 sts)
Row 27-29: Repeat rows 24-26. (35 sc)
Rows 30-32: Ch 1, turn, sc in each st across. (35 sc)
1st half of top:
Row 33: Ch 1, turn, sc in first 17 sts, leaving remaining sts unworked. (17 sc)
Row 34: Ch 1, turn, sc in each st across. (17 sc)
Row 35: Ch 1, turn, sk first st, sc across to last 2 sts, dec. (15 sc)
Rows 36-37: Ch 1, turn, sc in each st across (15 sc)
Row 38: Ch 1, turn, sk first st, sc across to last 2 sts, dec. (13 sc)
Row 39: Ch 1, turn, sc in each st across. (13 sc).
Rows 40-43: Ch 1, turn, sk first st, sc across to last 2 sts, dec. (5 sc)
Fasten off.
2nd half of top:
Working into skipped stitches from Row 32, sk first st, join yarn with a sl st in next st.
Row 33: Ch 1, sc in each st across. (17 sts)
Rows 34-43: Repeat rows 34-43 of 1st half of top.
Fasten off after first heart. Do not fasten off second heart.
Edging Round
Hold both heart pieces together, lining up the edges. Work through both layers together, going backwards. If you are right handed, this means work from left to right instead of from right to left. This is called reverse sc or crab stitch.
- Left top: Ch 1, sc in each st across top. (5 reverse sc)
- Center “valley”: Ch 1, work 11 sc evenly spaced across sides of rows to the skipped st at the center, sc in skipped st, work 11 sc evenly spaced across sides of rows to top. (23 reverse sc)
- Right top: Ch 1, sc in each st across top. (5 reverse sc)
- Right side: Ch 1, work 41 sc evenly spaced to bottom point, 3 sc in bottom point. (44 reverse sc)
- Left side: Work 41 sc evenly spaced to top, stuffing your pillow firmly as you go. Join with sl st to first st of edging. (41 reverse sc)
When made in a “feltable” wool yarn (not superwash), this project is perfect for felting. If you plan to felt your pillow, stuff it slightly less firmly, to allow for some shrinkage during the felting process. See this felting / fulling tutorial for more information.
I hope you enjoy making this pattern. A downloadable pdf of this pattern is also available on Ravelry, for a small fee. The fee for the pdf format is to offset the advertising revenue lost when you print or download the pattern rather than viewing it online.
Do you want the best of Stitches n Scraps delivered right to your inbox? The Stitches n Scraps email newsletter includes highlights from the blog as well as special features not available elsewhere. Don’t miss a stitch – Subscribe now!

Free Pattern – Simple Snowflake
With just three rounds, this simple snowflake is easy and fast to crochet, and can be made in any size yarn or thread. Make a set for your tree, for a gift, or just for decoration. It works well as an applique too!

This pattern contains affiliate advertisements (click for more info). If you click one of these advertisements and then make a purchase, I may be compensated. You get the same great prices, and you will be helping to support this site!
This pattern is protected by copyright. Please do not distribute or share this pattern in any way other than by sharing a link to this page or to the pattern page on Ravelry. Click here for copyright information.
Simple Snowflake

Add this to your Ravelry Queue
Materials
- Any size yarn or thread (yardage will vary based on size and gauge)
- Hook in a comfortable size for your yarn
- Yarn needle
- Fabric stiffener or school glue (optional)
Skill Level
Easy – basic stitches worked in the round.
Size / Gauge
Size and gauge will depend on materials used. In size 10 thread with a 2.75mm hook, mine came out to about 3 inches in diameter. In worsted weight yarn, with a 4.5mm hook, mine came out to about 5.5 inches in diameter.
Abbreviations used
(Pattern is written in US terms)
ch = chain
sc = single crochet
dc = double crochet
ch sp = chain space
st(s) = stitch(es)
sl st = slip stitch
rnd = round
Recommended Resources
- Learn to Crochet – Lesson 3 – Single Crochet
- Learn to Crochet – Lesson 4 – Double Crochet
- Learn to Crochet – Lesson 8 – Granny Square
Instructions
Snowflake
Ch 3 at the start of a round counts as a dc throughout.
Ch 6, join with sl st to form a circle.
Rnd 1: Working into the circle: ch 3, 2 dc, (ch 3, 3dc) 5 times, ch 3, join with sl st to first st (18 dc, 6 ch-3 sps)
Rnd 2: Sl st in next 2 sts, (sl st, ch 3, 2 dc, ch 3, 3 dc) in next ch-3 sp, [ch 1, sk next 3 sts, (3 dc, ch 3, 3 dc) in next ch-3 sp)] 5 times, ch 1, join with sl st to top of starting ch-3 (first dc), (36 dc, 6 ch-3 sps, 6 ch-1 sps)
Rnd 3: Sl st in next 2 sts, ch 1, [(sc, ch-3, sc, ch-7, sc, ch-3, sc) in next ch-3 sp, ch 1, sk next 3 sts, (sl st, ch 3, sl st) in next ch-1 sp, ch 1, sk next 3 sts] 6 times, join with sl st to first sc, fasten off. (24 sc, 18 ch-3 loops, 6 ch-7 loops)
Finishing
Weave in all ends. Block and stiffen as desired.
For bulkier yarns, stiffening may not be needed. In this case, wash and block as normal.
To stiffen with commercial fabric stiffener, follow package directions.
To stiffen with glue: Mix glue with a small amount of water. For cotton crochet thread I use a 1:1 ratio, but you may need more or less depending on your fiber. The more water you add, the less stiff it will be. Place snowflakes into the solution and squeeze until completely saturated, then lay flat, pin to shape, and allow to dry. You can remove the pins once the fabric stiffens enough to hold it’s shape. Use wax paper to protect your blocking surface if desired.

I hope you enjoy making this pattern. A downloadable pdf of this pattern is also available on Ravelry, for a small fee. The fee for the pdf format is to offset the advertising revenue lost when you print or download the pattern rather than viewing it online.
Do you want the best of Stitches n Scraps delivered right to your inbox? The Stitches n Scraps email newsletter includes highlights from the blog as well as special features not available elsewhere. Don’t miss a stitch – Subscribe now!


