Free Crochet Patterns – Babies and Children
Find the perfect, free crochet pattern for your next project! Browse them all, or select a category from the dropdown menu. Where will your creativity take you today?

Free Pattern – Rainbow Cake
This post contains sponsored content and affiliate links (click for more info). If you click an affiliate link and then make a purchase, I may be compensated. You get the same great prices, and you will be helping to support this site!
Fluffy, textured layers of vivid colors are separated by thin bands of white. This delicious baby blanket is as irresistible as the rainbow layer cakes that it looks like. The stitch pattern is easy and works up quickly, and best of all, it’s completely calorie free – so go ahead, dig in! It’s made in Red Heart Baby Hugs yarn, which has been tested to be free from harmful levels of over 300 substances, so smooshing your face in it is perfectly acceptable too.
Rainbow Cake
![]()
Add this to your Ravelry Queue
Materials:
- Red Heart Baby Hugs Medium yarn. 150-160 yds each of:
- #4255 Orangie (orange)
- #4201 Sunny (yellow)
- #4562 Aloe (green)
- #4825 Bluie (blue)
- #4538 Lilac (purple)
- #4909 Ladybug (red)
- #4001 Frosting (white)
- Size J (6 mm) hook or size needed to match gauge.
- Yarn or tapestry needle
Difficulty:
Easy: Repetitive stitch pattern, worked mostly into chain spaces.
Size:
About 36 inches square as written.
If you would like to adjust sizing and/or striping pattern:
- Start with a multiple of 3 chains.
- Work an even number of rows in each color.
- Edging stitches: If you’re still making a square, follow the pattern for the top and bottom edges, and work the same number of stitches for the side edges. If you’re not making a square, see this edging tutorial for tips on calculating how many stitches you will need on the side edges.
Gauge:
12.5 sc x 13 rows = 4 inches. Exact gauge is not critical.
Abbreviations used:
- ch = chain
- sc = single crochet
- hdc = half double crochet
- dc = double crochet
- st(s) = stitch(es)
- sp(s) = space(s)
- sk = skip
Recommended Resources:
Instructions:
With orange, ch 135 (multiple of 3)
Row 1 (RS): hdc in 2nd ch from hook, sk next ch, (sc, ch 1, dc) in next ch, *sk next 2 chs, (sc, ch 1, dc) in next ch, repeat from * across to last 2 chs, sk next ch, hdc in last ch. (44 sps)
Row 2: Ch 1, turn, hdc in first st, * sk next dc, (sc, ch 1, dc) in next sp, sk next sc, repeat from * across to last st, hdc in last st. (44 sps)
Rows 3-12: Repeat row 2, changing to white at end of row 12.
Row 13: With white, ch 1, turn, sc in first st, *sk next dc, 3 sc in next sp, sk next sc, repeat from * across to last st, sc in last st. (134 sc)
Row 14: Ch 1, turn, sc in each st across, changing to yellow at end of row. (134 sc)
Row 15: With yellow, ch 1, turn, hdc in first st, sk next st, (sc, ch 1, dc) in next st, *sk next 2 sts, (sc, ch 1, dc) in next st, repeat from * across to last 2 sts, sk next st, hdc in last st. (44 sps)
Rows 16-26: Repeat row 2, changing to white at end of row 26. (44 sps)
Rows 27-28: Repeat rows 13-14, changing to green at end of row 14 instead of yellow. (134 sc)
Rows 29-40: With green, repeat rows 15-26.
Rows 41-42: Repeat rows 13-14, changing to blue at end of row 14 instead of yellow. (134 sc)
Rows 43-54: With blue, repeat rows 15-26.
Rows 55-56: Repeat rows 13-14, changing to purple at end of row 14 instead of yellow. (134 sc)
Rows 57-68: With purple, repeat rows 15-26.
Rows 69-70: Repeat rows 13-14, changing to red at end of row 14 instead of yellow. (134 sc)
Rows 71-82: With red, repeat rows 15-26.
Edging:
Rnd 1 (RS):
- With white, ch 1, turn, sc in first st, *sk next dc, 3 sc in next sp, sk next sc, sk next dc, 2 sc in next sp, sk next sc, repeat from * across to last st, sc in last st. (112 sc)
- Ch 2, working in sides of rows, work 112 sc evenly spaced to bottom corner. (112 sc)
Note: This works out to 17 stitches in each color section, plus 2 stitches in each white section. - Ch 2, Working in bottom of row 1, sc in first st, sc in next sp, sk next st, *2 sc in next sp, sc in next st, sc in next sp, sc in next st, repeat from * across to last sp, 2 sc in last sp, sc in last st. (112 sc)
- Ch 2, working in sides of rows, work 112 sc evenly spaced to top corner, ch 2, join with sl st to first st. (112 sc)
Rnd 2 (RS): Do NOT turn. Ch 1, (sc in each sc across to next sp, 3 sc in sp) 4 times, join with sl st to first st, fasten off. (448 sc)
Weave in all ends.
I hope you enjoy the pattern. Thanks to HooksofLove, Melissa Carl, and luannfarmer for testing it. Also thanks to Red Heart for providing the wonderful Baby Hugs yarn!
A downloadable pdf of this pattern is also available in my Craftsy store or on Ravelry, for a small fee. The fee for the pdf format is to offset the advertising revenue lost when you print or download the pattern rather than viewing it online.
Do you want the best of Stitches ‘N’ Scraps delivered right to your inbox? The Stitches ‘N’ Scraps email newsletter includes highlights from the blog as well as special features not available elsewhere. Don’t miss a stitch – Subscribe now!

Free Pattern – Anemone
This pattern contains Sponsored content and affiliate links (click for more info). If you click one of these links and then make a purchase, I may be compensated. You get the same great prices, and you will be helping to support this site!
After making my Seahorse Teether pattern, I had quite a bit of yarn left, so I made this blanket to go with it. The design is reversible, and was inspired by pictures of “flower” anemones.
This pattern is made in Red Heart Baby Hugs yarn, which I received free from Red Heart. Baby Hugs yarn is tested to be free from harmful levels of over 300 substances!
This pattern is protected by copyright. Please do not distribute or share this pattern in any way other than by sharing a link to this page or to the pattern page on Ravelry. Click here for copyright information.
Anemone

![]()
Add this to your Ravelry Queue
Materials:
- 175-180 yds Red Heart Baby Hugs Medium – Aloe
- 300 yds Red Heart Baby Hugs Light – Peachie
- Size I / 9 (5.5 mm) hook or size needed to obtain gauge
- Yarn or Tapestry needle
Difficulty:
Intermediate – Basic stitches worked in the round. While the stitches themselves aren’t difficult, keeping track of the stitch counts and repeats requires some attention, particularly in the later rounds.
Size:
About 28 inches in diameter
Gauge:
With lighter weight yarn, 15 dc x 6.5 rows = 4 inches. After rnd 4, your circle should measure about 4 inches in diameter. Exact gauge is not critical, except that you may run out of yarn if your gauge is looser.
Abbreviations used:
- ch = chain
- sc = single crochet
- hdc = half double crochet
- dc = double crochet
- sl st = slip stitch
- st(s) = stitch(es)
- sp(s) = space(s)
- rnd = round
- WS = wrong side
- RS = right side
Recommended Resources:
Notes:
- This pattern works because one yarn is thicker than the other. If you try to do this pattern all in one weight of yarn, it will pucker.
- Join rounds where indicated, with a slip stitch into the first stitch of the round.
- Ch 3 at the beginning of a round counts as first dc.
- If you run out of yarn early, you can stop after rnd 36 without changing colors. Work rnd 37 in Aloe, and then skip to rnd 41 to finish the ruffle.
- Carrying yarn / changing colors:
- Do not cut Peachie yarn when changing colors. Instead, carry it up for the next round.
- For the Aloe yarn, you can either cut it and weave in the end each time, or try to carry it up neatly, weaving it into your chains as you chain up for each round. Remember the blanket is two sided though, so only carry the Aloe yarn if you can make it look neat on both sides.
Instructions:
Rnd 1 (RS): With Peachie, work 12 dc inside a magic circle, join. (12 sts)
OR Alternate Rnd 1: With Peachie, ch 4, 11 dc in 4th ch from hook, join. (12 sts)
Rnd 2: Ch 3, turn, dc in first st, 2 dc in each st around, join, changing to Aloe. (24 sts)
Rnd 3: With Aloe, ch 1, turn, (sc, ch 1, sk next st) around, join, changing to Peachie. (12 sts, 12 sps).
Rnd 4: With Peachie, ch 1, turn, 3 sc in each sp around. (36 sts)
Rnd 5: Ch 3, turn, dc in first 3 sts, (2 dc in next st, dc in next 2 sts) 11 times, join, changing to Aloe. (48 sts)
Rnd 6: Repeat Rnd 3. (24 sts, 24 sps)
Rnd 7: With Peachie, ch 1, turn, (2 sc in next sp, 3 sc in next sp) 12 times, join. (60 sts)
Rnd 8: Ch 3, turn, dc in first 5 sts, (2 dc in next st, dc in next 4 sts) 11 times, join, changing to Aloe. (72 sts)
Rnd 9: Repeat Rnd 3. (36 sts, 36 sps)
Rnd 10: With Peachie, ch 1, turn, (2 sc in next sp, 3 sc in next sp, 2 sc in next sp) 12 times, join. (84 sts)
Rnd 11: Ch 3, turn, dc in first 7 sts, (2 dc in next st, dc in next 6 sts) 11 times, join, changing to Aloe. (96 sts)
Rnd 12: Repeat Rnd 3. (48 sts, 48 sps)
Rnd 13: With Peachie, ch 1, turn, (2 sc in each of next 2 sps, 3 sc in next sp, 2 sc in next sp) 12 times, join. (108 sts)
Rnd 14: Ch 3, turn, dc in first 9 sts, (2 dc in next st, dc in next 8 sts) 11 times, join, changing to Aloe. (120 sts)
Rnd 15: Repeat Rnd 3. (60 sts, 60 sps)
Rnd 16: With Peachie, ch 1, turn, (2 sc in each of next 2 sps, 3 sc in next sp, 2 sc in each of next 2 sps) 12 times, join. (132 sts)
Rnd 17: Ch 3, turn, dc in first 11 sts, (2 dc in next st, dc in next 10 sts) 11 times, join, changing to Aloe. (144 sts)
Rnd 18: Repeat Rnd 3. (72 sts, 72 sps)
Rnd 19: With Peachie, ch 1, turn, (2 sc in each of next 3 sps, 3 sc in next sp, 2 sc in each of next 2 sps) 12 times, join. (156 sts)
Rnd 20: Ch 3, turn, dc in first 13 sts, (2 dc in next st, dc in next 12 sts) 11 times, join, changing to Aloe. (168 sts)
Rnd 21: Repeat Rnd 3. (84 sts, 84 sps)
Rnd 22: With Peachie, ch 1, turn, (2 sc in each of next 3 sps, 3 sc in next sp, 2 sc in each of next 3 sps) 12 times, join. (180 sts)
Rnd 23: Ch 3, turn, dc in first 15 sts, (2 dc in next st, dc in next 14 sts) 11 times, join, changing to Aloe. (192 sts)
Rnd 24: Repeat Rnd 3. (96 sts, 96 sps)
Rnd 25: With Peachie, ch 1, turn, (2 sc in each of next 4 sps, 3 sc in next sp, 2 sc in each of next 3 sps) 12 times, join. (204 sts)
Rnd 26: Ch 3, turn, dc in first 17 sts, (2 dc in next st, dc in next 16 sts) 11 times, join, changing to Aloe. (216 sts)
Rnd 27: Repeat Rnd 3. (108 sts, 108 sps)
Rnd 28: With Peachie, ch 1, turn, (2 sc in each of next 4 sps, 3 sc in next sp, 2 sc in each of next 4 sps) 12 times, join. (228 sts)
Rnd 29: Ch 3, turn, dc in first 19 sts, (2 dc in next st, dc in next 18 sts) 11 times, join, changing to Aloe. (240 sts)
Rnd 30: Repeat Rnd 3. (120 sts, 120 sps)
Rnd 31: With Peachie, ch 1, turn, (2 sc in each of next 5 sps, 3 sc in next sp, 2 sc in each of next 4 sps) 12 times, join. (252 sts)
Rnd 32: Ch 3, turn, dc in first 21 sts, (2 dc in next st, dc in next 20 sts) 11 times, join, changing to Aloe. (264 sts)
Rnd 33: Repeat Rnd 3. (132 sts, 132 sps)
Rnd 34: With Peachie, ch 1, turn, (2 sc in each of next 5 sps, 3 sc in next sp, 2 sc in each of next 5 sps) 12 times, join. (276 sts)
Rnd 35: Ch 3, turn, dc in first 23 sts, (2 dc in next st, dc in next 22 sts) 11 times, join, changing to Aloe. (288 sts)
Rnd 36: Repeat Rnd 3. (144 sts, 144 sps)
Rnd 37: With Peachie, ch 1, turn, (2 sc in each of next 6 sps, 3 sc in next sp, 2 sc in each of next 5 sps) 12 times, join. (300 sts)
Rnd 38: Ch 3, turn, dc in first 27 sts, (2 dc in next st, dc in next 24 sts) 11 times, join, changing to Aloe. Fasten off Peachie. (312 sts)
Rnd 39: With Aloe, ch 1, turn, (sc, ch 1, sk next st) around, join. (156 sts, 156 sps)
Rnd 40: Ch 1, turn, (2 sc in each of next 6 sps, 3 sc in next sp, 2 sc in each of next 6 sps) 12 times, join. (324 sts)
Rnd 41: Ch 3, turn, 2 dc in each st around. Fasten off. (648 sts)
Sew in all tails.
I hope you enjoy the pattern. Special thanks to Red Heart for providing the beautiful yarn, and to Roe Russell, OnceUponAYarn, & Kristinlovesyarn for testing the pattern!
A downloadable pdf of this pattern is also available on Ravelry, for a fee. The fee for the pdf format is to offset the advertising revenue lost when you print or download the pattern rather than viewing it online.
If you would like to receive notifications of new posts and patterns as they become available, please follow this blog. You can follow by e-mail (look at the sidebar on the right for the follow by email option), or via RSS feed, or via your WordPress.com reader: Follow Stitches ‘N’ Scraps on WordPress.com-

Seahorse Crochet Teether
This sweet seahorse crochet teether is a cuddly new friend for your baby, with a teething ring wrapped up in its tail.

This content is protected by copyright. See this Terms of Use / Copyright page for more information.
This post contains sponsored content and/or affiliate links. If you click an affiliate link and make a purchase, I may get a commission.
Red Heart Baby Hugs Yarn
This adorable seahorse teether is made in Red Heart Baby Hugs yarn, which I received free from Red Heart for this design. The pattern uses both worsted weight (medium) and dk weight (light) versions of Baby Hugs Yarn.

Just like the name suggests, this yarn has the soft texture and bright colors that babies love. Moms love that Baby Hugs is OEKO-TEX® Standard 100 Class I certified, which means it has been tested to be free from harmful levels of over 300 substances!
Make the matching blanket
If you like this pattern, be sure to check out the matching Anemone security blanket – you can make both patterns with just one skein of medium and one skein of light!
Continuous Rounds and Running Stitch Markers
Use a stitch marker to keep track of the beginning of the round. You can use a regular stitch marker, but my favorite technique is to use a piece of scrap yarn as a running stitch marker instead. Learn how in this Running Stitch Markers tutorial.

The marker spirals around the work because of the way continuous rounds gradually shift by one stitch every 2 rounds. In the instructions, the shaping also shifts to account for this. Read more about how this works in this post about Why Continuous Rounds Shift.
Materials
- Yarn:
- 55-60 yds Red Heart Baby Hugs Medium – Aloe
- 10-15 yds Red Heart Baby Hugs Light – Peachy
- Small amount of black thread or yarn for eyes.
- 55-60 yds Red Heart Baby Hugs Medium – Aloe
- 10-15 yds Red Heart Baby Hugs Light – Peachy
- Small amount of black thread or yarn for eyes.
- Hook: Size H / 8 (5 mm) hook or size needed to obtain gauge
- Notions:
- Maple teething ring
- Fiberfill / stuffing material
- Yarn or Tapestry needle
- Stitch marker or scrap yarn
Project Level
Intermediate: The stitches are easy but the shaping is more complicated. Most important thing is to keep track of the first stitch of each round.
Size
About 8 inches long when complete, not counting teething ring. Size will vary depending on your gauge and finishing (how tightly you curl the tail, etc).
Gauge
16 sc x 18 rows = 4 inches. Exact gauge is not critical. It’s best to use the smallest hook you are comfortable with for the medium yarn. Your stitches should be a bit tight, so the stuffing doesn’t come out.
Abbreviations used
This pattern uses US terms.
- ch = chain
- sc = single crochet
- hdc = half double crochet
- sc2tog = single crochet next 2 stitches together
- hdc-dec = half double crochet decrease (see special stitches)
- dc = double crochet
- sl st = slip stitch
- st(s) = stitch(es)
- sp(s) = space(s)
- rnd = round
- yo = yarn over
- WS = wrong side
- RS = right side
Special Stitches:
Half Double Crochet Decrease (hdc-dec): Yo, insert hook into next st, yo and draw up a loop (3 loops on hook). Insert hook into next st, yo and draw up a loop (4 loops on hook). Yo and pull through all 4 loops.
Picot: Ch 3, sl st in 3rd ch from hook.
Instructions
The entire body of the seahorse is worked in continuous rounds. Do NOT turn or join rounds unless specifically indicated.
Tail
Rnd 1 (RS): With Aloe, make a magic circle leaving an 8-inch tail for sewing. Ch 1, 4 sc in circle (4 sts)
OR Alternate Rnd 1: With Aloe, ch 2, 4 sc in 2nd ch from hook. (4 sts)
Rnd 2: (2 sc in next st, sc in next st) twice. (6 sts)
Rnds 3-4: Sc in next 3 sts, hdc in next 3 sts.
Rnd 5-6: Hdc in next st, sc in next 3 sts, hdc in next 2 sts.
Rnds 7-8: Hdc in next 2 sts, sc in next 3 sts, hdc in next st.
Rnds 9-10: Hdc in next 3 sts, sc in next 3 sts.
Rnds 11-12: Sc in next st, hdc in next 3 sts, sc in next 2 sts.
Rnds 13-14: Sc in next 2 sts, hdc in next 3 sts, sc in next st.
Rnd 15: Sc in next 2 sts, 2 sc in next st, hdc in next 3 sts. (7 sts)
Rnd 16: Sc in next 4 sts, hdc in next 2 sts, 2 hdc in next st. (8 sts)
Begin stuffing your seahorse and continue stuffing as you go. It should be plump, but not so stuffed that you can see the stuffing through the stitches.
Rnds 17-18: Hdc in next st, sc in next 4 sts, hdc in next 3 sts.
Rnds 19-20: Hdc in next 2 sts, sc in next 4 sts, hdc in next 2 sts.
Rnds 21-22: Hdc in next 3 sts, sc in next 4 sts, hdc in next st.
Rnds 23-24: Hdc in next 4 sts, sc in next 4 sts.
Rnds 25-26: Sc in next st, hdc in next 4 sts, sc in next 3 sts
Rnds 27-28: Sc in next 2 sts, hdc in next 4 sts, sc in next 2 sts
Rnds 29-30: Sc in next 3 sts, hdc in next 4 sts, sc in next st.
Body
Rnd 31: [2 sc in next st, sc in next st] twice, sc in next 4 sts. (10 sts)
Rnd 32: [Sc in next st, 2 sc in next st] twice, sc in next 6 sts. (12 sts)
Rnd 33: Sc in next 2 sts, 2 sc in next st, sc in next 3 sts, 2 sc in next st, sc in next 5 sts. (14 sc)
Rnd 34: [Sc in next 3 sts, 2 sc in next st] twice, sc in next 6 sts. (16 sts)
Rnd 35: Sc in next 4 sts, [2 sc in next st, sc in next 5 sts] twice. (18 sts)
Rnd 36: [Sc in next 5 sts, 2 sc in next st] twice, sc in next 6 sts. (20 sts)
Rnds 37-38: Sc in next 6 sts, hdc in next 9 sts, sc in next 5 sts.
Rnds 39-40: Sc in each st around
Rnd 41: sc in next 8 sts, sc2tog, sc in next 5 sts, sc2tog, sc in next 3 sts. (18 sts)
Rnd 42: Sc in each st around
Rnd 43: Sc in next 8 sts, sc2tog, sc in next 5 sts, sc2tog, sc in next st. (16 sts)
Rnd 44: Sc in each st around
Rnd 45: Sc in next 9 sts, sc2tog, sc in next 3 sts, sc2tog. (14 sts)
Rnd 46: Sc in each st around
Neck
Rnd 47: Sc2tog, hdc in next 9 sts, sc2tog, sc in next st. (12 sts)
Rnd 48: Sc in next st, hdc in next 9 sts, sc in next 2 sts.
Rnd 49: Sc in next st, sc2tog, hdc in next 7 sts, sc2tog. (10 sts)
Rnd 50: Sc in next 2 sts, hdc in next 7 sts, sc in next st.
Rnds 51-52: Sc in next 4 sts, hdc in next 5 sts, sc in next st.
Rnds 53-54: Sc in next 5 sts, hdc in next 5 sts.
Head
Rnd 55: Hdc in next st, [sc in next st, 2 sc in next st] twice, sc in next st, hdc in next 4 sts. (12 sts).
Rnd 56: Hdc in next st, sc in next 2 sts, 2 sc in next st, sc in next st, 2 sc in next st, sc in next 2 sts, hdc in next 4 sts. (14 sts)
Rnd 57: Hdc in next 2 sts, sc in next 2 sts, 2sc in next st, sc in next 3 sts, 2 sc in next st, sc in next 2 sts, hdc in next 3 sts. (16 sts)
Rnd 58: Hdc in next 3 sts, sc in next 9 sts, hdc in next 4 sts.
Rnds 59-60: Hdc in next 5 sts, sc in next 7 sts, hdc in next 4 sts.
Rnd 61: Hdc in next st, hdc-dec, hdc in next 2 sts, sc in next 7 sts, hdc in next 2 sts, hdc-dec (14 sts).
Rnd 62: Hdc in next st, hdc-dec, hdc in next st, sc in next 7 sts, hdc in next st, hdc-dec. (12 sts).
Remember to continue stuffing as you go – head gets very small at the end and will be harder to stuff.
Rnd 63: Hdc in next st, hdc-dec, sc in next 7 sts, hdc-dec. (10 sts)
Rnd 64: Hdc in next st, hdc-dec, sc in next 5 sts, hdc-dec. (8 sts)
Rnd 65: Hdc in next 3 sts, sc in next 5 sts.
Rnd 66: Sc in each st around.
Rnd 67: Sc2tog, sc in next 4 sts, sc2tog. (6 sts)
Rnd 68: Sc in each st around.
Rnd 69: [Sc in next st, sc2tog] twice. (4 sts)
Rnd 70: Sc in each st around.
Rnd 71: [2 sc in next st, sc in next st] twice. (6 sts)
Rnd 72: Sc in each st around.
Rnd 73: Sc2tog 3 times, fasten off.
Finish stuffing and weave in any ends except for the long starting tail.
Eye and neck pictures show fin already attached – please ignore that, it will be done later.
Make eye: With black yarn or thread, sew through both sides of head at the same time where you want the eye to be. Pull snuggly so the eye sinks in a little. When you’re happy with it, sew in the ends.

Secure neck: If you leave the neck as-is, the head will be able to move up and down a bit more. If you prefer a more secure / sharper crease in the neck as shown, use a scrap of Aloe to sew it in place. Fold the head down against the neck, and sew them together at the crease.

Fin
Foundation chain: With Peachy, ch 46
Row 1: Turn, sl st in 2nd ch from hook, sc in next ch, (picot, sc in next 3 chs) 10 times, sc in next 4 chs, leaving remaining chains unworked.
Row 2: Turn, sk first 2 sc, [ch 1, dc] 5 times in next sc, ch 1, sk next 2 sc, sl st in next sc.
Row 3: Turn, sk sl st, sc in first ch-1 sp, [picot, sc in next dc, sc in next ch-1 sp] 5 times; continuing in unworked chs from foundation chain, sc in next ch, picot, [sc in next 3 chs, picot] twice, sc in next ch, sl st in last ch.
Fasten off, leaving an 18-inch tail for sewing.
Attach Fin
You may find it helpful to pin or baste fin in place before sewing. Using long tail, Sew through the base of the fin from front to back, then through the seahorse underneath, from back to front. Continued in this manner to attach entire length of the fin. If desired, repeat seam in opposite direction to make it extra secure. Weave in fin ends.

Attach Teething Ring
Slide the teething ring onto the tail, curl the tail up, and sew it securely in place using the end.

Weave in any remaining ends.
I hope you enjoy this Seahorse Crochet Teether pattern. Special thanks to Red Heart for providing the beautiful yarn, and to MixedKreations, dollyBambas, DalColloLungo, wilmaelee, and asdlane for testing the pattern!
A downloadable pdf of this pattern is available on Ravelry for a small fee. The fee for the pdf format offsets the advertising revenue lost when you print or download the pattern rather than viewing it online.
Do you want the best of Stitches n Scraps delivered right to your inbox? Don’t miss a stitch – Subscribe now!

Free Pattern – Breezy Baby Tank
This simple tank top is a breeze to make, and light and airy to wear too – perfect for hot summer weather! Buttoned straps make it easy to put on, and can be made longer or shorter if needed, for just the right fit. It’s designed in a linen blend, but could be made in a cotton or bamboo too.
In this sample, I used Plymouth Yarns Linen Concerto in Aqua for the main color. For the edging I used a different linen yarn which is now discontinued. Linen Concerto also comes in a Grape colorway, which would be a great option for the edging.
This pattern is protected by copyright. Please do not distribute or share this pattern in any way other than by sharing a link to this page or to the pattern page on Ravelry. Click here for copyright information.
This pattern contains affiliate links (click for more info). If you click one of these links and then make a purchase, I may be compensated. You get the same great prices, and you will be helping to support this site!
Breezy Baby Tank

![]()
Add this to your Ravelry Queue
Materials:
- Worsted weight yarn, preferably a soft linen or cotton blend.
- 80-100 yds main color (MC)
- 20-25 yds accent color (AC)
- Size H / 8 (5 mm) hook or size needed to obtain gauge
- Yarn or Tapestry needle
- Stitch marker
- Two 1/2 inch buttons
Difficulty:
Easy – mostly sc and dc, some shaping (increases and decreases). Some working in the round.
Sizes:
Pattern is written for 6 months, with changes for 12 months shown in [ ]
Gauge:
15 sc x 16 rows = 4 inches. Gauge is important for a good fit. Take time to check your gauge.
Abbreviations used:
- ch = chain
- sc = single crochet
- fsc = foundation single crochet
- sc2tog = single crochet 2 stitches together
- dc = double crochet
- sl st = slip stitch
- st(s) = stitch(es)
- sp(s) = space(s)
- rnd = round
- MC = main color
- AC = accent color
- WS = wrong side
- RS = right side
Recommended Resources:
- Foundation Singe Crochet (fsc) by Moogly
- How to Single Crochet 2 Together (sc2tog) by Fiber Flux
- Invisible Join by Look What I Made
Notes:
- Join rounds as indicated with slip stitch in first st of round, unless otherwise stated.
- Ch 3 at beginning of round counts as first double crochet
- Ch 1 at the beginning of each row (turning ch) does not count as a stitch or a space.
Instructions:
Body:
Rnd 1 (WS): With MC, work 78 [82]) fsc, join (78 [82] sts)
OR Alternate Rnd 1: With MC, ch 79 [83], sc in 2nd ch from hook and in each ch across, join. (78 [82] sts)
Rnd 2: Ch 3, turn, (ch 1, sk next st, dc in next st) around to last st, ch 1, sk last st, join. (39 [41] dc, 39 [41] sps)
Rnd 3: Ch 1, turn, sk first st, (2 sc in next sp, sk next st) around, join. (78 [82] sts)
Rnds 4-6 [7]: Ch 3, turn, dc in next st and in each st around, join.
Rnd 7 [8]: Ch 1, turn, sc in each st around, join.
Rnd 8 [9]: Repeat Rnd 2
Rnd 9 [10]: Repeat Rnd 3, placing a marker in 75th (3rd) stitch of round. Fasten off.
Front:
Continuing from rnd 9 [10] of body, turn, sk first 20 sts, join MC in next st.
NOTE: Ch 1 at the beginning of each row (turning ch) does not count as a sp.
Row 1 (RS [WS]): Ch 1, sc2tog, (ch 1, sk next st, sc in next st) 17 [18] times, ch 1, sk next st, sc2tog (19 [20] sts, 18 [19] sps)
Row 2: Ch 1, turn, sk first st, sc in first sp, (ch 1, sk next st, sc in next sp) across to last sp, sc2tog in last sp and last st. (18 [19] sts, 17 [18] sps)
Row 3: Ch 1, turn, sc in first st, (sc in next sp, ch 1, sk next st) across to last sp, sc in last sp, sc in last st. (19 [20] sc, 16 [17] sps).
Row 4: Ch 1, turn, sc in first st, (ch 1, sk next st, sc in next sp) across to last 2 sts, ch 1, sk next st, sc in last st. (18 [19] sts, 17 [18] sps).
Rows 5-16 [19]: Repeat rows 2-4, four [five] more times. (14 sc, 13 sps at end of row 19).
6 months only – Row 17: Repeat row 2. (13 sc, 12 sps)
Both sizes – Fasten off.
Straps:
With WS facing, join MC in marked stitch on back.
Back
Row 1 (WS): Ch 1, sc in next 5 sts. (5 sc)
Note: Strap should be centered at the back, with 17 [18] unworked stitches on each side.
Rows 2-6: Ch 3, turn, dc in next 4 sts. (5 dc)
Row 7: Ch 3, turn, dc in next st, 2 dc in next st, dc in next 2 sts (6 dc)
Now we will split for left and right straps:
Right strap
Row 8r (RS): Ch 3, turn, dc in same st, dc in next 2 sts, leaving last 3 sts unworked. (4 dc)
Rows 9r-16r: Ch 3, turn, dc in next 3 sts (4 dc)
Note: At this point, strap is about 1.25″ shorter than it will be when finished. If you have the child available, this is a good time to try it on for size. The strap should comfortably reach the top of the front – the extra 1.25 inches will be overlapping for the button. You can adjust the strap size if needed at this point, by adding more rows (repeat row 9), or ripping back a row or two. It does not matter if you end up on a right side or wrong side row.
Row 17r: Ch 1, turn, sc in each st across (4 sc)
Row 18r: Ch 1, turn, sc2tog, ch 2 (buttonhole), sc2tog (2 sts, 1 sp)
Row 19r: Ch 1, turn, sc in first st, 2 sc in sp, sc in last st (4 sc)
Row 20r: Ch 1, turn, sc in each st across, fasten off. (4 sc)
Left strap
With right side facing, join MC in first unworked st from row 7 of strap.
Row 8L (RS): Ch 3, dc in next st, 2 dc in next st (4 dc)
Rows 9L – 20L: Work as for rows 9r-20r of right strap
Note: If you changed the number of rows on the right strap, be sure to make the same changes for the left strap. If you do make any changes, it would be a good idea to try it on the child again before starting the edging.
Top / Straps Edging:
With RS facing, join AC in first unworked stitch on back, after strap (see picture)
- Sc in the 17 [18] unworked sts from back (17 [18] sts)
- Working in sides of rows, work 15 [17] sc evenly spaced along edge of front, up to top corner (15 [17] sc)
- Working across top of front, 3 sc in first st, (sc in next sp, sc in next st) across to last sp, sc in last sp, 3 sc in last st. (29 [31] sts)
- Working in sides of rows, work 15 [17] sc evenly spaced along edge of front. (15 [17] sc)
- Sc in each of the remaining 17 [18] unworked sts from back (17 [18] sc)
- Working in sides of rows, work 35 sc up side of right strap, to top corner (35 sc)
- Working across top of right strap, 3 sc in first st, sc in next 2 sts, 3 sc in next st (8 sc)
- Working in sides of rows, work 23 sc down the side of the right strap to the center where the straps split, then work 23 sc up the side of the left strap, to top corner. (46 sc)
- Working across top of left strap, 3 sc in first st, sc in next 2 sts, 3 sc in next st. (8 sc)
- Working in sides of rows, work 35 sc down side of left strap. Join with sl st to beginning of edging. Fasten off. (35 sc)
Note: for a more seamless final join on your edging, try the invisible join technique instead.
Bottom Edging:
With RS facing, and working into the bottom of the foundation chain, join AC in any stitch around bottom, sc in each st around, join, fasten off. (78 [82] sts)
Note: for a more seamless final join on your edging, try the invisible join technique instead.
Finishing:
- Sew buttons to front. If you have the child available, you may want to try it on at this point to find the best placement for the buttons. Otherwise you can use the picture as a guide.
- Weave in all ends
I hope you enjoy the pattern. Special thanks to Kyla Marie of Keep Me in Stitchez, and wilmalee for testing it!
A downloadable pdf of this pattern is also available in my Craftsy store or on Ravelry, for a $1 fee. The fee for the pdf format is to offset the advertising revenue lost when you print or download the pattern rather than viewing it online.
If you would like to receive notifications of new posts and patterns as they become available, please follow this blog. You can follow by e-mail (look at the sidebar on the right for the follow by email option), or via RSS feed, or via your WordPress.com reader: Follow Stitches ‘N’ Scraps on WordPress.com-

Free Pattern – Cera the Triceratops Bib
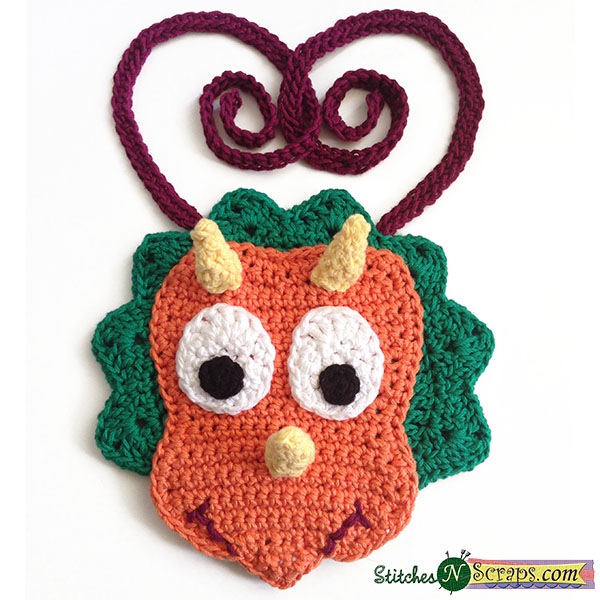
Meet Cera, the friendly triceratops bib, who is much more than just cute! With 3 soft layers of brightly colored, cotton / acrylic yarn, she’s sure to add some fun to mealtimes, while helping to keep baby’s clothes clean.
The sample is shown in mostly Cascade Avalon yarn (I made the eyes and horns with other scraps from my stash). I’ve used this yarn for a few projects now and I love it It’s very soft and smooth, and it comes in lots of fun colors too.
This pattern is protected by copyright. Please do not distribute or share this pattern in any way other than by sharing a link to this page or to the pattern page on Ravelry. Click here for copyright information.
This pattern contains affiliate links (click for more info). If you click one of these links and then make a purchase, I may be compensated. You get the same great prices, and you will be helping to support this site!
Cera the Triceratops Bib

![]()
Add this to your Ravelry Queue
Materials:
- Cascade Avalon worsted weight, cotton/acrylic yarn
- 100 yds #14 Golf Green (green)
- 50 yds #09 Bird of Paradise (orange)
- 10-20 yds each of #01 White, #11 Mellow Yellow (yellow), and #27 Raspberry (red)
- 5 yds of #03 Pirate Black (black)
- Size H / 8 (5 mm) hook or size needed to obtain gauge
- Yarn or Tapestry needle
Difficulty:
Intermediate – Lots of shaping (increases, decreases). Several small pieces that need to be assembled.
Sizes:
About 8 inches across.
Gauge:
13 dc x 8 rows = 4 inches. Gauge is not critical for this project. Rnds 1-3 of spikes should measure about 3.5 inches in diameter.
Abbreviations used:
- ch = chain
- sc = single crochet
- sc2tog = single crochet 2 stitches together
- fsc = foundation single crochet
- hdc = half double crochet
- dc = double crochet
- tr = treble crochet
- sl st = slip stitch
- st(s) = stitch(es)
- sp(s) = space(s)
- rnd = round
- yo = yarn over
- WS = wrong side
- RS = right side
Notes:
- Join rounds as indicated with slip stitch in first st of round, unless otherwise stated.
- Ch 3 at beginning of round counts as first double crochet.
- If you leave long tails, you can use them to sew pieces together.
- To stuff the horns, I cut up some small pieces of the same yellow yarn and used those instead of normal stuffing.
Recommended Resources:
- The Magic Circle by Moogly
- How to Single Crochet 2 Together (sc2tog) by Fiber Flux
- Extending a Row with Foundation Single Crochet (fsc) by Moogly
Instructions:
Frill: (Make 2)
Rnd 1 [RS]: Make a magic ring, ch 3 (counts as dc now and throughout), 11 dc in ring, pull ring closed, join. (12 sts)
OR Alternate Rnd 1: Ch 4 (counts as dc and ch), 11 dc in 4th ch from hook, join. (12 sts)
Rnd 2: Ch 3, turn, dc in first st, 2 dc in each st around, join. (24 sts)
Rnd 3: Ch 3, turn, dc in first st, (dc in next st, 2 dc in next st) 11 times, dc in last st, join. (36 sts)
Note: Circle should now measure about 3.5 inches in diameter.
Rnd 4: Ch 3, turn, dc in first st, (dc in next 2 sts, 2 dc in next st) 11 times, dc in last 2 sts, join. (48 sts)
Rnd 5: Ch 3, turn, dc in first st, (dc in next 3 sts, 2 dc in next st) 11 times, dc in last 3 sts, join. (60 sts)
Rnd 6: Ch 1, turn, sc in first 7 sts, 2 sc in next st, sc in next 2 sts, {sc in next st, hdc in next st, (dc, ch 1, dc) in next st, hdc in next st, sc in next st} 8 times, sc in next 7 sts, 2 sc in next st, sc in last 2 sts, join. (70 sts, 8 ch sps)
Rnd 7: Ch 1, turn, sc in first 6 sts, 2 sc in next st, sc in next 5 sts, {hdc in next st, dc in next st, (dc, ch 1, tr, ch 1, dc) in next ch sp, dc in next st, hdc in next st, sc2tog in next 2 sts} 7 times, hdc in next st, dc in next st, (dc, ch 1, tr, ch 1, dc) in next ch sp, dc in next st, hdc in next st, sc in next 6 sts, 2 sc in next st, sc in last 5 sts. Fasten off. (89 sts, 16 ch sps)
Ties: (Make 2)
With red, ch 76. Working in back bump of chain, sc in 2nd ch from hook and in each ch across, (75 sc)
Face:
Row 1 (RS): With orange, ch 2, sc in 2nd ch from hook. (1 st)
Row 2: Ch 1, turn, (hdc, sc, hdc) in first st. (3 sts)
Row 3: Ch 1, turn, (hdc, sc) in first st, sc in next st, (sc, hdc) in last st. (5 sts)
Row 4: Ch 1, turn, (hdc, sc) in first st, sc in next 3 sts, (sc, hdc) in last st. (7 sts).
Row 5: Ch 4, turn, sc in 2nd ch from hook, sc in next 2 chs, sc in next 7 sts, 3 fsc. (13 sts).
Rows 6-8: Ch 1, turn, (hdc, sc) in first st, sc across to last st, (sc, hdc) in last st. (19 sts on row 8)
Row 9-11: Ch 1, turn, sc in each st across.
Row 12: Ch 1, turn, sc2tog, sc in each st across, sc2tog. (17 sts)
Row 13: Ch 1, turn, sc in each st across
Row 14: Repeat row 12. (15 sts)
Rows 15-16: Repeat row 13.
Row 17: Ch 1, turn, (hdc, sc) in first st, sc across to last st, (sc, hdc) in last st. (17 sts).
Rows 18-20: Repeat row 13.
Row 21: Repeat row 17 (19 sts)
Row 22-26: Repeat row 13.
Row 27: Ch 1, turn, sc2tog, sc in next st, hdc in next st, dc in next 2 sts, hdc in next st, sc in next 2 sts, sl st in next st, sc in next 2 sts, hdc in next st, dc in next 2 sts, hdc in next st, sc in next st, sc2tog. (16 sts, 1 sl st)
Row 28: Ch 1, sc2tog, hdc in next 4 sts, sc in next 2 sts, sk next sl st, sc in next 2 sts, hdc in next 4 sts, sc2tog. (14 sts).
Edging Rnd:
- Ch 1, turn, sc in each st across top of head (14 sts)
- Working in sides of rows, work 30 sc evenly spaced down to row 1 (point at bottom of face)
- 3 sc in bottom of row 1
- Working in sides of rows, work 30 sc evenly spaced up to Row 28 (starting point), join, fasten off.
Eyes: (Make 2)
White:
Rnd 1 [RS]: With white, make a magic ring, ch 1, 6 sc in ring, pull ring closed, join. (6 sts)
OR Alternate Rnd 1: Ch 2, 6 sc in 2nd ch from hook, join. (6 sts)
Rnd 2: Ch 1, turn, 2 sc in each st around, join. (12 sts)
Rnd 3: Ch 1, turn, sc in same st, 2 sc in next st, sc in next st, 2 sc in next st, hdc in next st, 2 dc in each of next 2 sts, hdc in next st, (2 sc in next st, sc in next st) twice, join, fasten off. (18 sts)
Pupil:
Rnd 1: With black, work as for Rnd 1 of whites, fasten off.
Sew pupil to white, weave in black ends.
Horns: (Make 3)
With yellow, ch 7.
Rnd 1: Sc in 2nd ch from hook and in each ch across, join to form a circle. (6 sc)
Note: This will leave a small gap at the bottom, but you can sew that closed later.
Rnd 2: Ch 1, sc in each st around, join.
Rnd 3: Ch 1, (sc2tog, sc in next st) twice, join. (4 sts)
Rnd 4: Repeat Rnd 2.
Rnd 5: Ch 1, sc2tog twice, join. (2 sts)
Rnd 6: Ch 1, sc through both stitches at once, fasten off.
Assembly:
Using picture as a guide:
- Sew eyes to face
- Stuff horns lightly and sew in place onto face
- With red, sew mouth. I used a running stitch and went over each stitch twice to double the thickness.
- Weave in all ends from facial features.
- Sew ties onto wrong side of one frill piece
- Sew face onto right side of same frill piece.
- Weave in ends.
- Weave in the beginning (center) tail on the second frill piece.
- Place second frill piece on to the back of the first frill piece, with wrong sides together and lining up the edges. This will cover up all the messy seams from the face and ties. Sew around the entire edge to join – be careful not to sew through the face when working at the bottom edge.
- Weave in any remaining ends.
I hope you enjoy the pattern. Special thanks to wilmalee, Aurora from Dragonflymomof2, Heartscar28 & Gaelle from La laine de l’ogre for testing it!
A downloadable pdf of this pattern is also available in my Craftsy store or on Ravelry, for a $1 fee. The fee for the pdf format is to offset the advertising revenue lost when you print or download the pattern rather than viewing it online.
If you would like to receive notifications of new posts and patterns as they become available, please follow this blog. You can follow by e-mail (look at the sidebar on the right for the follow by email option), or via RSS feed, or via your WordPress.com reader: Follow Stitches ‘N’ Scraps on WordPress.com-

Free Pattern – Round the Mulberry Bush
Rainbow colors go round and round, punctuated by lightly textured, grey stripes. With a cotton/acrylic blend in vivid colors, this simple hat is just right for summer. It uses small amounts of several different colors, so is a great stashbuster project too.
Here’s a fun fact: despite the popular nursery rhyme, mulberries actually grow on trees, not bushes!
This pattern is protected by copyright. Please do not distribute or share this pattern in any way other than by sharing a link to this page or to the pattern page on Ravelry. Click here for copyright information.
This pattern contains affiliate links (click for more info). If you click one of these links and then make a purchase, I may be compensated. You get the same great prices, and you will be helping to support this site!
Round the Mulberry Bush

![]()
Add this to your Ravelry Queue
Materials:
- Cascade Avalon worsted weight, cotton/acrylic yarn
- 30-40 yds #27 Raspberry (red)
- 25-35 yds #20 Heather (grey)
- 10-20 yds #10 Artisan’s Gold (gold)
- 10-20 yds #18 Turkish Sea (blue)
- 10-20 yds #09 Bird of Paradise (orange)
- 30-40 yds #14 Golf Green (green)
- Size H / 8 (5 mm) hook or size needed to obtain gauge
- Size G / 6 (4 mm) hook or 1 size smaller than larger hook
- Yarn or Tapestry needle
- Locking Stitch markers
Difficulty:
Easy – worked in the round, with some stitches worked into back or front loop only.
Sizes:
Pattern is written for 6-12 months, with changes for 18-24 months & 3-5 years in [ ].
- Circumference: 16 inches [18 inches, 20 inches] (note, this should be 1-2 inches smaller than the actual head measurement)
- Height: 6.5 inches [7 inches, 7.5 inches]
Gauge:
13 dc x 8 rows = 4 inches, with larger hook. Gauge is important for a good fit. Take time to check gauge.
Abbreviations used:
- ch = chain
- sc = single crochet
- hdc = half double crochet
- dc = double crochet
- bpdc = back post double crochet
- fpdc = front post double crochet
- sl st = slip stitch
- st(s) = stitch(es)
- sp(s) = space(s)
- rnd = round
- WS = wrong side
- RS = right side
Notes:
- Join rounds as indicated with slip stitch in first st of round, unless otherwise stated.
- Ch 3 at beginning of round counts as first double crochet.
Recommended Resources:
- Front Loop Only (flo) and Back Loop Only (blo) by Moogly
- Front and Back Post Stitch Crochet by Jessie at Home
Instructions:
Top Circle:
Rnd 1 (WS [WS, RS]): With red, work 12 dc in a magic ring and pull ring closed, join. (12 sts)
OR – alternate Rnd 1 (WS [WS, RS]: With red, ch 4, 11 dc in 4th ch from hook, join. (12 sts)
Rnd 2: Ch 3, turn, dc in same st, 2 dc in each st around, join. (24 sts)
Rnd 3: Ch 3, turn, (2 dc in next st, dc in next st) 11 times, 2 dc in last st, join (36 sts)
Rnd 4: Ch 3, turn, (2 dc in next st, dc in next 2 sts) 11 times, 2 dc in next st, dc in last st, join (48 sts).
Size 6-12 months only:
Rnd 5: Ch 1, turn, sc in first st, (2 sc in next st, sc in next 7 sts) 5 times, 2 sc in next st, sc in last 6 sts, join, changing to grey. (54 sts)
Size 18-24 months only:
Rnd 5: Ch 3, turn, (2 dc in next st, dc in next 3 sts) 11 times, 2 dc in next st, dc in last 2 sts, join, changing to grey. (60 sts)
Size 3-5 yrs only:
Rnd 5: Ch 3, turn, (2 dc in next st, dc in next 3 sts) 11 times, 2 dc in next st, dc in last 2 sts, join, changing to grey. (60 sts)
Rnd 6: Ch 1, turn, sc in first st, (2 sc in next st, sc in next 9 sts) 5 times, 2 sc in next st, sc in last 8 sts, join, changing to grey. (66 sts)
Stripes:
Rnd 1 (RS): With grey, ch 1, turn, hdc in first st and in each st around, join in back loop only of first st, changing to gold. (54 [60, 66] sts)
Rnd 2: With gold, Ch 3, turn, dc in front loop only of next st and of each st around, join, changing to grey.
Rnd 3: Repeat rnd 1, changing to blue at the end instead of gold
Rnd 4: With blue, repeat rnd 2
Rnd 5: Repeat rnd 1, changing to orange at the end instead of gold
Rnd 6: With orange, repeat rnd 2
Rnd 7: Repeat Rnd 1, changing to green at the end instead of gold
Rnd 8: With green, ch 1, turn, sc in each st around, join.
Ribbing:
With smaller hook:
Rnd 1 (RS): With green, ch 3, turn, dc in next st and in each st around, join.
Rnds 2-3 [2-4, 2-5]: Ch 2 (counts as bpdc), do not turn, (fpdc around next st, bpdc around next st) around to last st, fpdc around last st, join.
Fasten off, weave in all ends.
I hope you enjoy the pattern. Special thanks to JStockert & MixedKreations for testing it!
A downloadable pdf of this pattern is also available on Ravelry, for a fee. The fee for the pdf format is to offset the advertising revenue lost when you print or download the pattern rather than viewing it online.
If you would like to receive notifications of new posts and patterns as they become available, please follow this blog. You can follow by e-mail (look at the sidebar on the right for the follow by email option), or via RSS feed, or via your WordPress.com reader: Follow Stitches ‘N’ Scraps on WordPress.com–

Free Pattern – Rainbow Ripple Wrap Dress
A wrap style front creates a double layer across the chest, giving this dress a little added warmth for chilly spring weather. It also allows the top of the dress to stretch and move – perfect for active toddlers!
This pattern works well in one color changing and one solid yarn, or in 2 solid colors. It’s available in sizes 2T, 3T, and 4T, and is pictured here in size 2T.
This pattern is protected by copyright. Please do not distribute or share this pattern in any way other than by sharing a link to this page or to the pattern page on Ravelry. Click here for copyright information.
This pattern contains affiliate links (click for more info). If you click one of these links and then make a purchase, I may be compensated. You get the same great prices, and you will be helping to support this site!
Rainbow Ripple Wrap Dress
Add this to your Ravelry Queue
Materials:
- Worsted weight yarn
- 250-300 yds Variegated (A)
- 75-100 yds Solid (B)
- Size I / 9 (5.5 mm) hook or size needed to obtain gauge
- Yarn or tapestry needle
- Locking stitch markers or safety pins
Difficulty:
Intermediate – Increasing, decreasing, working along sides of rows, seaming, reverse single crochet (crab stitch).
Sizes:
2T, 3T & 4T. Pattern is written for 2T, with changes for larger sizes in parentheses.
Gauge:
12 sc x 13 rows = 4″. Gauge is important to ensure a good fit – take the time to check your gauge!
Abbreviations used:
- ch = chain
- sc = single crochet
- dc = double crochet
- tr = treble crochet
- YO = yarn over
- sc dec = single crochet 2 stitches together
- dc dec = double crochet 2 stitches together
- dbl dc dec = double dc decrease (See special stitch)
- sl st = slip stitch
- st(s) = stitch(es)
- sp(s) = space(s)
- RS = right side
- WS = wrong side
Special Stitch:
Double dc decrease (dbl dc dec): Double decrease worked over 3 sts: YO, draw up a loop in next st, YO and pull through 2 loops on hook, YO, draw up a loop in each of next 2 sts, [YO and pull through 2 loops on hook] twice, YO and pull through all 3 loops on hook. View full tutorial here.

Recommended Resources:
Note:
Ch 3 at beginning of rows counts as dc throughout. Ch 1 or ch 2 at the beginning of any row does NOT count as a stitch.
Instructions:
Back:
With A, Ch 33 [35, 37].
Row 1 (RS): Sc in 2nd ch from hook and in each ch across, turn. (32 [34, 36] sc). Mark this row as right side.
Row 2: Ch 1, sc in each st across, turn.
Row 3: Ch 3, dc in 2nd st and in each st across, turn.
Rows 4-5: Repeat row 2
Rows 6-8 [8, 11]: Repeat rows 3-5 once [once, twice] more
Size 2T only:
Row 9: Repeat row 3
Rows 10-11: Sl st in first st, ch 1, sc dec, sc across to last 3 stitches, sc dec, skip last st, turn (24 sts, ignoring sl st)
Rows 12-15: Repeat rows 3-5, then repeat row 3 once more.
Row 16: Ch 1, sc in first 8 sts, place stitch marker in last st worked (8th st of row), sc across, turn.
Right Strap:
Row 17(R): Ch 1, sc in first 6 sts, sc dec, turn, leaving remaining 16 sts unworked (7sc)
Row 18(R): Ch 2 (does NOT count as a st), sk first st, dc across, turn (6 sts)
Row 19(R): Ch 1, sc in first 4 sts, sc dec, turn (5 sts)
Row 20(R): Ch 1, sc across, fasten off.
Left Strap:
Row 17(L): With RS facing, Join A with sl st in marked st on row 16. Ch 1, sc dec, sc across, turn (7 sts)
Row 18(L): Ch 3, dc in 2nd st and in next 3 sts, dc dec, turn (6 sts)
Row 19(L): Ch 1, sc dec, sc in next 4 sts, turn (5 sts)
Row 20(L): Ch 1, sc across, fasten off.
Size 3T only:
Rows 9-10: Repeat rows 3 & 4
Row 11: Sl st in first st, ch 1, sc dec, sc across to last 3 stitches, sc dec, skip last st, turn (30 sts, ignoring sl st)
Row 12: Ch 2 (does NOT count as a st), sk first st, dc dec, dc across to last 3 sts, dbl dc dec, turn. (26 sts)
Row 13: Repeat row 2
Rows 14-16: Repeat rows 2-4.
Row 17: Ch 1, sc in first 8 sts, place stitch marker in last st worked (8th st of row), sc across, turn.
Left Strap:
Row 18(L): Ch 3, dc in next 5 sts, dc dec, turn, leaving remaining 18 sts unworked (7 sts)
Row 19(L): Ch 1, sc dec, sc in next 5 sts, turn (6 sts)
Row 20(L): Ch 1, sc across, turn
Row 21(L): Ch 3, dc in 2nd st and in each st across, fasten off.
Right Strap:
Row 18(R): With WS facing, join A with sl st in marked st on row 17. Ch 2 (does not count as a st), skip first st, dc across, turn (7 sts)
Row 19(R): Ch 1, sc in first 5 sts, sc dec, turn (6sts)
Row 20(R): Ch 1, sc across, turn
Row 21(R): Ch 3, dc in 2nd st and in each st across, fasten off.
Size 4T only:
Row 12: Ch 2 (does NOT count as a st), sk first st, dc dec, dc across to last 3 sts, dbl dc dec, turn. (32 sts)
Row 13: Sl st in first st, ch 1, sc dec, sc across to last 3 stitches, sc dec, skip last st, turn (28 sts, not counting sl st)
Rows 14 – 18: Repeat rows 2-6
Row 19: Ch 1, sc in first 9 sts, place stitch marker in last st worked (9th st of row), sc across, turn.
Left Strap:
Row 20(L): Ch 1, sc in first 7 sts, sc dec, turn, leaving remaining 19 sts unworked (8 sts)
Row 21(L): Ch 2 (does NOT count as a st), sk first st, dc across, turn (7 sts)
Row 22(L): Ch 1, sc across to last 2 sts, sc dec, turn (6 sts)
Row 23(L): Ch 1, sc across, fasten off
Right Strap:
Row 20(R): With WS facing, join A with sl st in marked st on row 19. Ch 1, sc dec, sc across, turn (8 sts)
Row 21(R): Ch 3, dc in 2nd st and in each st across to last 2 sts, dc dec, turn (7 sts)
Row 22(R): Ch 1, sc dec, sc across, turn (6 sts)
Row 23(R): Ch 1, sc across, fasten off
Right Front:
With A, ch 33 [35, 37]. Mark last ch for later joining.
Row 1 (RS): Sc in 2nd ch from hook and in each ch across, turn (32 [34, 36] sts). Mark row as right side.
Row 2: Ch 1, sc across to last 2 sts, sc dec (31 [33, 35] sts)
Row 3: Ch 2 (does NOT count as a stitch), sk first st, dc dec over next 2 sts, dc across, turn (29 [31, 33] sts)
Row 4: Ch 1, sc across to last 2 sts, sc dec (28 [30, 32] sts)
Row 5: Ch 1, sc dec, sc across, turn (27 [29, 31] sts)
Row 6: Ch 3, dc in 2nd st and in each st across to last 3 sts, dbl dc dec, turn (25 [27, 29] sts)
Row 7: Ch 1, sc dec, sc across, turn (24 [26, 28] sts)
Row 8: Ch 1, sc across to last 2 sts, sc dec (23 [25, 27] sts)
Row 9: Ch 2 (does NOT count as a stitch), sk first st, dc dec over next 2 sts, dc across, turn (21 [23, 25] sts)
Size 2T only:
Row 10: Sl st in first st, ch 1, sc dec, sc across to last 2 sts, sc dec, turn (18 sts, ignoring sl st)
Row 11: Ch 1, sc dec, sc across to last 3 sts, sc dec, turn leaving last st unworked. (15 sts)
Row 12-15: Repeat rows 6 – 9 (9 sts on row 15)
Rows 16-18: Repeat rows 4 – 6 (5 sts on row 18)
Rows 19 –20: Ch 1, sc in each st across, turn. Fasten off after row 20
Size 3T only:
Row 10: Repeat row 4 (22 sts)
Row 11: Ch 1, sc dec, sc across to last 3 sts, sc dec, turn, leaving last st unworked. (19 sts)
Row 12: Ch 2 (does NOT count as a stitch), sk first st, dc dec over next 2 sts, dc across to last 3 sts, dbl dc dec, turn. (15 sts)
Rows 13-15: Repeat rows 7-9 (11 sts on row 15)
Row 16-19: Repeat rows 4 – 7 (6 sts on row 19)
Row 20: Ch 1, sc in each st across, turn.
Row 21: Ch 3, dc in 2nd st and in each st across, fasten off.
Size 4T only:
Rows 10-11: Repeat rows 4 – 5 (23 sts on row 11)
Row 12: Ch 2 (does NOT count as a stitch), sk first st, dc dec over next 2 sts, dc across to last 3 sts, dbl dc dec, turn. (19 sts)
Row 13: Ch 1, sc dec, sc across to last 3 sts, sc dec, turn, leaving last st unworked. (16 sts)
Rows 14-15: Repeat rows 8-9 (13 sts on row 9)
Rows 16-20: Repeat rows 4 – 8 (7 sts on row 20)
Row 21: Ch 2 (does NOT count as a stitch), sk first st, dc in each st across, turn. (6 sts).
Row 22-23: Ch 1, sc in each st across, turn. Fasten off after row 23
Left Front:
With A, ch 33 [35, 37]. Mark first ch for later joining.
Row 1 (RS): Sc in 2nd ch from hook and in each ch across, turn (32 [34, 36] sts). Mark this row as right side.
Row 2: Ch 1, sc dec, sc across, turn (31 [33, 35] sts).
Row 3: Ch 3, dc in 2nd st and in each st across to last 3 sts, dbl dc dec, turn (29 [31, 33] sts)
Row 4: Ch 1, sc dec, sc across, turn (28 [30, 32] sts)
Row 5: Ch 1, sc across to last 2 sts, sc dec (27 [29, 31] sts)
Row 6: Ch 2 (does NOT count as a stitch), sk first st, dc dec over next 2 sts, dc across, turn (25 [27, 29] sts)
Row 7: Ch 1, sc across to last 2 sts, sc dec (24 [26, 28] sts)
Row 8: Ch 1, sc dec, sc across, turn (23 [25, 27] sts)
Row 9: Ch 3, dc in 2nd st and in each st across to last 3 sts, dbl dc dec, turn (21 [23, 25] sts)
Size 2T only:
Row 10: Ch 1, sc dec, sc across to last 3 sts, sc dec, turn leaving last st unworked. (18 sts)
Row 11: Sl st in first st, ch 1, sc dec, sc across to last 2 sts, sc dec, turn (15 sts, ignoring sl st)
Row 12-15: Repeat rows 6 – 9 (9 sts on row 15)
Rows 16-18: Repeat rows 4 – 6 (5 sts on row 18)
Rows 19 –20: Ch 1, sc in each st across, turn. Fasten off after row 20
Size 3T only:
Row 10: Repeat row 4 (22 sts)
Row 11: Sl st in first st, ch 1, sc dec, sc across to last 2 sts, sc dec, turn (19 sts, ignoring sl st)
Row 12: Ch 2 (does NOT count as a stitch), sk first st, dc dec over next 2 sts, dc across to last 3 sts, dbl dc dec, turn. (15 sts)
Rows 13-15: Repeat rows 7-9 (11 sts on row 15)
Row 16-19: Repeat rows 4 – 7 (6 sts on row 19)
Row 20: Ch 1, sc in each st across, turn.
Row 21: Ch 3, dc in 2nd st and in each st across, fasten off.
Size 4T only:
Rows 10-11:Repeat rows 4 – 5 (23 sts on row 11)
Row 12: Ch 2 (does NOT count as a stitch), sk first st, dc dec over next 2 sts, dc across to last 3 sts, dbl dc dec, turn. (19 sts)
Row 13: Sl st in first st, ch 1, sc dec, sc across to last 2 sts, sc dec, turn (16 sts, ignoring sl st)
Rows 14-15: Repeat rows 8-9 (13 sts on row 9)
Rows 16-20: Repeat rows 4 – 8 (7 sts on row 20)
Row 21: Ch 3, dc in 2nd st and in each st across to last 2 sts, dc dec, turn. (6 sts)
Row 22-23: Ch 1, sc in each st across, turn. Fasten off after row 23
All sizes: Using seaming diagram as a guide, hold left front and back pieces with right sides together, and sew left side seam only.
Skirt:
Turn work upside down, with right side facing you. Working in the bottom of the foundation chain, join B in marked ch on left front (see Seaming Diagram above):
Size 4T only:
Set up row: Ch 3, dc in 2nd st and in each st across, turn. (74 sts)
All Sizes:
Row 1 (RS [WS, WS]): Ch 1, sc in first 5 [3, 4] sts, (2 sc in next st, sc in next 10 [6, 4] sts) 5 [9, 13] times, 2 sc in next st, sc in last 5 [3, 4] sts, turn. (72 [80, 88] sts)
Row 2: Ch 3, hdc in 2nd st, (sc in next st, sl st in next 2 sts, sc in next st, hdc in next st, dc in next 2 sts, hdc in next st) 8 [9, 10] times, sc in next st, sl st in next 2 sts, sc in next st, hdc in next st, dc in next st, switching to A at end of row, turn.
Row 3: With A, ch 3, dc in same st and in next st. (dc dec twice, dc in next st, 2dc in each of next 2 sts, dc in next st) 8 [9, 10] times, dc dec twice, dc in next st, 2dc in next st, turn.
Row 4: Ch 4 (counts as tr), dc in same st, 2 dc in next st, (dc dec twice, 2 dc in next st, [dc, tr] in next st, [tr, dc] in next st, 2 dc in next st) 8 [9, 10] times, dc dec twice, 2 dc in next st, [dc, tr] in next st, turn. (90 [100, 110] sts)
Row 5: Ch 3, dc in same st and in next 2 sts, (dc dec twice, dc in next 2 sts, 2 dc in each of next 2 sts, dc in next 2 sts) 8 [9, 10] times, dc dec twice, dc in next 2 sts, 2 dc in next st, switching to B at end of row, turn.
Row 6: With B, repeat row 5, switching to A at end of row.
Row 7: With A, repeat row 5, but do not change colors at end of row.
Row 8: Ch 4, dc in same st, 2 dc in next st, (dc in next st, dc dec twice, dc in next st, 2 dc in next st, [dc, tr] in next st, [tr, dc] in next st, 2 dc in next st) 8 [9, 10] times, dc in next st, dc dec twice, dc in next st, 2 dc in next st, [dc, tr] in next st, turn. (108 [120, 132] sts)
Row 9: Ch 3, dc in same st and in next 3 sts. (dc dec twice, dc in next 3 sts, 2 dc in each of next 2 sts, dc in next 3 sts) 8 [9, 10] times, dc dec twice, dc in next 3 sts, 2 dc in next st, switching to B at end of row, turn.
Row 10: With B, repeat row 9, switching to A at end of row.
Row 11: With A, repeat row 9, but do not change colors at end of row.
Row 12: Ch 4, dc in same st, 2 dc in next st, (dc in next 2 sts, dc dec twice, dc in next 2 sts, 2 dc in next st, [dc, tr] in next st, [tr, dc] in next st, 2 dc in next st) 8 [9, 10] times, dc in next 2 sts, dc dec twice, dc in next 2 sts, 2 dc in next st, [dc, tr] in next st, turn. (126 [140, 154] sts)
Row 13: Ch 3, dc in same st and in next 4 sts. (dc dec twice, dc in next 4 sts, 2 dc in each of next 2 sts, dc in next 4 sts) 8 [9, 10] times, dc dec twice, dc in next 4 sts, 2 dc in next st, switching to B at end of row, do not turn.
Size 3T only:
Row 14: Turn. With B, repeat row 13, fasten off.
Join B with sl st in first st of row 14.
Size 4T only:
Row 14: Turn. With B, repeat row 13, but do not change colors at end of row.
All Sizes:
Next Row [RS]: With B, ch 1, reverse sc in each stitch across. Fasten off.
Using seaming diagram as a guide, sew seams as follows:
- Hold right front and back pieces with right sides together, and sew right side seam.
- Sew both shoulder seams.
Bodice Edging:
Turn work sideways, with right side facing. Join B with sc in marked ch on left front. (See seaming diagram) Work reverse sc around the edges of the bodice pieces as follows:
- Work 29 [30, 31] reverse sc in sides of rows, evenly spaced along left front
- Work 21 [24, 27] reverse sc evenly spaced along neckline.
- Work 30 [31, 32] reverse sc evenly spaced across right front, ending in marked ch on right front.
- Working in bottom of starting chain, reverse sc in each ch across bottom of right front, ending at right side seam. (33 [35, 37] reverse sc)
Armhole Edging:
With right side facing, join B with sc in any stitch on either arm hole. Work 30 [31, 33] reverse sc evenly spaced around, finish off. Using yarn needle, sew yarn end to first st as shown below. This joins the round with less bulk than a slip stitch. Repeat edging for other arm hole.
Finishing:
Using seaming diagram as a guide:
- With right sides together, sew side seam on skirt.
- Turn dress right side out. With 2 or 3 small stiches, tack marked stitch on right front corner to bottom of left side seam. If desired, this corner can be joined with a decorative button or tie instead.
- Sew in all ends.
I hope you enjoy the pattern! Special thanks to the unbelievably adorable model and her very patient mom. Also thanks to Kyla of Keep Me in Stitchez and my mom, for testing the pattern!
A downloadable pdf of this pattern is also available in my Craftsy store or on Ravelry for a $1 fee. The fee for the pdf format is to offset the advertising revenue lost when you print or download the pattern rather than viewing it online.
If you would like to receive notifications of new posts and patterns as they become available, please follow this blog. You can follow by e-mail (look at the sidebar on the right for the follow by email option), or via RSS feed, or via your WordPress.com reader: Follow Stitches ‘N’ Scraps on WordPress.com

Free Pattern – Daydreamer Cardigan
This is the final piece of a 4 piece set, designed to match my Puffy Pinwheel Hat, Striped Booties and Dreaming of Pinwheels blanket. The Anne Geddes Baby yarn by Red Heart quickly became a favorite of mine through these projects, and I hope I have a chance to work with it again soon. It’s soft and squishy, but strong too, and comes in beautiful, bright colors!
This pattern has instructions for sizes 0-6 months, 6-12 months, and 12-24 months. The images show the 6-12 month size.
This pattern is protected by copyright. Please do not distribute or share this pattern in any way other than by sharing a link to this page or to the pattern page on Ravelry. Click here for copyright information.
This pattern contains affiliate links (click for more info). If you click one of these links and then make a purchase, I may be compensated. You get the same great prices, and you will be helping to support this site!
Daydreamer Cardigan
Add this to your Ravelry Queue
Materials:
- Anne Geddes Baby Yarn:
- 20-40 yds Bumble (A)
- 20-40 yds Grass (B)
- 250-350 yds Bluebell (C) (see notes)
- Size G / 6 (4.25 mm) hook or size needed to achieve gauge
- Yarn or tapestry needle
- 2 locking stitch markers
Difficulty:
Experienced – Made in several pieces with decreases, seaming, working into the back loop only, and working in the round.
Sizes:
Pattern is written for 0-6 months with changes for 6-12 months and 12-24 months in ( ). See assembly diagram for measurements.
Gauge:
15 hdc x 12 rows = 4″ square. Gauge matters for a proper fit, so be sure to check your gauge!
Abbreviations used:
- ch = chain
- sc = single crochet
- hdc = half double crochet
- fphdc = front post half double crochet
- bphdc = back post half double crochet
- hdc2tog = half double crochet two stitches together
- sl st = slip stitch
- st(s) = stitch(es)
- sp(s) = space(s)
- rnd = round
- RS = right side
- WS = wrong side
Notes:
- You should be able to get the largest size made with just one skein (340 yds) of color C, but it will be very close. You might want to buy an extra skein just to be on the safe side (plus that way you can make the booties and hat too!).
- Foundation stitches are highly recommended because they are stretchier and leave a nice finished edge. If you do decide to use starting chains instead, you may want to add a single crochet or slip stitch edging around the hemline when you’re done.
Recommended Resources:
- Foundation Crochet Stitches by Jessie at Home
- The Magic Circle by Moogly
- Alternative hdc2tog
- Whipstitch seam through wrong side loops only
- Front & Back Post Crochet by Jessie at Home
Back:
Row 1 (WS): With blue: Work 38 [40, 44] fhdc OR ch 39 [41, 45], hdc in 2nd ch from hook and each ch across. (38 [40, 44] sts)
Row 2: Ch 1, turn, hdc in each st across, switching to green at end of row
Row 3: With green, repeat row 2, switching to yellow at end of row
Row 4: With yellow, ch 3 (counts as dc), turn, dc in blo only of next st and each st across, switching to green at end of row
Row 5: With green, ch 1, turn, hdc in each st across, changing to blue in last st
Row 6: With blue, ch 1, turn, hdc in blo of each st across
Rows 7-31 [33, 34]: Ch 1, turn, hdc in each st across. Mark first and last st of row 21 [22, 24] for later joining.
Row 32 [34, 36]: Ch 1, turn, hdc in next 12 [13, 14] sts, mark last st worked, hdc in each st across.
Row 33 [35, 37] L: Ch 1, turn, hdc in next 10 [11, 12] sts, hdc2tog over next 2 sts, leaving remaining 26 [27, 30] sts unworked (11 [12, 13] sts)
Row 34 [36, 38] L: Ch 1, turn, hdc2tog over next 2 sts, hdc in next 9 [10, 11] sts. (10 [11, 12] sts)
Edging L: Ch 1, working in sides of rows, work 16 [17, 17] sc evenly spaced to marker, move marker to last st worked (for underarm placement), work 28 [30, 33] sc evenly spaced to bottom corner. Fasten off, leaving a long tail for sewing.
Row 33 [35, 37] R: With WS facing, join blue in marked st on row 32 [34, 36]. Ch 1, hdc2tog over next 2 sts, hdc in next 10 [11, 12] sts. (11 [12, 13] sts)
Row 34 [36, 38] R: Ch 1, hdc in next 9 [10, 11] sts, hdc2tog over last 2 sts. Fasten off. (10 [11, 12] sts)
Edging R: With right side facing, join blue with sl st in bottom right corner (last st of row 1). Working in sides of rows, work 28 [30, 33] sc evenly spaced to marker, sc in marked row, move marker to last st worked (for underarm placement), work 15 [16, 16] sc evenly spaced to top corner. Fasten off, leaving a long tail for sewing.
Left [Left, Right] Front:
Row 1 [WS]: With blue: Work 20 [21, 23] fhdc OR ch 21 [22, 24], hdc in 2nd ch from hook and each ch across. (20 [21, 23] sts)
Rows 2-26 [28, 29]: Repeat rows 2-26 [28, 29] of back. On row 21 [22, 24], only mark the last [first, last] stitch of the row.
Row 27 [29, 30]: Turn, sl st in first 2 sts, ch 1, hdc2tog over next 2 sts, hdc in next 16 [17, 19] sts. (17 [18, 20] sts)
Row 28 [30, 31]: Ch 1, turn, hdc in next 14 [15, 18] sts, hdc2tog over next 2 sts, leaving last st unworked. (15 [16, 18] sts)
Row 29 [31, 32]: Ch 1, turn, hdc2tog over next 2 sts, hdc in each st across. (14 [15, 17] sts)
Row 30 [32, 33]: Ch 1, turn, hdc in each st across to last 2 sts, hdc2tog in last 2 sts. (13 [14, 16] sts)
Rows 31-33 [33-35, 34-36]: Repeat rows 29-30 [31-32, 32-33], then repeat row 29 [31, 32] once more.(10 [11, 13] sts)
Sizes 0-6 months & 6-12 months only:
Row 34 [36]: Ch 1, turn, hdc in each st across. Fasten off. (10 [11] sts)
Edging row: With right side facing, join blue with sl st in bottom right corner (last st of row 1). Working in sides of rows along straight edge, work 28 [30, 33] sc evenly spaced to marker, sc in marked row, move marker to last st worked (for underarm placement), work 15 [16, 16] sc evenly spaced to top corner. Fasten off, leaving a long tail for sewing.
Size 12-24 months only:
Row 37: Repeat row 33. (12 sts)
Row 38: Ch 1, turn, hdc in each st across. Do not fasten off. (12 sts)
Edging row: Ch 1, working in sides of rows along straight edge, work 16 [17, 17] sc evenly spaced to marker. Move marker to last st worked (for underarm placement). Work 28 [30, 33] sc evenly spaced to bottom corner. Fasten off, leaving a long tail for sewing.
Right [Right, Left] Front:
Row 1 [WS]: With blue: Work 20 [21, 23] fhdc OR ch 21 [22, 24], hdc in 2nd ch from hook and each ch across. (20 [21, 23] sts)
Rows 2-26 [28, 29]: Repeat rows 2-26 [28, 29] of back. On row 21 [22, 24], only mark the first [last, first] stitch of the row
Row 27 [29, 30]: Turn, hdc in next 16 [17, 19] sts, hdc2tog over next 2 sts, leaving last 2 sts unworked. (17 [18, 20] sts)
Row 28 [30, 31]: Ch 1, turn, sl st in next st, hdc2tog over next 2 sts, hdc in next 14 [15, 18] sts. (15 [16, 18] sts)
Row 29 [31, 32]: Ch 1, turn, hdc in each st across to last 2 sts, hdc2tog in last 2 sts. (14 [15, 17] sts)
Row 30 [32, 33]: Ch 1, turn, hdc2tog over next 2 sts, hdc in each st across. (13 [14, 16] sts)
Rows 31-33 [33-35, 34-36]: Repeat rows 29-30 [31-32, 32-33], then repeat row 29 [31, 32] once more.(10 [11, 13] sts)
Sizes 0-6 months & 6-12 months only:
Row 34 [36]: Ch 1, turn, hdc in each st across. Fasten off. (10 [11] sts)
Edging row: Ch 1, working in sides of rows along straight edge, work 16 [17, 17] sc evenly spaced to marker. Move marker to last st worked (for underarm placement). Work 28 [30, 33] sc evenly spaced to bottom corner. Fasten off, leaving a long tail for sewing.
Size 12-24 months only:
Row 37: Repeat row 33. (12 sts)
Row 38: Ch 1, turn, hdc in each st across. Do not fasten off. (12 sts)
Edging row: With right side facing, join blue with sl st in bottom right corner (last st of row 1). Working in sides of rows along straight edge, work 28 [30, 33] sc evenly spaced to marker, sc in marked row, move marker to last st worked (for underarm placement), work 15 [16, 16] sc evenly spaced to top corner. Fasten off, leaving a long tail for sewing.
Sleeve:
(Make 2)
Row 1 WS: With blue: Work 23 [24, 24] fhdc, join with sl st to first st. (23 [24, 24] sts)
OR ch 24 [25, 26] being careful not to twist the chain, join with sl st to first ch to form a circle, ch 1, hdc in each ch around. (23 [24, 24] sts)
Rnd 2: Ch 1, turn, hdc in each st around, join with sl st to first st, changing to green.
Rnd 3: With green, ch 1, turn, hdc in each st around, join with sl st to first st, changing to yellow.
Rnd 4: With yellow, ch 3 (counts as dc), turn, sk first st, dc in blo of next st and each st around, join with sl st to first st, changing to green.
Rnd 5: With green, ch 1, turn, hdc in each st around, join with sl st to first st, changing to blue.
Rnd 6 [6, 6-7]: With blue, ch 1, turn, hdc in blo of each st around, join with sl st to first st.
Rnd 7 [7, 8]: Ch 1, turn, 2 hdc in first st, hdc in each st around, join with sl st to first st. (24 [25, 25] sts)
Rnd 8 [8, 9]: Ch 1, turn, hdc in each st around, join with sl st to first st.
Rnd 9 [9, 10]: Ch 1, turn, hdc in each st around to last st, 2 hdc in last st, join with sl st to first st. (25 [26, 26] sts)
Rnd 10 [10, 11]: Repeat rnd 8 [8, 9].
Rnds 11-23 [11-25, 12-27]: Repeat Rnds 7-10 [7-10, 8-11] three more times, then repeat rnd 7 [ 7-9, 8-11] once more. (32 [34, 34] sts)
Rnd 24 [26, 28]: Ch 1, turn, hdc in next 16 [17, 17] sts, mark last st worked, hdc in each st around, join with sl st to first st.
Fasten off, leaving a long tail for sewing.
Pocket:
(Make 2 – optional)
Row 1 (WS): With blue, work 10 (10, 11) fhdc OR ch 11 (11, 12), hdc in 2nd ch from hook and each ch across. (10 [10, 11] sts]
Rows 2-7 [7, 9]: Ch 1, turn, hdc in each st across, changing to yellow at end of last row. Do not fasten off blue.
Row 8 [8, 10]: With yellow, ch 1, turn, hdc in each st across, changing to green at end of row.
Row 9 [9, 11]: With green, sl st in each st across, fasten off green.
Edging round: With right side facing, insert hook into side of row 8 [8, 10] (directly below where you just fastened off the green, as shown in image below), and draw up the blue yarn that you dropped at the end of row 7 [7, 9].
With blue, working into sides of rows, work 10 [10, 12] sc evenly spaced to bottom corner. Working in bottom of row 1, work 3 sc in first st, sc across to last st, 3 sc in last st. Working into sides of rows, work 10 [10, 12] sc evenly spaced to corner. Working across row 8 [8, 10] (behind row 9 [9, 11] as shown in image below), 3 sc in first st, sc in each st across, 3 sc in last st, join with sl st to first st of edging round. Fasten off.
Assembly:
- With right sides facing:
- Sew back to each front piece at shoulder seams.
- Sew side seams from hem to underarm markers. Remove underarm markers.
- With right sides facing, line up sleeve with armhole opening so that the 1st stitch / joining on the sleeve (where the tail is) lines up with the underarm / side seam, and the marked stitch on the sleeve lines up with the shoulder seam. Sew together. Repeat for 2nd sleeve.

Button Band & Collar Edging:
Row 1L [WS]: With WS facing, join blue with sl st to bottom corner of left front as shown in assembly diagram. Work 33 [35, 37] hdc evenly spaced to neck opening, fasten off.
Row 1R [WS]: With WS facing, join blue with sl st to bottom of neck opening on right front as shown in assembly diagram.Work 33 [35, 37] hdc evenly spaced to hem, changing to green in last st.
Row 2:
- With green, ch 1, turn, hdc in next 2 [4, 2] sts, [ch 1, sk next st (buttonhole made), sc in next 6 [6, 7] sts] 4 times, ch 1, sk next st, sc in next st, 3 hdc in next st. (35 [37, 39] sts)
- Working along neckline, work 15 [15, 17] hdc evenly spaced to shoulder seam, work 18 [19, 21] hdc evenly spaced across back to next shoulder seam, work 15 [15, 17] hdc evenly spaced to corner. (48 [49, 55] sts)
- Working into row 1L, 3 hdc in next st, hdc in remaining 32 [34, 36] sts, changing to blue in last st. (35 [37, 39] sts)
Row 3: With blue, ch 1, turn, working in blo, hdc in next 33 [35, 37] sts, 3 hdc in next st, hdc in next 49 [50, 56] sts, 3 hdc in next st, hdc in next 33 [35, 37] sts. Fasten off. (122 [127, 137] hdc)
Finishing:
- Sew buttons onto front, lined up with button holes.
- Using picture as a guide, sew patch pockets into place. I like to use a backstitch or running stitch just under the top edge so the seam is hidden.
- Weave in any remaining ends.
I hope you enjoy the pattern! Thank you to Red Heart, for supplying the lovely yarn, and to Jen Mackenzie of AG Handmades for testing the pattern!
A downloadable pdf of this pattern is also available in my Craftsy store for a $1 fee. The fee for the pdf format is to offset the advertising revenue lost when you print or download the pattern rather than viewing it online.
If you would like to receive notifications of new posts and patterns as they become available, please follow this blog. You can follow by e-mail (look at the sidebar on the right for the follow by email option), or via RSS feed, or via your WordPress.com reader: Follow Stitches ‘N’ Scraps on WordPress.com

Free Pattern – Non-stop slippers- Baby sizes
These boxy-toe slippers are worked all in one piece, never needing to break the yarn until you’re finished (unless you want to incorporate more colors). The sole is worked first, with the rest of the slipper built up from there, which makes it easy to add a 2nd sole for extra padding if desired. These slippers can also be a great blank canvas for your creativity – make them your own by working different sections in different colors, adding a drawstring around the ankle, or adding your favorite embellishments!
The Non-Stop Slippers pattern is available in a total of 9 sizes, from infant all the way up to adult, so you can make a pair for everyone! This post contains the instructions for the baby sizes (0-6 mo, 6-12 mo). Follow these links for the adult sizes (s, m, l, xl), and the child sizes (s, m, l).
This pattern was designed for the #HolidayStashdownCAL2015. Check out this post for official rules and links!
This pattern is protected by copyright. Please do not distribute or share this pattern in any way other than by sharing a link to this page or to the pattern page on Ravelry. Click here for copyright information.
This pattern contains affiliate links (click for more info). If you click one of these links and then make a purchase, I may be compensated. You get the same great prices, and you will be helping to support this site!
Non-Stop Slippers – Baby Sizes
Add this to your Ravelry Queue
Materials:
- Worsted weight yarn: 75 – 150 yds
- Size H / 8 (5 mm) hook or size needed to achieve gauge
- Yarn or tapestry needle
- Locking stitch marker
Difficulty:
Intermediate – front and back post stitches, decreases, and changing direction of work to create 3 dimensions.
Sizes:
Instructions are written for 0-6 months, with changes for 6-12 months in ( ). Find the right size by measuring the length of the child’s foot or of a well fitting shoe, and choosing the size closest to that measurement. If you’re measuring their foot, be sure to add a little “wiggle room”. Sole should measure approximately 3.5 (4.5) inches long and 2 inches wide at the widest point.
Gauge:
14 sc x 15 rows = 4″ square.
Abbreviations used:
- ch = chain
- fsc = foundation single crochet
- sc = single crochet
- fphdc = front post half double crochet
- bphdc = back post half double crochet
- sl st = slip stitch
- fp sl st = front post slip stitch
- bp sl st = back post slip stitch
- st(s) = stitch(es)
- rnd = round
- RS = right side
- WS = wrong side
Recommended Resources:
- Foundation Single Crochet (fsc) – by Moogly
- Single Crochet Decrease Stitch (sc2tog) – by Articles of A Domestic Goddess
- Invisible Single Crochet Decrease (sc2tog – alternate version) – by The Hooked Haberdasherer
- Front Post / Back Post slip stitches (fp sl st / bp sl st) – by me!
- Front/Back Post Half Double Crochet (fphdc / bphdc) – by Articles of a Domestic Goddess
Sole Options:
- The sole is worked from heel to toe and is the same for both feet. For a basic slipper / slipper sock, follow instructions as written. This is a good option if you want more of a sock-like feel, or if you want to attach a sewn on, outer sole (like leather or suede soles you can buy at the store).
- For a thicker, cushier sole, make an extra pair of soles and sew the 2nd (outer) sole on at the end. With this option, you may need a 2nd skein of yarn for the larger sizes. This is a good option if you want to add a painted on, non-skid finish. You can add your chosen finish to the outer sole before sewing it on, so the inner sole stays soft and clean.
Sole:
Row 1 [RS]: Work 4 fsc, OR ch 5, sc in 2nd ch from hook and in each ch across. [4 sc]
Row 2: Ch 1, turn, sc in each st across.
Row 3: Ch 1, turn, 2 sc in first st, sc across to last st, 2 sc in last st [6 sc]
Rows 4-10 (14): Repeat row 2
Row 11 (15): Ch 1, turn, sc2tog over first 2 sts, sc across to last 2 sts, sc2tog over last 2 sts. [4 sts]
Edging Rnd: Ch 1, do NOT turn. Working into sides of rows along edge of sole, work 9 (13) sc evenly spaced to the bottom corner. Working along bottom of row 1, 3 sc in first st, sc across to last st, 3 sc in last st. Working into sides of rows, work 9 (13) sc evenly spaced to top corner. Working into last row, 3 sc in first st, sc across to last st, 3 sc in last st, join with sl st to first st of round. Do NOT fasten off. [34 (42) sc]
If possible, place the child’s foot on the sole. The sole should be about the same size as the foot, and no part of the foot should be hanging over the edges. Adjust to a larger/smaller hook, or larger/smaller pattern size if needed before continuing.
Sides:
Rnd 1 [WS]: Ch 1, turn, fphdc around each st around, join with sl st to first st.
Rnd 2: Ch 1, turn, sc in each st around, join with sl st to first st. Do NOT fasten off.
Instep:
Row 1 [WS]: Turn, sk first st, sc in next 6 sts, fp sl st around each of next 2 sts, leaving remaining sts unworked. [6 sc]
Row 2: Turn, skip sl sts, sc in each sc across, bp sl st around each of next 2 unworked sts from sides.
Row 3: Turn, skip sl sts, sc in each sc across, fp sl st around each of next 2 unworked sts from sides.
Row 4: Repeat Row 2
6-12 months only: Rows 5-6: Repeat row 3, then repeat row 2.
Both sizes: Row 5 (7): Turn, skip sl sts, sc in each sc across, fp sl st around next unworked st from sides, do not fasten off.
Ankle:
Rnd 1 [RS]: Ch 1, turn, skip sl st, sc in each sc across instep, (for 6-12 months only – mark last st), sc in each unworked st from sides, join with sl st to first st. Do not fasten off. [22 (26) sc]
6-12 months only:
Rnd 2: Ch 1, turn, sc2tog over next 2 sts, sc to 2 sts before marker, sc2tog over next 2 sts, remove marker, sc in next 6 sts, join with sl st to first st. [24 sc]
Rnd 3: Ch 1, turn, sc in next 6 sts, sc2tog over next 2 sts, sc around to last 2 sts, sc2tog over last 2 sts, join with sl st to first st. Do not fasten off. [22 sc]
Cuff:
Rnd 1[RS]: Do NOT turn, ch 2 (counts as bphdc), fphdc around next st, [bphdc around next st, fphdc around next st] around, join with sl st to first st.
Rnd 2: Do NOT turn, ch 2 (counts as bphdc), fphdc around next fphdc, [bphdc around next bphdc, fphdc around next fphdc] around, join with sl st to first st. Fasten off.
Note: For a longer cuff, repeat rnd 2 to desired length.
Finishing:
- Weave in ends
- Add extra soles and/or non-skid finishes as desired (see sole options above)
- Add embellishments as desired.
I hope you enjoy the pattern – remember it’s available in adult sizes and child sizes too! Big thanks to Timiae Knoll, wilmaelee, andanteknitter, and mbwross for testing this pattern.
If you would like to receive notifications of new posts and patterns as they become available, please follow this blog. You can follow by e-mail (look at the sidebar on the right for the follow by email option), or via RSS feed, or via your WordPress.com reader: Follow Stitches ‘N’ Scraps on WordPress.com

Free Pattern – Non-stop slippers- Child sizes
These boxy-toe slippers are worked all in one piece, never needing to break the yarn until you’re finished (unless you want to incorporate more colors). The sole is worked first, with the rest of the slipper built up from there, which makes it easy to add a 2nd sole for extra padding if desired. These slippers can also be a great blank canvas for your creativity – make them your own by working different sections in different colors, adding a drawstring around the ankle, or adding your favorite embellishments!
The Non-Stop Slippers pattern is available in a total of 9 sizes, from infant all the way up to adult, so you can make a pair for everyone! This post contains the instructions for the child sizes (s, m, l). Follow these links for the adult sizes (s, m, l, xl), and the baby sizes (0-6 mo, 6-12 mo)
This pattern was designed for the #HolidayStashdownCAL2015. Check out this post for official rules and links!
This pattern is protected by copyright. Please do not distribute or share this pattern in any way other than by sharing a link to this page or to the pattern page on Ravelry. Click here for copyright information.
This pattern contains affiliate links (click for more info). If you click one of these links and then make a purchase, I may be compensated. You get the same great prices, and you will be helping to support this site!
Non-Stop Slippers – Child Sizes
Add this to your Ravelry Queue
Materials:
- Worsted weight yarn: 150 – 250 yds
- Size H / 8 (5 mm) hook or size needed to achieve gauge
- Yarn or tapestry needle
- Locking stitch marker
Difficulty:
Intermediate – front and back post stitches, decreases, and changing direction of work to create 3 dimensions.
Sizes:
Instructions are written for small, with changes for medium and large in ( ). Find the right size by measuring the length of the child’s foot or of a well fitting shoe, and choosing the size closest to that measurement. If you’re measuring their foot, be sure to add a little “wiggle room”. Sole should measure approximately 5.5 (6.5, 7.5) inches long and 2.5 (2.5, 3.25) inches wide at the widest point.
Gauge:
14 sc x 15 rows = 4″ square.
Abbreviations used:
- ch = chain
- fsc = foundation single crochet
- sc = single crochet
- fphdc = front post half double crochet
- bphdc = back post half double crochet
- sl st = slip stitch
- fp sl st = front post slip stitch
- bp sl st = back post slip stitch
- st(s) = stitch(es)
- rnd = round
- RS = right side
- WS = wrong side
Recommended Resources:
- Foundation Single Crochet (fsc) – by Moogly
- Single Crochet Decrease Stitch (sc2tog) – by Articles of A Domestic Goddess
- Invisible Single Crochet Decrease (sc2tog – alternate version) – by The Hooked Haberdasherer
- Front Post / Back Post slip stitches (fp sl st / bp sl st) – by me!
- Front/Back Post Half Double Crochet (fphdc / bphdc) – by Articles of a Domestic Goddess
Sole Options:
- The sole is worked from heel to toe and is the same for both feet. For a basic slipper / slipper sock, follow instructions as written. This is a good option if you want more of a sock-like feel, or if you want to attach a sewn on, outer sole (like leather or suede soles you can buy at the store).
- For a thicker, cushier sole, make an extra pair of soles and sew the 2nd (outer) sole on at the end. With this option, you may need a 2nd skein of yarn for the larger sizes. This is a good option if you want to add a painted on, non-skid finish. You can add your chosen finish to the outer sole before sewing it on, so the inner sole stays soft and clean.
Sole:
Row 1: Work 6 fsc, OR ch 7, sc in 2nd ch from hook and in each ch across. [6 sc]
Row 2 [RS]: Ch 1, turn, sc in each st across.
Row 3: Ch 1, turn, 2 sc in first st, sc across to last st, 2 sc in last st [8 sc]
Rows 4-7: Repeat row 2
Row 8: Repeat row 2 (2, 3) [8 (8, 10) sc]
Rows 9-16 (19, 21): Repeat row 2
Row 17 (20, 22): Ch 1, turn, sc2tog over first 2 sts, sc across to last 2 sts, sc2tog over last 2 sts. [6 (6, 8) sts]
Row 18-19 (21-22, 23-26): Repeat the last 2 rows one (one, two) more times. [4 sc]
Edging Rnd: Ch 1, do NOT turn. Working into sides of rows along edge of sole, work 17 (20, 24) sc evenly spaced to the bottom corner. Working along bottom of row 1, 3sc in first st, sc across to last st, 3 sc in last st. Working into sides of rows, work 17 (20, 24) sc evenly spaced to top corner. Working into last row, 3 sc in first st, sc across to last st, 3 sc in last st, join with sl st to first st of round. Do NOT fasten off. [52 (58, 66) sc]
If possible, place the child’s foot on the sole. The sole should be about the same size as the foot, and no part of the foot should be hanging over the edges. Adjust to a larger/smaller hook, or larger/smaller pattern size if needed before continuing.
Sides:
Rnd 1 [WS]: Ch 1, turn, fphdc around each st around, join with sl st to first st. [52 (58, 66) sc]
Rnd 2: Ch 1, turn, sc in each st around, join with sl st to first st. Do NOT fasten off.
Instep:
Row 1 [WS]: Turn, sk first st, sc in next 6 sts, fp sl st around each of next 2 sts, leaving remaining sts unworked. [6sc]
Row 2: Turn, skip sl sts, sc in each sc across, bp sl around each of next 2 unworked sts from sides.
Row 3: Turn, skip sl sts, sc in each sc across, fp sl st around each of next 2 unworked sts from sides.
Row 4: Turn, skip sl sts, 2sc in next sc, sc in each sc across to last sc, 2sc in last sc, bp sl st around each of next 2 unworked sts from sides. [8 sc]
Large size only – Rows 5-6: Repeat rows 3 & 4 once more [10 sc]
All sizes:
Rows 5-8 (5-10, 7-12): Repeat row 3, then repeat rows 2 & 3 one (two, two) times more, then repeat row 2 once more.
Row 9 (11, 13): Turn, skip sl sts, sc in each sc across, bp sl st around next unworked st from sides, do not fasten off.
Ankle:
Rnd 1 [RS]: Ch 1, turn, skip sl st, sc in each sc across instep, mark last st, sc in each unworked st from sides, join with sl st to first st. [36, (38, 44) sc]
Rnd 2: Ch 1, turn, sc2tog over next 2 sts, sc to 2 sts before marker, sc2tog over next 2 sts, remove marker, sc in next 8 (10, 10) sts, join with sl st to first st. [34 (36, 42) sc]
Rnd 3: Ch 1, turn, sc in next 8 (10, 10) sts, mark last st worked, sc2tog over next 2 sts, sc around to last 2 sts, sc2tog over last 2 sts, join with sl st to first st. [32 (34, 40) sc]
Rnd(s) 4-6 (6, 8): Repeat rnds 2 & 3 one (one, two) times more, then repeat rnd 2 once more. [26 (28, 30) sc]
Cuff:
Rnd 1: Ch 2 (counts as bphdc), turn, fphdc around next st, [bphdc around next st, fphdc around next st] around, join with sl st to first st.
Rnds 2-3: Do NOT turn, ch 2 (counts as bphdc), fphdc around next fphdc, [bphdc around next bphdc, fphdc around next fphdc] around, join with sl st to first st. Fasten off.
Note: for a longer cuff, repeat last round to desired length.
Finishing:
- Weave in ends
- Add extra soles and/or non-skid finishes as desired (see sole options above)
- Add embellishments as desired.
I hope you enjoy the pattern – remember it’s available in adult sizes and baby sizes too! Big thanks to NerdlingAlong and mbwross for testing this pattern.
If you would like to receive notifications of new posts and patterns as they become available, please follow this blog. You can follow by e-mail (look at the sidebar on the right for the follow by email option), or via RSS feed, or via your WordPress.com reader: Follow Stitches ‘N’ Scraps on WordPress.com


