Crochet Tutorials
Ready for a new crochet stitch, technique, or pattern? You’re in the right place! Browse all the crochet tutorials, or select a category from the dropdown menu. What will you learn today?

Tunisian Twist Ear Warmer Video Tutorial
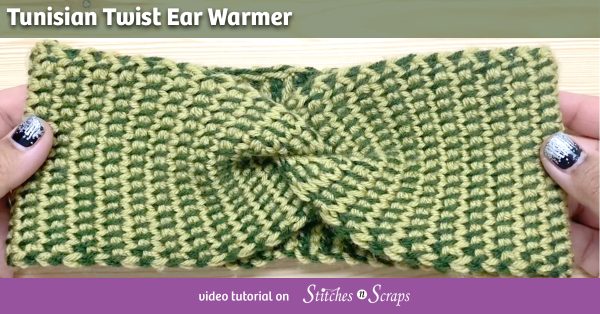
The Tunisian Twist Ear Warmer is a super cozy and comfy pattern here on Stitches n Scraps. It only uses two basic stitches, so if you’re new to Tunisian crochet, this is a great first project! Learn how to make it, step by step, in this video tutorial.

Tunisian Twist Ear Warmer Pattern
This video is mean to supplement the written ear warmer pattern. The pattern has detailed instructions for 7 different sizes, all the way from newborn to adult. This video walks you through all the steps, but does not include all the specific stitch counts and measurements for the various sizes.
Featured in This Video
Knit Picks Brava Yarn
This tutorial features Brava Worsted yarn. Knit Picks / We Crochet had given me this yarn to use for my Simply Sweet Baby Sweater pattern. I used some of what was left over for this ear warmer pattern and tutorial.

Brittany Crochet Hook
Since this pattern only has at most 17 stitches on a row, I did not use an actual Tunisian hook. My go-to hook for small Tunisian pieces like this one is this beautiful hook from Brittany Needles. They had sent it to me some time ago to try out and review, and it’s absolutely perfect for this kind of project. Read my full review here.
You may notice this is a 4.5 mm hook, and the pattern calls for a 5.5 mm hook. My gauge tends to be quite loose. I find that people tend to have more success matching my gauge if they use a slightly larger hook than I did. So I almost always recommend a hook slightly larger than the one I am actually using.
Want More Tunisian?
Check out Modern Tunisian – a new book from Mary Beth Temple!

Tunisian Twist Ear Warmer Video Tutorial
Watch This Video on YouTube

Rate this Tunisian Ear Warmer Tutorial!
Do you want the best of Stitches n Scraps delivered right to your inbox? Don’t miss a stitch – Subscribe now!

How to Start a Crochet Circle – 3 Ways
Learn how to start a crochet circle with a ring of chains, a magic circle, or by working into a chain. All of these three methods work out to be more similar than you might think!

This content is protected by copyright. See this Terms of Use / Copyright page for more information.
This post contains sponsored content and/or affiliate links. If you click an affiliate link and make a purchase, I may get a commission.
Ring of Chains Method
This is the first way most people learn to start a crochet circle, and is by far the easiest for most new crocheters.
Start by chaining 4 (or 6, depending on your pattern) and joining with a slip stitch to form a ring.

Now chain as many as you need for your stitches (1 for sc, 2 for hdc, 3 for dc, etc) and work your first round into that circle.
This method leaves an open circle at the center, which you can close with the tail. After you finish your project, sew the starting tail through the “legs” of each stitch in a circle.

Sewing your tail in this way basically creates a magic ring. Pull on the tail to tighten the center of the circle, and then weave in your end as normal. It is the same effect as if those stitches had been worked into a magic ring to begin with, except that you have a ring of chains embedded in the stitches as well.
Pros of the ring of chains method:
- Easiest to do.
- Stronger because of the extra chains.
Cons of the ring of chains method:
- Leaves an open center until sewn closed with the tail.
- Bulkier because of the extra chains.
When to use the ring of chains method:
- If you want an open circle at the center as a design element
- If extra strength is desired, such as for a basket bottom.
Magic Circle Method
Most crocheters either love magic circles or hate them, and I sometimes think it depends on how they were taught. At its essence, a magic circle is nothing more than a loose slip knot. Yes, really!
Make a LOOSE slip knot such that the knot part can be tightened by pulling on the tail. The working loop will be tightened by pulling on the working yarn. If you’re not sure how to do that, here is a tutorial for making a slip knot that will work this way.
Keep this knot loose, do not tighten it all the way.

Now holding this ring open, chain up to the height of your stitches (1 for sc, 2 for hdc, 3 for dc, etc) and work the first round of your circle into the open ring.
When you finish your round, pull on the tail to tighten the ring (the knot part of the slip knot).

Pros of the magic circle method:
- Closed circle without sewing
- Many methods for making the circle / slip knot so you can find the one you like best.
Cons of the magic circle method:
- Only 1 strand of yarn holding center together
- Open circle can be floppy and hard to manage when working into it.
When to use the magic circle method:
- When you want less bulk in your starting circle.
- Great for most garments such as hats and socks.
Working Into a Chain Method
Another common way to start a crochet circle is by working into a chain. Start by chaining however many chains you need for your stitch, plus one. So for a single crochet that would be 2 chains, for a double crochet it would be 4 chains. Here we are going to make a single crochet circle.

Now work the first round of your circle into the furthest chain from your hook.

This method has a slip knot at the end where you started your chain, and leaves a bit of a hole because you can’t pull it closed.
But Wait!
A slip knot is, in essence, a tight chain that isn’t connected to anything. Which means, if you remove the slip knot, the next chain after it becomes the new slip knot. in this method, all your stitches were worked into that very same chain that is now the new slip knot. And we know that working into a slip knot is the same as the magic loop.
So that all boils down to this – if you remove the slip knot after finishing your round, you end up with the exact same effect as the magic loop method. There’s no more bump, and you can now pull the ring closed by pulling on the tail!

Pros of the working into a chain method:
- Can tighten center if you remove the slip knot.
- Less floppy to work into than a magic loop.
Cons of the working into a chain method:
- Needs one extra step of removing the slip knot to get the same effect as a magic loop.
When to use the working into a chain method:
- If you find the magic loop too floppy or hard to work with
- Everywhere you would otherwise use a magic loop!
How to Start a Crochet Circle Video Tutorial
Watch This Video on YouTube

Rate this How to Start a Crochet Circle tutorial!
Do you want the best of Stitches n Scraps delivered right to your inbox? Don’t miss a stitch – Subscribe now!

Reversible Crochet Ribbing in 2 Colors
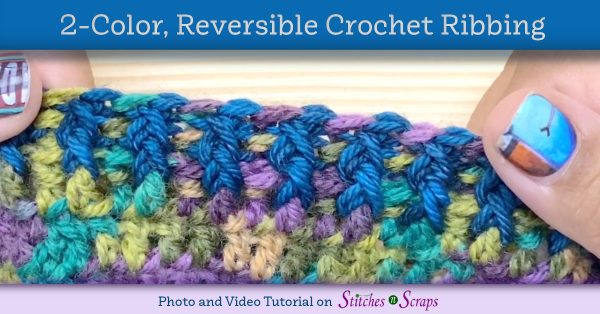
Create reversible crochet ribbing with a different look on each side! Worked in the round, this technique is perfect for hats, mitts, and cuffs. The video version of the tutorial also shows how it can be worked flat.

I used this reversible crochet ribbing on the Two Way Toque hat pattern.
This content is protected by copyright. See this Terms of Use / Copyright page for more information.
This post contains sponsored content and/or affiliate links. If you click an affiliate link and make a purchase, I may get a commission.
Front and Back Post Double Crochet
This technique uses front and back post double crochet stitches (fpdc and bpdc). The tutorial assumes you already know how to work those. If you don’t, here is a great front and back post stitch tutorial from Edie Eckman.

2 Colors
For the hat shown in this tutorial, I used leftover yarn from my Hand in Hand fingerless mitts pattern. I had used a 2-color, reversible ribbing in that knit pattern, and wanted to duplicate that look in crochet for this hat.
You will hear me refer to color A and B because that is how they are indicated in the hat pattern. Whichever color you decide is A or B, the important part is that one color (in my case color B) is always in the back and the other color is always in the front, throughout the ribbing.
Changing colors:
Always change colors in the last part of the previous stitch. In this case we’re working with double crochets, so when you get to the point where there are 2 loops left on your hook, drop the old color and finish the stitch with the new color instead.
For a more in depth look at changing colors, check out my changing colors tutorial.

Reversible Crochet Ribbing in the Round
Scroll down for video tutorial
Abbreviations:
ch = chain
fpdc = front post double crochet
bpdc = back post double crochet
Even stitch count
For this ribbing to work out well, you need to start with an even number of stitches. First, let’s look at how it works if you’re starting from a completed round of stitches. For example, if you have just crocheted a top-down hat and are finishing it with this reversible crochet ribbing.
Starting bpdc
Start the round with a ch 3 that counts as a bpdc. Just like in every other stitch, we’re going to change colors in the last part. This means that you ch 2 with your back color (color B in this case), and then you do the third chain with the new color (color A).

Dropping the yarn
Every time we change colors, we have to drop the yarn of the previous color. What side you drop the yarn on is important. The back color should always be dropped at the back, and the front color should always be dropped at the front. This keeps the two yarns from twisting together and is what makes the crochet ribbing reversible.
Alternating stitches
We have our first bpdc, so the next stitch will be a fpdc. Fpdc with color A in the next stitch, changing colors in the last part of the stitch. Remember to drop color A to the front as you pick up color B.

Now do a bpdc with color B in the next stitch. Again, change colors at the end of the stitch and this time drop color B to the back as you pick up color A.
Continue alternating in this way until you reach the end of the round.
Joining the round
When you get to the end, you should have just finished a fpdc and have changed to the back color (color B). Join the round with a slip stitch in the 2nd chain of the starting bpdc. This should be the topmost chain of the back color (color B).

In this case, it looks like I have 3 chains of the back color, but that bottom one is actually the slip stitch that joined the previous round.
Modifications:
Starting from a chain
Now let’s suppose you’re working this ribbing from a foundation chain, instead of from a previous row of stitches. It’s a bit fiddly to do this because of the two colors, but really not much changes from the previous instructions.
Chain an even number of stitches and join to work in the round, being sure not to twist your chain. Then continue exactly as above, except that instead of working fpdc and bpdc stitches, you will just be working normal dc stitches into the chain.
Working in Rows
When worked in rows, the main thing that changes is that the front and back colors switch every time you turn your work. The front color will now be at the back and vice versa. Also, you don’t need to change colors in the last stitch of the row, because your first stitch of the next row will be in the same color.
I explore this difference in the video tutorial below.
Reversible Crochet Ribbing – Video Tutorial
Watch this video on YouTube
Rate this Reversible Crochet Ribbing Tutorial
Do you want the best of Stitches n Scraps delivered right to your inbox? Don’t miss a stitch – Subscribe now!

Tunisian Reverse Stitch Crochet Tutorial
With it’s thick, bumpy texture, Tunisian reverse stitch is a great tool to have in your crochet toolbox. This stitch is worked from the back, and does not curl as much as others. Working on the opposite side of the fabric takes a little time to get used to, but once you have you’ll love the textures it can create!

Foundation Row
In a previous tutorial, I showed a basic, Tunisian foundation row. For this tutorial, I’m working from a swatch already in progress, with 10 stitches across. You don’t need the full swatch in order to follow along. Just work one foundation row of 10 stitches as follows:
Chain 10
Forward Pass: Insert hook into 2nd chain from hook, yarn over and pull up a loop, repeat for remaining chains. (10 loops on hook)
Return Pass: Chain 1, (yarn over and pull through 2 loops on hook) 9 times. (10 sts)
If you need help making this foundation row, please see the Tunisian foundation row tutorial first.
Choosing a Hook
We are only working with a small number of stitches, so you won’t need to use a Tunisian hook. As long as you can fit 10 loops on your hook before you get to the thumb grip, a regular hook is fine.
I’m using a hook that I received from Brittany Hooks some time ago for a product review. It has a straight shaft without a thumb grip, so it’s perfect for small sections of Tunisian crochet. I used this same hook to make the entrelac cowl pictured here.
Tunisian Reverse Stitch (trs) Forward Pass
Tunisian reverse stitch is similar to Tunisian simple stitch, but from the back side of the fabric. Each stitch on your foundation row has front and back vertical bars, plus a chain-like top.

Some people find it easier to turn the work upside down so they can see the back bar more easily.

Yarn over, and pull up a loop. Because we picked up from the reverse side of the fabric, this will push the top of the stitch forward, creating that distinctive ridge. In the last stitch, there is an extra bump at the edge from the chain on the previous row. You can either put your hook under just the back bar, or you can go under this bump as well for a bit of added stability at the edge.

Tunisian Reverse Stitch Return Pass
The return pass is worked exactly the same way as it was on the foundation row.
Start with a chain (yarn over and pull through only the first loop on your hook).

Now, yarn over and pull through two loops on your hook. Continue doing this until there is only one loop left on your hook.

Binding Off
I like to use a slip stitch bind off for the Tunisian reverse stitch. Starting with the 2nd stitch, insert your hook and pull up a loop as before. Now also pull that loop through the loop on your hook. This makes a slip stitch.

Repeat this in every stitch across. This bind off creates a row of slip stitches across the back of the work, and the same raised ridge across the front. On this swatch, you also see the Tunisian knit stitches and Tunisian simple stitches that I did earlier.

Very little curling!
Unlike most Tunisian crochet stitches, Tunisian reverse stitch does not have as much of a tendency to curl. Because the back and front sides of the stitch are more balanced, it lays flatter than other stitches.
Tunisian Reverse Stitch (trs) – Video Tutorial
Watch this video on YouTube
Rate this Tunisian Reverse Stitch Crochet Tutorial!

Tunisian Knit Stitch Crochet Tutorial
Create the appearance of knitted stockinette stitch in crochet, with the Tunisian knit stitch! Once you’ve learned the Tunisian simple stitch, the knit stitch is easy to learn. It’s simply a variation in where you place your hook.

Foundation Row
In a previous tutorial, I showed a basic, Tunisian crochet foundation row. For this tutorial, I’m working from a swatch already in progress, with 10 stitches across. To follow along, first work a foundation row of 10 stitches as follows:
Chain 10
Forward Pass: Insert hook into 2nd chain from hook, yarn over and pull up a loop, repeat for remaining chains. (10 loops on hook)
Return Pass: Chain 1, (yarn over and pull through 2 loops on hook) 9 times. (10 sts)
If you need help making this foundation row, please see the Tunisian foundation row tutorial first.
Choosing a Hook
For this tutorial, we are only working with a small number of stitches, so you don’t need to use a Tunisian hook. As long as you can fit 10 loops on your hook before you get to the thumb grip, a regular hook is fine.
I’m using a hook that I received from Brittany Hooks some time ago for a product review. It has a straight shaft without a thumb grip, so it’s perfect for small sections of Tunisian crochet. I used this same hook to make the entrelac cowl pictured here.
Tunisian Knit Stitch (tks) Forward Pass
Each stitch of the foundation row has a vertical bar in the front and one at the back, plus a top section that looks like a chain.

Yarn over, and pull up a loop. Repeat this in each stitch across to the very last stitch. For the last stitch, insert your hook under the front bar and the little bump just behind it, and pull up a loop.

You should now have 10 loops on your hook.
Tunisian Knit Stitch Return Pass
The return pass is worked exactly the same way as it was on the foundation row.
Start with a chain (yarn over and pull through only the first loop on your hook).

Now, yarn over and pull through two loops on your hook. Continue doing this until there is only one loop left on your hook.

Binding Off
There are several methods for binding off. The simplest is to use a slip stitch bind off just like we did for the Tunisian simple stitch.
Slip Stitch Bind off
Starting with the 2nd stitch, insert your hook and pull up a loop as before, but this time also pull that loop through the loop on your hook. this makes a slip stitch.

Repeat this in every stitch across. This bind off creates a raised chain across the front of the work, which is pretty for some applications but may not be what you want all the time.

Single crochet bind off
Instead of binding off with slip stitches, we can bind off with single crochet. Insert your hook into the 2nd stitch and pull up a loop as before. Now yarn over and pull through both loops on your hook, as for a single crochet.

For a clean edge, work the last stitch as a slip stitch. Insert your hook and pull up a loop as normal, then pull that loop through the other loop on your hook.

The single crochet bind off leaves you with a smoother edge, and I prefer it for Tunisian knit stitch.

Curling is Normal
Most Tunisian stitches will curl, and this is normal. Blocking or adding borders can help minimize the curling, but it is just the nature of the stitch.
Tunisian Knit Stitch (tks) – Video Tutorial
Watch this video on YouTube
Rate this Tunisian Knit Stitch Crochet Tutorial!

Tunisian Simple Stitch Crochet Tutorial
Tunisian crochet is often described as a cross between regular crochet and knitting. This easy to learn technique can create unique textures and patterns. The Tunisian simple stitch (tss) is one of the most basic and commonly used stitches in Tunisian crochet.

Foundation Row
In a previous tutorial, I showed a basic, Tunisian crochet foundation row. This tutorial starts with a foundation row of 10 stitches as follows:
Chain 10
Forward Pass: Insert hook into 2nd chain from hook, yarn over and pull up a loop, repeat for remaining chains. (10 loops on hook)
Return Pass: Chain 1, (yarn over and pull through 2 loops on hook) 9 times. (10 sts)
If you need help making this foundation row, please see the Tunisian foundation row tutorial first.
Choosing a Hook
For this tutorial, we are only working with a small number of stitches, so you don’t need to use a Tunisian hook. As long as you can fit 10 loops on your hook before you get to the thumb grip, a regular hook is fine.
This hook, which I received from Brittany Hooks some time ago for a product review, has a straight shaft without a thumb grip. This makes it perfect for small sections of Tunisian crochet, like in this entrelac cowl.
Tunisian Simple Stitch (tss) Forward Pass
Each stitch of the foundation row has a vertical bar in the front and one at the back.

Repeat this in each stitch across. Now you should have 10 loops on your hook.

There is an alternate option for the last stitch that creates a more stable, tighter edge. Instead of working under just the front bar, insert your hook under the front bar and the little bump just behind it. This is not the standard way to do it, but is a commonly used alternative for nicer edges.

Tunisian Simple Stitch Return Pass
The return pass is worked exactly the same way as it was on the foundation row.
Start with a chain, similar to making a turning chain when starting a new row. To make the chain, yarn over and pull through only the first loop on your hook.

Now, yarn over and pull through two loops on your hook. Continue doing this until there is only one loop left on your hook.

Binding Off
The last row of your Tunisian simple stitch will always look more open than the rest, because it hasn’t been worked into yet. To fix this, we need to bind off.
Starting with the 2nd stitch, insert your hook into the vertical bar and pull up a loop as before, but this time also pull that loop through the loop on your hook. this makes a slip stitch into the vertical bar.

Repeat this in every stitch across. If you used both loops for the last stitch, go ahead and do the same here as well.

Now you can cut your yarn and fasten off as normal.
Curling is Normal
Tunisian simple stitch will curl, in the same way that stockinette stitch curls in knitting. Blocking or adding borders can help minimize the curling, but it is just the nature of the stitch.
Tunisian Simple Stitch (tss) – Video Tutorial
Watch this video on YouTube
Rate this Tunisian Crochet Tutorial!

Tunisian Foundation Row Crochet Tutorial
Welcome to the world of Tunisian crochet! A cross between regular crochet and knitting, this technique can create unique textures and patterns. Lace and other complicated designs may start differently. But most basic designs will start with this Tunisian foundation row.

The Tunisian 2-Step
A normal single crochet has 2 parts – first you pull up a loop, then you pull through both loops on your hook. In Tunisian crochet we split these 2 steps apart. First we pull up all the loops in all the stitches. This is called the forward pass. Then, we work through the loops two at a time. This is called the return pass.
Tunisian Crochet Hooks
Because we pull up all the loops at once in the forward pass, we need a hook that can hold all those loops with an even tension. This means that the space between any thumb grip and the neck of your hook has to be able to comfortably hold as many loops as you have.
Tunisian crochet hooks resemble knitting needles with a hook on the end. They are long, with no thumb grip, and often have a stopper at the back to keep stitches from falling off.

For this tutorial, I am only showing a small number of stitches, so I am actually using a regular crochet hook. This hook, which I received from Brittany Hooks some time ago for a product review, has a straight shaft without a thumb grip. This makes it perfect for small sections of Tunisian crochet, like in this entrelac cowl.
Starting chain
Like most crochet, we start with a chain. You only need as many chains as you would like to have stitches. You do not need any extra chains for turning. For our tutorial, let’s work with 10 chains.

If you are working on a project with a long foundation, you can of course make extra chains to be safe and rip out any leftovers at the end. See this post for more tips on working with long starting chains in traditional crochet.
Foundation Row Forward Pass
When picking up loops for the forward pass, you can work into any part of the chain as you normally would. I prefer to work into the back bump.
The loop that is on your hook is coming out of the last chain you made. We will treat that loop as the first stitch. Starting with the 2nd chain from your hook, insert your hook into the chain, yarn over, and pull up a loop. Repeat this in every chain across. You should now have 10 loops on your hook

Foundation Row Return Pass
The return pass starts with a chain, similar to making a turning chain when starting a new row. To make the chain, yarn over and pull through only the first loop on your hook. That first loop becomes a vertical bar, which is our first stitch.

Now, yarn over and pull through two loops on your hook. Continue doing this until there is only one loop left on your hook.

You can see that each of the 10 loops has created a vertical bar, for 10 stitches. Each stitch has a vertical bar in the front, a vertical bar at the back, and a chain like section at the top. This is your Tunisian foundation row.
Tunisian Foundation Row – Video Tutorial
Watch this video on YouTube
Rate this Tunisian Crochet Tutorial!

Long Starting Chains – Crochet Tips and Tricks
Larger crochet projects, like blankets, often start with long starting chains. Large numbers of chains can be hard to keep track of, particularly if you are joining them to work in the round. Learn some simple tricks to make it easier, including a video tutorial below!

Foundation Stitches
Foundation stitches, where you work the chain and the stitch at the same time, are a great alternative to starting with a chain. They are my preferred option when the first row is straight and plain. However, they don’t always work as well when the first row is more complicated, particularly if it includes decreases or skipped chains.
This post is about those times when you cannot (or do not want to) use foundation stitches and instead are working with a long starting chain. If you’d like to learn more about foundation stitches, here’s a great tutorial.

Tip 1: Make extra chains
Very few things are worse than getting to the end of your first row only to find that you don’t have enough chains. Luckily, there’s an easy solution. Make more chains!
Purposely make a handful of extra chains when you start your project. I usually make 5 or 6 extra, but for very long projects I may even make 10 or 15. This is also handy when designing, so I can tweak the pattern without starting over.

At the end of your first row, when you have confirmed you have the right number of stitches, you can undo the extra chains. I usually don’t use a slip knot, but if you do, use your fingernails or a needle to unpick the knot. If you have enough extra chains, you could even cut the knot off. You will still have a tail from undoing the extra chains.
Once your knot is gone, simply pull out each extra chain. Follow the path of the yarn and gently pull them out one by one. Stop when you see that the yarn is now coming out of the bottom of the last stitch. At that point, pull on your tail to tighten it, and you’re done!

Tip 2: Joining long starting chains in the round
It can be frustrating to join a long chain in the round without twisting it. The solution to this problem is to bring the ends together while the chain is still short!
Start by chaining enough stitches to make a comfortable loop – in my case, with worsted weight yarn, this was about 20. Next, without twisting the chain, place the first chain on the hook just behind the current working loop.

If you have a plain, straight hook with no grip, you can bring the first chain up and over the back of the hook, and slide it into place. In my case, the grip would have made this more difficult. I still could have done it, by loosening the chain until it would fit over the hook, and then tightening it again.

The other way is to take the current stitch off the hook, put the hook through the first chain, and then put the current stitch back onto the hook. Now you have the two ends of the loop together. You can continue chaining as much as you want and the loop will not be twisted.
When you are finished chaining, pull the working loop through the first chain, and you’re ready to go!

My only problem with this method is that we are now back to needing the exact right number of chains. We can’t make extra and rip them out at the end like in our first tip. To make it easier, my preferred technique is to actually not join the chains at all!
Tip 3: Joining the first round
I usually work the first round as though it was a row. I make extra chains, and then rip them out when I know I have enough stitches. Then, I join the first round with a slip stitch, just like I normally would join a round.
This leaves a small gap at the bottom of the round, where the chain is not joined. To close the gap, simply sew it closed with the tail.

This method may give you a slightly different look at the edge. If you work in the back bump, or if you were going to turn before working the first round, it will look the same.
Otherwise, the chains may tilt in the opposite direction from what was intended. This is not a big deal at all if you are going to add an edging. If it is important to the design though, you may want to use the method in Tip 2 instead.
Working with Long Starting Chains – Video Tutorial
Watch this video on YouTube
Rate this Crochet Tutorial!

Front Loop Only (flo) or Back Loop Only (blo) Crochet
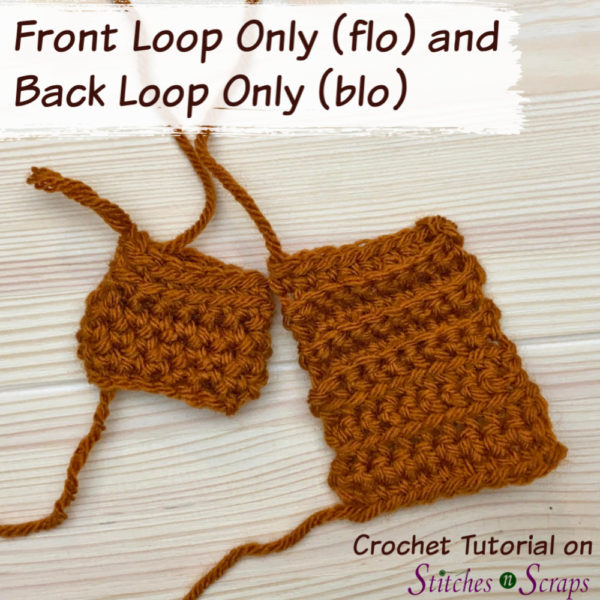
Working in the front loop only or back loop only of a crochet stitch is a useful technique to know. With it, you can create different textures, layers, or even turn your work in a new direction. In this tutorial, see how to work in one loop only, and why to choose one loop or the other.

This post contains sponsored content and/or affiliate links. If you click an affiliate link and make a purchase, I may get a commission.
Finding the front loop and back loop
Almost every crochet stitch has a V shape at the top. That V is made up of 2 loops, a front loop and a back loop. Many people get confused about which is which, because it’s not absolute.
The front loop is always the one closest to you. The back loop is always the one further away from you.

That means it changes depending on which side of the stitch you are looking at. When you’re working in rounds and not turning your work, the front and back loop look different than they do when you’re working in rows and turning your work.
Working into the front loop only or back loop only
Normally, you insert your hook under both the loops that make up that top V shape. But what if the instructions say to work into the front loop only (flo) or back loop only (blo)? To do that, insert your hook under only the specified loop instead.

It really is that simple!
Why work into 1 loop?
Working in one loop instead of both does 2 things. First, it leaves the other loop exposed / unused. Second, it shifts the stitch you’re making slightly to the front or the back.
Exposed loops are useful if you need something to work into later. This could be for seaming, adding another layer of fabric, decorative surface crochet, and more. They also create a pretty and subtle striping effect.
Changing the angle of the stitch can create a ribbed fabric. It can also help to turn your work in a different direction, when creating three dimensional objects. I use this as a ribbing technique often. You can see it in my Pumpkin Post Topper, Sapling Sweater Vest, Ice Scraper Mitt, and Super Stretchy Leg Warmers.
Front or Back?
The choice of which loop to work into depends on the effect you want to create. If you’re looking for exposed loops, which side of the fabric do you want them to be on? Working in the front loop will leave an exposed loop on the back, and working into the back loop will leave an exposed loop on the front.

Similarly, working in the front loop will tilt your stitches forward, while working in the back loop will tilt your stitches backwards. This tilt is not the same for both loops.
When working in rows, because you are turning your work, the top of the stitch leans towards the back. This means the back loop creates more of a tilt than the front loop. If you work every row in the back loop, it will tilt in one direction and then another. This alternating tilt creates a ribbed fabric.

This effect is much less noticeable when working in front loops, because it doesn’t tilt as much.
Working in rounds
If you turn your rounds, the stitches lean backwards just like in rows. If you do not turn your rounds but always work in the same direction, the stitches lean forwards.
In either case, the tilting effect is not as noticeable in rounds. Forming a closed circle, by joining or continuing around, pulls the stitches together so they are straight again. You may notice a bit of puffiness, but it won’t be as dramatic as it was in rows.

Front Loop Only (flo) and Back Loop Only (blo) video tutorial
Rate this Front and Back Loop Tutorial!

How to Crochet Star Stitch Chevrons – Photo and Video Tutorial
If you like the rich texture of crochet star stitches and the bold, zig-zag lines of chevrons, bring them together with this striking star stitch chevron stitch pattern!

Try this stitch out with the Star Stitch Chevron Spa Washcloth pattern!
Abbreviations used
This tutorial uses the following abbreviations (in US terms).
ch = chain
sc = single crochet
hdc = half double crochet
sc2tog = single crochet 2 stitches together
sc3tog = single crochet 3 stitches together
hdc2tog = half double crochet 2 stitches together
star = star stitch
beg star = beginning star stitch
dec = star decrease
st(s) = stitch(es)
sl st = slip stitch
Crochet Star Stitch Tutorial
This is a more advanced stitch and the tutorial assumes you already know how to do the star stitch. If you don’t, you may want to read this Crochet Star Stitch tutorial first. Here’s a basic refresher:
Star Stitch (Star):
Pick up one loop each in eye, last leg, and base of next star, pick up one loop in each of next 2 stitches, yarn over and pull through all 6 loops on hook, ch-1 to close.

Crochet Chevron Basics
All the magic of chevrons happens in the “peaks” and “valleys.” Increases at the top peaks and decreases at the bottom valleys are what give the stitch it’s zig-zag shape.
Increase at the top, Decrease at the bottom
Increasing forces the stitches to curve outwards, forming the peak at the top. Decreasing at the bottom pulls the stitches in towards each other, creating the valleys.
The decrease at the bottom should match the increase at the top. Typically, this is a 2 stitch increase at the top matched by a 2 stitch decrease at the bottom. This way, the stitch count will stay the same. For every peak, there needs to be an equal and opposite valley, taking into account the edge stitches as well.

A little different at the edges
To get nice, straight edges, increase and decrease only half as many stitches as normal at the edges. For our example, there should be one increase edge and one matching decrease edge, to keep the stitch counts the same. I like to add one extra stitch at the decrease end as well, just to get a straighter looking edge.
It is also common to have both edges the same, either both increases or both decreases. Since the edges only use half as many stitches for the increases and decreases, they can be offset by one extra peak or valley in the middle. So you can have an extra peak in the middle and a valley at each end, or an extra valley in the middle and a peak at each end. For this tutorial, I wanted to show you both edge options, so we’re doing one of each.
What’s in the middle?
Now that we know the basic structure, let’s have some fun in the middle! The stitches between the peaks and valleys can be any stitches you want, as long as the stitch count remains the same in each section. This is where the star stitches come in.
How to crochet star stitch chevrons
Stitch Counts
For our chevrons, we will be using a multiple of 18 stitches plus 11. The foundation chain will need 1 extra turning chain as well, so the foundation chain is a multiple of 18 plus 12. In the video below, I have used a swatch with just one repeat, so I chained 30 to start.
Set up row
Ch 30
Row 1: Sc in the 2nd ch from hook, sc2tog (valley edge), [sc in next 7 chs, 3 sc in next ch (peak), sc in next 7 chs, sc3tog (valley)], Repeat between [ ] until you reach the last 8 chs, sc in next 7 chs, 2 sc in last ch (peak edge).
This basic single crochet chevron row gives us a foundation for our star stitches.

Star Stitch Row
This row starts at a peak, so ch 1, 2 hdc in the first st.
Now we can start our repeat section, with star stitches. But star stitches normally start with chains at the edge, which we can’t do here. We need something else to work the first star into. Let’s use an hdc.
*Hdc in the next stitch, then work a beginning star:
Beginning star (beg star)
For a normal star we pick up 5 loops – in the eye, leg, and base of the previous star, and then 1 in each of the next 2 stitches. Our hdc has no eye, so instead, do a yo for that first loop.
The hdc does have a leg and a base, so we can pick up the next 4 loops just like normal. Yarn over and pull through all 6 loops, and our beginning star is complete!
Work 2 more normal star stitches, and that takes you to the first valley.

Star decrease (dec)
We could decrease using an hdc3tog, but those can be bulky. Eliminating the first yarn over decreases the bulk and makes it look more like a star stitch.
Insert hook into next stitch and draw up a loop, (yo, insert hook into next stitch and draw up a loop) twice. You should now have 6 loops on your hook. Yarn over and raw through all 6 loops.

3 more stars will take us up to the peak: Beg star, star twice, 3 hdc in next st.
Repeat from * until you have 10 stitches left. 3 more stars (beg star, star twice) takes you to the final valley. Hdc2tog, hdc in the last stitch.
Row 2: Ch 1, turn, 2 hdc in first st, [hdc in next st, beg star, star twice, dec, hdc in next st, beg star, star twice, 3 hdc in next st] repeat between [ ] to last 10 sts, hdc in next st, beg star, star twice, hdc2tog, hdc in last st.
Single Crochet Chevron Row
This row is almost the same as our first, set up row, except now we’re working into the star stitches we made. The only tricky part of this row is knowing where the stitches are.
Each star counts as 2 stitches – one in the eye, and one in the top. When you get to the valleys in this row, you will be working your sc3tog decreases into an hdc, the star decrease, and the eye of the next star.

Row 3: Ch 1, turn, sc in first st, sc2tog, [sc in next 7 sts, 3 sc in next st, sc in next 7 sts, sc3tog], Repeat between [ ] until you reach the last 8 sts, sc in next 7 sts, 2 sc in last st.
Repeat rows 2 and 3 until you reach your desired size.
Edging:
Rows 1 and 3 are wrong side rows, so you will most likely want to do some sort of edging. A round of single crochet makes a good base for any edging you plan to do.
For the top edge, Ch 1, turn, and work an sc chevron row across. This time, you’ll be starting at a peak:
Top edge: Ch 1, turn, 2 sc in first st, [sc in next 7 sts, sc3tog, sc in next 7 sts, 3 sc in next st], repeat between [ ] until you reach the last 10 sts, sc in next 7 sts, sc2tog, sc in last st.
For the side edge, ch 1 and sc evenly across. The rows have been alternating between hdc and sc rows, so working 1 sc in each row should give you a nice, even edge.

The bottom edge is another sc chevron row. Because we’ve turned our work upside down, we’re again starting with a peak. Work this edge the same way you worked the top edge.
For the other side edge, ch 1 and sc evenly across, using the same number of stitches you did for the other side. Join with a sl st to complete the edging round.


