Free Knitting Patterns

Find the perfect, free knitting pattern for your next project! Browse them all, or select a category from the dropdown menu. Where will your creativity take you today?


Flying Fingers knit flat fingerless mitts
Make fingerless gloves fast, on 2 straight needles! With simple stitches and minimal shaping, your fingers will fly through these ...More
Polyantha Rose Garden Shawl - free knitting pattern on Stitches n Scraps
Lacy leaves, dotted with clusters of rosebuds and bordered by spectacular blooms. Step into the rose garden with the Polyantha ...More
Lucky Hearts Coaster - Free double knitting pattern on Stitches n Scraps
Create a reversible, 2-color design with double knitting! With two layers of fabric, this double knit coaster is thick and ...More
Fabulous Floats Slip Stitch Knit Washcloth knit pattern on Stitches n Scraps
Show off your floats! This slip stitch knit washcloth takes advantage of the carried strands of yarn (or floats) to ...More
A yellow, textured scrunchie on a wood table. Text: Rosette Stitch Scrunchie - Free Knitting Pattern on StitchesnScraps.com
It's official, scrunchies are back! My inner pre-teen is so excited. Try this knit scrunchie pattern for a quick holiday ...More
A finger knit snow blanket, with some holiday decorations on top of it. Text - Finger Knit Snow Blanket - Free Pattern on Stitches n Scraps
Show off your holiday decor on a finger knit snow blanket! Twisted stitches create a puffy, snowy texture that's a ...More
Taupe and green pillow, showing front and back - Unbiased Pillow on StitchesnScraps
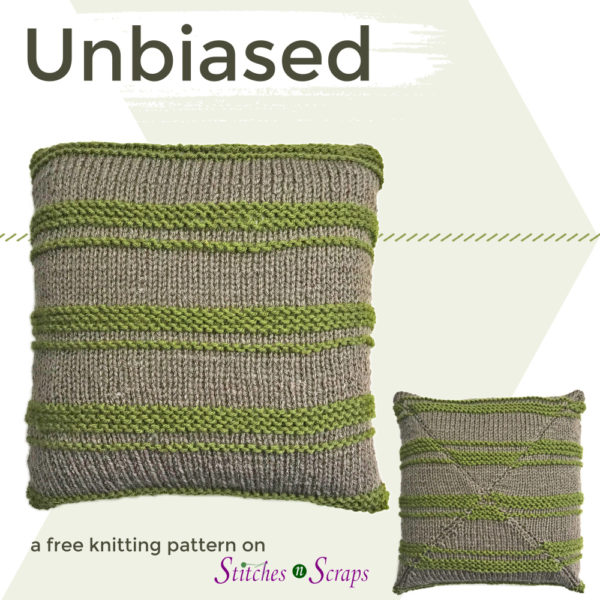
This seemingly simple, striped pillow has a secret - it's knit on the bias! Knit diagonal stripes, then seam them ...More
A fuzzy, finger knit basket in bright blue and green, on a wood floor next to a beige wall, brown couch, and red rug. Basket is filled with skeins of yarn. Finger Knit Basket - Pattern on Stitches n Scraps
Learn how to knit without needles! This bright, finger knit basket pattern is fast and easy to make. It stands ...More
Reversible cables headband - free knitting pattern on Stitches n Scraps
Get 2 looks from one headband! Wear it one way for 2 cables with a decorative edge. Turn it round ...More
Cobblestone Lane - a free knitting pattern on Stitches n Scraps
Take a stroll down a winding, cobblestone lane on a crisp spring day, and see what adventures you can find. ...More
Flying Fingers knit flat fingerless mitts

Knit Flat Fingerless Gloves – Flying Fingers

Make fingerless gloves fast, on 2 straight needles! With simple stitches and minimal shaping, your fingers will fly through these knit flat, fingerless gloves. Leave the row of eyelets open at the wrist, or add your favorite ribbon for a personal touch.

Flying Fingers knit flat fingerless mitts

This content is protected by copyright. See this Terms of Use / Copyright page for more information.

This post contains sponsored content and/or affiliate links. If you click an affiliate link and make a purchase, I may get a commission.

Christmas in July Make Along

This pattern was designed for the Christmas in July Make Along hosted by Underground Crafter. Come join the fun with a month full of daily, free patterns perfect for holiday gifting. There’s something new to make every day in July!

2020 Christmas in July Make Along with Underground Crafter

The make along includes crochet, knitting, sewing, and other crafting projects. Each week has a theme:

  • Week 1 (July 1-7): Babies, Kids, and Teens
  • Week 2 (July 8-14): Women
  • Week 3 (July 15-21): Gifts for Anyone
  • Week 4 (July 22-28): Home
  • Week 5 (July 29-31): Pets

How To Join the 2020 Christmas in July Make Along

  • Make the projects – Make just a few, or make them all. By the end of the make along, you’ll have up to 31 projects ready for gifting!
  • Share pictures of your progress and your finished projects. Be sure to use the hashtag #CIJMakeAlong2020 when sharing on social media.
  • Join the conversation on the Underground Crafters Facebook group

Enter the Giveaway

There’s also a giveaway with some great prizes! See the full schedule, participating designers, and giveaway details on Underground Crafter. Hurry – the giveaway entry deadline is Tuesday, August 4, 2020 at 11:59 p.m. Eastern.

Paintbox Simply Aran yarn

I made my gloves with Paintbox Simply Aran yarn in #224 Pistachio Green. This is one of my go-tos for a soft, affordable, worsted weight yarn. I love that it comes in such a wide array of colors too!

Paintbox color 224

Knitting increases

The thumb shaping in this pattern uses 2 different variations of the make 1 (m1) knit increase. A make 1 is done by picking up the bar (strand of yarn) between two stitches and knitting it. Depending on which direction you place that strand on your needle, and how you knit into it, your stitch will lean either to the left or to the right.

Make 1 Right (m1r)

For a right leaning, m1r increase, pick up the bar by inserting your needle from back to front, then knit it through the front leg.

Make 1 right - M1R

Make 1 Left (m1l)

For a left leaning, m1l increase, pick up the bar by inserting your needle from front to back. Then knit it through the back leg.

Make 1 Left - M!L

Either way, you should end up with a brand new, twisted stitch. For more information on the m1 increases, check out this tutorial from Purl Soho.


Materials

Project Level

Easy: Mostly knits and purls, with a few basic increases and decreases.

Size

Adult – one size fits most.

Gauge

15 sts x 24 rows = 4 inches in stockinette.

Abbreviations used

k = knit
p = purl
m1r = make 1 right
m1l = make 1 left
k2tog = knit 2 together
yo = yarn over
co = cast on
bo = bind off
RS = right side

Instructions

Cuff

Co 29 sts using an alternating cable / seed stitch cast on.

Row 1 (RS): K1, (p1, k1) across.

Row 2: P1, (k1, p1) across.

Rows 3-11: Repeat rows 1-2 4 times, then repeat row 1 once more.

Flying Fingers - Cuff

This is a good time to check your sizing – place all stitches on waste yarn and wrap the cuff around your wrist. It should stretch to fit comfortably. If it does not, try a different needle size.

Hand (below thumb)

Row 12: K1, (yo, k2tog) across.

Row 13: K across.

Row 14: P across.

Rows 15-22: Repeat rows 13-14 4 times.

Flying Fingers - Hand below thumb opening

Thumb

Row 23: K14, m1r, k1, m1l, k14. (31 sts)

Row 24: P across.

Row 25: K15, m1r, k1, m1l, k15. (33 sts)

Row 26: P across.

Row 27: K across.

Row 28: P14, bo5, p14. (28 sts).

Flying Fingers - bottom part of thumb

Row 29: K13, m1r, k2, m1l, k13. (30 sts)

Row 30: P across.

Row 31: K14, k2tog, k14. (29 sts)

Flying Fingers Thumb

Hand (above thumb)

Row 32: P across.

Row 33: K across.

Rows 34-42: Repeat rows 32-33 4 times, then repeat row 32 once more.

Row 43: K1, (p1, k1) across.

Row 44: P1, (k1, p1) across.

Rows 45-46: Repeat rows 43-44

Cut yarn leaving a 48 inch tail for bind off and seaming.

Bind off all stitches using a sewn / tubular bind off.

Fling Fingers - knit flat fingerless gloves

Finishing

Fold glove in half and sew the sides together using a mattress stitch.

Weave in all ends.

Flying Fingers knit flat fingerless mitts

Repeat instructions for second glove.

Optional – weave a ribbon into the eyelets at the wrist and tie in a bow.

Flying Fingers knit flat fingerless mitts

Rate this Knit Flat Fingerless Gloves Pattern!


I hope you enjoyed this knit flat fingerless gloves pattern. A downloadable pdf of this pattern is available on Ravelry for a small fee. The fee for the pdf format is to offset the advertising revenue lost when you print or download the pattern rather than viewing it online.

Do you want the best of Stitches n Scraps delivered right to your inbox? The Stitches n Scraps email newsletter includes highlights from the blog as well as special features not available elsewhere. Don’t miss a stitch – Subscribe now!

Polyantha Rose Garden Shawl - free knitting pattern on Stitches n Scraps

Knit Triangle Shawl – Polyantha Rose Garden

Lacy leaves, dotted with clusters of rosebuds and bordered by spectacular blooms. Step into the rose garden with the Polyantha Rose Garden triangle knit shawl. Wrap yourself in the generous layers of lace, perfect for a breezy, summer evening.

Triangle knit shawl - Polyantha Rose Garden Shawl - free knitting pattern on Stitches n Scraps

This content is protected by copyright. See this Terms of Use / Copyright page for more information.

This post contains sponsored content and/or affiliate links. If you click an affiliate link and make a purchase, I may get a commission.

Nurturing Fibres

At a conference last year, I met the wonderful folks from Good Loops Yarn. They gave me some of their Nurturing Fibres Supertwist Sock yarn for free to design this shawl. It’s a lusciously soft and smooth merino yarn that was a joy to work with. It was strong enough to handle being knit and ripped out at least 5 or 6 times as I changed my mind about the design. It’s also available in a wide variety of rich colors so you can find just the right shade! Both colors I chose have a lovely, subtle, tonal quality to them.

Nurturing fibers SuperTwist Sock yarn from Good Loops

Step into the Garden

Polyantha roses are small plants with tight clusters of blooms. Check out this great article on how to grow these fragrant roses!

The mesh stripes in this shawl reminded me of these types of roses. I picture a fragrant garden with clusters of miniature roses, bordered by a few larger blooms just around the edge.

Closeup of the Polyantha shawl showing border and edging detail

Polyantha Rose Garden

1 - Super fine (Fingering)
Project-Level-Complex

Add this to your Ravelry queue

Materials

  • Yarn: Nurturing Fibres SuperTwist Sock yarn – 100% merino wool, 350 yds / 100g per skein. (See gauge for note on quantity). 1 skein each of:
    • Cedar (green)
    • Odette (pink)
  • Needles: Size 4 / 3.5 mm circular knitting needles at least 32 inches long.
  • Notions:
    • 2 Stitch markers
    • Tapestry Needle
    • 12 inches waste yarn for cast on

Project Level

Complex: 2 lace patterns plus mesh, sideways border with 1 small short row section at the point.

Size

60 inches wide at top x 36 inches tall at center

Gauge

Before Blocking: 22 sts x 40 rows = 4 inches in stockinette stitch.

After Blocking: 18 sts x 36 rows = 4 inches in stockinette stitch.

This pattern uses nearly the entire skein of both colors – if your gauge is larger, you will need more yarn.

Abbreviations used

k = knit
p = purl
yo = yarn over
ssk = slip slip knit
k2tog = knit next 2 stitches together
sk2p = slip one, knit 2 together, pass slipped stitch over
st(s) = stitch(es)
RS = right side
WS = wrong side

Instructions

Garter Tab Cast on

With waste yarn, cast on 3

Rows 1-6: With green, k across

Row 7: K 3, pick up and knit 3 sts along side of rows, remove waste yarn from cast on and knit the 3 live stitches along along bottom of cast on. (9 sts)

Row 8: K5, place marker, k4.

Cast on completed – row count starts over for remainder of shawl. Slip markers as you come to them. On RS rows, center stitch is shown in bold. On rows 1 and 55, the center stitch is in the 2nd of the 3 repeats.

Triangle knit shawl - Polyantha Rose Garden Shawl - free knitting pattern on Stitches n Scraps

Shawl

Scroll down for charts

Section 1

Row 1 (RS): k3, (yo, k1) 3 times, yo, place marker, k3. (13 sts)

All WS rows from 2-54: K3, p to last 3 sts, k3.

Row 3: (K3, yo) twice, k1, (yo, k3) twice. (17 sts)

Row 5: K3, [yo, k1, yo, sk2p, yo, k1, yo], k1, rep [ ], k 3. (21 sts)

Row 7: K3, [yo, k1, k2tog, yo, k1, yo, ssk, k1, yo], k1, rep [ ], k 3. (25 sts)

Row 9: K3, [yo, k1, k2tog, yo, k3, yo, ssk, k1, yo], k1, rep [ ], k 3. (29 sts)

Row 11: K3, [yo, k1, k2tog, yo, k5, yo, ssk, k1, yo], k1, rep [ ], k 3. (33 sts)

Row 13: K3, [yo, k2tog, yo, k1, yo, ssk, k3, k2tog, yo, k 1, yo, ssk, yo], k1, rep [ ], k 3. (37 sts)

Row 15: K3, [yo, k2tog, yo, k3, yo, ssk, k1, k2tog, yo, k 3, yo, ssk, yo], k1, rep [ ], k 3. (41 sts)

Row 17: K3, [yo, k2tog, yo, k5, (yo, sk2p, yo, k 5) to 2 sts before marker, yo, ssk, yo], k1, rep [ ], k 3. (45 sts)

Row 19: K3, [yo, k2, (yo, ssk, k3, k2tog, yo, k1) to 1 st before marker, k1, yo], k1, rep [ ], k 3. (49 sts)

Row 21: K3, [yo, k4, (yo, ssk, k1, k2tog, yo, k3) to 1 st before marker, k1, yo], k1, rep [ ], k 3. (53 sts)

Row 23: K3, [yo, k6, (yo, sk2p, yo, k5) to 1 st before marker, k1, yo], k1, rep [ ], k 3. (57 sts)

Row 25: K3, [yo, k1, (yo, ssk, k3, k2tog, yo, k1) to marker, yo], k1, rep [ ], k 3. (61 sts)

Row 27: K3, [yo, k3, (yo, ssk, k1, k2tog, yo, k3) to marker, yo], k1, rep [ ], k 3. (65 sts)

Row 29: K3, [yo, k5, (yo, sk2p yo, k5) to marker, yo], k1, rep [ ], k 3. (69 sts)

Row 31: K3, [yo, k5, (k2tog, yo, k1, yo, ssk, k3) to 2 sts before marker, k2, yo], k1, rep [ ], k 3. (73 sts)

Row 33: K3, [yo, k2, (yo, ssk, k1, k2tog, yo, k3) to 7 sts before marker, yo, ssk, k1, k2tog, yo, k2, yo], k1, rep [ ], k 3. (77 sts)

Row 35: K3, [yo, k4, (yo, sk2p, yo, k5) to 7 sts before marker, yo, sk2p, yo, k4, yo], k1, rep [ ], k 3. (81 sts)

Row 37: K3, [yo, k4, (k2tog, yo, k1, yo, ssk, k3) to 1 st before marker, k1, yo], k1, rep [ ], k 3. (85 sts)

Row 39: K3, [yo, k1, (yo, ssk, k1, k2tog, yo, k3) to 6 sts before marker, yo, ssk, k1, k2tog, yo, k1, yo], k1, rep [ ], k 3. (89 sts)

Row 41: K3, [yo, k3, (yo, sk2p yo, k5) to 6 sts before marker, yo, sk2p yo, k3, yo], k1, rep [ ], k 3. (93 sts)

Row 43: K3, [yo, k3, (k2tog, yo, k1, yo, ssk, k3) to marker, yo], k1, rep [ ], k 3. (97 sts)

Row 45: K3, [yo, k3, (k2tog, yo, k3, yo, ssk, k1) to 2 sts before marker, k2, yo], k1, rep [ ], k 3. (101 sts)

Row 47: K3, [yo, k2, (yo, sk2p, yo, k5) to 5 sts before marker, yo, sk2p, yo, k2, yo], k1, rep [ ], k 3. (105 sts)

Row 49: K3, [yo, k2, (k2tog, yo, k1, yo, ssk, k3) to 7 sts before marker, k2tog, yo, k1, yo, ssk, k2, yo], k1, rep [ ], k 3. (109 sts)

Row 51: K3, [yo, k2, (k2tog, yo, k3, yo, ssk, k1) to 1 st before marker, k1, yo], k1, rep [ ], k 3. (113 sts)

Row 53: K3, [yo, k1 (yo, sk2p, yo, k5) to 4 sts before marker, yo, sk2p, yo, k1, yo], k1, rep [ ], k 3. (117 sts)

On row 55, the center stitch is in the 2nd of the 3 repeats.

Row 55: With pink, K3, (yo, k2tog) to 1 st before marker, (yo, k1) 3 times (yo, k2tog) to last 3 sts, yo, k 3. (121 sts)

Row 56: K.

Rows 57-64: Repeat rows 55-56 4 times. (137 sts)

Triangle knit shawl - Polyantha Rose Garden Shawl - free knitting pattern on Stitches n Scraps

Section 2:

Rows 65-102: With green, rep rows 17-54 (213 sts)

Rows 103-112: With pink, rep rows 55-64 (233 sts)

Section 3:

Rows 113 -138: With green, rep rows 17-42 (285 sts)

Shawl Chart

Because this chart is so wide, I have split it into 2 sections. RS rows are worked from the right to the left, and WS rows from the left to the right. Start at the edge, work to the center stitch, then continue on the other chart to the other edge.

Chart for Polyantha Rose Garden Shawl - Sections 1-3
Click image to expand.

Border:

Row 139: With pink, k3, yo, k to marker, yo, k1, yo, k to marker, yo, k3. (289 sts)

All WS rows from 140-168: K3, p to last 3 sts, k3.

Row 141: K3, yo, [k12, k2tog, yo, k1, (yo, ssk) twice, k8] 5 times, k6, yo, k1, yo, k6, [k8, (k2tog, yo) twice, k1, yo, ssk, k12] 5 times, yo, k3. (293 sts)

Row 143: K3, yo, [k11, k2tog, yo, k7, (yo, ssk, k1) twice, k1] 5 times, k 8, yo, k1, yo, k8, [k2, (k2tog, yo, k1) twice, k6, yo, ssk, k11] 5 times, yo, k3. (297 sts)

Row 145: K3, yo, [k10, k2tog, yo, k9, (k1, yo, ssk) twice] 5 times, k10, yo, k1, yo, k10, [(k2tog, yo, k1) twice, k9, yo, ssk, k10] 5 times, yo, k3. (301 sts)

Row 147: K3, yo, k2, [k11, k2tog, yo, k2, k2tog, yo, k1, yo, ssk, k5, yo, ssk] 5 times, k10, yo, k1, yo, k10, [k2tog, yo, k5, k2tog, yo, k1, yo, ssk, k2, yo, ssk, k11] 5 times, k2, yo, k3. (305 sts)

Row 149: K3, yo, k4, [k8, k2tog, yo, k3, k2tog, yo, k3, yo, ssk, k5, yo, ssk] 5 times, k10, yo, k1, yo, k10, [k2tog, yo, k5, k2tog, yo, k3, yo, ssk, k3, yo, ssk, k8] 5 times, k4, yo, k3. (309 sts)

Row 151: K3, yo, k5, [k7, k2tog, yo, k2, (k2tog, yo, k1, yo, ssk, k1) twice, k2, yo, ssk] 5 times, k11, yo, k1, yo, k11, [k2tog, yo, k2, (k1, k2tog, yo, k1, yo, ssk) twice, k2, yo, ssk, k7] 5 times, k5, yo, k3. (313 sts)

Row 153: K3, yo, k5, [k7, k2tog, yo, k2, k2tog, yo, k3, yo, sk2p, yo, k3, yo, ssk, k1, k2tog, yo] 5 times, k13, yo, k1, yo, k13, [yo, ssk, k1, k2tog, yo, k3, yo, sk2p, yo, k3, yo, ssk, k2, yo, ssk, k7] 5 times, k5, yo, k3. (317 sts)

Row 155: K3, yo, k6, [k7, k2tog, yo, k3, (yo, ssk, k1, k2tog, yo, k1) twice, k1, k2tog, yo] 5 times, k14, yo, k1, yo, k14, [yo, ssk, k1, (k1, yo, ssk, k1, k2tog, yo) twice, k3, yo, ssk, k7] 5 times, k6, yo, k3. (321 sts)

Row 157: K3, yo, k7, [k8, yo, ssk, k3, (yo, sk2p, yo, k3) twice, k2tog, yo] 5 times, k15, yo, k1, yo, k15, [yo, ssk, (k3, yo, sk2p, yo) twice, k3, k2tog, yo, k8] 5 times, k7, yo, k3. (325 sts)

Row 159: K3, yo, k7, [k10, yo, ssk, k4, yo, ssk, k1, k2tog, yo, k4, k2tog, yo] 5 times, k17, yo, k1, yo, k17, [yo, ssk, k4, yo, ssk, k1, k2tog, yo, k4, k2tog, yo, k10] 5 times, k7, yo, k3. (329 sts)

Row 161: K3, yo, k7, [k12, (yo, ssk) twice, k2, yo, sk2p, yo, k2, (k2tog, yo) twice] 5 times, k19, yo, k1, yo, k19, [(yo, ssk) twice, k2, yo, sk2p, yo, k2, (k2tog, yo) twice, k12] 5 times, k7, yo, k3. (333 sts)

Row 163: K3, yo, k7, [k14, yo, ssk, k7, (k2tog, yo) twice] 5 times, k21, yo, k1, yo, k21, [(yo, ssk) twice, k7, k2tog, yo, k14] 5 times, k7, yo, k3. (337 sts)

Row 165: K3, yo, k5, [k19, yo, ssk, k4, k2tog, yo] 5 times, k25, yo, k1, yo, k25, [yo, ssk, k4, k2tog, yo, k19] 5 times, k5, yo, k3. (341 sts)

Row 167: K3, yo, k5, [k21, (ssk, yo) twice, k2tog, yo] 5 times, k27, yo, k1, yo, k27, [yo, ssk, (yo, k2tog) twice, k21] 5 times, k5, yo, k3. (345 sts)

Remember to work Row 168

Border Chart

Because this chart is so wide, I have split it into 2 sections. RS rows are worked from the right to the left, and WS rows from the left to the right. Start at the edge, work to the center stitch, then continue on the other chart to the other edge.

Polyantha Rose Garden Shawl chart - border
Click image to expand

Edging

Edging is worked sideways and connected to the shawl by a decrease on every RS row. Leave any remaining sts unworked at the end of every RS row. Remove markers as you come to them. When casting on and binding off, use a cable cast on and a basic knit bind off.

First half

Row 1 (RS): Cast on 3, k2, k2tog.

All WS rows from 2-338: K3.

Row 3: Cast on 8, bind off 8, k2, k2tog. (loop created)

Rows 5-11: K2, k2tog.

Row 13: Pick up 2 strands from end of loop and place it on your right needle. K1, pass the picked up strands over, k1, k2tog. (loop attached)

Rows 15-338: Rep rows 3-14 27 times.

There should now be 3 sts remaining before the center marker. Rows 343-346 are short rows – simply leave any remaining stitches unworked, there is no need to wrap and turn.

Center loop

Row 339: Cast on 12, bind off 12, k2, k2tog. (center loop created)

Row 340: K3

Row 341: K2, k2tog

Row 343-344: K1

Row 345-346: K2

Row 347: K2, k2tog

Row 348: K3

Row 349: K2, k2tog (this should connect to the center stitch of the shawl)

Row 350: K3

Rows 351-358: Rep rows 343-350

Row 359: Rep row 13.

Row 360: K3

2nd half

Rows 361-696: Rep rows 3-14 28 times.

Row 697: K2, k2tog (this should connect to the last stitch of the shawl)

Bind off remaining 3 sts.

Triangle knit shawl - Polyantha Rose Garden Shawl - free knitting pattern on Stitches n Scraps

Finishing

Weave in all ends.

Wash and block. Blocking is critical to open up the lace.

Rate this Triangle Knit Shawl Pattern!


I hope you enjoyed this knit triangle shawl pattern. A downloadable pdf of this pattern is available on Ravelry for a small fee. The fee for the pdf format is to offset the advertising revenue lost when you print or download the pattern rather than viewing it online.

Do you want the best of Stitches n Scraps delivered right to your inbox? The Stitches n Scraps email newsletter includes highlights from the blog as well as special features not available elsewhere. Don’t miss a stitch – Subscribe now!

Lucky Hearts Coaster - Free double knitting pattern on Stitches n Scraps

Double Knit Coaster – Lucky Hearts

Create a reversible, 2-color design with double knitting! With two layers of fabric, this double knit coaster is thick and absorbent. Make a whole set to keep or as a gift!

Lucky Hearts Coaster - Free double knitting pattern on Stitches n Scraps

DK weight yarn

Did you know the “DK” in dk weight yarn stands for double knitting? Because double knitting produces a 2-layer fabric, the lighter weight yarn is a good choice for it. For my coaster, I used up some stash yarn which is now discontinued. It was Caron Simply Soft Light in coral and cream. Any DK weight yarn will work – try it in cotton for super absorbency!

KAL Corner 2020 Knit Along

This design is part of the 2020 Knit Along at KAL Corner Knitting. Join us in knitting a new design every month, using DK weight yarn! You can find all the info on the main post, and join in the fun on the Facebook group. Don’t forget to enter the giveaway too!

KAL Corner 2020 Knit Along

How double knitting works

The basic concept is that you are knitting two pieces of fabric at the same time, one in front and one in back. Each pair of stitches represents one “front” stitch and one “back” stitch.

To get stockinette stitch on both sides, you knit the stitches on the front fabric, and purl the stitches on the back fabric. Whatever color you knit with will show on the side you are currently working on, and whatever color you purl with will show on the other side.

Lucky Hearts Coaster - Free double knitting pattern on Stitches n Scraps

If you always use one color for the knits and other color for the purls, you will get two, solid color layers. Keeping the layers separate has it’s uses, but the real fun is in switching the colors to create reversible patterns.


Lucky Hearts Coaster

Project-Level-Complex

Add this to your Ravelry queue

Materials

  • Yarn: DK weight yarn – 20 yds each in 2 colors.
  • Needles: Size 8 / 5 mm knitting needles
  • Notions: Yarn Needle

Project Level

Complex: 2 color double knitting

Size

4 inches square.

Gauge

Use pattern as swatch – coaster should be 4″ square.

Abbreviations used

k = knit
p = purl
BC = background color of the side you are working on
AC = accent color of the side you are working on
KBC = Knit background color (see Special Stitches)
KAC = Knit accent color (see Special Stitches)
Sel = Selvage stitch (see Special Stitches)
sl = slip purlwise
st(s) = stitch(es)

Because the pattern is reversible, the background and accent colors will be different for the two sides. In the sample shown, on one side the background color is coral and the accent color is cream, while on the other side it is reversed. BC and AC always refer to the side you are currently working on.

Recommended Resources

Special Stitches

  • Knit background color (KBC): K 1 in BC, bring both yarns to the front, p 1 in AC, bring both yarns to the back.
  • Knit accent color (KAC): K 1 in AC, bring both yarns to the front, p 1 in BC, bring both yarns to the back.
  • Selvage stitch (Sel): With both yarns at the back, sl 1, bring only AC to the front, sl 1.

Alternate (easier) methods

As written, the pattern makes smooth edges at the cast on, bind off, and sides. Working these edge stitches in pairs, instead of separately, makes chunkier edges but is easier to do. Here are some alternate, easier methods for the edges if you are new to double knitting .

  • Cast on: Hold both yarns together and cast on 19 stitches with both yarns together, using your preferred cast on method. Arrange the stitches so they are alternating in color on the needle.
  • Side edge: Sl the last pair of stitches on each row with both yarns held in front. On the next row, k both stitches together, using both yarns held together. It does not matter what order the yarns end up in on the needle since you are always working them together.
  • Bind off: Bind off the stitches in pairs, using both yarns held together and a simple bind off.

Instructions

Cast on 19 pairs of stitches, using a 2-color, long tail cast on (see Recommended Resources). (38 sts total)

The color that is first on your needle when you start the next row is the BC for that side.

Scroll down for chart – written instructions are the same pattern as the chart.

Rows 1-2: KBC across to last pair of sts, Sel.

Row 3: KBC 1, KAC across to last pair of sts, Sel.

Rows 4-5: KBC 1, KAC 1, KBC across to last 2 pairs of sts, KAC 1, Sel.

Row 6: KBC 1, KAC 1, KBC 5, KAC 2, KBC 1, KAC 2, KBC 5, KAC 1, Sel.

Rows 7-10: KBC 1, KAC 1, KBC 4, KAC 7, KBC 4, KAC 1, Sel.

Row 11: KBC 1, KAC 1, KBC 2, KAC 2, KBC 1, KAC 5, KBC 1, KAC 2, KBC 2, KAC 1, Sel.

Row 12: KBC 1, KAC 1, KBC 1, KAC 4, KBC 1, KAC 3, KBC 1, KAC 4, KBC 1, KAC 1, Sel.

Row 13: KBC 1, KAC 1, KBC 1, KAC 4, KBC 2, KAC 1, KBC 2, KAC 4, KBC 1, KAC 1, Sel.

Row 14: KBC 1, KAC 1, KBC 1, KAC 5, KBC 1, KAC 1, KBC 1, KAC 5, KBC 1, KAC 1, Sel.

Row 15: KBC 1, KAC 1, KBC 2, KAC 11, KBC 2, KAC 1, Sel.

Row 16: Rep row 14

Row 17: Rep row 13

Row 18: Rep row 12

Row 19: Rep row 11

Rows 20-23: Rep rows 7-10

Row 24: Rep row 6

Rows 25-26: Rep rows 4-5

Row 27: Rep row 3

Row 28: Rep row 2

Row 29: Rep row 1

Bind off: KBC, pass 1st st over 2nd st, (k 1 with BC, pass previous st over last st, bring both yarns to front, p 1 with AC, bring both yarns to the back, pass previous st over last st) across.

Fasten off and weave in ends.

Chart:

Click image to expand

Lucky Hearts Double Knit Coaster Chart - Stitches n Scraps

Rate this Double Knit Coaster Pattern!


I hope you enjoyed this washcloth pattern. A downloadable pdf of this pattern is available on Ravelry for a small fee. The fee for the pdf format is to offset the advertising revenue lost when you print or download the pattern rather than viewing it online.

Do you want the best of Stitches n Scraps delivered right to your inbox? The Stitches n Scraps email newsletter includes highlights from the blog as well as special features not available elsewhere. Don’t miss a stitch – Subscribe now!

Fabulous Floats Slip Stitch Knit Washcloth knit pattern on Stitches n Scraps

Slip Stitch Knit Washcloth – Fabulous Floats

Show off your floats! This slip stitch knit washcloth takes advantage of the carried strands of yarn (or floats) to create the striking design. The garter stitch pattern uses ony one color at a time, and only knit and slipped stitches!

Fabulous Floats Slip Stitch Knit Washcloth knit pattern on Stitches n Scraps

Slip Stitches, Mosaic, and Intermeshing Crochet

I was playing around with mosaic knitting, but didn’t really care for how it looked at the back. For something like a washcloth, I really prefer when both sides are pretty. Eventually, my playing led me to try garter stitch, with the floats on both sides of the work instead of always at the back. I loved how the floats became the focal point of the design.

Fabulous Floats Washcloth stitch detail

As I worked on it, I realized that what I was doing was very similar to intermeshing crochet! First, you work one color for two rows, then the other color for two rows. In this way, each color is really creating its own separate fabric, with the floats and edges holding the two fabrics together. This is very much like intermeshing crochet, where 2 layers of crochet mesh are intertwined. If you’re not familiar with that technique, learn more in this Intermeshing Crochet Basics tutorial!

This post contains sponsored content and/or affiliate links. If you click an affiliate link and make a purchase, I may get a commission.

Optical Illusion

This design contains both vertical and horizontal stripes. From some angles, the horizontal stripes are more prevalent. From other angles, the vertical stripes pop out instead!

Side view of Fabulous Floats Washcloth

Lion Brand Re-Up Yarn

I used Lion Brand Re-Up yarn for my washcloth. This 85% cotton / 15% polyester yarn is eco friendly with recycled cotton content. It’s also soft, absorbent, and comes in loads of pretty colors!

Lion Brand Re-Up yarn in red and grey

Fabulous Floats Washcloth

4-medium
Project Level Easy

Add this to your Ravelry queue

Materials

  • Yarn: Lion Brand Re-Up Yarn
    • 40 yds grey (#149)
    • 35 yds red (#113)
  • Needles: Size 9 / 5.5 mm knitting needles
  • Notions: Yarn Needle

Project Level

Easy: 2 colors, slip stitches and knit stitches.

Size

8 inches square.

Gauge

19 sts x 24 rows = 4 inches in garter stitch. Exact gauge is not critical.

Abbreviations used

k = knit
sl = slip purlwise, with yarn at back.
st(s) = stitch(es)

Recommended Resources

Instructions

With grey, cast on 38 sts. (multiple of 4 + 2)

When slipping stitches, it is important to keep even tension on the carried yarn (the floats). If these are too loose they will look messy, and if too tight they will scrunch up the stitches in front of them.

Row 1: K across

Rows 2-3: With red, sl 2 (k 2, sl 2) across.

Rows 4-5: With grey, k 2, (sl 2, k 2) across.

Repeat rows 2-5 21 more times, or until work measures about 7.5 inches.

Last Row: With grey, k across

Bind off all stitches.

Weave in ends.

For best results, wash and block.

Fabulous Floats Slip Stitch Knit Washcloth knit pattern on Stitches n Scraps

Rate this Slip Stitch Knit Washcloth Pattern!


I hope you enjoyed this washcloth pattern. A downloadable pdf of this pattern is available on Ravelry for a small fee. The fee for the pdf format is to offset the advertising revenue lost when you print or download the pattern rather than viewing it online.

Do you want the best of Stitches n Scraps delivered right to your inbox? The Stitches n Scraps email newsletter includes highlights from the blog as well as special features not available elsewhere. Don’t miss a stitch – Subscribe now!

A yellow, textured scrunchie on a wood table. Text: Rosette Stitch Scrunchie - Free Knitting Pattern on StitchesnScraps.com

Knit Scrunchie Pattern – Rosette Stitch

It’s official, scrunchies are back! My inner pre-teen is so excited. Try this knit scrunchie pattern for a quick holiday gift, and learn how to make the rosette stitch. The short pattern repeat is easy to learn and creates a beautiful texture.

A yellow, textured scrunchie on a wood table. Text: How to knit a Rosette Stitch Scrunchie - Free Pattern on StitchesnScraps.com

Finishing Touches KAL

I designed this pattern for the Finishing Touches KAL. This year long event is broken into 4 sections, and this pattern is for the last section: Small Gifts. We have great prizes for each of the 4 sections, thanks to our generous sponsors. See all the details, including the giveaway entry information and links to the other patterns, in the main KAL post on Underground Crafter. Be sure to join in all the fun on the KAL Corner Knitting Facebook group too.

Finishing Touches Knit Along at KAL Corner

This post contains sponsored content and/or affiliate links. If you click an affiliate link and make a purchase, I may get a commission.

Lion Brand Vanna’s Choice yarn

I made my scrunchie with some Lion Brand Vanna’s Choice yarn. Lion Brand originally sent me this yarn for free for another design, and I have quite a bit left over. This pattern is perfect for using up those smaller, leftover bits in your stash!

A pile of partially used skeins of Vanna's Choice yarn, in various colors

Rosette Stitch Scrunchie

4-medium
Project level Intermediate

Add this to your Ravelry queue

Materials

  • Yarn: Worsted weight yarn
    • 50 yds for scrunchie
    • 5 yds waste yarn for cast on.
  • Needle: Size 9 / 5.5 mm knitting needles
  • Notions:
    • Yarn Needle
    • Hair elastic or 6 inches of 1/2 inch wide elastic

Project Level

Intermediate: Special pattern stitch, provisional cast on, kitchener stitch / grafting.

Size

20 x 3 inches before seaming.

Gauge

15 sts x 20 rows = 4 inches in stockinette. Exact gauge is not critical.

Abbreviations used

k = knit
p = purl
k2tog = knit 2 together
p2tog = purl 2 together
r = rosette (see Special Stitch)
st(s) = stitch(es)
RS = right side

Recommended Resources

Special Stitch

Rosette (r): P2tog, leaving the stitches on the left needle. K2tog through same 2 stitches and take them off the left needle.

The first half (p2tog) of a rosette stitch.
The second half (k2tog) of a rosette stitch

Each rosette counts as 2 stitches.

Instructions

Scrunchie

With waste yarn, cast on 75 sts.

Row 1 (RS): K across.

Row 2: K 1, r across.

Row 3: K

Row 4: R across to last st, k 1.

Rows 5-7: Repeat rows 1-3.

Repeat rows 4-7 twice more, or until work measures about 3 inches. End after a repeat of row 7.

Cut yarn, leaving a 30 inch tail for seaming.

Knit fabric with a textured rosette stitch pattern, on a piece of fabric with fall motifs.

Finishing:

  • Carefully remove waste yarn from cast on, placing the live stitches onto empty needle.
  • Fold work so that long edges are together and right side is facing out.
  • If using a hair elastic, slide it onto one needle so that it rests within the fold.
knit fabric with a hair elastic slid onto one of the needles.
  • Seam long edges together using a kitchener stitch (grafting). This will create a tube – if you used a hair elastic, it will be inside.
Sewing a kitchener stitch seam with a hair elastic caught up in the middle of the fabric.
  • If using regular elastic, feed the elastic through the tube. Being careful not to twist the elastic, sew the ends together.
  • Seam short edges together, working in a circle around the elastic.
  • Weave in all ends.

Replacing Elastic

If the elastic breaks, you can replace it with a piece of 1/2 inch elastic. Open up the seam on the short edge enough to remove the broken elastic. Feed a 6 inch piece of 1/2 inch wide elastic through the tube and sew the ends together. Sew the seam closed again.

Rate this Knit Scrunchie Pattern!


I hope you enjoyed this scrunchie pattern. A downloadable pdf of this pattern is available on Ravelry for a small fee. The fee for the pdf format is to offset the advertising revenue lost when you print or download the pattern rather than viewing it online.

Do you want the best of Stitches n Scraps delivered right to your inbox? The Stitches n Scraps email newsletter includes highlights from the blog as well as special features not available elsewhere. Don’t miss a stitch – Subscribe now!

A finger knit snow blanket, with some holiday decorations on top of it. Text - Finger Knit Snow Blanket - Free Pattern on Stitches n Scraps

Finger Knit Snow Blanket with Loop Yarn

Show off your holiday decor on a finger knit snow blanket! Twisted stitches create a puffy, snowy texture that’s a perfect backdrop for Christmas and winter decorations. You can make any size you need with this customizable pattern. The preformed loops mean it works up super quickly – no needles needed!

A white, finger knit runner, with some holiday decorations on top of it. Text - How to Finger Knit a Snow Blanket - Free Pattern on Stitches n Scraps

IMPORTANT Safety Notice!

Yarn is typically not treated to be fire resistant. Do NOT use a yarn snow blanket under or near any objects with lights, flames, batteries, electrical cords, or other potential fire hazards.


This post contains sponsored content and/or affiliate links. If you click an affiliate link and make a purchase, I may get a commission.

Bernat Alize Blanket EZ Yarn

Yarnspirations sent me some Bernat Alize Blanket EZ yarn for free for this pattern. It’s the same soft, fluffy feel of Bernat Blanket, but in a loop yarn format. A loop yarn is a yarn that already has the loops sewn into it. It’s perfect for finger knitting – no needles needed!

Bernat Alize Blanket EZ yarn with a finger knit swatch next to it

Any Size You Need!

This simple pattern can be easily adjusted to fit whatever surface you’d like to cover. One skein covers approximately 3.5 sq ft (504 sq inches). To figure out how many skeins you need, find the square footage of your surface and divide by 3.5. For example, I made a 14″ x 72″ snow blanket, which works out to 1008 sq inches, or 7 sq ft. 7 / 3.5 means I needed 2 skeins.

A white, finger knit runner,  on top of a shelving unit, with some holiday decorations on top of it.

Finger Knit Snow Blanket

Project level Intermediate

Add this to your Ravelry Queue

Materials

Project Level

Intermediate: Twisted stitches in loop yarn

Size

14 x 72 inches. Size can be adjusted – yarn usage will vary accordingly.

Gauge

Because the loops are a fixed size, no gauge measurement is needed.

Abbreviations used

(Pattern is written in US terms)
k = knit (see Special Stitches)
lt = left twist (see Special Stitches)
rt = right twist (see Special Stitches)
st(s) = stitch(es)

Recommended Resources

Special Stitches

For the sake of clarity, I will be calling unworked loops that are on the working yarn “loops” and loops that have already been worked “stitches”. See the full tutorial for these stitches here.

Knit (k): Without twisting the stitch, pull the next loop on the working yarn through the indicated stitch, from back to front. 

Swatch showing a knit stitch in loop yarn

Left Twist (lt): Twist the indicated stitch clockwise, then pull the next loop through as to knit.

Swatch showing a left twisting knit stitch in loop yarn

Right Twist (rt): Twist the indicated stitch counterclockwise, then pull the next loop through as to knit.

Swatch showing a right twisted knit stitch in loop yarn.

Instructions

This entire piece is worked from the right side, working back and forth in rows. Do not turn your work.

Row 1: Count out 22 loops for a tail, then 20 loops for row 1. Use stitch markers to mark the start and end of row 1 if desired. (20 sts)

Loop yarn with 20 stitches marked off as row 1, and 22 loops for a tail.

You can change the width of your piece by changing the number of loops you use. Leave a starting tail that is the same number of loops as your first row, plus 2. This tail will be used for an edging row later.

Row 2: K1, lt across to last st, k1.

Row 3: K1, rt across to last st, k1.

Repeat rows 2-3 until you reach your desired length. Cut yarn, leaving a tail of 2 loops.

To start a new skein, leave a tail of 2 loops on both the old skein and the new skein, and start working with the next loop on the new skein.

Bind Off

Starting at the beginning of the previous row (opposite end from your working yarn), pull the 2nd st through the 1st st, pull the next st through the current st across until only 1 st remains. Pull tail through remaining st to secure.

Binding off in loop yarn

Bottom Edging

Using the starting tail, pull one loop up in the bottom of each st across. This will leave 2 loops unused. Bind off the same way as you did the other end.

Finishing

Every loop has a thread sewn through it that holds it together. For each tail, cut that thread to open all the loops, then weave in the tail.

a single loop of looped yarn, pulled apart to show the thread that is forming the loops

IMPORTANT Safety Notice!

Yarn is typically not treated to be fire resistant. Do NOT use a yarn snow blanket under or near any objects with lights, flames, batteries, electrical cords, or other potential fire hazards.


Rate this Snow Blanket pattern!


I hope you enjoyed this pattern. A downloadable pdf of this pattern is available on Ravelry for a small fee. The fee for the pdf format is to offset the advertising revenue lost when you print or download the pattern rather than viewing it online.

Do you want the best of Stitches n Scraps delivered right to your inbox? The Stitches n Scraps email newsletter includes highlights from the blog as well as special features not available elsewhere. Don’t miss a stitch – Subscribe now!

Taupe and green pillow, showing front and back - Unbiased Pillow on StitchesnScraps

Knit Diagonal Stripes Pillow Pattern – Unbiased

This seemingly simple, striped pillow has a secret – it’s knit on the bias! Knit diagonal stripes, then seam them together to make them straight again. The only indication of the unique construction is the diagonal seams and offset stripes at the back.

Taupe and green pillow, showing front and back - Unbiased Pillow on StitchesnScraps

This post contains affiliate advertisements (click for more info). If you click one of these advertisements and then make a purchase, I may be compensated. You get the same great prices, and you will be helping to support this site!

Finishing Touches KAL

I designed this pattern for the Finishing Touches KAL. This year long event is broken into 4 sections, and this is my 2nd pattern is for the 3rd section: Home. We have great prizes for each of the 4 sections, thanks to our generous sponsors. See all the details, including the giveaway entry information and links to the other patterns, in the main KAL post on Underground Crafter. Be sure to join in all the fun on the KAL Corner Knitting Facebook group too.

Finishing Touches Knit Along at KAL Corner

Lion Brand Vanna’s Choice yarn

Lion Brand originally sent me this Vanna’s Choice yarn for another project. I actually have quite the stash of leftover bits of Vanna’s Choice! With a soft feel and wide range of colors, it’s one of my go-to yarns when I want a good, everyday acrylic. My favorites are the earthy, neutral colors, like the ones I used in this pillow.

Why Unbiased?

This design came about as an experiment in bias knitting. Bias knitting, or knitting on the bias, simply means knitting diagonally. For a square like this pillow, that means working from corner to corner to knit diagonal stripes. But what happens when you take that bias knit fabric and seam it on the bias (along the diagonal edges)?

Folding the corners in makes those diagonal stripes line up straight again. In other words, they become “un-biased”! From the front, it looks like this pillow is just knit straight up in stripes. At the back though, the folded in corners create diagonal seams and an interesting reversal of the striping pattern.

Back side of a green and taupe striped pillow, showing diagonal seams. Unbiased Pillow on StitchesnScraps

Seaming Tutorial

The visible seams are an important part of this design. So I added a photo and video tutorial just for those! See the seaming tutorial for some great tips on getting a neat and pretty seam.


This pattern is protected by copyright. Please do not distribute or share this pattern in any way other than by sharing a link to this page or to the pattern page on Ravelry. Click here for copyright information.

Unbiased Pillow

4-medium
Project level Intermediate

Add this to your Ravelry Queue

Materials

Project Level

Intermediate: Basic increases, decreases, and stripes. The seaming requires a little concentration.

Size

To fit a 14 inch, square pillow form

Gauge

15 sts x 23 rows = 4 inches in stockinette

Abbreviations used

k = knit
p = purl
m1r = make one right
m1l = make one left
ssk = slip, slip, knit
k2tog = knit 2 together
RS = right side
WS = wrong side

Recommended Resources

Taupe and green striped pillow on a brown couch, against a corner with a floor lamp. One wall is red, one is white.

Instructions

Increasing

Wide Stockinette Stripe

With A, cast on 3, using a long tail cast on.

Row 1 (RS): With A, k 1, m1r, k across to last st, m1l, k 1. (5 sts)

Row 2: K 1, p across to last st, k 1.

Rows 3-10: Repeat rows 1-2 four times more. (13 sts)

Wide Garter Stripe

Carry unused colors up along side edge.

Row 11: With B, k 1, m1r, k across to last st, m1l, k 1. (15 sts)

Row 12: K across.

Rows 13-16: Repeat rows 11-12 twice more. (19 sts)

Narrow Stockinette Stripe

Row 17-18: With A, repeat rows 1-2. (21 sts)

Narrow Garter Stripe:

Rows 19-20: With B, repeat rows 11-12. (23 sts)

Rows 21-90: Repeat rows 1-20 three times more, then repeat rows 1-10 once more. (93 sts)

Taupe and green, knit diagonal stripe fabric

Decreasing

Wide Garter Stripe:

Row 91: With B, k 1, ssk, k across to last 3 sts, k2tog, k 1. (91 sts)

Row 92: K across.

Rows 93-96: Repeat rows 91-92 twice more. (87 sts)

Narrow Stockinette Stripe:

Row 97: With A, k 1, ssk, k across to last 3 sts, k2tog, k 1. ( 85 sts)

Row 98: K 1, p across to last st, k 1.

Narrow Garter Stripe:

Rows 99 – 100: With B, repeat rows 91-92. (83 sts)

Wide Stockinette Stripe:

Rows 101 – 110: With A, repeat rows 97-98 five times. (73 sts)

Rows 111 – 180: Repeat rows 91-110 three times more, then repeat rows 91-99 once more. (5 sts)

Row 180: Ssk, k 1, k2tog. (3 sts)

Bind off: Slip first st knitwise, k2tog, pass slipped stitch over. Cut yarn leaving a 24 inch tail for seaming, and fasten off.

Block your fabric before seaming. It should measure approximately 18 inches square.

Seaming

The seams are part of the design and should be visible but neat. Take your time with the seaming to make sure everything lines up. Seaming tutorial coming soon!

Lay square flat with wrong side up. Fold 2 corners in so that they meet in the center with RS up.

Line up striped sections and seam adjoining edges using the following rules:

Taupe and green, knit diagonal stripe fabric being seamed, with points folded in to the center
  • Always seam into the stitch that is one stitch in from the edge. This will be just behind the garter stitch selvedge.
  • Each garter ridge has 2 lines of bumps – top and bottom. When working into garter stitch, on one side of the seam work into the top bump of the ridge, and on the other side work into the bottom bump of the ridge. In both cases, insert needle from top to bottom.
Taupe and green striped fabric. Hands inserting a yarn needle through a loop on garter stitch a the edge of one piece. Text shows "top bump" and "bottom bump" of the garter stitch ridge
  • When working into stockinette, work into one loop of the increase or decrease stitch at the edge. Choose the loop furthest from the edge, and insert needle so that it points towards the seam.
  • Where stockinette meets garter in the striped section, one garter ridge should line up with 1 row of stockinette. The garter ridge is 2 rows, but it is more compact, so it works out evenly this way.
  • After each section, pull the seaming thread snug. The seam should come together firmly, but not pucker.
Taupe and green striped knit fabric with a diagonal seam. Hands on each side of the seam are pulling it shut.

Repeat for remaining corners, leaving only one seam unworked.

Sew in all tails except for the one you plan to use for the last seam.

Insert pillow form, then seam remaining edge and weave in end. .

Optional Button(s)

If desired, either sew a button over the center of the pillow only on the side where the seams meet, OR place one button in the center of each side of the pillow and sew them together, going through the center of the pillow.

Back of a green and taupe striped pillow, showing diagonal seams, with a button in the center.

I hope you enjoy making this Unbiased pillow pattern. A downloadable pdf of this pattern is also available on Ravelry, for a small fee. The fee for the pdf format is to offset the advertising revenue lost when you print or download the pattern rather than viewing it online.

Do you want the best of Stitches n Scraps delivered right to your inbox? The Stitches n Scraps email newsletter includes highlights from the blog as well as special features not available elsewhere. Don’t miss a stitch – Subscribe now!

Rate this pattern!

A fuzzy, finger knit basket in bright blue and green, on a wood floor next to a beige wall, brown couch, and red rug. Basket is filled with skeins of yarn. Finger Knit Basket - Pattern on Stitches n Scraps

Knit Without Needles – Finger Knit Basket Pattern

Learn how to knit without needles! This bright, finger knit basket pattern is fast and easy to make. It stands up tall with the help of some plastic canvas hidden between the layers. There’s a video tutorial below as well.

A fuzzy, finger knit basket in bright blue and green, on a wood floor next to a beige wall, brown couch, and red rug. Basket is filled with skeins of yarn. Knit Without Needles! - Finger Knit Basket - Pattern on Stitches n Scraps

This post contains affiliate advertisements (click for more info). If you click one of these advertisements and then make a purchase, I may be compensated. You get the same great prices, and you will be helping to support this site!

Finishing Touches KAL

I designed this pattern for the Finishing Touches KAL. This year long event is broken into 4 sections. This pattern is for the 3rd section: Home. We have great prizes for each of the 4 sections, thanks to our generous sponsors. See all the details, including the giveaway entry information and links to the other patterns, in the main KAL post on Underground Crafter. Be sure to join in all the fun on the KAL Corner Knitting Facebook group too.

Finishing Touches Knit Along at KAL Corner

Crayola, Off The Hook

Lion Brand sent me some of their new Crayola Off the Hook yarn for free to use for this design. I first saw this yarn earlier this year at a conference and couldn’t wait for it to become available! Lion Brand has teamed up with Crayola to make several of their yarns in bright, bold, crayon colors. How fun is that?

Two skeins of Crayola off the Hook yarn from Lion Brand. One in Fern Green and one in Cornflower Blue. Pictured on a white table, in front of a basket made from this yarn. Finger Knit Basket - Pattern on Stitches n Scraps

Knit Without Needles

Off the Hook yarn is a loop yarn, meaning that all the loops are already formed for you and held in place with a thread. It’s fuzzy and soft, so stitches don’t pull out easily on their own. This means you don’t need a needle to hold your stitches in place!

Working with loop yarn is fun and fast, and a great introduction to knitting. By pulling loops through other loops with just your fingers, you can create many knitting stitches. But you don’t actually have to know how to knit in order to do it.

Plastic Canvas Frame

Loop yarn is soft and fluffy, so without some sort of frame, the basket wouldn’t hold it’s shape very well at all. Adding a stiff frame fixes that, but would make the basket hard to wash. To solve this problem, I added a plastic canvas frame in such a way that it can easily be removed! Now the basket can be washed easily and then the frame can be reinserted. The plastic canvas is also flexible, so the basket can easily be squeezed into tighter spaces, while still standing upright.

a blue and green, finger knit basket, folded flat on a wood table.

This pattern is protected by copyright. Please do not distribute or share this pattern in any way other than by sharing a link to this page or to the pattern page on Ravelry. Click here for copyright information.

Finger Knit Basket

Project Level Easy

Add this to your Ravelry Queue

Materials

Project Level

Easy: Working in the round, with some increases.

Size

12 inches diameter x 7 inches tall.

Gauge

Because the loops are a set size in this yarn, gauge will not vary and no swatch is needed.

Abbreviations used

k = knit (see Special Stitches)
inc = increase (see Special Stitches)
st(s) = stitch(es)

Recommended Resources

Special Stitches

For clarity I will be calling loops that are on the working yarn “loops” and loops that have already been worked “stitches” throughout the pattern.

Knit (k): Pull next loop through indicated stitch, from the back to the front.

Fabric knit with blue loop yarn, demonstrating a knit stitch. Finger Knit Basket - Pattern on Stitches n Scraps

Increase (inc): Pull the next 2 loops through indicated stitch, from the back to the front.

Fabric knit with blue loop yarn, demonstrating a knit increase stitch. Finger Knit Basket - Pattern on Stitches n Scraps

Bind off: Pull next st through current st.

Bind off in progress - one loop being pulled through another. Finger Knit Basket - Pattern on Stitches n Scraps

Instructions

Bottom

Entire piece is worked from the right side. It does not matter which direction you work, as long as you work the same way throughout.

Ensure you have enough of a tail to weave in later (about 4 inches is enough). If you do not, cut open the first one or two loops until you do. At the bottom of each loop there is a string holding the loop together – cut that string to open the loop.

A loop of yarn stretched open to show the thread holding it together at the bottom. Finger Knit Basket - Pattern on Stitches n Scraps

Mark the first stitch of each round with a stitch marker. Move the marker with each round.

Rnd 1: Arrange the first 4 loops in a circle. (4 sts)

Rnds 2-3: Inc in each st. (16 sts)

Rnd 4: [Inc in next st, k next st] around. (24 sts)

Rnd 5: [Inc in next st, k next 2 sts] around. (32 sts)

Rnd 6: [Inc in next st, k next 3 sts] around. (40 sts)

Rnd 7: [Inc in next st, k next 4 sts] around. (48 sts)

A blue, finger knit circle on a white background - Bottom circle - Finger Knit Basket - Pattern on Stitches n Scraps

Do not cut yarn. Bind off around, until there is only 1 st left.

Work should now measure approximately 12 inches in diameter. This is the bottom circle of the basket. The right side will show on the outside of the basket. The lumpier wrong side will be on the inside of the basket.

We are now going to pull loops up behind the bind off edge to start working up the sides.

Sides (Blue)

Rnd 1: Bring the working yarn to the front of your work. Working under the bind off edge, push remaining st from bind of through the first bind off stitch, from front to back. [Push next loop up through next bound off st, from front to back] around. (48 sts)

Flip work over so wrong side of bottom circle is facing up.

Rnds 2-8: Being sure to stay on the right side of the work, bring working yarn to the back and k each st around. (48 sts)

Cut open next 2 loops on working yarn to create a tail, and cut blue yarn leaving the tail to weave in later.

Sides (Green)

We are now going to create a round of extra, unused loops. Later, we will be using those loops to form the top edging.

Leave a starting tail of green yarn, cutting open 1 or 2 loops if necessary.

Rnd 9: With green yarn, [k next st, pull next loop forward between st just worked and next st] around. (48 sts, 48 free loops).

Two stitches knit with green yarn into blue yarn, with one extra loop hanging down between the two stitches. Finger Knit Basket - Pattern on Stitches n Scraps

Rnd 10: Working only into the sts and ignoring the extra loops that were pulled forward, k around. (48 sts)

Rnds 11 – 15: K

Bind off around, until there is only 1 st. Cut open next 2 loops on working yarn to create a tail, and cut the yarn. Pull tail through last st to secure it.

Top Edging

Cut a scrap of green yarn that is 4 loops long and open up all 4 loops.

Using the free loops from rnd 9, bind off until only 1 loop remains.

Pull the scrap of green yarn through the remaining loop and pull both ends through to wrong side of work.

Securing the last bound off loop of green with a scrap of green yarn. - Finger Knit Basket - Pattern on Stitches n Scraps

Plastic Canvas Frame:

Cut the sheet of plastic canvas in half lengthwise and trim any rough edges.

Overlap the ends by an inch of two, and sew them together with scrap of yarn or thread to form a long strip.

Overlap the ends of the long strip to forms a cylinder, so that it fits tightly inside the basket, and sew them together.

A cylinder made out of strips of plastic canvas, on a wood table. Plastic canvas support for Finger Knit Basket - Pattern on Stitches n Scraps

Finishing

Weave in all ends

Insert plastic mesh frame into basket.

Fold green side down to cover the plastic mesh, so that top edging rests on the top.

The inside of a round basket, with a blue bottom and green sides, on a wood table. Learn how to knit without needles! This bright, finger knit basket pattern is fast and easy to make. It stands up tall with the help of some plastic canvas hidden between the layers. Find the free pattern on Stitches n Scraps.

Additional options:

  • For a sturdier basket, add a circle of plastic mesh to the bottom.
  • For a more padded bottom (or to cover a plastic mesh circle), make another bottom circle out of the green yarn and place it on the inside of the basket. You will need a 2nd skein of green yarn to do this.
  • You can make a smaller basket by stopping the bottom circle earlier. The stitch count won’t matter to the rest of the pattern. For a larger basket, make a bigger bottom circle, increasing 8 sts with each extra rnd.

Video Tutorial

View this video on YouTube


I hope you enjoyed knitting without needles. A downloadable pdf of this pattern is also available on Ravelry, for a small fee. The fee for the pdf format is to offset the advertising revenue lost when you print or download the pattern rather than viewing it online.

Do you want the best of Stitches n Scraps delivered right to your inbox? The Stitches n Scraps email newsletter includes highlights from the blog as well as special features not available elsewhere. Don’t miss a stitch – Subscribe now!

Rate this finger knit basket pattern!

Reversible cables headband - free knitting pattern on Stitches n Scraps

Free Pattern – Reversible Cables Headband

Get 2 looks from one headband! Wear it one way for 2 cables with a decorative edge. Turn it round the other way and you have 3 cables. Which side is your favorite?

Reversible cables headband - free knitting pattern on Stitches n Scraps

The reversible effect is created by working cables on both sides of the work, but the actual cables are simple and work up quickly. This headband can be made to any length.

Finishing Touches KAL

I designed this pattern for the Finishing Touches KAL. This year long event is broken into 4 sections and this pattern is for the 2nd section, which is headwear. There are some great prizes for each of the 4 sections, thanks to our generous sponsors. See all the details, including the giveaway entry information and links to the other patterns, in the main KAL post on Underground Crafter. Be sure to join in all the fun on the KAL Corner Knitting Facebook group too.

Finishing Touches Knit Along at KAL Corner

This post contains affiliate links (click for more info). If you click an affiliate link and then make a purchase, I may be compensated. You get the same great prices, and you will be helping to support this site!

Lion Brand Vanna’s Choice Yarn

Lion Brand had sent me some free Vanna’s Choice Yarn for our Harmony Blanket KAL last year. I used some of the leftovers from that to make this headband.

Vanna’s Choice is a worsted, acrylic yarn that comes in an amazing array of colors. It’s soft, and easy to work with too. I’ve used it a lot, so I have little balls of leftovers in about 15 or 16 different colors now. They’re great for small projects like this one.


This pattern is protected by copyright. Please do not distribute or share this pattern in any way other than by sharing a link to this page or to the pattern page on Ravelry. Click here for copyright information.

Reversible Cables Headband

4-medium

Add this to your Ravelry Queue

Materials:

Project Level:

Intermediate – Basic cables worked on both sides of the fabric. Slip stitch selvedge.

Size:

About 20 inches circumference. Can be adjusted to any length / circumference.

Gauge:

13 sts x 24 rows = 4 inches in garter stitch. Exact gauge is not critical. Use pattern as gauge – after row 20, work should measure about 3 inches long.

Abbreviations used:

  • k = knit
  • p = purl
  • sl = slip purlwise with yarn in front
  • m1 = make 1 (increase)
  • k2tog = knit 2 together
  • RT = right twist (see special stitches)
  • st(s) = stitch(es)

Recommended Resources:

Special Stitch:

Right Twist (RT): Knit the 2nd stitch, then knit the first stitch, then remove both stitches from the left needle (right needle, if you’re left handed).

This stitch is also referred to as 1/1 RC (1 over 1, right crossing cable).

Instructions:

(scroll down for chart)

Cast on 8 stitches with a provisional cast on, using waste yarn.

There are many ways to do a provisional cast on with waste yarn. I’ve linked to several options in the Recommended Resources section, and any of those are fine. I usually just do a knitted cast on entirely with waste yarn as that’s easy enough to unpick later.

Whichever method you use, you will be removing the waste yarn at the end so that the live stitches are exposed.

Garter Stitch

Rows 1-10: K

Cables

Row 11: (increase row): K 1, (k 1, m 1) 6 times, sl 1. (14 sts)

Row 12: K 4, (p2, k 2) twice, k 1, sl 1.

Row 13 (cable row): K 2, (p 2, RT) twice, p 2, k 1, sl 1.

Row 14 (cable row): K 2, (RT, p 2) twice, RT, k 1, sl 1.

Row 15: (K 2, p 2) 3 times, k 1, sl 1.

Row 16: K 4, (p2, k 2) twice, k 1, sl 1.

Rows 17-18: Repeat rows 15-16.

Repeat rows 13-18 until you reach about 17 inches from beginning (or 3 inches less than desired length).

Repeat rows 13-15 once more.

Decrease row: K 1, k2tog 6 times, sl 1. (8 sts)

Reversible cables headband - free knitting pattern on Stitches n Scraps

Garter Stitch

Rows 1-10: K

Joining / Finishing

Check size before joining, add or remove rows in garter stitch section as needed.

Remove provisional cast on and place live stitches onto empty needle.

Graft the two ends together using the kitchener stitch.

Weave in all ends.

Wash and block.

Chart

Reversible Cables Headband Chart - free pattern on Stitches n Scraps

I hope you enjoy the pattern!

A downloadable pdf of this pattern is also available on Ravelry for a small fee. The fee for the pdf format is to offset the advertising revenue lost when you print or download the pattern rather than viewing it online.

Do you want the best of Stitches n Scraps delivered right to your inbox? The Stitches n Scraps email newsletter includes highlights from the blog as well as special features not available elsewhere. Don’t miss a stitch – Subscribe now!

Cobblestone Lane - a free knitting pattern on Stitches n Scraps

Free Pattern – Cobblestone Lane

Take a stroll down a winding, cobblestone lane on a crisp spring day, and see what adventures you can find. There’s still a bit of a chill in the air, so don’t forget your scarf!

Cobblestone Lane - a free knitting pattern on Stitches n Scraps

A chunky, diagonal rib stitch meanders back and forth, broken by bumpy rows of seed stitch. Bold stripes in neutral shades make this a great, unisex design.

Finishing Touches KAL

I designed this pattern for the Finishing Touches KAL. This year long event is broken into 4 sections, the first of which is neckwear. We have great prizes for each of the 4 sections, thanks to our generous sponsors. See all the details, including the giveaway entry information and links to the other patterns, in the main KAL post on Underground Crafter. Be sure to join in all the fun on the KAL Corner Knitting Facebook group too.

Finishing Touches Knit Along at KAL Corner

Color Made Easy

Lion Brand sent me some of their new Color Made Easy yarn for free, to make this design. It’s a superbly soft, squishy, cozy yarn. The bulky weight means it knits up fast too. If neutrals aren’t your thing, Lion Brand has you covered. Color Made Easy comes in lots of bright, bold shades as well!


This post contains affiliate links (click for more info). If you click an affiliate link and then make a purchase, I may be compensated. You get the same great prices, and you will be helping to support this site!

This pattern is protected by copyright. Please do not distribute or share this pattern in any way other than by sharing a link to this page or to the pattern page on Ravelry. Click here for copyright information.

Cobblestone Lane

Add this to your Ravelry Queue

Materials:

  • Lion Brand Color Made Easy Yarn
    • 240 yds of #150 Basalt (A)
    • 75 yds of #151 Smoky Quartz (B)
  • Size 10.5 (6.5mm) knitting needles or size needed to obtain gauge
  • Yarn needle

Skill Level:

Easy – All knits and purls, with some color changes.

Sizes:

9.5 inches x 58 inches. The stitch pattern will curl at the edges, and the scarf is extra wide to accommodate that curling.

Gauge:

13 sts x 16 rows = 4 inches in seed stitch. Use pattern as gauge – after row scarf should measure 9.5 x 5 inches.

Abbreviations used:

  • k = knit
  • p = purl
  • sl = slip purlwise with yarn in front
  • st(s) = stitch(es)
  • RS = Right Side

Recommended Resources:

Cobblestone Lane - a free knitting pattern on Stitches n Scraps

Instructions:

(scroll down for chart)

Cast on 32 stitches with B. (Multiple of 6 + 2).

I recommend the alternating cable cast on (also called a seed stitch cast on).

Seed Stitch

Row 1 (RS): (P 1, k 1) across.

Row 2: Sl 1, (p 1, k 1) across to last st, k 1.

Row 3: Sl 1, (k 1, p 1) across to last st, k 1.

Row 4: Repeat Row 2. Change to A. Cut B, leaving a tail to weave in later.

Right Diagonal Rib

Row 5: With A, sl 1, k across.

Row 6: Sl 1, (k 2, p 4) across to last st, k 1.

Row 7: Sl 1, (k 4, p 2) across to last st, k 1.

Rows 8-10: Repeat rows 6 & 7, then repeat row 6 once more.

Row 11: Sl 1, k 2, (p 2, k 4) across to last 5 sts, p 2, k 3.

Row 12: Sl 1, p 2, (k 2, p 4) across to last 5 sts, k 2, p 2, k 1.

Rows 13-15: Repeat rows 11 & 12, then repeat row 11 once more.

Row 16: Sl 1, (p 4, k 2) across to last st, k 1.

Row 17: Sl 1, (p 2, k 4) across to last st, k 1.

Rows 18-20: Repeat rows 16 & 17, then repeat row 16 once more. Change to B. Cut A, leaving a tail to weave in later.

Seed Stitch

Row 21: With B, sl 1, k across.

Row 22-24: Repeat rows 2-4

Left Diagonal Rib

Rows 25-30: Repeat rows 5-10.

Row 31: Sl 1, (p 2, k 4) across to last st, k 1.

Row 32: Sl 1, (p 4, k 2) across to last st, k 1.

Rows 33-35: Repeat rows 31-32, then repeat row 31 once more.

Row 36: Sl 1, p 2, (k 2, p 4) across to last 5 sts, k 2, p 2, k 1.

Row 37: Sl 1, k 2, (p 2, k 4) across to last 5 sts, p 2, k 3.

Rows 38-40: Repeat rows 36-37, then repeat row 36 once more. Change to B. Cut A, leaving a tail to weave in later.

Remainder of Scarf

Row 41: With B, sl 1, k across.

Rows 42-281: Repeat rows 2-41 six times,

Rows 282-284: Repeat rows 2-4 but do not cut or change yarn.

Bind off all stitches.

Finishing

Weave in all ends.

Wash and block – blocking is important to open up the ribbing pattern.

Cobblestone Lane - a free knitting pattern on Stitches n Scraps

Chart

Chart for Cobblestone Lane - a free knitting pattern on Stitches n Scraps

I hope you enjoy the pattern. Thanks to Carie Carolyn for helping me name it!

A downloadable pdf of this pattern is also available on Ravelry for a small fee. The fee for the pdf format is to offset the advertising revenue lost when you print or download the pattern rather than viewing it online.

Do you want the best of Stitches n Scraps delivered right to your inbox? The Stitches n Scraps email newsletter includes highlights from the blog as well as special features not available elsewhere. Don’t miss a stitch – Subscribe now!