Free Crochet Patterns
Find the perfect, free crochet pattern for your next project! Browse them all, or select a category from the dropdown menu. Where will your creativity take you today?

Free Pattern – Rainbow Cake
This post contains sponsored content and affiliate links (click for more info). If you click an affiliate link and then make a purchase, I may be compensated. You get the same great prices, and you will be helping to support this site!
Fluffy, textured layers of vivid colors are separated by thin bands of white. This delicious baby blanket is as irresistible as the rainbow layer cakes that it looks like. The stitch pattern is easy and works up quickly, and best of all, it’s completely calorie free – so go ahead, dig in! It’s made in Red Heart Baby Hugs yarn, which has been tested to be free from harmful levels of over 300 substances, so smooshing your face in it is perfectly acceptable too.
Rainbow Cake
![]()
Add this to your Ravelry Queue
Materials:
- Red Heart Baby Hugs Medium yarn. 150-160 yds each of:
- #4255 Orangie (orange)
- #4201 Sunny (yellow)
- #4562 Aloe (green)
- #4825 Bluie (blue)
- #4538 Lilac (purple)
- #4909 Ladybug (red)
- #4001 Frosting (white)
- Size J (6 mm) hook or size needed to match gauge.
- Yarn or tapestry needle
Difficulty:
Easy: Repetitive stitch pattern, worked mostly into chain spaces.
Size:
About 36 inches square as written.
If you would like to adjust sizing and/or striping pattern:
- Start with a multiple of 3 chains.
- Work an even number of rows in each color.
- Edging stitches: If you’re still making a square, follow the pattern for the top and bottom edges, and work the same number of stitches for the side edges. If you’re not making a square, see this edging tutorial for tips on calculating how many stitches you will need on the side edges.
Gauge:
12.5 sc x 13 rows = 4 inches. Exact gauge is not critical.
Abbreviations used:
- ch = chain
- sc = single crochet
- hdc = half double crochet
- dc = double crochet
- st(s) = stitch(es)
- sp(s) = space(s)
- sk = skip
Recommended Resources:
Instructions:
With orange, ch 135 (multiple of 3)
Row 1 (RS): hdc in 2nd ch from hook, sk next ch, (sc, ch 1, dc) in next ch, *sk next 2 chs, (sc, ch 1, dc) in next ch, repeat from * across to last 2 chs, sk next ch, hdc in last ch. (44 sps)
Row 2: Ch 1, turn, hdc in first st, * sk next dc, (sc, ch 1, dc) in next sp, sk next sc, repeat from * across to last st, hdc in last st. (44 sps)
Rows 3-12: Repeat row 2, changing to white at end of row 12.
Row 13: With white, ch 1, turn, sc in first st, *sk next dc, 3 sc in next sp, sk next sc, repeat from * across to last st, sc in last st. (134 sc)
Row 14: Ch 1, turn, sc in each st across, changing to yellow at end of row. (134 sc)
Row 15: With yellow, ch 1, turn, hdc in first st, sk next st, (sc, ch 1, dc) in next st, *sk next 2 sts, (sc, ch 1, dc) in next st, repeat from * across to last 2 sts, sk next st, hdc in last st. (44 sps)
Rows 16-26: Repeat row 2, changing to white at end of row 26. (44 sps)
Rows 27-28: Repeat rows 13-14, changing to green at end of row 14 instead of yellow. (134 sc)
Rows 29-40: With green, repeat rows 15-26.
Rows 41-42: Repeat rows 13-14, changing to blue at end of row 14 instead of yellow. (134 sc)
Rows 43-54: With blue, repeat rows 15-26.
Rows 55-56: Repeat rows 13-14, changing to purple at end of row 14 instead of yellow. (134 sc)
Rows 57-68: With purple, repeat rows 15-26.
Rows 69-70: Repeat rows 13-14, changing to red at end of row 14 instead of yellow. (134 sc)
Rows 71-82: With red, repeat rows 15-26.
Edging:
Rnd 1 (RS):
- With white, ch 1, turn, sc in first st, *sk next dc, 3 sc in next sp, sk next sc, sk next dc, 2 sc in next sp, sk next sc, repeat from * across to last st, sc in last st. (112 sc)
- Ch 2, working in sides of rows, work 112 sc evenly spaced to bottom corner. (112 sc)
Note: This works out to 17 stitches in each color section, plus 2 stitches in each white section. - Ch 2, Working in bottom of row 1, sc in first st, sc in next sp, sk next st, *2 sc in next sp, sc in next st, sc in next sp, sc in next st, repeat from * across to last sp, 2 sc in last sp, sc in last st. (112 sc)
- Ch 2, working in sides of rows, work 112 sc evenly spaced to top corner, ch 2, join with sl st to first st. (112 sc)
Rnd 2 (RS): Do NOT turn. Ch 1, (sc in each sc across to next sp, 3 sc in sp) 4 times, join with sl st to first st, fasten off. (448 sc)
Weave in all ends.
I hope you enjoy the pattern. Thanks to HooksofLove, Melissa Carl, and luannfarmer for testing it. Also thanks to Red Heart for providing the wonderful Baby Hugs yarn!
A downloadable pdf of this pattern is also available in my Craftsy store or on Ravelry, for a small fee. The fee for the pdf format is to offset the advertising revenue lost when you print or download the pattern rather than viewing it online.
Do you want the best of Stitches ‘N’ Scraps delivered right to your inbox? The Stitches ‘N’ Scraps email newsletter includes highlights from the blog as well as special features not available elsewhere. Don’t miss a stitch – Subscribe now!

Free Pattern – Sargassum
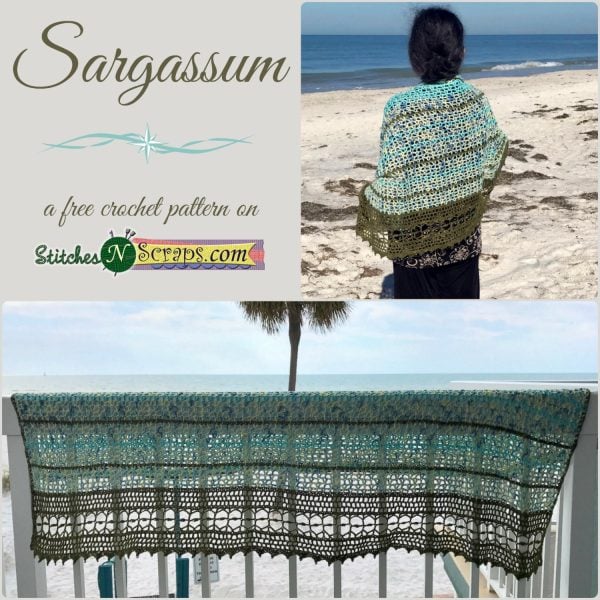
Capture the feeling of delicate, lacy strands of seaweed, white sand beaches littered with shells, and the sparkle of sunshine on the clear, blue ocean. Sargassum is the name of a seaweed that washes ashore on the gulf beaches of Florida, where I recently went for a vacation. The days were full of warm sunshine, but there was still enough of a chill in the early mornings and late evenings to make this shawl a welcome accessory. The striping pattern gently shifts from more green to more blue, without repeating, while optional beads add a nice weight, and sparkle as they catch the sunlight.
This pattern was released in 5 sections, for the CGOA Spring Crochet Along 2017.
This post contains affiliate links (click for more info). If you click one of these links and then make a purchase, I may be compensated. You get the same great prices, and you will be helping to support this site!
Sargassum
![]()
Add this to your Ravelry Queue
Materials:
- Sport weight cotton yarn
- 400-425 yds Color A (shown in olive green)
- 525-550 yds Color B (shown in multi)
- 300-320 yds Color C (shown in turquoise)
- Size G (4 mm) hook or size needed to match gauge.
- Yarn or tapestry needle
- Optional: 637 beads, size 6/0 (slightly larger is ok too, just make sure they have a big enough hole to fit on your yarn). I used this “Summer Greens” assortment from Bead Biz.
Difficulty:
Intermediate: Mostly easy stitches, but there is some complexity to the borders and edging.
Size:
About 27 x 60 inches after blocking.
Gauge:
17 dc x 7 rows = 4 inches (after blocking). Exact gauge is not critical.
Abbreviations used:
- ch = chain
- sc = single crochet
- fsc = foundation single crochet (optional – see Recommended Resources)
- dc = double crochet
- csdc = chainless starting double crochet (optional – see Recommended Resources)
- ldc = linked double crochet (see special stitches)
- puff = puff stitch (see special stitches)
- V = V stitch (see special stitches)
- sb = Set bead (optional – see special stitches)
- sl st = slip stitch
- st(s) = stitch(es)
- sp(s) = space(s)
- yo = yarn over
- RS = Right side
- WS = Wrong side
Recommended Resources:
- Foundation Single Crochet (fsc) on Moogly
- Chainless starting Double Crochet (csdc) on Moogly
- Tutorial – Linked Double Crochet
- Tutorial – Changing Colors
- Tutorial – Puff stitches
- Tutorial – Crocheting with Beads
- Edging – Shells and picots
Notes:
- 2 of the yarns I used were Schachenmayr Catania Color in #053 “Fresh Color” (B) and Catania #397 Turquoise (C). The green yarn (A) was Toluca Coronado, which is now discontinued. Catania #395 Olive could be a good substitution.
- If you want to adjust the width, the pattern repeat is a multiple of 6 + 3.
Special Stitches:
- Linked Double Crochet (ldc): (See full tutorial)For first stitch: Insert hook into 2nd ch from hook and draw up a loop, insert hook into next st and draw up a loop, (yo and draw through 2 loops on hook twice).For remaining stitches: Insert hook into center bar of previous stitch (see picture below) and draw up a loop, insert hook into next st and draw up a loop, (yo and draw through 2 loops on hook twice).
- Puff Stitch (puff): (See full tutorial)
(Yo, insert hook into specified ch and draw up a loop) 3 times, yo and draw through all 7 loops on hook, ch 1 to close.
- V Stitch (V): (Dc, ch 1, dc) in indicated stitch or space. In the stitch counts, Vs are counted as one complete stitch – the dc stitches and spaces that make up the Vs are not counted as separate stitches. When working into a V, work only into the space in the center and ignore the dc stitches.
- Set Bead (sb): (See full tutorial)
Slide a bead up next to the last stitch you made, so that it gets wrapped up into the next stitch or chain. This is optional. If you’re not using beads, ignore this wherever you see it.

Instructions:
Bottom Border:
Note: Starting with foundation stitches is recommended. If you are going to use chains instead, I suggest making a few extra chains just to be safe, and then later undo the ones you don’t use.
Row 1 (RS): With A, work 273 fsc.
OR Alternate Row 1: With A, ch 274, sc in 2nd ch from hook and in each ch across. (273 sc)
Note: The chainless starting dc stitch (csdc) counts as a dc for all the stitch counts. It helps add structure to the edge. If you don’t like it, you can substitute “ch 3 (counts as dc), turn” instead of “turn, csdc” everywhere it appears.
Row 2: Turn, csdc, ch 1, sk next st, (dc in next st, ch 1, sk next st) across to last st, dc in last st. (137 sts, 136 sps)
Row 3: Turn, csdc, (dc in next sp, ch 1, sk next st) across to last sp, dc in last sp, dc in last st. (138 sts, 135 sps)
Row 4: Repeat row 2.
Row 5: Ch 1, turn, sc in each st and sp across. (273 sc)
Row 6: Turn, csdc, (dc in next st, ch 3, sk next 2 sts, sc in next st, ch 3, sk next 2 sts) 45 times, dc in last 2 sts. (48 dc, 45 sc, 90 sps)
Note: On rows 7 & 8, skip all the spaces and sc stitches from the previous row – you’ll only be working into the dc stitches.
Row 7: Turn, csdc, (dc in next dc, ch 4, puff in 3rd ch from hook, ch 1) 45 times, dc in last 2 sts. (48 dc, 45 puffs, 90 sps)
Row 8: Turn, csdc, (dc in next dc, ch 7) 45 times, dc in last 2 sts. (48 dc, 45 sps)
Row 9: Turn, csdc, (dc in next dc, ch 2, sc in next sp, ch 2) 45 times, dc in last 2 sts. (48 dc, 45 sc, 90 sps)
Row 10: Ch 1, turn, sc in each st and 2 sc in each sp across. (273 sc)
Rows 11-14: Repeat rows 2-5.
Optional: String 91 beads on to skein of B.
Row 15: Ch 1, turn, sc each st across, change to B, fasten off A.
Main Section 1:
Note: In the stitch counts, Vs are counted as one complete stitch – the dc stitches and spaces that make up the Vs are not counted as separate stitches.
Row 16 (WS): With B, turn, csdc, sb, ch 1, sk next st, (dc in next st, sb, ch 1, sk next 2 sts, V in next st, sb, ch 1, sk next 2 sts) 45 times, dc in last st. (45 Vs, 47 dc, 91 sps with beads)
Row 17: Turn, csdc, dc in next sp, (ch 1, dc in next V, ch 1, V in next dc) 45 times, dc in last dc. (45 Vs, 48 dc, 90 sps)
Row 18: Turn, csdc, (ch 1, dc in next V, ch 1, V in next dc) 45 times, ch 1, sk next dc, dc in last dc. (45 Vs, 47 dc, 91 sps)
Row 19-20: Repeat rows 17-18, changing to A at the end of row 18, fasten off B.
Optional: String 91 beads on to skein of B.
Row 21: With A, ch 1, turn, sc in first st, sc in first sp, (2 sc in next V, 2 sc in next sp, sk next dc, 2 sc in next sp) across to last st, sc in last st, changing to B, fasten off A. (273 sc)
Main Section 2:
Row 22-24: With B, Repeat rows 16-18.
Optional: String 91 beads on to skein of C.
Row 25: Repeat row 17, changing to C at the end of the row, fasten off B.
Row 26: With C, repeat row 16, changing to B at the end of the row, fasten off C.
Rows 27-31: With B, repeat rows 17-21 (including color changes and the option of stringing beads).
Main Section 3:
Rows 32-34: With B, Repeat rows 16-18.
Row 35: Repeat row 17, changing to C at the end of the row, fasten off B.
Optional: String 91 beads on to skein of B.
Row 36: With C, repeat row 18, changing to B at the end of the row, fasten off C.
Row 37: With B, repeat row 17.
Row 38: Repeat row 16.
Row 39: Repeat row 17, changing to C at the end of the row, fasten off B.
Row 40: With C, repeat row 18, changing to B at the end of the row, fasten off C.
Row 41-45: With B, repeat rows 17-21 (including color changes and the option of stringing beads).
Main Section 4:
Rows 46-48: With B, Repeat rows 16-18.
Optional: String 91 beads on to skein of C.
Row 49: Repeat row 17, changing to C at the end of the row, fasten off B.
Row 50: With C repeat row 18.
Row 51: Repeat row 17.
Row 52-44: Repeat row 16-18, changing to B at the end of row 18, fasten off C.
Rows 55-59: Repeat rows 17-21, including color changes, but do not string any beads.
Top Border:
Row 60: With B, ch 1, turn, sc in each st across, changing to C at the end of the row, fasten off B.
Row 61: With C, turn, csdc, ldc in each st across, changing to B at the end of the row, fasten off C.
Optional: String 45 beads on to skein of A.
Row 62: With B, ch 1, turn, sc in each st across, changing to A at the end of the row, fasten off B.
Edging:
Rnd 63:
- With A, ch 1, turn, sc in each st across, do not fasten off.
- With right side facing, rotate work to work into sides of rows. Sc in each sc row, and 2 sc in each dc row across to bottom corner. (114 sts)
- Working into bottom of row 1: Ch 1, sc in same corner st, *sc in next st, sk next 2 sts, (3 dc, ch 1, sb, ch 2, sl st in top of last dc made, 2 dc) in next st, sk next 2 sts, repeat from * 44 more times, sc in last 2 sts. (45 fans)
- Working into sides of rows: Sc in each sc row and 2 sc in each dc row across to top corner.
Fasten off and join with invisible join method OR join with sl st and then fasten off.
Weave in all ends. Wash and block.

Charts:
Go back to written instructions
Note: This is the same pattern as the written instructions do one or the other, not both. The chart is broken up into several pieces for ease of use – each section shows one row of overlap. The shaded edging / rnd 63 is done last and goes around the whole outside.
Click images to view larger (opens image in a separate tab / window).
I hope you enjoy the pattern. Thanks to Kristine Mullen for tech editing it!
A downloadable pdf of this pattern is also available on Ravelry, for a fee. The fee for the pdf format is to offset the advertising revenue lost when you print or download the pattern rather than viewing it online.
Do you want the best of Stitches ‘N’ Scraps delivered right to your inbox? The Stitches ‘N’ Scraps email newsletter includes highlights from the blog as well as special features not available elsewhere. Don’t miss a stitch – Subscribe now!

Free Pattern – Beach Ball Square
Jump into summery fun with this Beach Ball Square! Vibrant colors and a raised edge make the beach ball really pop on a neutral, sandy background. Finished off with a fast and colorful border, this square is sure to add a little sunshine to your project.
This pattern was designed for the Moogly 2017 afghan CAL. If this is the first you’ve heard about it, go check it out! The CAL is is just getting started, so there’s plenty of time to catch up. Also be sure to take a look at the block 7 post to see how Moogly’s version of this square turned out.
This pattern is protected by copyright. Please do not distribute or share this pattern in any way other than by sharing a link to this page or to the pattern page on Ravelry. Click here for copyright information.
This pattern contains affiliate links (click for more info). If you click one of these links and then make a purchase, I may be compensated. You get the same great prices, and you will be helping to support this site!
Beach Ball Square

![]()
Add this to your Ravelry Queue
Materials:
- Worsted weight yarn: 20-30 yds each of 5 different colors (100-125 yds total). Pictured square was made with Lion Brand Vanna’s Choice in:
- Size J / 10 (6 mm) hook or size needed to match gauge.
- Yarn or tapestry needle
Difficulty:
Intermediate – Simple stitches, but for the center section you will be working with 6 separate balls of yarn at once.
Sizes:
12 inches square
Gauge:
12.5 dc x 6.5 rows = 4 inches square.
Abbreviations used:
- ch = chain
- sc = single crochet
- dc = double crochet
- tr = treble crochet
- csdc = chainless starting double crochet (optional)
- sl st = slip stitch
- st(s) = stitch(es)
- sp(s) = space(s)
- rnd = round
- RS = right side
- WS = wrong side
Recommended Resources:
- The Magic Circle by Moogly
- Chainless Starting Double Crochet by Moogly
- Changing Colors
- Front Post & Back Post Slip Stitches
- Invisible Join vs Slip Stitch Join by Look at What I Made
Instructions:
Beach Ball:
Note: You will need a separate ball of yarn for each color section. Before starting, make 3 balls of A, about 8-10 yds each.
Rnd 1 (WS): With A: 6 sc inside a magic circle, close circle, join. OR ch 2, 6 sc in 2nd ch from hook, join. (6 sc)
Note: Chainless starting double crochet stitches are recommended because it results in a cleaner looking edge. However, if you prefer, you can replace “turn, csdc” with “ch 3 (counts as first dc), turn” anywhere it appears in the pattern.
Rnd 2:
- Turn, csdc, 2 dc in same st, changing to B.
- With B, 3 dc in next st, changing to A.
- With A, 3dc in next st, changing to C.
- With C, 3dc in next st, changing to A.
- With A, 3dc in next st, changing to D.
- With D, 3 dc in next st, join. (18 sts)
Rnd 3: Turn, csdc, dc in same st, dc in next st, 2 dc in next st, *change to next color, 2 dc in next st, dc in next st, 2 dc in next st, repeat from * 4 more times, join. (30 sts)
Rnd 4: Turn, csdc, (2dc in next st, dc in next st) twice, *change to next color, dc in next st, (2 dc in next st, dc in next st) twice, repeat from * 4 more times, join. (42 sts)
Rnd 5: Turn, csdc, 2 dc in next st, dc in next 3 sts, 2dc in next st, dc in next st, *change to next color, dc in next st, 2 dc in next st, dc in next 3 sts, 2 dc in next st, dc in next st, repeat from * 4 more times, join. (54 sts)
Rnd 6: Turn, csdc, dc in next st, 2 dc in next st, dc in next 3 sts, 2 dc in next st, dc in next 2 sts, *change to next color, dc in next 2 sts, 2 dc in next st, dc in next 3 sts, 2 dc in next st, dc in next 2 sts, repeat from * 4 more times, join. (66 sts)
Rnd 7: Turn, csdc, dc in next 2 sts, (2 dc in next st, dc in next 3 sts) twice, *change to next color, dc in next 3 sts, (2 dc in next st, dc in next 3 sts) twice, repeat from * 4 more times, join. (78 sts)
Ball edging: Turn, ch 1, *(fpsl st, ch 1) around next 13 sts, change to next color, fasten off previous color, repeat from * 4 more times, (fpsl st, ch 1) around next 13 sts, change to E, fasten off D.
Note: Work should now measure about 8 inches in diameter. If your piece is a little smaller, you will probably need to add the optional last rnd. To make it still come out ending with a right side rnd, simply do not turn on Rnd 9.
Background:
Rnd 9: Turn. With E and working into the stitches from rnd 7, ignoring the edging rnd: ch 1, sc in first 6 sts, (2 sc in next st, sc in next 12 sts) 5 times, 2 sc in next st, sc in last 6 sts, join. (84 sts)
Rnd 10: Ch 4 (counts as tr), turn, tr in same st, *tr in next st, dc in next 2 sts, hdc in next 2 sts, sc in next 10 sts, hdc in next 2 sts, dc in next 2 sts, tr in next st,** (2 tr, ch 2, 2 tr) in next st, repeat from * 3 more times, ending at ** on last repeat, 2 tr in same st as starting, ch 2, join. (96 sts, 4 sps)
Rnd 11: Turn, sl st in first sp, (csdc, dc) in same sp, *dc in next 4 sts, hdc in next 4 sts, sc in next 8 sts, hdc in next 4 sts, dc in next 4 sts,** (2 dc, ch 2, 2 dc) in next sp, repeat from * 3 times more, ending at ** on last repeat, 2 dc in same sp as starting, ch 2, join, changing to B, fasten off E. (112 sts, 4 sps)
Border:
Rnd 12: With B, turn, sl st in first sp, ch 1, sc in same sp, *(ch 1, sk next st, sc in next st) across to next sp, ch 1** (sc, ch 2, sc) in sp, repeat from * 3 times more, ending at ** on last repeat, sc in same corner sp as starting, ch 2, join, changing to C, fasten off B. (64 sts, 60 ch 1 sps, 4 ch 2 corner sps).
Rnd 13: With C, turn, sl st in first corner sp, ch 1, sc in same sp, *ch 1, sk next st, (sc in next sp, ch 1, sk next st) across to next corner sp,** (sc, ch 2, sc) in corner sp, repeat from * 3 times more, ending at ** on last repeat, sc in same corner sp as starting, ch 2, join, changing to D, fasten off C. (68 sts, 64 ch 1 sps, 4 ch 2 corner sps).
Rnd 14: With D, repeat rnd 13, changing to E at the end of the rnd, fasten off D. (72 sts, 68 ch 1 sps, 4 ch 2 corner sps)
Rnd 15: With E, repeat rnd 13, do not change colors or fasten off at the end of the rnd. (76 sts, 72 ch 1 sps, 4 ch 2 corner sps)
Rnd 16: Turn, sl st in first corner sp, ch 1, sc in same sp, *sc in each st and each sp across to next corner sp,** (sc, ch 1, sc in corner sp), repeat from * 3 times more, ending at ** on last repeat, sc in corner same sp as starting, ch 2. (152 sts, 4 sps).
Rnd 17 (optional if needed for size): Join previous rnd, turn, sl st in first sp, ch 1, sc in same sp, *sc in each st across to next sp, (sc, ch 1, sc in corner sp), repeat from * twice more, sc in each st across to starting sp, sc in starting sp, ch 1. (160 sts, 4 sps)
Fasten off, join last round with invisible join method. Weave in all ends.
I hope you enjoy the pattern. Big thanks to Tamara Kelly for testing it.
A downloadable pdf of this pattern is also available on Ravelry, for a fee. The fee for the pdf format is to offset the advertising revenue lost when you print or download the pattern rather than viewing it online.
If you would like to receive notifications of new posts and patterns as they become available, please follow this blog. You can follow by e-mail (look at the sidebar on the right for the follow by email option), or via RSS feed, or via your WordPress.com reader: Follow Stitches ‘N’ Scraps on WordPress.com

Free Pattern – Jelly Beads
It’s stretchy, it’s glittery, it’s jelly yarn! This quick and easy bracelet can be worked up in about 15 minutes. Stack them, share them, give them as gifts. The pattern works for any size – you can even make a really long one and wear it as a necklace. If you’re not into the jelly look, you can make this simple pattern with other yarns as well.
A note on safety – if you’re making these with the jelly yarn, avoid giving them to very young kids. The nylon material is stretchy, almost like a very stiff rubber band. If it’s too tight it can cut off circulation and if snags on something it may stretch too far and snap. If the kids are too young to have a rubber band, I probably wouldn’t give them this either.
This post contains affiliate links (click for more info). If you click one of these links and then make a purchase, I may be compensated. You get the same great prices, and you will be helping to support this site!
Jelly Beads
![]()
Add this to your Ravelry Queue
Materials:
- Yummy Yarns Jelly Yarn, Fine – shown in Raspberry Sorbet. Yardage will depend on the size of your bracelet or necklace
- Size J (6 mm) hook, or whatever hook feels comfortable to you working with this yarn.
- Yarn needle
Difficulty:
Easy – chains and puff stitches.
Size:
Can be made to any size desired.
Gauge:
Gauge is not important for this project.
Abbreviations used:
- ch = chain
- puff = puff stitch (see special stitches)
- sl st = slip stitch
- yo = yarn over
Special Stitch:
Puff Stitch (puff): (Yo, insert hook into indicated ch, yo and draw up a loop) 3 times. Yo and draw through all 7 loops on hook, ch 1 to close.
Instructions:
Note: You may want to put a stitch marker or piece of scrap yarn into your first chain so it’s easier to find later.
(Ch 3, puff in 2nd ch from hook) until desired length is achieved, sl st in first ch, fasten off.
Tie a knot with starting and ending tails, then weave in the tails. I don’t normally recommend tying knots, but with this yarn it felt like it needed it.
That’s it! It really is that easy!
I hope you enjoy the pattern. A downloadable pdf of this pattern is also available on Ravelry, for a fee. The fee for the pdf format is to offset the advertising revenue lost when you print or download the pattern rather than viewing it online.
Do you want the best of Stitches ‘N’ Scraps delivered right to your inbox? The Stitches ‘N’ Scraps email newsletter includes highlights from the blog as well as special features not available elsewhere. Don’t miss a stitch – Subscribe now!

Free Pattern – Resistance
Show your resistance to injustice, bigotry and hate with his bold, zig-zag scarf. The eye-catching motif is the symbol used on electric circuit diagrams to indicate a resistor.
This content is protected by copyright. See this Terms of Use / Copyright page for more information.
This post contains sponsored content and/or affiliate links. If you click an affiliate link and make a purchase, I may get a commission.
Resistance Matters
Update from 6/5/2020: When I first designed this pattern, it was early 2017, and Trump had just taken office. I wanted to support the science march and other resistance efforts, but I was trying to be quiet about it because I didn’t want to alienate a large portion of my audience who didn’t agree with me.
Since then I’ve become more vocal on my page about issues that matter to me, and now in the wake of George Floyd’s murder, I’ve come to the point where I need to say what I feel and say it out loud.
Resist injustice. Resist bigotry. Resist hate. Resistance matters. Black. Lives. Matter.
Update from 12/31/24: We are heading into a new year that promises difficult challenges for many here in the US. It feels like hatred and bigotry, injustice and anger are everywhere, and it can feel hopeless. But resistance still matters. In small ways and big, let’s work towards the future we want to see, and love and care for each other along the way.
Color Choices
Change colors as you go, anywhere in the pattern. Choose colors that reflect your message, or just use up scraps. The Red, White and Blue colors in the sample reflect my hope for change in this country that I love.
Reversible Intarsia
I took a class once from Laurinda Reddig in which she taught techniques for making color changes so invisible that the piece is truly reversible. While it’s not required for this pattern, I highly recommend her book Reversible Color Crochet: A New Technique which teaches these same techniques.
Resistance


Add this to your Ravelry Queue
Materials
- Yarn: Worsted weight yarn
- 175 yds main color(s) (MC)
- 30 yds accent color(s) (AC)
- Hook: Size J (6 mm) hook or size needed to match gauge.
- Notions:
- Scissors
- Tapestry needle
Project Level
Intermediate: Simple double crochet colorwork (intarsia).
Size
Approximately 8.5 x 60 inches
Gauge
14 dc x 8 rows = 4 inches. Exact gauge is not critical.
Abbreviations used
This pattern uses US terms.
- ch = chain
- sc = single crochet
- fdc = foundation double crochet
- sl st = slip stitch
- st(s) = stitch(es)
- sp(s) = space(s)
Recommended Resources
Notes
- Starting with foundation stitches is recommended as it makes for a stretchier edge. However, if you’re just not comfortable with foundation stitches, an alternative starting row is provided.
- Feel free to change colors at any point for a unique look. In the sample, I kept the accent color the same, but changed main colors twice. It’s dark blue on one side, red on the other, and there’s some grey in the middle. I was using up some stash, and basically changed colors every time I ran out of one.
- Since it’s a scarf, be careful to make your color changes neatly. Do not carry the yarn – use a different ball for each section. This means you will need 3 balls at any given time – one for the accent color and 2 for the main color.
Instructions
Row 1 ( RS): 14 fdc in MC, 2 fdc in AC, 14 fdc in MC. (30 sts)
OR Alternate Row 1: With MC, ch 32, sk first 3 chs (counts as dc), dc in 4th ch from hook and next 12 chs, switching to AC. With AC, dc in next 2 chs, switching to MC. With MC, dc in last 14 chs. (30 sts)
For each following row: Ch 3 (counts as dc), dc in next st and each st across, with color changes as specified. Note that the stitch counts in each row include the starting ch 3. Each row has a total of 30 sts.
Rows 2-10: 14 dc in MC, 2 dc in AC, 14 dc in MC
Row 11: 13 dc in MC, 3 dc in AC, 14 dc in MC
Row 12: 16 dc in MC, 4 dc in AC, 10 dc in MC
Row 13: 7 dc in MC, 4 dc in AC, 19 dc in MC
Row 14: 22 dc in MC, 4 dc in AC, 4 dc in MC
Row 15: Repeat row 13
Row 16: Repeat row 12
Row 17: 13 dc in MC, 4 dc in AC, 13 dc in MC
Row 18: 10 dc in MC, 4 dc in AC, 16 dc in MC
Row 19: 19 dc in MC, 4 dc in AC, 7 dc in MC
Row 20: 4 dc in MC, 4 dc in AC, 22 dc in MC
Row 21: Repeat row 19.
Row 22: Repeat row 18.
Row 23: Repeat row 17.
Rows 24-46: Repeat rows 12-23 once, then repeat rows 12-22 once more.
Row 47: Repeat row 11.
Rows 48-72: Repeat row 2 (25 rows)
Rows 73-109: Repeat rows 11-47.
Rows 110 – 119: Repeat row 2 (10 rows)
Fasten off. Weave in all ends.
Charts
Go back to written instructions
Chart shows same pattern as written instructions.
Share this Resistance crochet scarf pattern on Pinterest!
Here’s an image perfect for pinning.

Rate this Resistance crochet scarf pattern!
I hope you enjoyed this crochet scarf pattern. Thanks to Soulpart71 for testing it!
A downloadable pdf of this pattern is also available for free on Ravelry
Do you want the best of Stitches n Scraps delivered right to your inbox? Don’t miss a stitch – Subscribe now!

Easy Crochet Cowl – Impetuous
Be breezy, bright, and ready for spring with Impetuous! This easy crochet cowl works up super quickly, and is completely customizable too. Make a whole rainbow of cowls for every occasion.

This post contains sponsored content and/or affiliate links. If you click an affiliate link and make a purchase, I may get a commission.
This content is protected by copyright. See this Terms of Use / Copyright page for more information.
Make It Your Way!
Color
Choose blocks of color, skinny stripes, or anywhere in-between. This design allows you to change color at will, to create your own unique striping pattern. Just remember that for each time you change colors, you will have 2 more ends to weave in when you’re done. Check out these many versions I made for a charity project!
Size
The pattern has a stitch repeat of 3 stitches. This means you can make your cowl wider or narrower by adding or subtracting stitches in groups of 3. Try doubling the stitch count for a chunky, squishy cowl suitable for colder weather!
You can also make it as long or short as you like, by adding or subtracting rows. Changing the size will of course affect how much yarn you need.
Shape
Seaming the two ends together forms the cowl loop. If you would prefer a scarf or shawl, you can choose to leave it open instead. The pattern includes alternate edging instructions for this option.
Shine Worsted Yarn
I originally created this pattern with some stash yarns that have long since been discontinued. We Crochet was nice enough to send me some of their Shine Worsted yarn for free to update this design.

As the name suggests, it has a captivating sheen to it. This yarn is a luxurious blend of 60% Pima Cotton and 40% Modal®. Modal is a natural beech wood fiber, and that’s what really makes it shine. It works up beautifully soft and is machine washable too! Shine also comes in a sport weight yarn, so be sure you’re choosing the right size for your project.
Materials:
- Yarn: Knit Picks Shine Worsted yarn
- 110 – 120 yds total, in any combination of colors
- Sample shown in #25783 Pistachio & #23798 Wisteria
- Hook: Size J (6 mm) hook
- Notions:
- Yarn needle
- 2-3 Stitch markers (optional)
Project Level:
Basic – All chains and single crochets, with a slip stitch seam.
Size:
7.5 x 12 inches flat. (24 inches before seaming).
Instructions are included to adjust size. Changing size will affect yarn usage.
Gauge:
11 sc x 11 rows = 4″. Exact gauge is not critical.
Abbreviations used:
ch = chain
ch sp = chain space
sc = single crochet
sl st = slip stitch
st(s) = stitch(es)
RS = Right Side
Recommended Resources:
Instructions:
Main Section
Scroll down for charted version of instructions
You may find it helpful to mark Row 1 as the RS, and to mark the first stitch of each row.
To adjust the width, add or remove stitches, in multiples of 3.
Row 1 ( RS): Ch 22 (multiple of 3 + 1), sc in 2nd ch from hook and in each ch across. (21 sc)
Row 2: Ch 1, sc in first st, (ch 3, sk 2 sts, sc in next st) across to last 2 sts, ch 2, sk next st, sc in last st. (9 sts, 7 ch sps).

Row 3: Ch 1, sc in first st, sk first ch-2 sp, (ch 3, sk next st, sc in next ch-3 sp) across, ch 2, sc in last st.
Row 4-60: Repeat row 3
Change colors at any point as desired.
To adjust length, add or remove rows, ending after a WS (even numbered) row.
Row 61: Ch 1, sc in first st, sc in first ch-2 sp, (sc in next st, 2 sc in next ch-3 sp) across, sc in last st. (21 sts). Do not fasten off.

Main Section Chart
(Main Section only, does not include seaming or edging)

Seaming:
Fold piece in half so that right sides are together and first and last rows match up.
Working through both layers, (ch-1, sl st) in each st across. Do not fasten off.

Edging:
First edge: Turn work so that right side is facing. Working in sides of rows, sc in side of each row around, join with a sl st in first st of rnd. (61 sc)
Second edge: With right side facing, join yarn with sl st at the opposite end of the seam. Working in sides of rows, sc in side of each row around, join with a sl st in first st of rnd. (61 sc)

Alternate Edging
Use this edging if you are not seaming, to make a scarf or shawl.
Side: Turn work so that right side is facing. Working in sides of rows, ch 1, sc in side of each row across (61 sc)
Bottom: Ch 1, working in bottom of row 1, sc in each st across (21 sc)
Side: Ch 1, working in sides of rows, sc in side of each row across (61 sc).
Top: Ch 1, working across last row, sc in each st across, ch 1, join with sl st to first sc. Fasten off.
Finishing
Weave in all ends.
Wash and block. Blocking is important to open up the mesh – for best results, do not skip this step.
Impetuous Crochet Cowl Video Tutorial
Watch this video on YouTube

Rate this easy crochet cowl pattern!
I hope you enjoy the pattern. Thanks to tawnierose, celiaak, mugdhamanasa, marjos, colleenmoss and Taylor Jira for testing it!
A downloadable pdf of this pattern is available on Ravelry for a small fee. The fee for the pdf format is to offset the advertising revenue lost when you print or download the pattern rather than viewing it online.
Do you want the best of Stitches n Scraps delivered right to your inbox? Don’t miss a stitch – Subscribe now!

Free Pattern – Straight Up Beanie
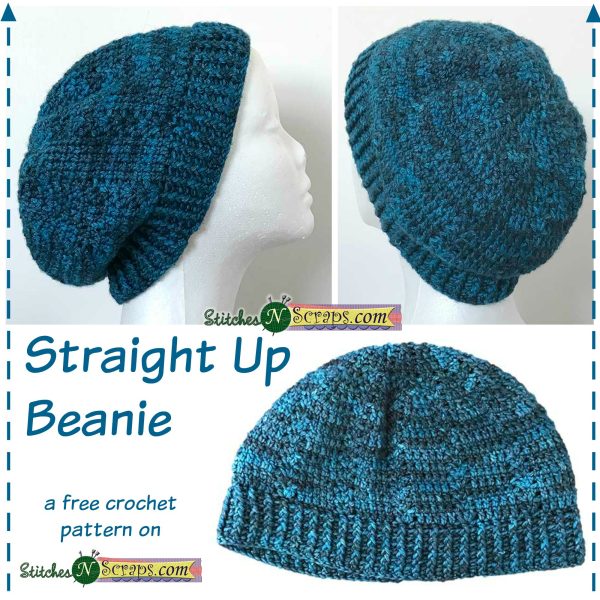
Delicate columns of fans climb straight up to the top of this hat. The split/center dc stitches line up directly on top of each other, instead of being slightly offset like they normally would. This creates perfectly straight columns of stitches, for a unique texture.
This pattern was designed for the “Make it for Me” CAL on ELK Studio. You’ve made it through another busy holiday season, and probably poured lots of love into handmade gifts for others. Now it’s time to make something extra special just for you. Be sure to check out the other great “Make it for Me” patterns, and fabulous prize giveaways too!
This post contains affiliate links (click for more info). If you click one of these links and then make a purchase, I may be compensated. You get the same great prices, and you will be helping to support this site!
Straight Up Beanie
![]()
Add this to your Ravelry Queue
Materials:
- 250-275 yds DK weight yarn (shown in Fyberspates Vivacious DK #807 Deep Aqua)
- Size G (4 mm) hook or size needed to obtain gauge
- Size E (3.5 mm) hook or .5mm smaller than hook used for gauge
- Yarn needle
Difficulty:
Intermediate – Front and back post stitches, split / center dc (see special stitch).
Sizes:
Adult – one size fits most.
Gauge:
16 dc x 10 rows = 4 inches with larger hook. Correct gauge is important for a good fit – take time to check your gauge.
Abbreviations used:
- ch = chain
- dc = double crochet
- fdc = foundation double crochet
- fpdc = front post double crochet
- bpdc = back post double crochet
- split dc = split double crochet (see special stitches)
- dec = split double crochet decrease (see special stitches)
- sl st = slip stitch
- st(s) = stitch(es)
- sp(s) = space(s)
- yo = yarn over
- rnd(s) = round(s)
Recommended Resources:
- Foundation Double Crochet (FDC) on Moogly
- Front Post and Back Post Stitch Crochet by Jessie at Home
- Split / Center Stitches in the Round
Special Stitches:
-
Split double crochet (split dc):
Instead of working a dc into the top of the indicated stitch as normal, work the dc into the center of the indicated stitch, as shown here. See this split stitches tutorial for more details.

-
Split double crochet 2 together (dec):
Working into the center of the stitches (like for the split dc), dc2tog.

Instructions:
Ribbing:
Note: Starting with foundation stitches is recommended as it makes for a stretchier edge. However, if you’re just not comfortable with foundation stitches, an alternative starting rnd is provided. Either way, don’t crochet over your starting tail, you’ll need it later.
With smaller hook:
Rnd 1( RS): Work 96 fdc, join with sl st in top of first st, being careful not to twist the round.
OR
Alternate Rnd 1 (WS): Ch 98, dc in back bump of 4th ch from hook (first 3 chs count as first dc), dc in back bump of each ch across, join. (96 dc).
Note: Entire hat is worked on right side – do not turn work at the end of the rounds. There will be a small gap at the bottom of rnd 1, you can sew this closed later when weaving in the tails.
Rnds 2-8: Ch 2 (counts as bpdc), (fpdc in next st, bpdc in next st) around to last st, fpdc in last st, join.
Try on ribbing band to make sure it fits snuggly but not too tightly. If it doesn’t, you may need to go up or down a hook size.
Straight section:
Switch to larger hook.
Rnd 9: Ch 3 (counts as dc), dc in next 4 sts, (sk next st, 3 dc in next st, sk next st, dc in next 5 sts) 11 times, sk next st, 3 dc in next st, sk last st, join.
Rnds 10-18: Ch 2 (counts as a split dc now and throughout), split dc in next 4 sts, (sk next st, 3 split dc in next st, sk next st, split dc in next 5 sts) 11 times, sk next st, 3 split dc in next st, sk last st, join.
Note: If you want more slouch, feel free to add another 1 or 2 rounds here before starting the decreases.
Decrease section:
Rnd 19: Ch 2, split dc in next st, (dec, split dc in next st, sk next st, 3 split dc in next st, sk next st, split dc in next 2 sts) 11 times, dec, split dc in next st, sk next st, 3 split dc in next st, sk last st, join. (84 sts)
Rnd 20: Ch 2, (dec, split dc in next st, sk next st, 3 split dc in next st, sk next st, split dc in next st) 11 times, dec, split dc in next st, sk next st, 3 split dc in next st, sk last st, join. (72 sts)
Rnd 21: Ch 2, (dec, sk next st, 3 split dc in next st, sk next st, split dc in next st) 11 times, dec, sk next st, 3 split dc in next st, sk last st, join. (60 sts)
Rnd 22: Ch 1 (does not count as a st, now and throughout), sk first st, split dc in next st, (sk next st, 3 split dc in next st, sk next st, dec) 11 times, sk next st, 3 split dc in next st, sk last st, join. (48 sts)
Rnd 23: Ch 2, (sk next st, 2 split dc in next st, sk next st, split dc in next st) 11 times, sk next st, 2 split dc in next st, sk last st, join. (36 sts)
Rnd 24: Ch 2, (dec, split dc in next st) 11 times, dec, join. (24 sts)
Rnd 25: Ch 1, split dc in next st, dec 11 times, join. (12 sts)
Rnd 26: Ch 1, split dc in next st, dec 5 times, join, fasten off. (6 sts)
Weave in all tails – use ending tail to sew hole at top closed, and use starting tail to sew gap closed at bottom.
I hope you enjoy the pattern. Thanks to Glendaww, WilmaELee, Marjos, Tawnierose, and Niveknits for testing it!
A downloadable pdf of this pattern is also available on Ravelry, for a fee. The fee for the pdf format is to offset the advertising revenue lost when you print or download the pattern rather than viewing it online.
If you would like to receive notifications of new posts and patterns as they become available, please follow this blog. You can follow by e-mail (look at the sidebar on the right for the follow by email option), or via RSS feed, or via your WordPress.com reader: Follow Stitches ‘N’ Scraps on WordPress.com-

Free Pattern – Eleanora
This post contains affiliate links (click for more info). If you click one of these links and then make a purchase, I may be compensated. You get the same great prices, and you will be helping to support this site!
Get cozy with Eleanora! This casual, comfy vest has big roomy pockets and a subtle, all-over texture. It’s lightweight and not too warm. Perfect for relaxing at home. The Red Heart Soft Touch yarn is super soft and has lovely drape with just a little shine.
Are you curious about the process of designing a crochet pattern? Check out this 8-part “How a Pattern Happens” series that I wrote while designing this!
Eleanora
![]()
Add this to your Ravelry Queue
Materials:
- Red Heart Soft Touch
- 850 – 1000 yds (3 [4, 4, 4]) skeins Cream (A)
- 125 – 175 yds (1 skein) Camel (B)
- Size H/8 (5 mm) hook or size needed to obtain gauge
- Yarn or Tapestry needle
- Stitch markers
Difficulty:
Intermediate – Herringbone half double crochet, simple color changes, made in pieces and seamed.
Sizes:
Instructions are given for Women’s S, with changes for M, L, and XL in [ ].

Gauge:
15 hhdc (herringbone half double crochet) x 12 rows = 4″. Gauge is important for a good fit – take time to check your gauge!
Abbreviations used:
- ch = chain
- sc = single crochet
- hhdc = herringbone half double crochet (see special stitches)
- dec = herringbone half double crochet decrease (see special stitches)
- sl st = slip stitch
- st(s) = stitch(es)
- sp(s) = space(s)
- yo = yarn over
Recommended Resources:
- Foundation Single Crochet (fsc) on Moogly
- Herringbone Half-Double Crochet (hhdc)
- Herringbone Half-Double Crochet Decrease
- Changing Colors
- Working Evenly Across/Around
- Invisible Join on Look What I Made
Special Stitches:
- Herringbone half double crochet (hhdc): Yo (shown in blue); insert hook in specified stitch, yo and draw up a loop (shown in red); pull the loop you just drew up (red) through the next loop on the hook (blue); yo and pull through both loops. For more detail, view the full hddc tutorial.
- Herringbone half double crochet decrease (dec): In first st, *yo; insert hook in stitch, yo and draw up a loop; pull the loop you just drew up through the next loop on the hook (everything up to here is shown in blue); repeat from * in next st (repeat shown in purple); Yo and pull through all three loops on the hook. For more detail, view the full hddc decrease tutorial.
Instructions:
Back:
Border:
Row 1 (WS): With B, Ch 74 [81, 88, 96], sc in 2nd ch from hook and in each ch across, changing to A at the end of the row. Cut B. (73 [80, 87, 95] sts)
OR
Alternate Row 1 (WS): With B, work 73 [80, 87, 95] fsc, changing to A at the end of the row. Cut B. (73 [80, 87, 95] sts)
Rows 2-4: With A, ch 1, turn, sc in each st across. At the end of row 4, change to B and cut A.
Row 5: With B, ch 1, turn, sc in each st across, changing to A at the end of the row. Cut B.
Waist shaping (decreases):
Row 6 (RS): With A, dec, hhdc in each st across to last 2 sts, dec. (71 [78, 85, 93] sts)
Rows 7-8: Ch 1, turn, hhdc in each st across.
Rows 9-26: Repeat rows 6-8 six more times. (59 [66, 73, 81] sts)
Bust shaping (increases):
Row 27 (WS): Ch 1, turn, hhdc in each st across.
Row 28: Ch 1, turn, 2 hhdc first st, hhdc in each st across to last st, 2 hhdc in last st. (61 [68, 75, 83] sts)
Rows 29-32 [32, 31, 31]: Ch 1, turn, hhdc in each st across.
Rows 33-47 [33-47, 32-47, 32-47] : Repeat last 5 [5, 4, 4] rows 3 [3, 4, 4] more times. (67 [74, 83, 91] sts)
Sizes S & M only – Rows 48-49: Repeat rows 28-29. (69 [76] sts)
Armhole shaping:
Note: Ch 2 at the beginning of a row does not count as a stitch.
Row 50 [50, 48, 48]: Sl st in first 1 [2, 2, 3] sts, ch 2, dec, hhdc in each st across to last 3 [4, 4, 5] sts, dec, leave last 1 [2, 2, 3] sts unworked. (65 [70, 77, 83] sts)
Row 51 [51, 49, 49]: Ch 2, turn, dec, hhdc in each st across to last 2 sts, dec. (63 [68, 75, 81] sts)
Size XL only – Row 50: Repeat last row once more. (79 sts)
Row 52 [52, 50, 51]: Ch 1, turn, hhdc in each st across. (63 [68, 75, 79] sts)
Row 53 [52, 51, 52]: Ch 2, turn, dec, hhdc in each st across to last 2 sts, dec. (61 [66, 73, 77] sts)
Sizes L & XL only – Rows 52-53 [53-54]: Repeat last 2 rows once more. (71 [75] sts).
Row 54-73 [53-75, 54-75, 55-77]: Ch 1, turn, hhdc in each st across. (63 [68, 71 ,75] sts)
Neck & shoulder shaping:
Row 74a [76a, 76a, 78a] (RS): Turn, sl st in first 5 [5, 6, 6] sts, ch 2, dec, hhdc in next 11 [13, 14, 14] sts, dec, leave remaining 43 [46, 49, 53] sts unworked.
Row 74a [76a, 76a, 78a]:
Sizes S & M only: Ch 2, turn, dec, hhdc in next 5 [6] sts, sl st in next st, leave remaining 5 [6] sts unworked, fasten off. (6 [7] sts)
Sizes L & XL only: Turn, sl st in first st, ch 2, dec, hhdc in next 6 sts, sl st in next st, leave remaining 6 sts unworked. Fasten off. (7 sts)
Join for other shoulder: With RS facing, sk next 21 [22, 23, 27] unworked sts from row 73 [75, 75, 77], join A with sl st in next st.
Row 74b [76b, 76b, 78b]: Ch 2, dec in same st and next st, hhdc in next 11 [13, 14, 14] sts, dec, leave remaining 5 [5, 6, 6] sts unworked.
Row 75b [77b, 77b, 79b]:
Sizes S & M only: Turn, sl st in first 5 [6] sts, ch 2, dec, hhdc in next 4 [5] sts, dec, fasten off (6 [7] sts)
Sizes L & XL only: Turn, sl st in first 6 sts, ch 2, dec, hhdc in next 5 sts, dec, leave last st unworked, fasten off. (7 sts)
[the_ad id=”7845″]
Left Front:
Border:
Note: Leave slightly longer tails (about 10-12 inches) at the start of rows 1 & 5. You will work 1 stitch with each of these tails when you do the edging.
Row 1 (WS): With B, Ch 44 [48, 51, 55], sc in 2nd ch from hook and in each ch across, changing to A at the end of the row. Cut B. (43 [47, 50, 54] sts)
OR
Alternate Row 1 (WS): With B, work 43 [47, 50, 54] fsc, changing to A at the end of the row. Cut B. (43 [47, 50, 54] sts)
Rows 2-5: Work as for back.
Waist shaping (decreases):
Note: You may find it helpful to mark your increases and decreases on both front pieces, as shown here. They shouldn’t line up directly, but rather alternate back and forth slightly.
Row 6 (RS): With A, ch 1, turn, hhdc in first 17 [19, 21, 23] sts, dec, hhdc across. (42 [46, 49, 53] sts)
Rows 7-8: Ch 1, turn, hhdc in each st across.
Row 9: Ch 1, turn, hhdc in first 24 [26, 27, 29] sts, dec, hhdc across. (41 [45, 48, 52] sts)
Rows 10-11: Ch 1, turn, hhdc in each st across.
Row 12: Ch 1, turn, hhdc in first 16 [18, 20, 22] sts, dec, hhdc across. (40 [44, 47, 51] sts)
Rows 13-14: Ch 1, turn, hhdc in each st across.
Row 15: Ch 1, turn, hhdc in first 23 [25, 26, 28] sts, dec, hhdc across. (39 [43, 46, 50] sts)
Rows 16-17: Ch 1, turn, hhdc in each st across.
Row 18: Ch 1, turn, hhdc in first 15 [17, 19, 21] sts, dec, hhdc across. (38 [42, 45, 49] sts)
Rows 19-20: Ch 1, turn, hhdc in each st across.
Row 21: Ch 1, turn, hhdc in first 22 [24, 25, 27] sts, dec, hhdc across. (37 [41, 44, 48] sts)
Rows 22-23: Ch 1, turn, hhdc in each st across.
Row 24: Ch 1, turn, hhdc in first 14 [16, 18, 20] sts, dec, hhdc across. (36 [40, 43, 47] sts)
Rows 25-26: Ch 1, turn, hhdc in each st across.
Bust shaping (increases):
Row 27 (WS): Ch 1, turn, hhdc in each st across.
Row 28: Ch 1, turn, hhdc in first 14 [16, 18, 20] sts, 2 hhdc in next st, hhdc across. (37 [41, 44, 48] sts)
Rows 29-32 [32, 31, 31]: Ch 1, turn, hhdc in each st across.
Row 33 [33, 32, 32]: Ch 1, turn, hhdc in first 22 [16, 18, 27] sts, 2 hhdc in next st, hhdc across. (38 [42, 45, 49] sts)
Rows 34-37 [34-37, 33-35, 33-35]: Ch 1, turn, hhdc in each st across.
Row 38 [38, 36, 36]: Ch 1, turn, hhdc in first 15 [17, 19, 21] sts, 2 hhdc in next st, hhdc across. (39 [43, 46, 50] sts)
Rows 39-42 [39-42, 37-39, 37-39]: Ch 1, turn, hhdc in each st across.
Row 43 [43, 40, 40]: Ch 1, turn, hhdc in first 23 [17, 19, 28] sts, 2 hhdc in next st, hhdc across. (40 [44, 47, 51] sts)
Rows 44-47 [44-47, 41-43, 41-43]: Ch 1, turn, hhdc in each st across.
Row 48 [48, 44, 44]: Ch 1, turn, hhdc in first 16 [18, 20, 22] sts, 2 hhdc in next st, hhdc across. (41 [45, 48, 52] sts)
Rows 49 [49, 45-47, 45-47]: Ch 1, turn, hhdc in each st across.
Armhole shaping:
Row 50 [50, 48, 48] (RS): Turn, sl st in first 1 [2, 2, 3] sts, dec, hhdc across. (39 [42, 45, 48] sts)
Row 51 [51, 49, 49]: Ch 1, turn, hhdc in each st across to last 2 sts, dec. (38 [41, 44, 47] sts)
Row 52 [52, 50, 50]: Ch 1, turn, hhdc across.
Row 53 [53, 51, 51]: Ch 1, turn, hhdc across to last 2 sts, dec. (37 [40, 43, 46] sts)
Row 54 [54, 52, 52]: Ch 1, turn, hhdc across.
Size L & XL only – Rows 53-54 [53-56]: Repeat last 2 rows once [twice]. (42 [44] sts)
Sizes S, M, L only – Rows 55-56: Ch 1, turn, hdc across.
Neckline shaping:
Row 57: Ch 2, turn, dec, hhdc across. (36 [39, 41, 43] sts)
Row 58: Ch 1, turn, hhdc in each st across to last 2 sts, dec. (35 [38, 40, 42] sts)
Rows 59-73 [75, 75, 77]: Repeat last 2 rows 7 [8 ,8, 9] times, then repeat row 57 once more. (20 [21, 23, 23] sts).
Row 74 [76, 76, 78]: Turn, sl st in first 5 [5, 6, 6] sts, ch 2, dec, hhdc across to last 2 sts, dec. (13 [14, 15, 15] sts)
Row 75 [77, 77, 79]: Ch 1, turn, dec, hhdc in next 5 [6, 6, 6] sts, sl st in next st, leaving remaining 5 [5, 6, 6] sts unworked, fasten off. (6 [7, 7, 7] sts)
Right Front:
Border:
Note: Leave a slightly longer tails (about 10-12 inches) at the end of row 5. You will work 1 stitch with this tail when you do the edging.
Rows 1-5: Work as for back.
Waist shaping (decreases):
Row 6 (RS): With A, ch 1, turn, hhdc in first 24 [26, 27, 29] sts, dec, hhdc across. (42 [46, 49, 53] sts)
Rows 7-8: Ch 1, turn, hhdc in each st across.
Row 9: Ch 1, turn, hhdc in first 17 [19, 21, 23] sts, dec, hhdc across. (41 [45, 48, 52] sts)
Rows 10-11: Ch 1, turn, hhdc in each st across.
Row 12: Ch 1, turn, hhdc in first 23 [25, 26, 28] sts, dec, hhdc across. (40 [44, 47, 51] sts)
Rows 13-14: Ch 1, turn, hhdc in each st across.
Row 15: Ch 1, turn, hhdc in first 16 [18, 20, 22] sts, dec, hhdc across. (39 [43, 46, 50] sts)
Rows 16-17: Ch 1, turn, hhdc in each st across.
Row 18: Ch 1, turn, hhdc in first 22 [24, 25, 27] sts, dec, hhdc across. (38 [42, 45, 49] sts)
Rows 19-20: Ch 1, turn, hhdc in each st across.
Row 21: Ch 1, turn, hhdc in first 15 [17, 19, 21] sts, dec, hhdc across. (37 [41, 44, 48] sts)
Rows 22-23: Ch 1, turn, hhdc in each st across.
Row 24: Ch 1, turn, hhdc in first 21 [23, 24, 26] sts, dec, hhdc across. (36 [40, 43, 47] sts)
Rows 25-26: Ch 1, turn, hhdc in each st across.
Bust shaping (increases):
Row 27 (WS): Ch 1, turn, hhdc in each st across.
Row 28: Ch 1, turn, hhdc in first 21 [23, 24, 26] sts, 2 hhdc in next st, hhdc across. (37 [41, 44, 48] sts)
Rows 29-32 [32, 31, 31]: Ch 1, turn, hhdc in each st across.
Row 33 [33, 32, 32]: Ch 1, turn, hhdc in first 15 [23, 24, 21] sts, 2 hhdc in next st, hhdc across. (38 [42, 45, 49] sts)
Rows 34-37 [34-37, 33-35, 33-35]: Ch 1, turn, hhdc in each st across.
Row 38 [38, 36, 36]: Ch 1, turn, hhdc in first 22 [24, 25, 27] sts, 2 hhdc in next st, hhdc across. (39 [43, 46, 50] sts)
Rows 39-42 [39-42, 37-39, 37-39]: Ch 1, turn, hhdc in each st across.
Row 43 [43, 40, 40]: Ch 1, turn, hhdc in first 16 [24, 25, 22] sts, 2 hhdc in next st, hhdc across. (40 [44, 47, 51] sts)
Rows 44-47 [44-47, 41-43, 41-43]: Ch 1, turn, hhdc in each st across.
Row 48 [48, 44, 44]: Ch 1, turn, hhdc in first 23 [25, 26, 28] sts, 2 hhdc in next st, hhdc across. (41 [45, 48, 52] sts)
Rows 49 [49, 45-47, 45-47]: Ch 1, turn, hhdc in each st across.
Armhole shaping:
Row 50 [50, 48, 48] (RS): Ch 1, turn, hhdc in across to last 3 [4, 4, 5] sts, dec, leave remaining 1 [2, 2, 3] sts unworked. (39 [42, 45, 48] sts)
Row 51 [51, 49, 49]: Ch 2, turn, dec, hhdc across. (38 [41, 44, 47] sts)
Row 52 [52, 50, 50]: Ch 1, turn, hhdc across.
Row 53 [53, 51, 51]: Ch 2, turn, dec, hhdc across. (37 [40, 43, 46] sts)
Row 54 [54, 52, 52]: Ch 1, turn, hhdc across.
Size L & XL only – Rows 53-54 [53-56]: Repeat last 2 rows once [twice]. (42 [44] sts)
Sizes S, M, L only – Rows 55-56: Ch 1, turn, hdc across.
Neckline shaping:
Row 57: Ch 1, turn, hhdc across to last 2 sts, dec. (36 [39, 41, 43] sts)
Row 58: Ch 2, turn, dec, hhdc across. (35 [38, 40, 42] sts)
Rows 59-73 [75, 75, 77]: Repeat last 2 rows 7 [8 ,8, 9] times, then repeat row 57 once more. (20 [21, 23, 23] sts).
Row 74 [76, 76, 78]: Ch 2, turn, dec, hhdc in next 11 [12, 13, 13] sts, dec, leaving remaining 5 [5, 6, 6] sts unworked. (13 [14, 15, 15] sts)
Row 75 [77, 77, 79]: Ch 1, turn, sl st in first 5 [5, 6, 6] sts, ch 2, dec, hhdc across to last 2 sts, dec. (6 [7, 7, 7] sts)
Right (Right, Left, Left) Pocket:
Row 1 (RS): With A, Ch 18 [19, 21, 22], sc in 2nd ch from hook and in each ch across. (17 [18, 20, 21] sts)
OR
Alternate Row 1 (WS): With A, work 17 [18, 20, 21] fsc. (17 [18, 20, 21] sts)
Rows 2-8 [8, 9, 9]: Ch 1, turn, hhdc across.
Row 9 [9, 10, 10]: Ch 1, turn, hhdc across to last 2 sts, dec. (16 [17, 19, 20] sts)
Row 10 [10, 11, 11]: Ch 2, turn, dec, hhdc across. (15 [16, 18, 19] sts)
Rows 11-18 [11-18, 12-19, 12-19]: Repeat last 2 rows four more times. (7 [8, 10, 11] sts)
Sizes L & XL only – Row 20: Repeat row 11. (9 [10] sts)
Edging Rnd (RS):
- Ch 1, turn, sc in each st across. (7 [8, 9, 10] sts)
- Ch 1, working in sides of rows, work 10 [10, 25, 25] sc evenly across short (short, long, long) side of pocket. (10 [10, 25, 25] sts)
- Ch 1, working in bottom of row 1, sc in each st across. (17 [18, 20, 21] sts)
- Ch 1, working in sides of rows, work 23 [23, 11, 11] sc evenly across long (long, short, short) side of pocket. (23 [23, 11, 11] sts)
Left (Left, Right, Right) Pocket:
Rows 1-8 [8, 9, 9]: Repeat as for other pocket.
Row 9 [9, 10, 10]: Ch 2, turn, dec, hhdc across. (16 [17, 19, 20] sts)
Row 10 [10, 11, 11]: Ch 1, turn, hhdc across to last 2 sts, dec. (15 [16, 18, 19] sts)
Rows 11-18 [11-18, 12-19, 12-19]: Repeat last 2 rows four more times. (7 [8, 10, 11] sts)
Sizes L & XL only – Row 20: Repeat row 11. (9 [10] sts)
Edging Rnd (RS):
- Ch 1, turn, sc in each st across. (7 [8, 9, 10] sts)
- Ch 1, working in sides of rows, work 23 [23, 11, 11] sc evenly across long (long, short, short) side of pocket. (23 [23, 11, 11] sts)
- Ch 1, working in bottom of row 1, sc in each st across. (17 [18, 20, 21] sts)
- Ch 1, working in sides of rows, work 10 [10, 25, 25] sc evenly across short (short, long, long) side of pocket. (10 [10, 25, 25] sts)
Note: For best results, wash and block pieces separately before seaming.
Finishing:
Seaming:
Note: You may find it helpful to “pin” the pieces /edges together with stitch markers prior to seaming, as shown below. This will help you to make sure the rows are lined up nicely.
With right sides facing, sew fronts to back at shoulder seams.
With right sides facing, sew side seams.
Using the pictures / diagrams as a guide, sew pockets onto front.
Edging:
Armholes:
Rnd 1: With WS facing, join A with sl st at underarm seam. Ch 1, work 73 [80, 87, 96] sc evenly spaced around armhole, join, changing to B. Fasten off A.
Rnd 2: With B, ch 1, turn, sc in each st around. Fasten off, join (see invisible join tutorial). (73 [80, 87, 96] sc)
Repeat for other armhole.
Front and Neckline:
Row 1 (WS):
Note: The basic idea on this row is to work stitches of color B into the rows of color B, and stitches of color A into the rows/stitches of color A. Using the tails from the border to do this just means fewer ends to work in later.
- With WS facing, Pick up a loop with the tail of B at the corner of left front, as shown

- With tail, Ch 1, sc in side of row 1, changing to A. With A, work 2 sc across side of rows 2-4, changing to the tail from row 5. With tail, sc in side of row 5, changing to A. (4 sc)

- With A, and working in sides of rows along front edge, ch 1, work 62 sc evenly spaced up to bottom of neckline
- Working into angled edge of V neck, ch 1, work 58 [58, 59, 60] sc evenly spaced up to right shoulder seam.
- Ch 1, work 25 [28, 29, 33] sc evenly spaced across back of neck to left shoulder seam.
- Working into angled edge of V neck, ch 1, work 58 [58, 59, 60] sc evenly spaced to bottom of neckline.
- Working in sides of rows along front edge, ch 1, work 62 sc evenly spaced down to row 5 (beginning of border). Change to tail from row 5.
- With tail, sc in side of row 5, changing to A. With A, work 2 sc across side of rows 4-2, changing to B (not tail). Cut A. With B, sc in side of row 1. (4 sc – 272 [276, 279, 285] sc total)
Rows 2-3: Ch 1, turn, (sc in each st across to next ch 1 sp, (sc, ch 1, sc) in ch 1 sp) 5 times, sc across. Do not fasten off. (292 [296, 299, 305] sts)
Hem (RS):
- Do not turn. Ch 1, work 2 sts across sides of rows from front edging.
- Working across bottom of stitches from row 1, sc in each st across. (238 [260, 260, 282, 306] sts)
- Work 2 sts across sides of rows from front edging. Fasten off, join at corner st (first st of row 3 of front edging) with invisible join. (242 [264, 286, 310] sts total)
Weave in all ends.
I hope you enjoy the pattern. Big thanks to Red Heart Yarns for supplying the fabulous yarn!
A downloadable pdf of this pattern is also available on Ravelry, for a fee. The fee for the pdf format is to offset the advertising revenue lost when you print or download the pattern rather than viewing it online.
If you would like to receive notifications of new posts and patterns as they become available, please follow this blog. You can follow by e-mail (look at the sidebar on the right for the follow by email option), or via RSS feed, or via your WordPress.com reader: Follow Stitches ‘N’ Scraps on WordPress.com-

Free Pattern – Seed Stitch Bow
This post contains affiliate links (click for more info). If you click one of these links and then make a purchase, I may be compensated. You get the same great prices, and you will be helping to support this site!
Use this Seed Stitch Bow to trim your tree, or when wrapping the presents underneath it. It’s also a great addition to headbands and hats. The Red Heart Holiday yarn is soft and shimmery, and the seed stitch adds a bit of fun texture.
This pattern is protected by copyright. Please do not distribute or share this pattern in any way other than by sharing a link to this page or to the pattern page on Ravelry. Click here for copyright information.
Seed Stitch Bow
![]()
Add this to your Ravelry Queue
Materials:
- Red Heart Holiday Yarn
- 25 yds cream/gold
- 20 yds red/red
- Size H/8 (5 mm) hook or size needed to obtain gauge
- Yarn or Tapestry needle
Difficulty:
Easy – Worked flat, basic stitches.
Size:
About 3 inches x 6 inches.
Gauge:
13 sc x 15 rows = 4 inches. Exact gauge is not critical. You can use the first few rows as your gauge swatch. After row 8, your work should measure about 2.5″ wide by 3 inches long.
Abbreviations used:
- ch = chain
- sc = single crochet
- sc2tog = single crochet 2 stitches together
- sl st = slip stitch
- st(s) = stitch(es)
- sp(s) = space(s)
Instructions:
Bow:
With cream, ch 9.
Row 1 (RS): sc in 2nd ch from hook, (dc in next ch, sc in next ch) 3 times, dc in last ch. (8 sts)
Rows 2-32: Ch 1, turn, sc in first dc, (dc in next sc, sc in next dc) 3 times, dc in last sc. (8 sts)
Note: Work should now measure 2.5 inches wide x 12 inches long.
Joining:
Fold work in half lengthwise, so that row 32 lines up with the bottom of foundation chain.

Working through both pieces together, sl st in each st across to join. (8 sl sts). Change to red, cut cream yarn.

Edging:
Turn work right-side-out (so that bulky part of seam is on inside).

Edging Rnd: Ch 1, work 38 sc evenly spaced around edge, join with sl st to first sc. Fasten off red.
Join red with slip stitch at other end of seam.

Repeat edging rnd. When you fasten off, leave a longer tail (about 12 inches).
Shaping:
Weave in all tails except for the last one. Arrange loop so that right side is facing and seam is on top, at the center.

Pinch center together.

Wrap remaining tail tightly around two or 3 times, to hold it in place.

Adjust as needed. Once you’re happy with the shape, finish weaving in the tail.
Center Band:
With red, ch 5.
Row 1: Sc in 2nd ch from hook, dc in next ch, sc in next ch, dc in last ch. (4 sts)
Rows 2-8: Ch 1, turn, sc in first dc, dc in next sc, sc in next dc, dc in last sc. (4 sts).
Fasten off, leaving a long tail for sewing.

Weave in starting tail.
Finishing:
Wrap band around center of bow and sew ends together using the long tail. It should be tight, and you will need to stretch the yarn to make the ends meet.
Arrange so seam is at the back. Sew up through the center of the bow and back down again once or twice to hold everything in place neatly, then finish weaving in end.
I hope you enjoy the pattern. A downloadable pdf of this pattern is also available on Ravelry, for a fee. The fee for the pdf format is to offset the advertising revenue lost when you print or download the pattern rather than viewing it online.
If you would like to receive notifications of new posts and patterns as they become available, please follow this blog. You can follow by e-mail (look at the sidebar on the right for the follow by email option), or via RSS feed, or via your WordPress.com reader: Follow Stitches ‘N’ Scraps on WordPress.com-

Free Pattern – Textured Tree Skirt
This post contains affiliate links (click for more info). If you click one of these links and then make a purchase, I may be compensated. You get the same great prices, and you will be helping to support this site!
Wrap your holiday tree in the simple elegance of this textured tree skirt. It’s made in Red Heart Holiday yarn, which is soft and puffy with a festive shimmer. Seed stitch gives it a subtle, all over texture, highlighted by lacy corner increases. The ribbon-like border adds a splash of color, finished with a decorative fan and picot edge.

This pattern is protected by copyright. Please do not distribute or share this pattern in any way other than by sharing a link to this page or to the pattern page on Ravelry. Click here for copyright information.
Textured Tree Skirt
![]()
Add this to your Ravelry Queue
Materials:
- Red Heart Holiday Yarn
- 4 [6, 8] skeins cream/gold
- 1 skein red/red
- Size H/8 (5 mm) hook or size needed to obtain gauge
- Yarn or Tapestry needle
- 1 stitch marker
Difficulty:
Easy – Worked in the round, basic stitches. Edging uses spike stitches, but tutorial links are provided.
Sizes:
Instructions are given for a diameter (point to point) of 36 inches, with changes for 48 and 60 inches in [ ]. For all 3 sizes, the center hole is about 5 inches in diameter, not counting the edging.
Gauge:
13 sc x 15 rows = 4″. Exact gauge is not critical. You can use the first few rows as your gauge swatch – after row 4, your piece should be approximately 8 inches across from corner to corner, including the center hole. The center hole should be about 5″.
Abbreviations used:
- ch = chain
- sc = single crochet
- dc = double crochet
- spdc = spike double crochet
- sl st = slip stitch
- st(s) = stitch(es)
- sp(s) = space(s)
Recommended Resources:
- Tutorial – Changing Colors
- How to Crochet Spike Stitches by Moogly
- Edging – Shells and picots
- Edging – Working Evenly Across/Around
Special Stitches:
- Picot: Sl st in indicated st or sp, ch 3, sl st in same st or sp.
- Spike double crochet (spdc): Yarn over, Insert hook in indicated stitch (3 rows below next st), draw up loop to height of current row, (yarn over and pull through 2 loops on hook) twice, skip the st directly above the spdc. Note: The spdc is worked around (not in front of or behind) the stitches above it.
Instructions:
Skirt:
Row 1 (RS): Ch 55, sc in 2nd ch from hook, dc in same ch, *(sc in next ch, dc in next ch) 4 times, ch 2, dc in next ch, repeat from * 4 more times, (sc in next ch, dc in next ch) 4 times. (55 sts, 5 sps)
Note: Ch 3 at the beginning of a row counts as a dc.
Row 2: Ch 3, turn, sc in first (same) st, *(dc in next sc, sc in next dc) across to next sp, ch 2, sc in sp, ch 2, sc in next dc, repeat from * 4 more times, (dc in next sc, sc in next dc) across to last st, dc in last st. (61 sts, 10 sps)
Row 3: Ch 3, turn, sc in first (same) st, *dc in next sc, (sc in next dc, dc in next sc) across to next sp, sc in sp, ch 2, sk next sc, sc in next sp, repeat from * 4 more times, (sc in next dc, dc in next sc) across to last st, sc in last st. (67 sts, 5 sps)
Row 4: Ch 1, turn, sc in first st, dc in same st, *(sc in next dc, dc in next sc) across to next sp, ch 2, sc in sp, ch 2, dc in next sc, repeat from * 4 more times, (sc in next dc, dc in next sc) across to last st, sc in last st. (73 sts, 10 sps).
Row 5: Ch 1, turn, sc in first st, dc in same st, *sc in next dc, (dc in next sc, sc in next dc) across to next sp, sc in sp, ch 2, sk next sc, sc in next sp, rep from * 4 more times, (sc in next dc, dc in next sc) across. (79 sts, 5 sps)
Row 6: Ch 3, turn, sc in first (same) st, *dc in next sc, (sc in next dc, dc in next sc) across to st before next sp, sc in next sc, ch 2, sc in sp, ch 2, sc in next sc, repeat from * 4 more times, (dc in next sc, sc in next dc) across to last st, dc in last st. (85 sts, 10 sps)
Rows 7 – 42 [58, 74] : Repeat rows 3-6 nine [thirteen, seventeen] more times, changing to red at end of last row. (on last row: 301 [397, 493] sts, 10 sps)
Border:

Row 1 (RS): With red, ch 1, turn, 2 sc in first st, *sc in each st across to next sp, sc in sp, ch 2, sk next sc, sc in next sp, repeat from * 4 more times, sc in each st across, change to cream in last st. (307 [403, 499] sts, 5 sps)
Row 2: With cream, ch 1, turn, 2 sc in first st, *sc in each st across to next sp, ch 2, sc in sp, ch 2, repeat from * 4 more times, sc in each st across, changing to red in last st. (313 [409, 505] sts, 10 sps).
36″ only:
Note: Multiple of 5 sts + 3 on row 2.
Row 3: With red: Ch 1, turn, 2 sc in first st, *(ch 1, sk next st, sc in next 4 sts) 10 times, ch 1, sk next st,** sc in next sp, ch 2 (corner), sk next sc, sc in next sp, rep from * 5 more times ending at ** on last repeat, sc in last st. (253 sts, 66 ch-1 sps, 5 corner sps).
Row 4: Ch 1, turn, 2 sc in first st, *sc in each st and sp across to next corner sp, ch 2, sc in corner sp, ch 2, repeat from * 4 more times, sc in each st and sp across, changing to cream in last st. (325 sts, 10 sps).
Row 5: With cream, ch 1, turn, sc in first st, *sk next st, 5 spdc in skipped st 3 rows below next st, (sk next 4 sts, 5 spdc in skipped st 3 rows below next st) 10 times, sk next st,** sk next sp, ch 2, sk next st, sk next sp, repeat from * 5 more times ending at ** on last repeat, sc in last st. Mark last st for later joining. (332 sts, 5 sps)
Row 6: Turn, picot in first sc, ch 2, *(sl st in next dc, ch 3, sk next dc, picot in next dc, ch 3, sk next dc, sl st in next dc) 11 times, ch 2,** picot in next sp, ch 2, repeat from * 5 more times, ending at ** on last repeat, picot in last st. (73 picots)
Fasten off.
48″ only:
Note: Multiple of 5 sts + 4 on row 2.
Row 3: With red: Ch 1, turn, 2 sc in first st, *(ch 1, sk next st, sc in next 4 sts) 13 times, ch 1, sk next st,** sc in next st, sc in next sp, ch 2 (corner), sk next sc, sc in next sp, rep from * 5 more times ending at ** on last repeat, sc in last 2 sts. (331 sts, 84 ch-1 sps, 5 corner sps).
Row 4: Repeat as for row 4 of 36″ size. (421 sts,10 sps)
Row 5: With cream, ch 1, turn, sc in first st, *sk next st, 5 spdc in skipped st 3 rows below next st, (sk next 4 sts, 5 spdc in skipped st 3 rows below next st) 13 times, sk next 2 sts,** sc in next sp, ch 1, sk next st, sc in next sp, repeat from * 5 more times ending at ** on last repeat, sc in last st. Mark last st for later joining. (431 sts, 5 sps)
Row 6: Turn, picot in first sc, *ch 3, sk next sc, (sl st in next dc, ch 3, sk next dc, picot in next dc, ch 3, sk next dc, sl st in next dc) 14 times, ch 3, sk next sc,** picot in next sp, repeat from * 5 more times, ending at ** on last repeat, picot in last st. (91 picots)
Fasten off.
60″ only:
Note: Multiple of 5 sts on row 2.
Row 3: With red: Ch 1, turn, 2 sc in first st, *sc in next st, (ch 1, sk next st, sc in next 4 sts) 16 times, ch 1, sk next st,** sc in next st, sc in next sp, ch 2 (corner), sk next sc, sc in next sp, rep from * 5 more times ending at ** on last repeat, sc in last 2 sts. (409 sts, 102 ch-1 sps, 5 corner sps).
Row 4: Repeat as for row 4 of 36″ size. (517 sts, 10 sps)
Row 5: With cream, ch 1, turn, 2 sc in first st, *sk next 2 sts, 5 spdc in skipped st 3 rows below next st, (sk next 4 sts, 5 spdc in skipped st 3 rows below next st) 16 times, sk next 2 sts,** sc in next sp, ch 2, sk next sc, ch 2, sc in next sp, repeat from * 5 more times ending at ** on last repeat, 2 sc in last st. Mark last st for later joining. (524 sts, 10 sps)
Row 6: Turn, picot in first sc, ch 3, sk next sc, *(sl st in next dc, ch 3, sk next dc, picot in next dc, ch 3, sk next dc, sl st in next dc) 17 times,** ch 3, sk next sc, picot in next sp, ch 3, sk next sc, repeat from * 5 more times, ending at ** on last repeat, ch 3, sk next sc, picot in last sc. (109 picots).
Inside Edging:
With RS facing, join cream in marked st.

- Ch 1, working in sides of rows, work 60 [80, 100] sc evenly spaced to bottom of row 1 of skirt (60 [80, 100] sc)
- Ch 1, working along bottom of row 1 (around center hole), sc in bottom of each ch across. (54 sc)
- Ch 1, working in sides of rows, work 60 [80, 100] sc evenly spaced to beginning of rnd, sl st in first st of round, fasten off. (60 [80, 100] sc)
Weave in all ends.
Note: Washing and blocking or drying flat is recommended, as it will make the lacy sections open up.
Optional: For a little extra decorative touch, consider adding these Little Frog closures along the opening.

I hope you enjoy the pattern. Thanks to gtcmom for testing it!
A downloadable pdf of this pattern is also available on Ravelry, for a small fee. The fee for the pdf format is to offset the advertising revenue lost when you print or download the pattern rather than viewing it online.
If you would like to receive notifications of new posts and patterns as they become available, please follow this blog. You can follow by e-mail (look at the sidebar on the right for the follow by email option), or via RSS feed, or via your WordPress.com reader: Follow Stitches ‘N’ Scraps on WordPress.com-


