Crochet Tutorials
Ready for a new crochet stitch, technique, or pattern? You’re in the right place! Browse all the crochet tutorials, or select a category from the dropdown menu. What will you learn today?

Mardava 3D Crochet Shell Stitch Tutorial
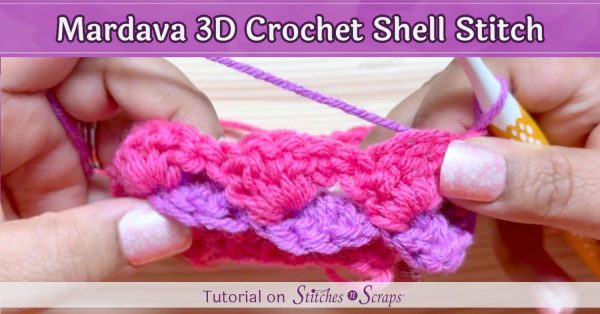
With a simple variation in placement, stacked shell stitches twist and curve into soft, squishy, intertwined cups. Learn how in this 3D crochet shell stitch tutorial, then try it out in the Mardava Cowl pattern!

This content is protected by copyright. See this Terms of Use / Copyright page for more information.
This post contains sponsored content and/or affiliate links. If you click an affiliate link and make a purchase, I may get a commission.
Get the Pattern
This fun, 3D shell stitch is used in the Mardava Cowl pattern. Get the pattern and follow along!
Front Post Double Crochet Stitches
Front post double crochet stitches make these shells really pop. A front post double crochet is a double crochet worked around the post of a stitch instead of the top of the stitch as normal.

To make a front post double crochet, insert your hook from front to back before the post of the stitch, then around the back of the stitch and out to the front again on the other side. This wraps the bottom of the stitch around the post of the stitch below, making it puff out.
Working in Rounds or Rows
The dimensional shell stitch pattern is worked in turned rounds for both the Mardava Cowl and Mardava Hat (coming soon). This means that at the end of each round you join with a slip stitch to make it a round, but then you turn and work back in the opposite direction.
Since it’s a turned pattern, it works equally well in rows! Just add an hdc at each edge to make the edges nice and straight. Check out the last section of the video for this option.
Mardava Dimensional Crochet Shell Stitch Video Tutorial
Embed not working? Watch this video on YouTube.
Want to jump to a specific section? Click on the timestamp below to go directly to that spot in the video! These links open on YouTube, in a new window or tab.
Share this 3D Crochet Shell Stitch Tutorial on Pinterest!
Here’s an image perfect for pinning:

Rate this 3D Crochet Shell Stitch Tutorial!
Do you want the best of Stitches n Scraps delivered right to your inbox? Don’t miss a stitch – Subscribe now!

Linen Puff Crochet Washcloth Tutorial
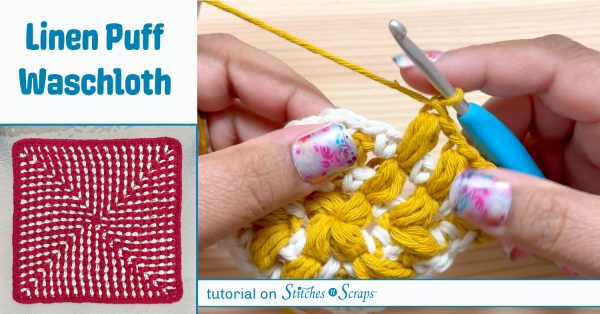
Alternate linen stitch and puff stitch to make the fabulously textured, linen puff washcloth! Learn this fun, repeating pattern in this crochet washcloth tutorial. Grab the pattern and follow along step by step!

This content is protected by copyright. See this Terms of Use / Copyright page for more information.
This post contains sponsored content and/or affiliate links. If you click an affiliate link and make a purchase, I may get a commission.
Get the Pattern
Follow along with the written pattern for the Linen Puff Waschloth. The video references the chart and instructions in the pattern.
Once you have the pattern handy, scroll down to follow along step-by-step with the video tutorial!
Starting Circle
This crochet washcloth tutorial starts from a center circle. Specifically, it shows a starting ch-2, with the first round worked into the 2nd chain from the hook. Feel free to substitute a magic ring, or your preferred way of starting a crochet circle. Here is a tutorial for 3 ways to start a crochet circle.
Closing Puff Stitches
It is important to note that the puff stitches as written in this pattern have an ending ch-1 to close. Working into that closing ch-1 on future rounds keeps the puff stitches lined up straight. It also creates a gap between the puff stitches, where the single crochets go for the linen stitch rounds.
Featured in this Video – Drops Paris Yarn
I dug into my stash for this crochet washcloth pattern. For the sample, I used Drops Paris Yarn left over from a previous pattern several years ago. I originally received that yarn for free for that pattern, and really enjoyed working with it! It’s a soft, absorbent, unmercerized cotton, with so many great colors to choose from! I used #37 Bordeaux and #17 Off White.

Linen Puff Crochet Waschloth Video Tutorial
Want to jump to a specific section? Click on the timestamp below to go directly to that spot in the video! These links open on YouTube, in a new window or tab.
Share this Crochet Waschloth Tutorial on Pinterest!
Here’s an image perfect for pinning:

Rate this Crochet Waschloth Tutorial!
Do you want the best of Stitches n Scraps delivered right to your inbox? Don’t miss a stitch – Subscribe now!

Snowdrift Crochet Capelet Tutorial
Snuggle into the softness of freshly fallen snow with this Snowdrift Crochet Capelet tutorial! Follow along, step by step, with the free written pattern.

This content is protected by copyright. See this Terms of Use / Copyright page for more information.
This post contains sponsored content and/or affiliate links. If you click an affiliate link and make a purchase, I may get a commission.
Snowdrift Crochet Capelet Pattern
This video tutorial is designed to be used along with the written pattern. You will find all the stitch counts, notes, and other pattern details in the written version.

Snowdrift Crochet Capelet Video Tutorial
Want to jump to a specific section? Click on the timestamp below to go directly to that spot in the video! These links open on YouTube, in a new window or tab.
Share this Tutorial on Pinterest!
Here’s an image perfect for pinning:

Rate this Snowdrift Capelet Tutorial!
Do you want the best of Stitches n Scraps delivered right to your inbox? Don’t miss a stitch – Subscribe now!

White Ash Leaf Crochet Tutorial
Crochet a lovely autumn leaf with this White Ash Leaf crochet tutorial! Follow along, step by step, with the free written pattern and chart.

This content is protected by copyright. See this Terms of Use / Copyright page for more information.
This post contains sponsored content and/or affiliate links. If you click an affiliate link and make a purchase, I may get a commission.
White Ash Leaf Pattern
This video tutorial is designed to be used along with the written pattern. You will find all the stitch counts, notes, and other pattern details in the written version.

White Ash Leaf Video Tutorial
Want to jump to a specific section? Click on the timestamp below to go directly to that spot in the video! These links open on YouTube, in a new window or tab.
Share this Tutorial on Pinterest!
Here’s an image perfect for pinning:

Rate this White Ash Leaf Tutorial!
Do you want the best of Stitches n Scraps delivered right to your inbox? Don’t miss a stitch – Subscribe now!

Double Crochet Mitered Square Tutorial
Create dramatic, L-shaped stripes with this double crochet mitered square tutorial! Learn the repeating pattern to make squares of any size, then finish your square with a single crochet edging and optional slip stitch border detail.

This content is protected by copyright. See this Terms of Use / Copyright page for more information.
This post contains sponsored content and/or affiliate links. If you click an affiliate link and make a purchase, I may get a commission.
What is a Mitered Square?
Mitered squares start at one corner and grow outwards on only 2 sides. This creates the distinctive arrow or L-shaped rows. Changing colors highlights the unique construction, so double crochet mitered squares are most often worked in multiple colors.
Mitered Squares in Other Stitches
You can make a mitered square using any stitch you like! The key for different stitch sizes is how you do the corner increases in the middle of each row. To keep the square shape, you need to add enough stitch width to match the height of the row. Try this tutorial for single crochet mitered squares!
Featured in this Tutorial
The pattern shown in this tutorial video is my Around the Corner Mitered Square Waschloth pattern.
For this pattern and the tutorial, I used Lion Brand 24/7 Cotton yarn, which Lion Brand had originally sent me for free for other projects.

Abbreviations used
This tutorial uses US crochet terms.
- ch = chain
- dc = double crochet
- sc = single crochet
- sp = space
- st(s) = stitch(es)
How to make a double crochet mitered square
The square starts in one corner, with 2 stitches on each side of a ch-1 corner space.
Row 1: Ch 4, (dc, ch 1, 2 dc) in 4th ch from hook (the 3 skipped chains count as 1 dc).

Now we extend the square, working only on these 2 sides.
All remaining rows: Ch 3 (counts as a dc), turn, dc in each st to the corner ch-1 sp, (2 dc, ch 1, 2 dc) in the ch-1 sp, dc in all remaining stitches.
Keep repeating this last row until your square is the size you want. You’ll notice that on every row, we are adding 4 stitches in the corner ch-1 sp. We started with 4 stitches on Row 1, so you can calculate the stitch count of any row by multiplying the row number by 4!

Single Crochet Edging
We have been working on only 2 sides of the square. On those 2 sides, you’ll see the pretty v-shaped tops of the stitches. But on the other 2 sides, you’ll see the sides of the rows. To give your mitered square a pretty finish, add an edging round! I like the low profile of a single crochet edging.

Edging Round: Ch 1, turn, sc in each st across to the corner ch-1 sp, (sc, ch 2, sc) in the ch-1 sp, sc in each remaining st across, ch 2 to create another corner. Now working in ends of rows, 2 sc in each row to the next corner – this will be the very first chain that row 1 was worked into. (Sc, ch 2, sc) in the corner ch, 2 sc in each row across to the end, ch 2 for the last corner. Finally, join the round with a slip stitch in the first sc, or try the invisible join shown in the video.
Double crochet mitered square chart
This chart shows the mitered square and the single crochet edging.

Optional surface crochet
I dislike the look of one color worked into the side of a row of another color. Unless you want a bunch of ends, it’s hard to avoid that with a mitered square edging. One solution is to cover up that transition with surface crochet! Simply make a surface crochet slip stitch at the bottom of each stitch along the edging round.

Finishing
Block your finished square for best results, and weave in the ends!
Double Crochet Mitered Square Video Tutorial
Want to jump to a specific section? Click on the timestamp below to go directly to that spot in the video! These links open on YouTube, in a new window or tab.
Share this Double Crochet Mitered Square Tutorial on Pinterest!
Here’s an image perfect for pinning.

Rate this Double Crochet Mitered Square Tutorial!
I hope you enjoyed this tutorial!
Do you want the best of Stitches n Scraps delivered right to your inbox? Don’t miss a stitch – Subscribe now!

Single Crochet Mitered Square Tutorial
Create L-shaped stripes with a single crochet mitered square! Learn the repeating pattern to make squares of any size, then finish your square with an edging round and optional slip stitch border detail.

This content is protected by copyright. See this Terms of Use / Copyright page for more information.
This post contains sponsored content and/or affiliate links. If you click an affiliate link and make a purchase, I may get a commission.
What is a Mitered Square?
Mitered squares start at one corner and grow outwards on only 2 sides. This creates the distinctive arrow or L-shaped rows. Changing colors highlights the unique construction, so single crochet mitered squares are most often worked in multiple colors.
Mitered Squares in Other Stitches
You can make a mitered square using any stitch you like! The key for different stitch sizes is how you do the corner increases in the middle of each row. To keep the square shape, you need to add enough stitch width to match the height of the row. Look for more mitered stitch tutorials coming soon!
Featured in this Tutorial
For this tutorial, I used Lion Brand 24/7 Cotton yarn, which Lion Brand had originally sent me for free for other projects.

Abbreviations used
This tutorial uses US crochet terms.
- ch = chain
- sc = single crochet
- sp = space
- st(s) = stitch(es)
How to make a single crochet mitered square
The square starts in one corner, with 1 stitch on each side of a ch-2 corner space.
Row 1: Ch 2, (sc, ch 2, sc) in 2nd ch from hook.

Now we extend the square, working only on these 2 sides.
All remaining rows: Ch 1, turn, sc in each st to the corner ch-2 sp, (sc, ch 1, sc) in the ch-2 sp, sc in all remaining stitches.
Keep repeating this last row until your square is the size you want. You’ll notice that on every row, we are adding 2 stitches in the corner ch-1 sp. We started with 2 stitches on Row 1, so you can calculate the stitch count of any row by multiplying the row number by 2!

Edging Round
We have been working on only 2 sides of the square. On those 2 sides, you’ll see the pretty v-shaped tops of the stitches. But on the other 2 sides, you’ll see the sides of the rows. To give your mitered square a pretty finish, add an edging round!

Edging Round: Ch 1, turn, sc in each st across to the corner ch-2 sp, (sc, ch 2, sc) in the ch-2 sp, sc in each remaining st across, ch 2 to create another corner. Now working in ends of rows, sc in each row to the next corner – this will be the very first chain that row 1 was worked into. (Sc, ch 2, sc) in the corner ch, sc in each row across to the end, ch 2 for the last corner. Finally, join the round with a slip stitch in the first sc.
Single crochet mitered square chart
This chart shows the mitered square and the edging round.

Optional surface crochet
I dislike the look of one color worked into the side of a row of another color. It’s hard to avoid that with a mitered square edging. You can change colors to match the edging stitches to each stripe, but that may mean a lot of extra ends to weave in.
Another solution is to cover up that transition with surface crochet! Simply make a surface crochet slip stitch at the bottom of each stitch along the edging round. To keep the corners neat, make only 1 slip stitch in each corner, even though there are 2 edging stitches worked into the corner.

Finishing
Block your finished square for best results, and weave in the ends!
Share this Single Crochet Mitered Square Tutorial on Pinterest!
Here’s an image perfect for pinning.

Rate this Single Crochet Mitered Square Tutorial!
I hope you enjoyed this tutorial!
Do you want the best of Stitches n Scraps delivered right to your inbox? Don’t miss a stitch – Subscribe now!

River Birch Leaf Crochet Tutorial
Crochet a lovely autumn leaf with this river birch Leaf crochet tutorial! Follow along, step by step, with the free written pattern and chart.

This content is protected by copyright. See this Terms of Use / Copyright page for more information.
This post contains sponsored content and/or affiliate links. If you click an affiliate link and make a purchase, I may get a commission.
River Birch Leaf Pattern
This video tutorial is designed to be used along with the written pattern. You will find all the stitch counts, notes, and other pattern details in the written version.

River Birch Leaf Video Tutorial
Want to jump to a specific section? Click on the timestamp below to go directly to that spot in the video! These links open on YouTube, in a new window or tab.
Share this Tutorial on Pinterest!
Here’s an image perfect for pinning:

Rate this River Birch Leaf Tutorial!
Do you want the best of Stitches n Scraps delivered right to your inbox? Don’t miss a stitch – Subscribe now!

Ginkgo Leaf Crochet Tutorial
Crochet a lovely autumn leaf with this Ginkgo Leaf crochet tutorial! Follow along, step by step, with the free written pattern and chart.

This content is protected by copyright. See this Terms of Use / Copyright page for more information.
This post contains sponsored content and/or affiliate links. If you click an affiliate link and make a purchase, I may get a commission.
Ginkgo Leaf Pattern
This video tutorial is designed to be used along with the written pattern. You will find all the stitch counts, notes, and other pattern details in the written version.

Ginkgo Leaf Video Tutorial
Want to jump to a specific section? Click on the timestamp below to go directly to that spot in the video! These links open on YouTube, in a new window or tab.
Share this Tutorial on Pinterest!
Here’s an image perfect for pinning:

Rate this Ginkgo Leaf Tutorial!
Do you want the best of Stitches n Scraps delivered right to your inbox? Don’t miss a stitch – Subscribe now!

Summer Sunset Crochet Coaster Tutorial
Bring the gold and orange hues of a summer sunset to your next gathering with Summer Sunset coasters! Layer and stagger stitches by working into rounds below, creating beautifully blended colors. Get the free pattern, then follow along with this Summer Sunset crochet coaster tutorial.

This content is protected by copyright. See this Terms of Use / Copyright page for more information.
This post contains sponsored content and/or affiliate links. If you click an affiliate link and make a purchase, I may get a commission.
Summer Sunset Coaster pattern
This video tutorial goes along with the Summer Sunset Coaster pattern. You will find stitch counts for each round, as well as notes and other pattern details in the written pattern.
Featured in this video – Lion Brand 24/7 Cotton yarn
I made these coasters using leftover 24/7 cotton yarn that Lion Brand had provided for previous designs. The colors are #158R Goldenrod, #133 Tangerine and #108G Denim.

Summer Sunset crochet coaster video tutorial
Want to jump to a specific section? Click on the timestamp below to be taken to that spot in the video! These links open on YouTube, in a new window or tab.
- 00:12 Get the Pattern
- 00:27 Materials
- 00:44 Round 1
- 01:37 Round 2
- 02:27 Round 3
- 04:57 Round 4
- 08:03 Round 5
- 09:56 Round 6
- 13:18 Round 7
Share this Summer Sunset coaster tutorial on Pinterest!
Here’s an image perfect for pinning:

Rate this Summer Sunset coaster tutorial!
Do you want the best of Stitches n Scraps delivered right to your inbox? Don’t miss a stitch – Subscribe now!

Blooming Bobbles Blanket Square Tutorial
Bobbles bloom into a 12-petaled flower with layers of texture. Crochet this fun and ever-changing pattern with something new on every round! Get the free written pattern, and follow along with this Blooming Bobbles Blanket Square tutorial.

This content is protected by copyright. See this Terms of Use / Copyright page for more information.
This post contains sponsored content and/or affiliate links. If you click an affiliate link and make a purchase, I may get a commission.
Blooming Bobbles Square pattern
This video tutorial is designed to be used along with the written pattern. You will find stitch counts for each round, as well as notes and other pattern details in the written version.
Featured in this video – Caron One Pound & Red Heart With Love
I made this square using leftover Caron One Pound & Red Heart With Love yarns that Yarnspirations had provided for previous designs. The Caron One Pound colors are 0611 Ocean, 10523 Azure, and 10616 Soft Gray Mix.

In Red Heart With Love, I used color 1711 Cameo (the solid pink in the picture below)

Blooming Bobbles Blanket Square video tutorial
Want to jump to a specific section? Click on the timestamp below to be taken to that spot in the video! These links open on YouTube, in a new window or tab.
Share this Blooming Bobbles Blanket Square tutorial on Pinterest!
Here’s an image perfect for pinning:

Rate this Blooming Bobbles Blanket Square tutorial!
Do you want the best of Stitches n Scraps delivered right to your inbox? Don’t miss a stitch – Subscribe now!


