Crochet Doll – Masked Superhero
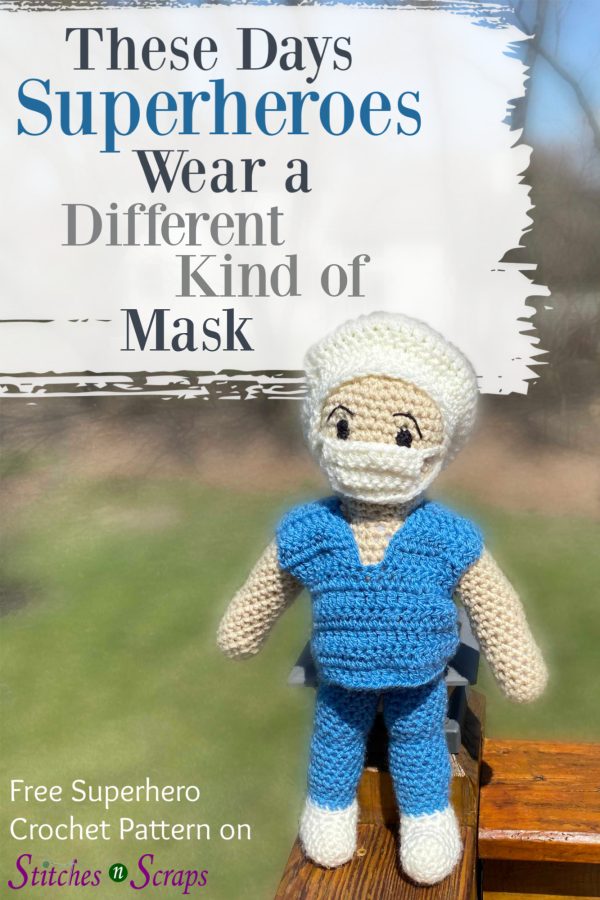
These days it’s clear that many of our real life superheroes wear a different type of mask. Do you know a doctor, nurse, paramedic, or other medical professional who is a real life hero? Make this crochet doll for them, complete with scrubs, and a removable mask and cap!
This content is protected by copyright. See this Terms of Use / Copyright page for more information.
Support Covid Relief Efforts
You can help support Covid-19 relief efforts by purchasing this pattern on Ravelry. For all sales of this pattern from my Ravelry store in 2020, I will donate 80% of the sale price to a charity supporting Covid relief. As of now, it will go to the United Way Covid-19 Community Response and Recovery Fund. If that changes later in the year, I will update it here.
Scrappy Stitchers Stash Bash Crochet Along
This crochet doll is the April pattern for the 2020 Stash Bash Crochet Along. Each month, I will post a new, stash-busting pattern, and a giveaway prize too! See the giveaway details below, and join in the fun on the Scrappy Stitchers Facebook group. Remember to use the hashtag #ScrappyStitchersStashBash in your social media posts!
This post contains sponsored content and/or affiliate links. If you click an affiliate link and make a purchase, I may get a commission.
My stash yarns
For this doll I used some Paintbox Simply Aran yarn from my stash. I got some of it free from Love Crafts for various other designs, and some I purchased myself. This is one of my go-to, medium weight, acrylic yarns because it’s soft and easy to work with, and it comes in a wide variety of colors.
They have lots of lovely skin color options to choose from. Since I was working from my stash, I used #207 Vanilla. Instead of a pure white, I had #202 champagne white. For the blue, I used #234 Kingfisher Blue.
Ultra Plush Poly Fil
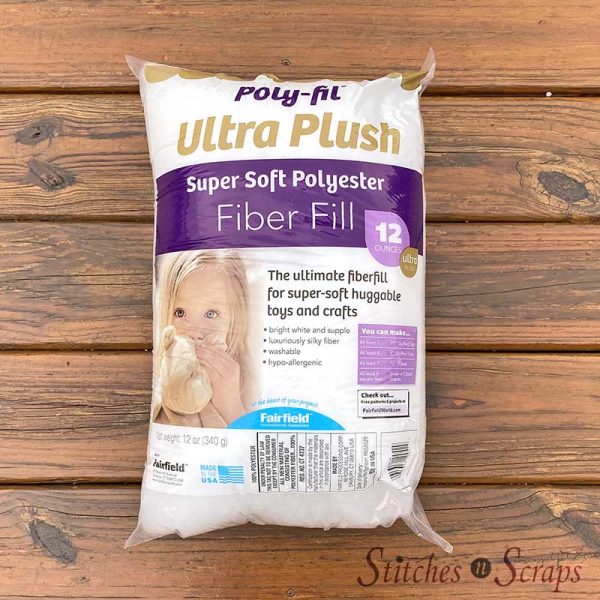
Our prize sponsor for this month’s giveaway is Fairfield World, the makers of Poly-Fil fiberfill. In this doll, I used their Ultra Plush Poly-Fil. I did receive this product for free from Fairfield, but it was for a previous project a while ago, so technically it’s still from my stash!
I love original Poly-Fil too, but the difference with the Ultra Plush is definitely noticeable. It’s softer, squishier, and smoother. Here’s a great video from Fairfield that shows a comparison of the two, along with some of their other fillers.
Enter the giveaway
Enter the giveaway for a chance to win a 12 oz bag of Ultra Plush Poly-Fil, so you can see the difference for yourself!
To be eligible, you must be 18 years of age or older, with a valid, US shipping address. The winner will be contacted by email, and must reply to that email and provide their selections and shipping address within 1 week in order to receive the prize. If the winner does not reply within 1 week, a new winner will be selected. The giveaway ends on April 30th, 2020 (at 11:59pm, central time). Hurry and enter below!
This giveaway is powered by Rafflecopter, and they may ask for some log-in information if you are not already logged in. See the Rafflecopter privacy policy for more information.
a Rafflecopter giveawayMaterials
- Yarn: Worsted weight yarn
- 75 yds white
- 175 yds blue
- 175 yds skin color
- Hook: Size H / 5 mm crochet hook or size needed to match gauge.
- Notions:
- Yarn Needle
- Stitch Marker
- 2 small buttons – about 1/2 to 5/8 inch – these will be the ears, I used clear.
Project Level
Intermediate: Continuous rounds with shaping, multiple parts to assemble.
Size
About 16 inches tall without cap.
Gauge
13 dc x 8 rows = 4 inches. You can use the shirt front as a gauge swatch.
Abbreviations used
(Pattern is written in US terms)
ch = chain
sc = single crochet
dc = double crochet
blo = back loop only
dec = decrease (see Special Stitches)
inc = increase (see Special Stitches)
sk = skip
st(s) = stitch(es)
sl st = slip stitch
sp = space
ch sp = chain space
rnd = round
WS = wrong side
RS = right side
Special Stitches
Increase (inc): Sc in back loop only of next st, then sc in both loops of the same st. See Recommended Resources for full tutorial.
Decrease (dec): Insert hook into front loop only of both of next 2 stitches, yarn over and draw up a loop, yarn over and draw through both loops on hook. This is an alternative to a single crochet 2 together (sc2tog) stitch. If you prefer, you can use the standard sc2tog instead.
Recommended Resources
- Continuous rounds and running stitch markers
- Why continuous rounds shift
- Working into the back bump
- Almost invisible increase
Instructions
Right Leg
Shoe
Rnd 1: With white, ch 2, 6 sc in 2nd ch from hook. (6 sc)
Rnd 2: Inc in each st around (12 sc)
Rnds 3-6: Sc in each st around (12 sc)
Rows 7-10 (heel): Ch 1, turn, sc in each st across. (12 sc)
Rnd 11 (WS): Ch 1, turn, sc in each st across, join with sl st to first sc. (12 sc)
Rnd 11 forms the back of the shoe.
Rnd 12 (RS): Turn / rotate to work into sides of heel rows. With RS facing, work 12 sc evenly spaced around ankle opening. Sl st into blo of first st, changing to blue. Leave an 8 inch tail of white for sewing.
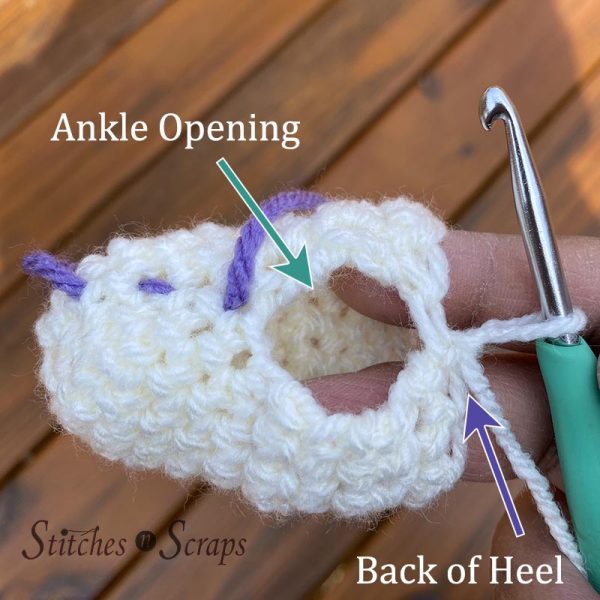
Using tails, sew toe and back of heel closed, and weave in ends.
Much of the pattern is worked in continuous rounds. Do not join or turn unless specifically indicated.
Leg:
Rnd 13: With blue, ch 1, sc in blo of each sc around, (12 sc)
Rnd 14-15: Sc in each st around. (12 sc)
Rnd 16: (Inc, sc in next 3 sts) 3 times. (15 sc)
Rnd 17-22: Sc in each st around (15 sc)
Rnd 23: (Dec, sc in next 3 sts) 3 times. (12 sc)
Rnd 24: Sc in each st around (12 sc)
Rnd 25: Rep rnd 16. (15 sc)
Rnds 26-31: Sc in each st around (15 sc)
Rnd 32: Sc in each st around, join with sl st in first st. (15 sc)
Crotch area (right leg only)
Row 33: Ch 1, turn, sk sl st, sc in next 5 sc, sl st in next st. (5 sc)
Row 34: Ch 1, turn, sk sl st, sc in next 5 sc, fasten off leaving an 8 inch tail for sewing. (5 sc).
Left Leg:
Work as for right leg through rnd 31.
Rnd 32: Sc in each st around, do not fasten off. (15 sc).
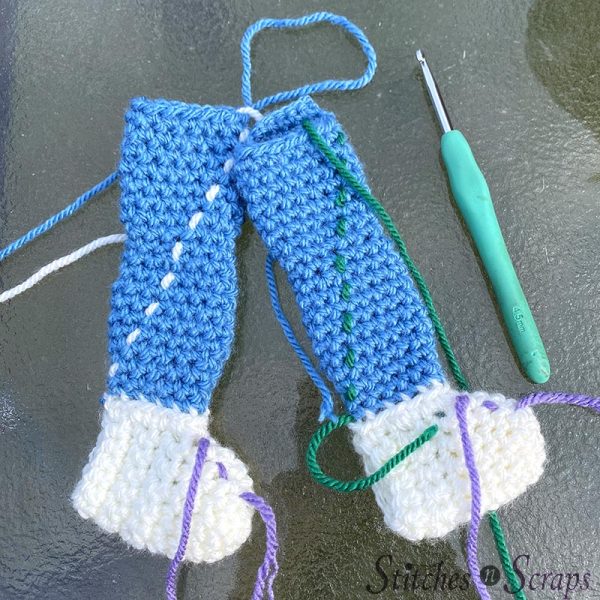
Stuff legs most of the way up.
Body:
Bottom
Rnd 1 (join legs): Sc in next 2 sc on left leg, sk next 5 sc on left leg, align legs with both shoes pointing in the same direction, work 2 sc in sides of rows on crotch area, sc in next 10 sc on right leg, work 2 sc in sides of rows on crotch area, sc in last 8 sc on right leg. (24 sts)

Rnd 2: Sc in next 11 sts, (inc, sc in next 4 sts) twice, inc, sc in last 2 sts. (27 sts)
Rnd 3: Sc in next 12 sts, (inc, sc in next 4 sts) 3 times. (30 sts)
Rnd 4: (Inc, sc in next 4 sts) around. (36 sts)
Rnds 5-7: Sc in each st around (36 sts)
Rnd 8: Sc in next 23 sts, dec, sc in next 11 sts. (35 sts)
Rnd 9: Sc in next 21 sts, dec, sc in next st, dec, sc in last 9 sts. (33 sts)
Rnd 10: Sc in next 16 sts, (dec, sc in next 4 sts) twice, dec, sc in last 3 sts. (30 sts)
Rnd 11: Sc in each st around, join with sl st to blo of first st, changing to skin color. (30 sts).
Use tails to sew crotch area shut. The 5 skipped stitches on the left leg should line up with the 5 stitches on the crotch area.
Finish adding stuffing to legs. Continue stuffing as you go, through torso.

Torso:
Rnd 12: With skin color, ch 1, sc in blo of each st around. (30 sts).
Rnds 13-19: Sc in each st around. (30 sts)
Rnd 20: (Dec, sc in next 3 sts) around. (24 sts)
Rnd 21: Sc in each st around. (24 sts)
Rnd 22: (Dec, sc in next 2 sts) around. (18 sts)
Rnd 23: (Dec, sc in next st) around. (12 sts)
Finish stuffing torso. Continue adding stuffing as you go through head.
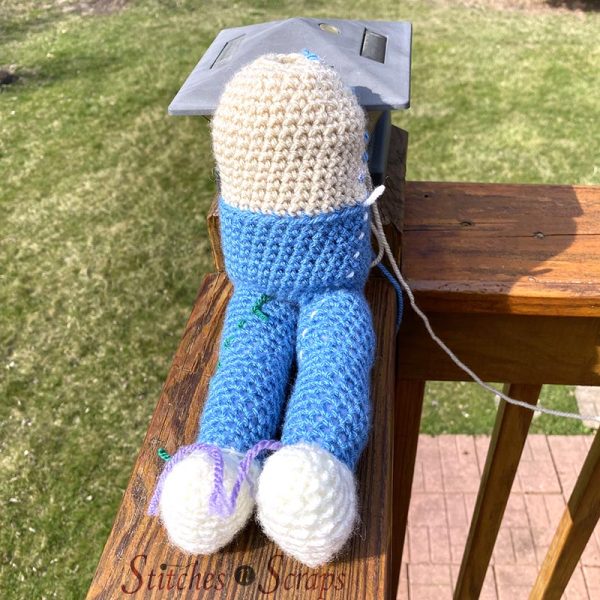
Head
Rnd 24: (Inc, sc in next st) around. (18 sts)
Rnd 25: (Inc, sc in next 2 sts) around. (24 sts)
Rnd 26: (Inc, sc in next 3 sts) around. (30 sts)
Rnd 27: (Inc, sc in next 4 sts) around. (36 sts)
Rnds 28-36: Sc in each st around. (36 sts)
Rnd 37: (Dec, sc in next 4 sts) around. (30 sts)
Rnd 38: Rep rnd 20. (24 sts)
Rnds 39-40: Rep rnds 22-23. (12 sts)
Finish stuffing head.
Rnd 41: Dec around. Fasten off. (6 sts)
Use final tail to sew top of head closed, then weave in all remaining ends.

Arms (make 2)
Rnd 1: With skin color, ch 2, 6 sc in 2nd ch from hook. (6 sc)
Rnd 2: Inc around. (12 sc)
Rnds 3-25: Sc in each st around. (12 sc).
Stuff arm, leaving about an inch at the top unstuffed.
Fold top of arm flat so that first stitch is on the right edge. The stitches should line up into 6 pairs.
Row 26 (closing arm): Working through both layers, sl st in each st across. (6 sl sts)
Fasten off leaving a 10 inch tail for sewing.
Use the tails to sew the arms to the torso at the neckline (the flat area forms the shoulders).
When you are happy with the placement, weave in all ends.

Shirt
Back:
Ch 3 at beginning of row counts as a dc.
With blue, ch 23
Row 1 (RS): Working into back bumps of the chain, dc in 4th ch from hook and in each ch across. (21 dc)
Rows 2-9: Ch 3, turn, dc in next st and in each st across. (21 dc)
Fasten off, leaving a 10 inch tail for sewing.
Front:
With blue, ch 23
Rows 1-6: Repeat rows 1-6 of back. (21 dc)
Left shoulder
Row 7L: Ch 3, turn, dc in next 9 sts, leaving remaining 11 sts unworked. (10 dc)
Row 8L: Ch 2 (does not count as a st), turn, sk first st, dc in next 9 sts. (9 dc)
Row 9L: Ch 3, turn, dc in next 6 sts, dc2tog. (8 sts)
Row 10L: Ch 3, turn, dc in next 7 sts. (8 sts)
Row 11L: Ch 3, turn, dc in next 7 sts, dc inc in next st. Fasten off, leaving a 10 inch tail for sewing(9 dc)
Right shoulder:
Working into unworked sts from row 6, sk first unworked st. Join blue with sl st in 2nd unworked st.
Row 7R: Ch 3, dc in next st and each st across. (10 dc)
Row 8R: Ch 3, turn, dc in next 7 sts, dc2tog. (9 sts)
Row 9R: Ch 2 (does not count as a st), turn, sk first st, dc in next 8 sts. (8 sts)
Row 10R: Ch 3, turn, dc in next 7 sts. (8 sts)
Row 11R: Ch 3, turn, dc in same st and in each st across. Fasten off, leaving a 10 inch tail for sewing. (9 sts)
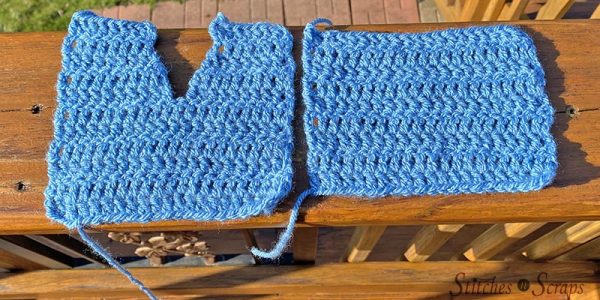
Seaming
Using tails, sew front to back at shoulder seams – there should be 3 unused stitches at the center of the back.
Fold shirt in half and sew side seams from rows 1-6 only. This should leave 4 rows open on each side for armholes.
Weave in all ends.
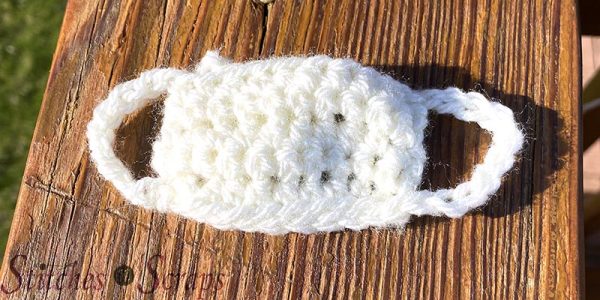
Mask
With white, ch 11
Row 1 (RS): Working in back bumps, Sc in 2nd ch from hook and in next ch, hdc in next 6 chs, sc in last 2 chs. (10 sts)
Row 2: Ch 1, turn, sc in each st across. (10 sc)
Row 3: Ch 1, turn, sc in first 2 sts, hdc in next 6 sts, sc in last 2 sts. (10 sts)
Rows 4-5: Repeat rows 2-3
Edging / Strap:
- Ch 10, sk side edge, sl st in next corner (bottom left).
- Working across bottom of foundation chains, sl st in blo of each ch across.
- Ch 10, sk side edge, sl st in next corner (top right).
- Working across Row 5, sl st in blo of each st across.
Fasten off, weave in all ends.
Cap:
Rnd 1: With white, ch 4, 11 dc in 4th ch from hook, join with sl st to first st. (12 dc)
Rnd 2: Ch 3, dc in same st, dc inc around, join with sl st to first st. (24 dc).
Rnd 3: Ch 3, dc in same st, dc in next st, (dc inc, dc in next st) around, join with sl st to first st. (36 dc)
Rnd 4: Ch 3, dc in same st, dc in next 2 sts, (dc inc, dc in next 2 sts) around, join with sl st to first st. (48 dc)
Rnds 5-7: Ch 3, dc in next st and in each st around, join with sl st to first st. (48 dc)
Rnd 8: Ch 1, (dec, sc in next 6 sts) around. (42 sts)
Rnd 9: (Dec, sc in next 5 sts) around. (36 sts)
Rnd 10: (Dec, sc in next 4 sts) around. (30 sts)
Rnd 11: Sc in each st around, join with sl st to first st. Fasten off. (30 sts)
Weave in all ends.

Finishing:
Sew on eyes with embroidery thread, or add safety eyes.
Create nose by sewing a few horizontal stitches with the skin color yarn.
Hold mask in place and use pins or stitch markers to mark where the ears should be to hold the straps taught. When you are happy with the ear locations, sew buttons on for ears.

Dress your doll in the shirt and hat, hook the mask onto the buttons, and your superhero is ready to save the world!
Rate this Superhero Crochet Doll Pattern!
I hope you enjoyed this superhero crochet doll pattern. A downloadable pdf of this pattern is available on Ravelry for a small fee. The fee for the pdf format is to offset the advertising revenue lost when you print or download the pattern rather than viewing it online.
Do you want the best of Stitches n Scraps delivered right to your inbox? The Stitches n Scraps email newsletter includes highlights from the blog as well as special features not available elsewhere. Don’t miss a stitch – Subscribe now!


13 Comments
Verna
I have used Fairfield’s form circular cushions for an elephant pillow and poly-fil for lots of amigurumi items. Always a great product and always satisfied.
Katrina McIntosh
Thank you so much for the superhero pattern, and all of your other patterns!
Pia Thadani
You’re very welcome, I’m glad you like it!
Linda Wise
I would love this filler. I have not shopped Fairfield before but i will now. I love making toy for my grandchildren. Thank you for this opportunity.
Kimberly
I have never had the chance to use Fairfield products before. Would love to chance to try their polyfil. I make amigurumi a lot, they are my favorite thing to make.
Melanie Titus
I enjoy making amigurumi. When I make pillows I prefer pillow forms. I haven’t tried your stuffing yet.:D
Brenda
I love many of the items pictured on the page. I guess I really like the rainbow window
Martha Maloney
I love FAirfield stuffing!! Rarely use any other brand.
Jill Smith
This doll is just precious. Such a great idea and wonderful way of giving back!
Pia Thadani
Thanks! 🙂 I’m glad you like it
Cindy
I have a few little guys and gals that will love this new buddy. Thanks for the pattern to help pass the time
Pamela T
My d-in-law is a masked hero. I’m going to make this for her.
Pia Thadani
That’s fantastic – please tell her thank you from me.