Free Pattern – Loopy Flower Square
Brighten up your day with this fun, Loopy Flower Square. Use it as a blanket square, trivet, or just for decoration. Twisted loops give the center flower a 3-dimensional pop, and add a textural border element as well. In addition to the written pattern, scroll down for a full video tutorial that takes you step by step through the entire square!

This pattern was designed for the Moogly 2018 afghan CAL. If this is the first you’ve heard about it, go check it out! Also be sure to take a look at the block 11 post to see how Moogly’s version of this square turned out.
This pattern is protected by copyright. Please do not distribute or share this pattern in any way other than by sharing a link to this page or to the pattern page on Ravelry. Click here for copyright information.
This pattern contains affiliate advertisements (click for more info). If you click one of these advertisements and then make a purchase, I may be compensated. You get the same great prices, and you will be helping to support this site!
Loopy Flower Square

Add this to your Ravelry Queue
Materials:
- Red Heart With Love yarn:
- 25-30 yds #1207 Cornsilk (A)
- 25-30 yds #1538 Lilac (B)
- 125 yds #1601 Lettuce (C)
- Size J / 6 mm hook, or size needed to obtain gauge
- Yarn needle
Skill Level:
Intermediate – Working into twisted chain loops, back bumps of chains, and third loops of hdc stitches. Worked in the round.
Size:
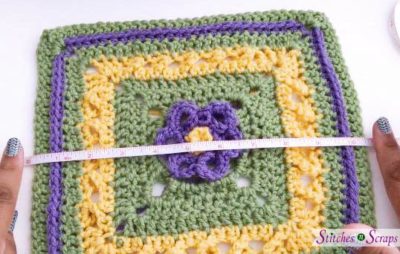
12 inches square.
Gauge:
Use pattern as gauge swatch. After Rnd 7, your work should measure about 5.5 inches square.
Abbreviations used:
(Pattern is written in US terms)
- ch = chain
- sc = single crochet
- hdc = half double crochet
- dc = double crochet
- st(s) = stitch(es)
- sp = space
- ch sp = chain space
- rnd = round
- RS = right side
- WS = wrong side
Recommended Resources:
- Working into the back bump
- Improved Chainless Starting Double Crochet on Moogly
- Standing Double Crochet on Moogly
- Front Loop Only or Back Loop Only
Instructions:
Flower:
With A, ch 2
Rnd 1 (WS): 6 sc in 2nd ch from hook. Join with sl st to first sc, fasten off. (6 sts)
Rnd 2 (RS): Working in back loops only: Turn, join B with sc in any stitch, (ch 9, sc in next st) 5 times, ch 9, join with sl st to first st. (6 sc, 6 ch-9 loops)
Rnd 3 (RS): Do not turn. Ch 1, *twist next loop 1/2 turn towards hook, (3 sc, ch 1, 3sc) in loop, repeat from * around, join with sl st to starting ch 1, fasten off. (6 petals with a total of 36 sc, 6 chs)

Square:
Note: Ch 3 at the start of a round counts as a dc throughout
Rnd 4 (WS): Working in back bump of chs, join C with sl st in center ch of any petal, (ch 4, sl st in center ch of next petal) 5 times, ch 4, join with sl st in same ch as start of rnd. (6 ch-4 sps)


Note: This will create a hexagon of chain spaces that sit behind the flower. It may make everything cinch in and look weird for now, but it should flatten out after the next round.
Rnd 5 (RS): Turn, sl st in first ch-4 sp, ch 3, (dc, hdc, sc, hdc) in same sp, *(2 dc, ch 2, 2 dc) in next sp, (hdc, sc, hdc, 2 dc) in next sp, ch 2, **(2 dc, hdc, sc, hdc) in next sp, repeat from * to **, join with sl st to first st. (16 dc, 8 hdc, 4 sc, 4 corner ch-2 sps)
Rnd 6 (WS): Turn, sl st in first ch-2 sp, ch 3, dc in same sp, dc in each st across to next ch-2 sp, *(2 dc, ch 2, 2 dc) in next ch-2 sp, dc in each st across to next ch-2 sp, repeat from * twice more, 2 dc in same ch-2 sp as beginning, ch 2, join with sl st to first st. (44 dc, 4 ch-2 corner sps)
Rnd 7 (RS): Repeat Rnd 6. Fasten off C. (60 dc, 4 corner ch-2 sps)
You should now have a 5.5 inch square.

Rnd 8 (WS): Turn, join A with sc in any corner ch-2 sp, sc in next st, (ch 7, sc in next 3 sts) 4 times, ch 7, sc in next 2 sts, *(sc, ch 2, sc) in next ch-2 sp, sc in next st, (ch 7, sc in next 3 sts) 4 times, ch 7, sc in next 2 sts, repeat from * twice more, sc in same ch-2 sp as beginning, ch 2, join with sl st to first st. (68 sc, 20 ch-7 loops, 4 corner ch-2 sps)
Rnd 9 (RS): Turn, sl st in first corner ch-2 sp, ch 3, dc in same sp, *dc in next st, sk next 2 sts, (twist next loop 1/2 turn towards hook, 3 sc in loop, sk next 3 sts) 4 times, twist next loop 1/2 turn towards hook, 3 sc in loop, sk next st, dc in next st,** (2 dc, ch 2, 2 dc) in next corner ch sp, repeat from * 3 times more, ending at ** on last repeat, 2 dc in same ch-2 sp as beginning, ch 2, join with sl st to first st, fasten off. (24 dc, 60 sc, 4 corner ch-2 sps)
Rnd 10 (WS): Turn, join C with sl st in any corner ch-2 sp, ch 3, dc in same sp, dc in each st across to next corner ch-2 sp, (2 dc, ch 2, 2dc) in next ch-2 sp, dc in each st across to next corner ch-2 sp, repeat from * twice more, dc in each st across, 2 dc in same ch-2 sp as beginning, ch 2, join with sl st to first st. (100 dc, 4 corner ch-2 sps)
Rnd 11 (RS): Turn, sl st in first corner ch-2 sp, changing to B. With B, ch 1, hdc in same sp, hdc in each st across to next ch-2 sp, *(hdc, ch 2, hdc) in next ch-2 sp, hdc in each st across to next ch-2 sp, repeat from * twice more, hdc in same ch-2 sp as beginning, ch 2, join with sl st to first st, fasten off. (108 hdc, 4 corner ch-2 sps)
Rnd 12 (WS): Turn, pick up a loop of C in first corner ch-2 sp, ch 3, dc in same sp, dc in third loop only (below front loop) of each hdc across to next ch-2 sp, *(2 dc, ch 2, 2 dc) in next ch-2 sp, dc in third loop only of each hdc across to next ch-2 sp, repeat from * twice more, 2 dc in same ch-2 sp as beginning, ch 2, join with sl st to first st. (124 dc, 4 corner ch-2 sps)

Your work should now measure about 10.5 – 10.75 inches. If it does not, see Optional Size Adjustments below before working next rnd.
Rnd 13 (RS): Repeat rnd 6. (140 dc, 4 corner ch-2 sps)
Fasten off, weave in all ends, wash and block.
Optional Size Adjustments:
Rnd 13 listed above is a dc rnd. Here are some alternate, plain rounds:
Sc rnd: Turn, sl st in first corner ch-2 sp, ch 1, sc in same sp, sc in each st across to next ch-2 sp, *(sc, ch 2, sc) in next ch-2 sp, sc in each st across to next ch-2 sp, repeat from * twice more, sc in beginning ch-2 sp, ch 2, join with sl st to first st.
Hdc rnd: Turn, sl st in first corner ch-2 sp, ch 1, hdc in same sp, hdc in each st across to next ch-2 sp, *(hdc, ch 2, sc) in next ch-2 sp, hdc in each st across to next ch-2 sp, repeat from * twice more, hdc in beginning ch-2 sp, ch 2, join with sl st to first st.
If your square is too big or too small, replace rnd 13 with any combination of sc, hdc, and dc rnds needed to get to 12 inches, just be sure to work an odd number of rnds, so you end after a RS rnd. For example, if your square is just a little too small, you could work 3 sc rnds instead of rnd 13.
Video Tutorial:
I hope you enjoy making this pattern. A downloadable pdf of this pattern is also available in my Craftsy store or on Ravelry, for a small fee. The fee for the pdf format is to offset the advertising revenue lost when you print or download the pattern rather than viewing it online.
Do you want the best of Stitches n Scraps delivered right to your inbox? The Stitches n Scraps email newsletter includes highlights from the blog as well as special features not available elsewhere. Don’t miss a stitch – Subscribe now!


2 Comments
Alexandra
What a beautiful square! At first glance, that yellow really caught my eye – love how it pops, but the design of the flower is very unique. Pinned.
Pia Thadani
Thanks!