Finger Knit Snow Blanket with Loop Yarn
Show off your holiday decor on a finger knit snow blanket! Twisted stitches create a puffy, snowy texture that’s a perfect backdrop for Christmas and winter decorations. You can make any size you need with this customizable pattern. The preformed loops mean it works up super quickly – no needles needed!

IMPORTANT Safety Notice!
Yarn is typically not treated to be fire resistant. Do NOT use a yarn snow blanket under or near any objects with lights, flames, batteries, electrical cords, or other potential fire hazards.
This post contains sponsored content and/or affiliate links. If you click an affiliate link and make a purchase, I may get a commission.
Bernat Alize Blanket EZ Yarn
Yarnspirations sent me some Bernat Alize Blanket EZ yarn for free for this pattern. It’s the same soft, fluffy feel of Bernat Blanket, but in a loop yarn format. A loop yarn is a yarn that already has the loops sewn into it. It’s perfect for finger knitting – no needles needed!

Any Size You Need!
This simple pattern can be easily adjusted to fit whatever surface you’d like to cover. One skein covers approximately 3.5 sq ft (504 sq inches). To figure out how many skeins you need, find the square footage of your surface and divide by 3.5. For example, I made a 14″ x 72″ snow blanket, which works out to 1008 sq inches, or 7 sq ft. 7 / 3.5 means I needed 2 skeins.

Finger Knit Snow Blanket


Add this to your Ravelry Queue
Materials
- Yarn: 2 skeins Bernat Alize Blanket EZ
- Notions:
- Jumbo yarn Needle
- 2 stitch markers (optional)
Project Level
Intermediate: Twisted stitches in loop yarn
Size
14 x 72 inches. Size can be adjusted – yarn usage will vary accordingly.
Gauge
Because the loops are a fixed size, no gauge measurement is needed.
Abbreviations used
(Pattern is written in US terms)
k = knit (see Special Stitches)
lt = left twist (see Special Stitches)
rt = right twist (see Special Stitches)
st(s) = stitch(es)
Recommended Resources
- Twisted Knit Stitches in Loop Yarn
- EZ Knitting: Stocking Stitch from Bernat (shows how to work back and forth in rows, plus bind off and finishing).
Special Stitches
For the sake of clarity, I will be calling unworked loops that are on the working yarn “loops” and loops that have already been worked “stitches”. See the full tutorial for these stitches here.
Knit (k): Without twisting the stitch, pull the next loop on the working yarn through the indicated stitch, from back to front.

Left Twist (lt): Twist the indicated stitch clockwise, then pull the next loop through as to knit.

Right Twist (rt): Twist the indicated stitch counterclockwise, then pull the next loop through as to knit.

Instructions
This entire piece is worked from the right side, working back and forth in rows. Do not turn your work.
Row 1: Count out 22 loops for a tail, then 20 loops for row 1. Use stitch markers to mark the start and end of row 1 if desired. (20 sts)
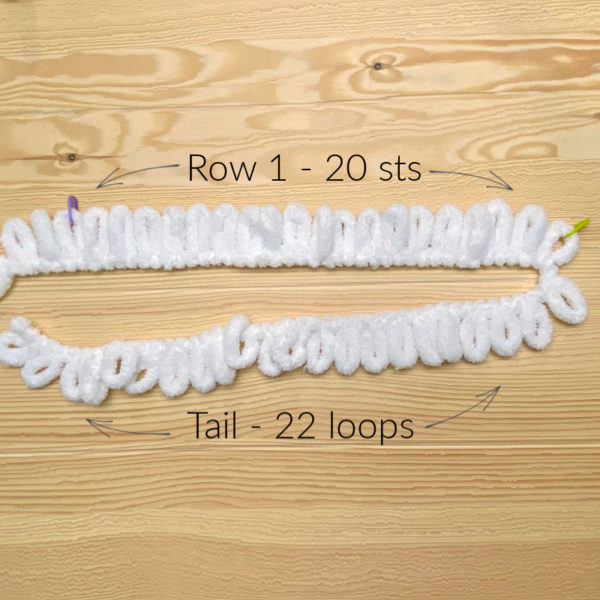
You can change the width of your piece by changing the number of loops you use. Leave a starting tail that is the same number of loops as your first row, plus 2. This tail will be used for an edging row later.
Row 2: K1, lt across to last st, k1.
Row 3: K1, rt across to last st, k1.
Repeat rows 2-3 until you reach your desired length. Cut yarn, leaving a tail of 2 loops.
To start a new skein, leave a tail of 2 loops on both the old skein and the new skein, and start working with the next loop on the new skein.
Bind Off
Starting at the beginning of the previous row (opposite end from your working yarn), pull the 2nd st through the 1st st, pull the next st through the current st across until only 1 st remains. Pull tail through remaining st to secure.

Bottom Edging
Using the starting tail, pull one loop up in the bottom of each st across. This will leave 2 loops unused. Bind off the same way as you did the other end.
Finishing
Every loop has a thread sewn through it that holds it together. For each tail, cut that thread to open all the loops, then weave in the tail.

IMPORTANT Safety Notice!
Yarn is typically not treated to be fire resistant. Do NOT use a yarn snow blanket under or near any objects with lights, flames, batteries, electrical cords, or other potential fire hazards.
Rate this Snow Blanket pattern!
I hope you enjoyed this pattern. A downloadable pdf of this pattern is available on Ravelry for a small fee. The fee for the pdf format is to offset the advertising revenue lost when you print or download the pattern rather than viewing it online.
Do you want the best of Stitches n Scraps delivered right to your inbox? The Stitches n Scraps email newsletter includes highlights from the blog as well as special features not available elsewhere. Don’t miss a stitch – Subscribe now!


2 Comments
Karen
Your Snowflake Blanket is absolutely beautiful and instructions clear. This is my first attempt with any kind of knitting so should be quite an adventure. I will let you know how it goes. Wish me luck!
Pia Thadani
Thanks! And I’m sure yours will turn out beautiful 🙂 This is a great first project to start with!