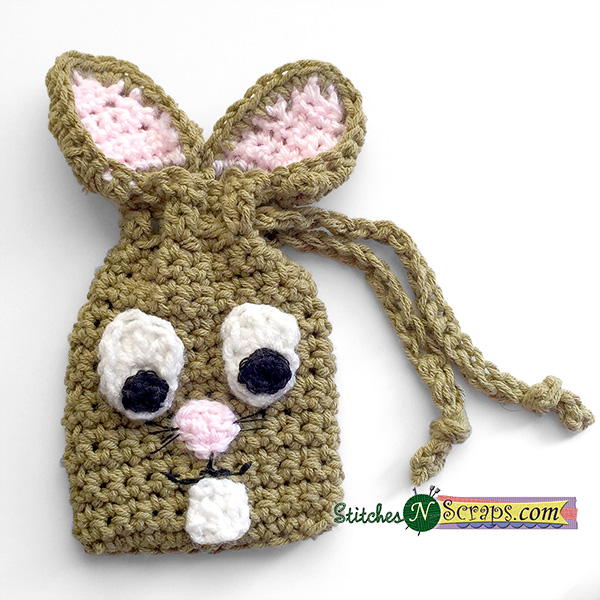
Free Pattern – Bunny Bag
This cute drawstring bag is the perfect addition to any Easter basket! It can be used in so many different ways. It’s just large enough for a few treats. You could also fill it with potpourri and sew it shut just under the drawstring for a pretty sachet. You can make it larger or smaller by using thinner or thicker yarns too. There are so many options!
This pattern is protected by copyright. Please do not distribute or share this pattern in any way other than by sharing a link to this page or to the pattern page on Ravelry. Click here for copyright information.
This pattern contains affiliate links (click for more info). If you click one of these links and then make a purchase, I may be compensated. You get the same great prices, and you will be helping to support this site!
Bunny Bag

Add this to your Ravelry Queue
Materials:
- Worsted weight yarn:
- 50-100 yds main color (MC)
- 10-25 yds each of pink, white, and black
- Size H / 8 (5.0 mm) hook
- Small amount of lighter weight black yarn or embroidery floss (for whiskers and mouth)
- Yarn or tapestry needle
- Locking stitch markers , safety pins, or scrap pieces of yarn.
Difficulty:
Intermediate – worked mostly in the round, some decreases, some working in sides of rows, and some seaming / joining. Foundation single crochet and magic circle are recommended but not required.
Size:
Bag portion is about 4″ x 5″, with the ears adding another 2″.
Gauge:
12 sc x 14 rows = approximately 4″ square. Exact gauge is not critical for this project.
Abbreviations used:
- ch = chain
- fsc = foundation single crochet
- sc = single crochet
- hdc = half double crochet
- dc = double crochet
- sl st = slip stitch
- st(s) = stitch(es)
- sp(s) = space(s)
- sk = skip
- rnd = round
- RS = right side
Notes:
- Foundation stitches are recommended for the first round because they are somewhat stretchier, however an alternate first round is provided for those who prefer a starting chain.
- Remember to turn at the beginning of each round. This helps to keep the sides of the bag straight. You may find it helpful to mark the beginning stitch of each round.
- Instead of the crocheted drawstring, you can use a ribbon or other cord if desired.
- When sewing on facial features, be sure not to leave big loops on the inside of the bag that could get caught or pulled. Instead, try to run the yarn through the stitches so the back stays relatively neat.
Recommended Resources:
- Foundation Crochet Stitches by Jessie at Home
- Joining Foundation Stitches to Work in the Round by Moogly
- Single Crochet: Front Loop Only by Kim Guzman
- How to Work the Bottom Side of a Foundation Chain by Freshstitches
- How to Single Crochet Two Together by Fiberfluxblog
- The Magic Circle by Moogly

Bag:
Rnd 1: With MC, work 12 fsc, turn work upside down and sc in the bottom of each sc. Join with sl st to first st. (24 sc)
OR
Alternate Rnd 1: With MC, ch 13, sc in 2nd ch from hook and in each ch across, turn work upside down, sc in bottom of next 12 chs, join with sl st in first st. (24 sc)
Rnds 2 – 15: Ch 1, turn, sc in each st around, join with sl st to first st. (24 sc)
Rnd 16 (RS): Ch 3 (counts as dc), turn, dc in first st, (sk next st, 2 dc in next st) around, sk last st, join with sl st to top of ch 3. (24 dc)
Rnd 17: Ch 1, turn, sc in first 3 sts, place marker in last st worked, sc in next 14 sts, place marker in last st worked, sc in last 7 sts, fasten off.
Ears:
Outer ears:
With RS facing, join MC with sl st in front loop only of either of the two marked stitches.
Row 1: Working in front loops only, ch 1, sc in first 8 sts. (8 sc).
Row 2: Working both loops, ch 1, turn, sc in each st across, (8 sc)
Row 3: Ch 1, sc2tog over first 2 sts, sc across to last 2 sts, sc2tog over last 2 sts. (6 sts)
Rows 4 – 7: Repeat Rows 2 – 3 twice. Fasten off (2 sts on Row 7)
Join MC with sl st in next marked st on bag. Repeat Rounds 1-7 for 2nd ear. The ears are set closer together in the back. There should be 2 unworked stitches between them at the back, and 6 unworked stitches between them at the front.
Inner ears:
With inside of ear facing, join pink with sl st in first unused loop from bag (see Fig 1).
Row 1: Working in unused loops only, ch 1, sc in each unused loop across. (8 sc)
Rows 2 – 7: Repeat Rows 2 – 7 of outer ear.
Repeat Rounds 1-7 for 2nd ear.

Eding for ears:
With inside of ear facing, join MC with sl st at base of ear. (See Fig 2)
Working along edges of rows and through both thicknesses (to join them), ch 1, 7 sc along side of ear, sc in both sts at top of ear, 7 sc along other side of ear, sl st at base of ear (see Fig 2), fasten off.
Repeat for 2nd ear.

Eyes (make 2):
With white:
Make magic circle, ch 1, (sc, hdc, 2 dc, hdc, 2 sc, hdc, 2 dc, hdc, sc) all in magic circle, join with sl st to first st, close magic circle, fasten off.
OR
Ch 2, (sc, hdc, 2dc, hdc, 2sc, hdc, 2 dc, hdc, sc) all in 2nd ch from hook. Join with sl st to first st, fasten off.
With black:
Make magic circle, ch 1, 6 sc in magic circle, join with sl st to first st, close magic circle, fasten off.
OR
Ch 2, 6 sc in 2nd ch from hook. Join with sl st to first st, fasten off.
Nose (make 1):
Row 1: With pink, ch 2, sc in 2nd ch from hook.
Row 2: Ch 1, turn, (hdc, sc, hdc) in sc, fasten off.
Tooth (make 1):
Row 1: With white, ch 3, sc in 2nd ch from hook and in next ch.
Row 2: Ch 1, turn, sc in each st, fasten off.
Drawstring:
With MC, work 50 fsc, fasten off.
OR ch 51, turn, sc in 2nd ch from hook and each ch across, fasten off.
Finishing:
- Using main picture as a guide, sew eyes, nose, and tooth to the front of the bag.
- With black thread / floss, embroider mouth detail and whiskers. I used typical embroidery floss that has 6 strands. I separated the floss and used 4 strands for the mouth and 2 strands for whiskers.
- Weave drawstring, ribbon, or cord into the gaps on rnd 16 of bag, and tie knots at the ends so it doesn’t pull out.
I hope you enjoy the pattern! An ad-free, downloadable pdf of this pattern is also available in my Craftsy store for a $1 fee. The fee for the pdf format is to offset the advertising revenue lost when you print or download the pattern rather than viewing it online.
If you would like to receive notifications of new posts and patterns as they become available, please follow this blog. You can follow by e-mail (look at the sidebar on the right for the follow by email option), or via RSS feed, or via your WordPress.com reader: Follow Stitches ‘N’ Scraps on WordPress.com


3 Comments
Audrey Woodbeck
I just started working the pattern and one end tends to curl as I crochet the 24 sc. What am I doing wrong? I thought it was supposed to be “in the round” since it starts with only 24 sts. Thank you!
Pia Thadani
It is in the round…you work across one side of the foundation, then across the other side of it, making an oval shape. It will curl a bit at first, but after you get a few rounds in, it will settle down 🙂
Audrey Woodbeck
Thanks so much, Pia, for your quick reply! I will continue on but may need your help with the remaining parts of the bunny bag. I don’t get a chance to try an Intermediate pattern very often, so this will be a good learning project.