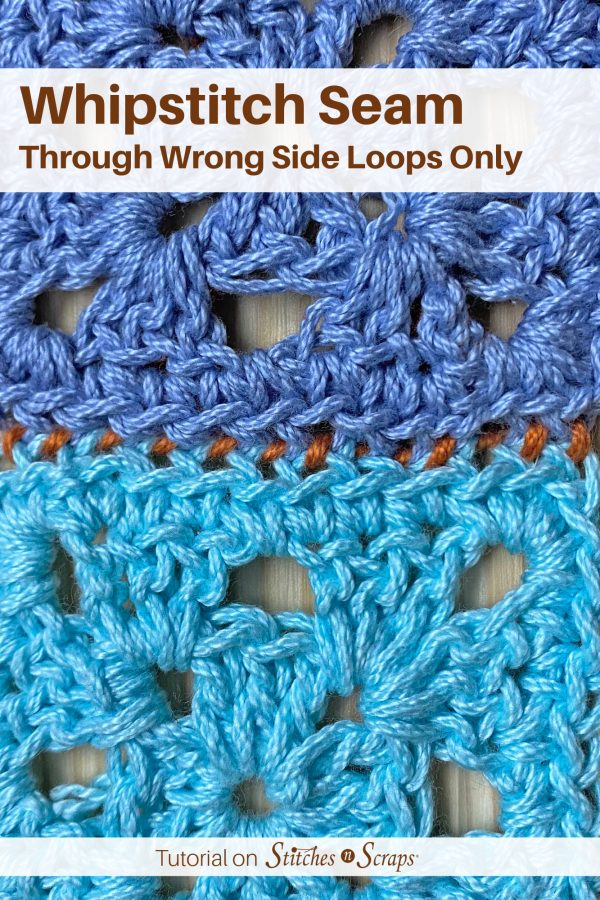
Whipstitch Seam Through Wrong Side Loops
There are dozens of ways to join crochet blanket squares and motifs. One of my favorite methods is the whipstitch seam through wrong side loops only. The unused, right-side loops line up neatly on either side of the seam, setting off each motif separately rather than blending them together.

This content is protected by copyright. See this Terms of Use / Copyright page for more information.
This post contains sponsored content and/or affiliate links. If you click an affiliate link and make a purchase, I may get a commission.
When to use this seam
Most crochet stitches have a V shape on top. For this whipstitch seam, you need those V shapes on both edges that are being joined.
The whipstitch seam through wrong side loops works really well for joining anything worked in the round, or anything that has an edging round. That way there are V-shaped stitch tops all the way around the edge.

You can also use it to join top and bottom edges of crochet worked in rows, as long as the first row has been worked into the back bump. Working into the back bump leaves the V-shaped chain visible at the bottom edge.
This seam even works for knitting, if your cast-on and bind-off edges have the same V shapes.
Right and Wrong side loops
Each V has 2 loops. The one closest to the right side of the fabric is the right side loop. The one closest to the wrong side of the fabric is the wrong side loop. For this whipstitch seam we will be working through the wrong side loops only.

Not Back Loops
Some people refer to this technique as whipstitching through back loops only, but that’s not always entirely accurate. Front and back loops change depending on which side of the work is facing you. Wrong and Right side loops do not.
The front loop is always the loop facing you and the back loop is the loop facing away. Holding your crochet with the right side facing you, the front loop is the right side loop and the back loop is the wrong side loop.

But if you turn that motif around, the wrong side loop is now the front loop, and the right side loop is now the back loop.
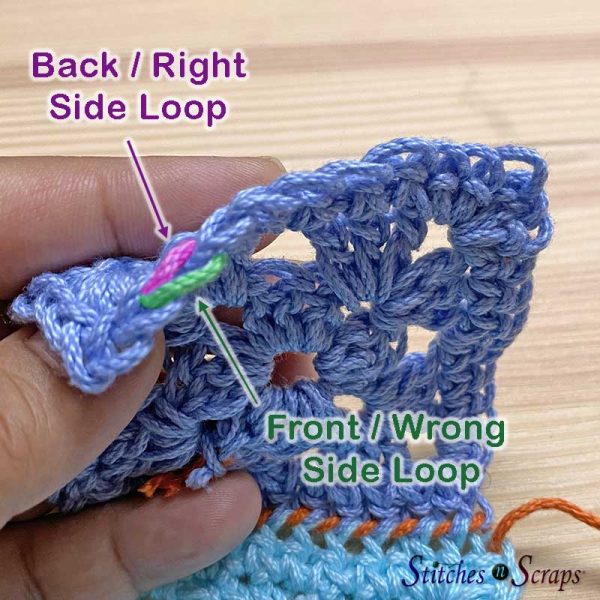
When we hold our pieces with right sides together for seaming (see below), the wrong side of the front piece is facing us. So we’re actually working through the front loop on the front piece, and the back loop on the back piece.
Whipstitch Seam Through Wrong Side Loops
Getting started
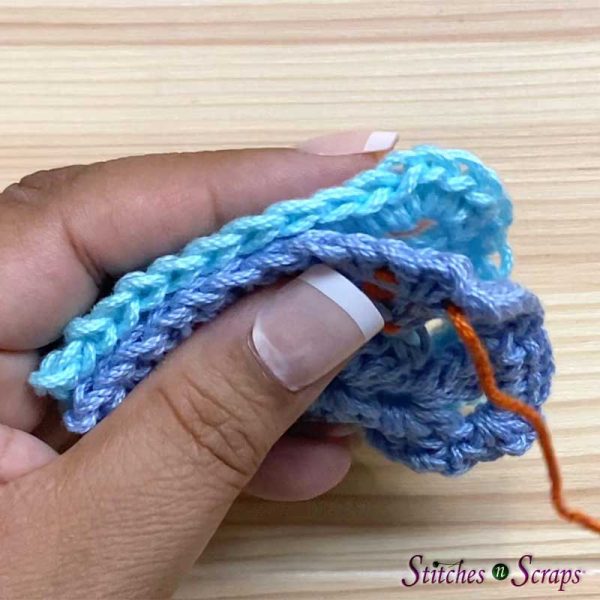
Cut a length of yarn for seaming and weave in the end on the wrong side of one of your pieces. Make sure the yarn comes out close to where you want to begin your seam.

Hold your pieces with right sides together. Notice that the right side loops are on the inside, touching each other, and the wrong side loops are on the outside.
Corner chain space
If you have a chain space in the corner, each chain has a V shape as well. You can work through the wrong side loops of chains in the same way as for stitches. If you find it easier, you can work into the chain space instead, just for the corner.
Making the stitches
Insert your needle from front to back through the wrong side loop only of the first stitch on both pieces.

Pull the yarn through and make it snug but not tight. Now insert your hook in the same way through the next pair of stitches.
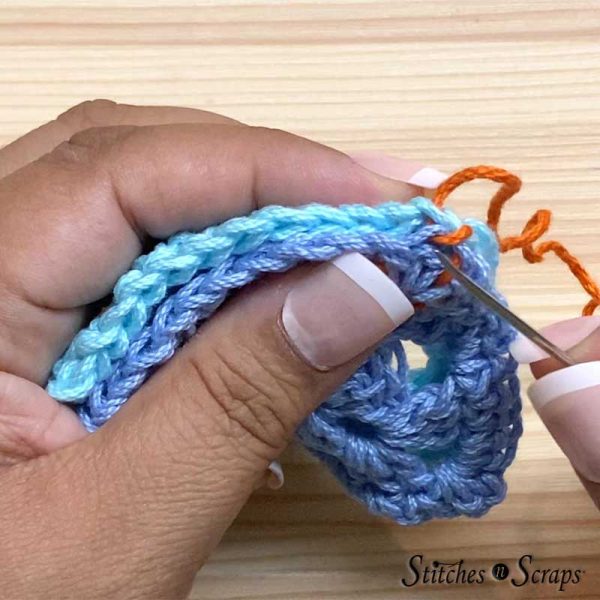
Notice that this causes your working yarn to loop up and over the edge of the seam. Repeat this for each pair of stitches across.

For an extra strong seam, you can go back across for a 2nd seam in the opposite direction. When you have finished, weave in the tail.
The finished whipstitch seam
On the right side of the fabric, the unused loops line up to form a decorative ridge on each side of the seam.
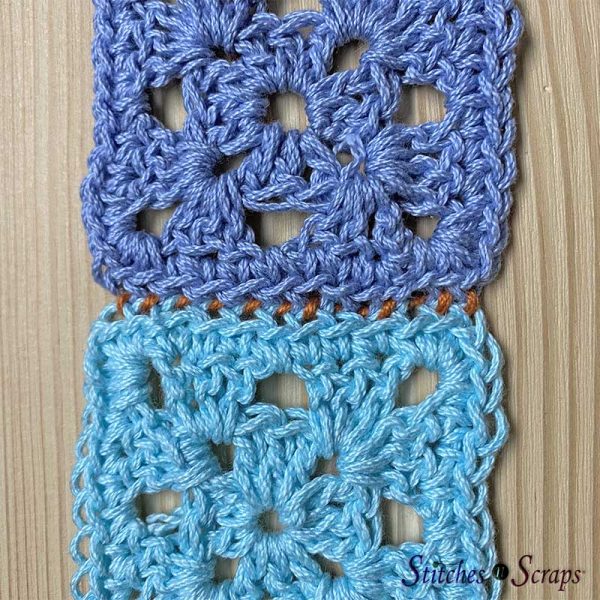
Here’s what this whipstich seam through wrong side loops looks like in all one color. The squares pictured here are the Windy Square pattern from the Dreaming of Pinwheels Blanket.

The key to this seam is to keep the tension even. If some stitches are looser and some are tighter, those raised lines on the front can get wavy instead of straight.
Whipstitch Seam through Wrong Side Loops Video Tutorial
Share this Whipstitch Seam tutorial on Pinterest!
Here’s an image perfect for pinning.
Rate this Whipstitch Seam tutorial!
Do you want the best of Stitches n Scraps delivered right to your inbox? Don’t miss a stitch – Subscribe now!


4 Comments
kathrynpless1
This is the method I use all of the time. I really like the way it looks on the right side. Great tutorial, thanks for sharing!
Pia Thadani
Thanks! 🙂
SILVIA
GOOD HELPING EXPLANATION. THANK YOU FOR THE HELP.
Pia Thadani
You’re welcome! 🙂