Corner to Corner Crochet Dishcloth – Symbiosis
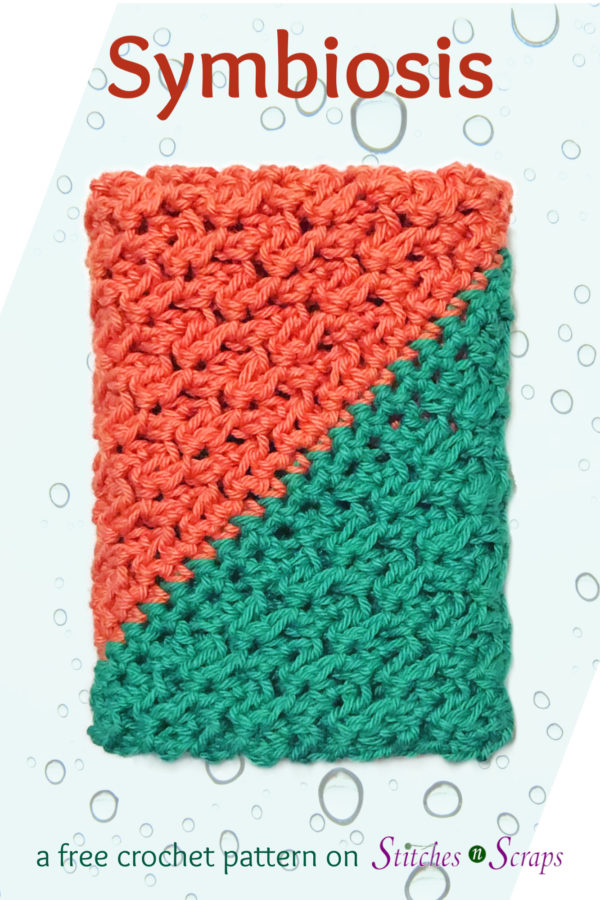
Wash up with this lightly textured, corner to corner crochet dishcloth. The bright colors and simple texture works equally well for dishes, bath time, and more. Best of all, you can easily adjust the pattern to any size you need!
This post contains affiliate advertisements (click for more info). If you click one of these advertisements and then make a purchase, I may be compensated. You get the same great prices, and you will be helping to support this site!
Did you know
Most corals are naturally translucent, with white skeletons. They get their vivid colors from algae that grow inside their bodies. It’s just one of the many symbiotic relationships that make up the beauty of a coral reef. Choosing reusable washcloths or other eco-friendly options over plastic sponges is a simple way to help keep our oceans beautiful.
2019 Washcloth Crochet Along
I designed this corner to corner crochet dishcloth for the CAL Central 2019 Washcloth Crochet Along. Follow along for a new washcloth pattern every Monday through August 19th, and of course, there is a giveaway too! See the giveaway details and full schedule, including links to the rest of the July patterns, in this intro post on Underground Crafter.

Paintbox Cotton DK
Lovecrafts generously provided the Paintbox Cotton DK yarn that I used in this pattern. I love this yarn for dishcloths because it’s very soft and absorbent. It comes in a wide array of colors too. Because the skeins are smaller, you can mix and match colors without having tons left over.
Lovecrafts is providing some of this lovely yarn as one of the giveaway prizes as well. Be sure to check out the giveaway details on the main CAL post.
From Corner to Corner
Most often, when people say “corner to corner” or “c2c”, they are talking about diagonal box stitch. But there are a surprising array of stitches that can be worked from corner to corner. This particular dishcloth uses a fun, half double crochet pattern that I’ve been playing with a lot recently. For a very simple stitch, it adds a lot of rich texture! I also particularly love the way the color change row came out.
Working into the 3rd loop
The texture of this dishcloth is created by alternating between working normal half double crochet stitches, and working half double crochet stitches into the third loop. The third loop is in the front and just below the front and back loops that we normally work into.

For a more detailed look at working into the third loop of hdc, see this tutorial
This pattern is protected by copyright. Please do not distribute or share this pattern in any way other than by sharing a link to this page or to the pattern page on Ravelry. Click here for copyright information.
Symbiosis


Add this to your Ravelry Queue
Materials
- Paintbox Cotton DK Yarn (100% cotton, 137 yds / 50g per ball).
- 60 yds #427 Slate Green (A)
- 60 yds #456 Vintage Pink (B)
- Size G / 4 mm crochet hook or size needed to obtain gauge.
- Tapestry Needle
Project Level
Easy: Basic stitches in a repeating pattern. Working in 3rd loop of half double crochet.
Size
10-inch square after blocking – size can be adjusted if desired.
Gauge
14 hdc x 13 rows = 4 inches. Exact gauge isn’t critical. Use pattern as gauge swatch – after row 10, you should have a triangle that is 4 inches long on each of the 2 shorter sides.
Abbreviations used
(Pattern is written in US terms)
ch = chain
sc = single crochet
hdc = half double crochet
st(s) = stitch(es)
sl st = slip stitch
sk = skip
RS = right side
Recommended Resources
Instructions
Color A – Increasing
With A, ch 2
Row 1: 3 hdc in 2nd ch from hook. (3 sts)
Row 2: Ch 1, turn, 2 hdc in first st, hdc in next st, 2 hdc in last st. (5 sts).
Row 3: Ch 1, turn, 2 hdc in first st, hdc in next st, hdc in 3rd loop of next st, hdc in next st, 2 hdc in last st. (7 sts)
Row 4: Ch 1, turn, 2 hdc in first st, [hdc in next st, hdc in 3rd loop of next st] across to last 2 sts, hdc in next st, 2 hdc in last st. (9 sts)
Repeat row 4 twenty more times, change to B at end of last row, fasten off A. (49 sts).
To change the size, add more or fewer repeats of row 4 as desired.
Color B – Decreasing
Row 1 (RS): With B, ch 1, turn, hdc in each st across. Place a marker in the first st of this row. (49 sts)
Row 2: Ch 1, turn, sk first st, [hdc in next st, hdc in 3rd loop of next st] across to last 2 sts, sk next st, hdc in last st. (47 sts)

Repeat row 2 twenty two more times, or until 3 stitches remain. (3 sts)
Row 25: Ch 1, turn, sk first st, hdc in next st, ch 1, sl st in last st, fasten off. (1 hdc).
Edging Rnd
With right side facing, join B with a sl st in first st of row 1 of color B section. This should be where your tails are from when you changed colors.

- Working across sides of rows of color B: , work 37 sc evenly spaced to corner, ch 1, work 37 sc evenly spaced to next corner, change to A.
- Working across sides of rows of color A, work 37 sc evenly spaced to corner, ch 1, work 37 sc evenly spaced to starting corner, join with sl st to first st of edging, fasten off.

I hope you enjoy making this corner to corner crochet dishcloth pattern. A downloadable pdf of this pattern is also available on Ravelry, for a small fee. The fee for the pdf format is to offset the advertising revenue lost when you print or download the pattern rather than viewing it online.
Do you want the best of Stitches n Scraps delivered right to your inbox? The Stitches n Scraps email newsletter includes highlights from the blog as well as special features not available elsewhere. Don’t miss a stitch – Subscribe now!
What did you think of dishclothpattern?


6 Comments
Kc
Do you plan to make a video for this? xo
Pia Thadani
I wasn’t planning to as I already have a video for working into the 3rd loop – did you check that out? The tutorial is in the recommended resources section: https://stitchesnscraps.com/tutorial-3rd-loop-hdc/ – if you scroll to the bottom you will find the video. Is there a part of the pattern that you are struggling with? Maybe I can help!
Alexandra
This washcloth looks awesome! I love how it’s split in color, and the fun stitch pattern. So unique!
Pia Thadani
thanks! 🙂
Annette
I love this c2c stitch! Do you think it would work for a blanket?
Pia Thadani
Yes absolutely! Just keep increasing to the size you want, then start decreasing 🙂 If you want a rectangle you’ll have to get a bit creative, increasing and decreasing on both sides till you get the short side length you want, then increasing on one side only to add length to the long side. But it will totally work!