Butterfly Coaster with ArtEsprix Thermal Transfer Markers
Free Download, Tutorial, and Giveaway!
Artesprix gave me a free sample of their Thermal Transfer Markers, a coaster blank, and some other supplies to try out and review. Using these supplies and my Filet Crochet Butterfly chart, I made this fantastic butterfly coaster!

Keep reading for more details and a full video tutorial. Plus, enter the giveaway below for a chance to win at set of markers!
Anyone can do it!
At first glance, I didn’t think sublimation markers were something I would ever use. I don’t draw well, and I don’t have a heat press.
Just for kicks, I read the instructions on the back, and realized this was something I could actually do after all! You don’t need any fancy equipment, just a regular iron.
How does it work?
It’s a lot like drawing your own iron-on image. Create a design with the markers on plain paper, then use heat and pressure to transfer it onto the finished product!
This post contains affiliate advertisements (click for more info). If you click one of these advertisements and then make a purchase, I may be compensated. You get the same great prices, and you will be helping to support this site!
What can you make?
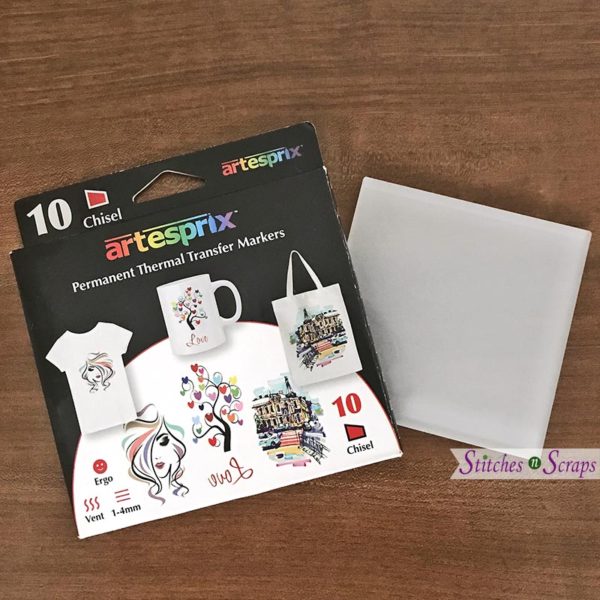
The ink transfers to polyester products, such as totes and t-shirts. There are also a wide variety of products, like coasters and coffee mugs, that have polyester coatings specifically designed for this type of thermal transfer. These are called “sublimation blanks.” The coaster blank and other materials I was given for this project came from Condé Systems. They have tons of options to choose from!
Materials:
Here are all the supplies I used for this project:
- Artesprix Thermal Transfer Markers
- ColorLyte Sublimation Blank Acrylic Coaster (4″ square)
- 2 Neenah Paper Silicone Protective Sheets (8.5″ x 11″)
- DyeTrans Heat Transfer Application Tape (1/2″ wide)
- Regular copy paper to draw on
- Butterfly design to trace (pdf download)
- Optional – Extra paper or newsprint to protect your work surface from ink bleeding through.

I had lots of newsprint lying around at home, so I used some of that to protect my work surface while drawing. The silicone sheets would have worked just as well, but the newsprint gave me a larger work surface.
When transferring the image, I used the silicone sheets. They feel just like paper, but protect better. This means you don’t need as thick of a layer to protect your surface, and the heat can get through more easily.
Drawing the image
The idea of these markers is that you can create any image you like. My only problem? I can’t draw!
Some of you may have seen my Filet Crochet Butterfly chart pattern, from a few years ago. I love the butterfly design, and decided that chart could be a great start for this project.
I printed out the chart to just a little bit less than 4 inches square, so it would fit on the coaster. Then, I drew the outline using a big black marker. It was a little like playing connect-the-dots. Download a cleaned up, pdf version of this outline!

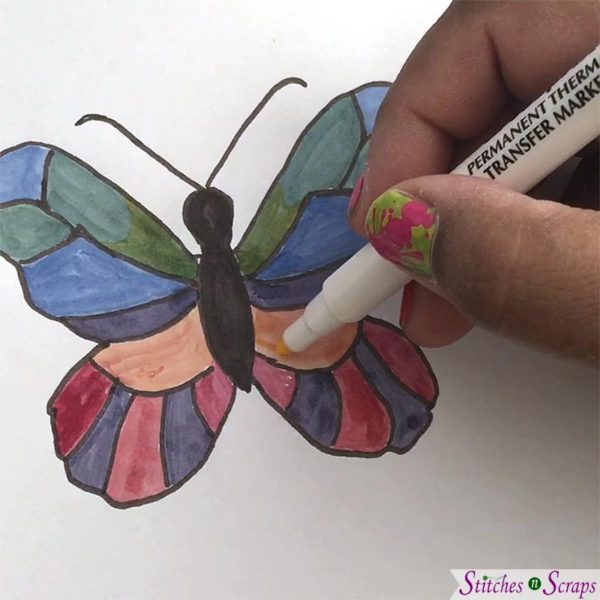
Placing a fresh sheet of paper on top, I was able to trace the outline using the Artesprix markers. This would have been infinitely easier with a light table, or even a light placed under a glass table. Unfortunately I didn’t have either available.
Then came the really fun part – coloring it in! The colors start out looking pretty dull on the paper, but once transferred they become much brighter, more like the end caps on the pens. I also layered some colors in a few places, to create some texture and shading.
Transferring the image
Before applying heat, I made a silicone sandwich. First, there was sheet of silicone to protect the work surface, and then the coaster. One side of the coaster has a matte, polyester coating. That was the side that needed to face up, with the other (shiny) side down. Next, I placed the image face down onto the coaster.
Here’s the point where I made a mistake. I thought it would be best to cut the image out first so I could position it easily on my coaster, and leave room to tape it into place. In doing so, I ended up placing some of the tape directly on top of the image I was transferring.

It worked out ok in this case, but when the folks at Artesprix saw it they explained that it wasn’t the best way. The tape I used is heat resistant, so it can affect the amount of heat that actually makes it through to the image. This can potentially make those areas of the image not transfer as well, leaving lighter patches. So when you make yours, be sure that the tape doesn’t cover any part of your image!
Finally, I finished my sandwich with another silicone sheet. Following the instructions, I set my iron to a high heat setting with no steam, and pressed down on the image for 5 minutes. Luckily, my iron covered the whole image at once. If it didn’t, I would have had to press down on each area for the full 5 minutes.
The finished coaster
Heat made the colors come out much brighter, and the layering/shading I had done transferred well.
As far as care, the instructions recommend hand-washing to prevent fading of the image.
I love my pretty new coaster! It’s perfect for spring and I think I may need to make a whole set for my deck.

Make your own!
You can find all the materials for this project (and much more) at Condé. You can also enter below for a chance to win a set of the markers plus 2 coaster blanks!
If you do make one, I’d love to see it! Please share your pictures on the Scrappy Stitchers Facebook group, or in the Scrappy Stitchers Link Party (yes, it’s ok, even though it’s not fiber).
Video tutorial
Watch the whole project from start to finish in this tutorial video!
Enter the giveaway!
Artesprix is generously providing a set of their Thermal Transfer Markers and 2 coaster blanks, for one lucky winner!
To be eligible, you must be 18 years of age or older, with a valid, US shipping address. The winner will be contacted by email, and must reply to that email and provide their selections and shipping address within 1 week in order to receive the prizes. If the winner does not reply within 1 week, a new winner will be selected. The giveaway ends on April 30th, 2019 (at 11:59pm, central time). Hurry and enter below!
This giveaway is powered by Rafflecopter, and they may ask for some log-in information if you are not already logged in. See the Rafflecopter privacy policy for more information.
a Rafflecopter giveaway


21 Comments
Tiffiny Kelley
I love your blog and the opportunity for giveaways! Thank you!
Pia Thadani
Thank you! I’m glad you’re here 🙂
Kimberly
I look forward to adding a wedding design to the coaster.
Pia Thadani
oooh I’d love to see that if you do!
Cindy Johnson
Looking forward to the drawing. I would love to try the coasters for a smaller project to test vs a t-shirt.
leslie carol m
love this kit
Kayla
These markers look awesome! I love your tutorial!
Jean Marmo
I have not seen anything like this! So fun!
Laurie Sprague
These look so so cool. Can’t wait to try them on everything!
Dawn Tenneson
Oh wow this looks like a lot of fun! I would love to try this and decorate lots of items I already have! Thank you for sharing this!
Carla Duke
This looks like so much !! Would really love to get started with this.
Angela
It’s too bad that Canadian residents can’t participate in the giveaway.
I might stop in to Michael’s in the next few days to see if they have this, have a few ideas for gifts for Mother’s Day.
Kathleen Milkowski
To think you could put a similar coaster in the middle of a dreamcatcher and crochet the rest of it or even make a wind chime using the item you choose to make as the topper
Andee
I want to make some fun summer coasters for my Mother-in-Law.
Paula Flinn
I would make a colorful mandala.
Evelene Sterling
I would make acute coin purse.
Heather W
This is awesome! I would love to do some sort of family name design coasters
Heather Cameron
I am always in search of another craft to do. this looks like fun
Koan
I love animals. I would like to make some chicken coasters.
Nicole Ni
I’m amazed that you make custom coasters by drawing instead of digital printing
Pia Thadani
That’s the fun of it – anyone can do it! I’ve seen some really cute stuff done with kids drawings 🙂